- Mobile Testing Tutorial
- Mobile Testing - Home
- Mobile Testing - Overview
- Mobile Testing - Platforms
- Mobile Testing - Device Types
- Native Vs Hybrid Vs Mobileweb
- Mobile Testing - Device Vs Application
- Emulator Vs Simulator
- Mobile Testing - Application
- Mobile Testing - UI
- Mobile Testing - Planning & Tools
- Hardware Perspective
- Mobile Device Testing - Types
- Mobile Testing - Framework Overview
- Mobile Testing - Android Frameworks
- Mobile Testing - IOS Frameworks
- Robotium Framework
- Selendroid Framework
- Mobile Testing - Appium Framework
- Mobile Testing - Zucchini Framework
- Mobile Testing Useful Resources
- Mobile Testing - Quick Guide
- Mobile Testing - Useful Resources
- Mobile Testing - Discussion
Mobile Testing - Hardware Perspective
Before we move ahead with actual mobile device testing, it is very important to have an insight into the mobile device hardware architecture. This will help us in better test planning when we actually jump into mobile device/mobile device application testing. Let’s take a look at the different characteristics of mobile device hardware.
Hardware Components
If you take any cellphone, mostly it will comprise of the following parts.
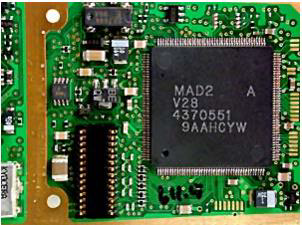
Circuit Board
It can be regarded as the brain of the phone that controls all its activities.
Touch screen display
Touchscreens are a vital component of smartphones. Touchscreens recognize where on the screen you have placed your finger or stylus and communicates the co-ordinates to the phone CPU accordingly.
There are two popular types of touchscreens −
Resistive Touchscreen − It has two layers (separated by a miniscule gap) which form an overlay over the screen. When a finger is placed on any point on the screen, the two form a contact and the co-ordinates are obtained. These are relatively inexpensive and are rightly found on most budget phones. The downside is that a certain amount of pressure is required to register a touch. As time goes by, some degree of damage does occur to the screen.
Capacitive Touchscreen − It has the entire screen coated with a capacitive substance which holds a certain amount of electrical charge. When a conducting object like a finger is placed on the screen, there is a change in capacitance on that point and thus the coordinates are obtained. Capacitive touchscreens don’t respond well in cold climates where the human finger doesn’t cause a change in capacitance, thus a stylus is recommended for such scenarios. Then there are multi-touch touchscreens wherein almost all fingers can be pinpointed accurately. This has led to an increase in the number of gestures that one can perform on a touchscreen.
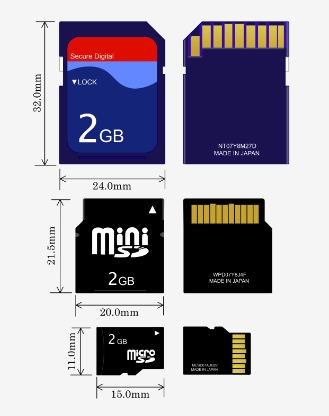
Memory Card
Memory cards come in different sizes and capacities. They are used widely as a data storage device to store digital information.
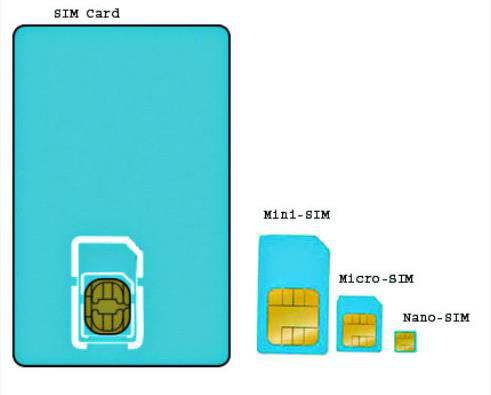
SIM Card
A SIM card provides personal mobility so that the user can have access to all subscribed services irrespective of both the location of the terminal and the use of a specific terminal. You need to insert the SIM card into another GSM cellular phone to receive calls at that phone, make calls from that phone, or receive other subscribed services.
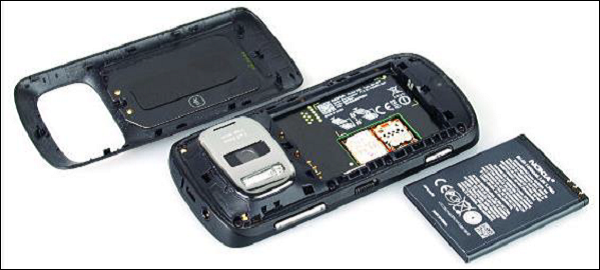
Battery
Smartphones run on a variety of different batteries depending on the phone’s manufacturer, its dimensions and features. For those who depend heavily on their smartphones, it is important that the batteries are as long lasting as possible. This eliminates the need to recharge them frequently, and makes it less likely that they will run out of charge when they are most needed.
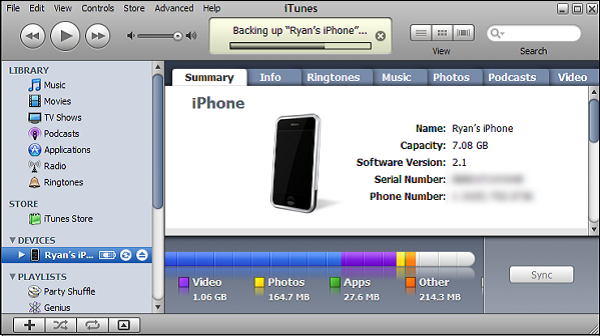
UDID for iOS
Each iPhone or iPod Touch has a Unique Device Identifier (UDID), which is a sequence of 40 letters and numbers that is specific to your device. It's like a serial number but much harder to guess. It will look something like this − 2b6f0cc904d137be2e1730235f5664094b831186.
How to find you UUID?
- Connect your iOS device to your computer.
- Open iTunes.
- In iTunes, click on the device’s name under “Devices” in the column on the left.
- Click once on the serial number of the device in the window’s main section.
- The serial number should then change to the device’s UDID.
Provision Profile for iOS
A provisioning profile is a collection of digital entities that uniquely ties developers and devices to an authorized iPhone Development Team and enables a device to be used for testing. A Development Provisioning Profile must be installed on each device on which you wish to run your application code.
How to create a provision profile for iOS?
Run Google Chrome, Mozilla Firefox or Safari.
In the iOS Dev. Center, click Certificates, Identifiers & Profiles.
In the iOS Apps panel, click Provisioning Profiles.
Click +.
Select iOS App Development and click Continue.
Select an App ID to associate with the provisioning profile and click Continue.
To be able to use one development provisioning profile across multiple apps, select a wildcard App ID, if available.
Select one or more certificates for development to include in the provisioning profile and click Continue.
Only certificates for development are listed.
Select one or more devices to include in the provisioning profile and click Continue.
Enter a name for the profile and click Generate.
(Optional) Click Download to download the provisioning profile.
How to add your provisioning profile in AppBuilder?
Click the cogwheel icon and select Options.
Select iOS → Provisioning Profiles.
Click Import.
Browse to the location where the mobile provision file for your provisioning profile is stored, select it and confirm the import.
Device Options & Preferences
You can specify a device preference (Mobile or All) for any text, dynamic search, image, or display ad.
If an ad group has both mobile-preferred and regular ads, only mobile-preferred ads serve on mobile devices, and only regular ads serve on computers and tablets.
In the type list, select Ads and Extensions and choose the type of ad you’d like to update. Select one or more ads. Under "Device preference" on the edit panel, select Mobile or All.