- MFC Tutorial
- MFC - Home
- MFC - Overview
- MFC - Environment Setup
- MFC - VC++ Projects
- MFC - Getting Started
- MFC - Windows Fundamentals
- MFC - Dialog Boxes
- MFC - Windows Resources
- MFC - Property Sheets
- MFC - Windows Layout
- MFC - Controls Management
- MFC - Windows Controls
- MFC - Messages & Events
- MFC - Activex Controls
- MFC - File System
- MFC - Standard I/O
- MFC - Document View
- MFC - Strings
- MFC - Carray
- MFC - Linked Lists
- MFC - Database Classes
- MFC - Serialization
- MFC - Multithreading
- MFC - Internet Programming
- MFC - GDI
- MFC - Libraries
- MFC Useful Resources
- MFC - Quick Guide
- MFC - Useful Resources
- MFC - Discussion
MFC - Linked Lists
A linked list is a linear data structure where each element is a separate object. Each element (we will call it a node) of a list comprises two items — the data and a reference to the next node. The last node has a reference to null.
A linked list is a data structure consisting of a group of nodes which together represent a sequence. It is a way to store data with structures so that the programmer can automatically create a new place to store data whenever necessary. Some of its salient features are −
Linked List is a sequence of links which contains items.
Each link contains a connection to another link.
Each item in the list is called a node.
If the list contains at least one node, then a new node is positioned as the last element in the list.
If the list has only one node, that node represents the first and the last item.
There are two types of link list −
Singly Linked List
Singly Linked Lists are a type of data structure. In a singly linked list, each node in the list stores the contents of the node and a pointer or reference to the next node in the list.

Doubly Linked List
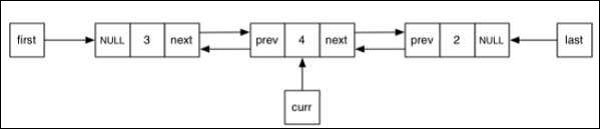
A doubly linked list is a linked data structure that consists of a set of sequentially linked records called nodes. Each node contains two fields that are references to the previous and to the next node in the sequence of nodes.
CList Class
MFC provides a class CList which is a template linked list implementation and works perfectly. CList lists behave like doubly-linked lists. A variable of type POSITION is a key for the list. You can use a POSITION variable as an iterator to traverse a list sequentially and as a bookmark to hold a place.
Following are the different operations on CList objects −
Create CList Object
To create a collection of CList values or objects, you must first decide the type of values of the collection. You can use one of the existing primitive data types such as int, CString, double etc. as shown below in the following code.
CList<double, double>m_list;
Add items
To add an item, you can use CList::AddTail() function. It adds an item at the end of the list. To add an element at the start of the list, you can use the CList::AddHead() function. In the OnInitDialog() CList, object is created and four values are added as shown in the following code.
CList<double, double>m_list;

//Add items to the list
m_list.AddTail(100.75);
m_list.AddTail(85.26);
m_list.AddTail(95.78);
m_list.AddTail(90.1);
Retrieve Items
A variable of type POSITION is a key for the list. You can use a POSITION variable as an iterator to traverse a list sequentially.
Step 1 − To retrieve the element from the list, we can use the following code which will retrieve all the values.
//iterate the list
POSITION pos = m_list.GetHeadPosition();
while (pos) {
   double nData = m_list.GetNext(pos);
   CString strVal;
   strVal.Format(L"%.2f\n", nData);
   m_strText.Append(strVal);
}
Step 2 − Here is the complete CMFCCListDemoDlg::OnInitDialog() function.
BOOL CMFCCListDemoDlg::OnInitDialog() {
   CDialogEx::OnInitDialog();

   // Set the icon for this dialog. The framework does this automatically
   // when the application's main window is not a dialog
   SetIcon(m_hIcon, TRUE);             // Set big icon
   SetIcon(m_hIcon, FALSE);             // Set small icon

   // TODO: Add extra initialization here
   CList<double, double>m_list;

   //Add items to the list
   m_list.AddTail(100.75);
   m_list.AddTail(85.26);
   m_list.AddTail(95.78);
   m_list.AddTail(90.1);

   //iterate the list
   POSITION pos = m_list.GetHeadPosition();
   while (pos) {
      double nData = m_list.GetNext(pos);
      CString strVal;
      strVal.Format(L"%.f\n", nData);
      m_strText.Append(strVal);
   }

   UpdateData(FALSE);

   return TRUE; // return TRUE unless you set the focus to a control
}
Step 3 − When the above code is compiled and executed, you will see the following output.
Add Items in the Middle
To add item in the middle of the list, you can use the CList::.InsertAfter() and CList::.InsertBefore() functions. It takes two paramerters — First, the position (where it can be added) and Second, the value.
Step 1 − Let us insert a new item as shown in the followng code.
BOOL CMFCCListDemoDlg::OnInitDialog() {
   CDialogEx::OnInitDialog();

   // Set the icon for this dialog. The framework does this automatically
   // when the application's main window is not a dialog
   SetIcon(m_hIcon, TRUE);             // Set big icon
   SetIcon(m_hIcon, FALSE);          // Set small icon

   // TODO: Add extra initialization here
   CList<double, double>m_list;

   //Add items to the list
   m_list.AddTail(100.75);
   m_list.AddTail(85.26);
   m_list.AddTail(95.78);
   m_list.AddTail(90.1);

   POSITION position = m_list.Find(85.26);
   m_list.InsertBefore(position, 200.0);
   m_list.InsertAfter(position, 300.0);

   //iterate the list
   POSITION pos = m_list.GetHeadPosition();
   while (pos) {
      double nData = m_list.GetNext(pos);
      CString strVal;
      strVal.Format(L"%.2f\n", nData);
      m_strText.Append(strVal);
   }

   UpdateData(FALSE);

   return TRUE; // return TRUE unless you set the focus to a control
}
Step 2 − You can now see see that we first retrieved the position of value 85.26 and then inserted one element before and one element after that value.
Step 3 − When the above code is compiled and executed, you will see the following output.

Update Item Value
To update item at the middle of array, you can use the CArray::.SetAt() function. It takes two paramerters — First, the position and Second, the value.
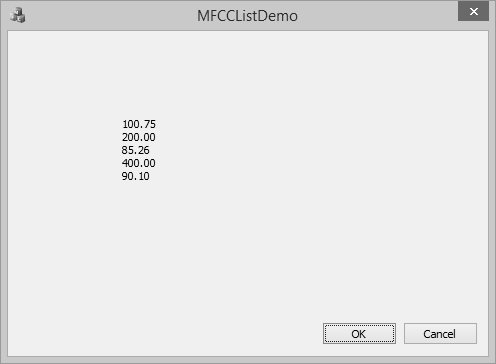
Let us update the 300.00 to 400 in the list as shown in the following code.
BOOL CMFCCListDemoDlg::OnInitDialog() {
   CDialogEx::OnInitDialog();

   // Set the icon for this dialog. The framework does this automatically
   // when the application's main window is not a dialog
   SetIcon(m_hIcon, TRUE);              // Set big icon
   SetIcon(m_hIcon, FALSE);            // Set small icon

   // TODO: Add extra initialization here
   CList<double, double>m_list;

   //Add items to the list
   m_list.AddTail(100.75);
   m_list.AddTail(85.26);
   m_list.AddTail(95.78);
   m_list.AddTail(90.1);

   POSITION position = m_list.Find(85.26);
   m_list.InsertBefore(position, 200.0);
   m_list.InsertAfter(position, 300.0);

   position = m_list.Find(300.00);
   m_list.SetAt(position, 400.00);

   //iterate the list
   POSITION pos = m_list.GetHeadPosition();
   while (pos) {
      double nData = m_list.GetNext(pos);
      CString strVal;
      strVal.Format(L"%.2f\n", nData);
      m_strText.Append(strVal);
   }

   UpdateData(FALSE);

   return TRUE; // return TRUE unless you set the focus to a control
}
When the above code is compiled and executed, you will see the following output. You can now see that the value of 300.00 is updated to 400.00.

Remove Items
To remove any particular item, you can use CList::RemoveAt() function. To remove all the element from the list, CList::RemoveAll() function can be used.
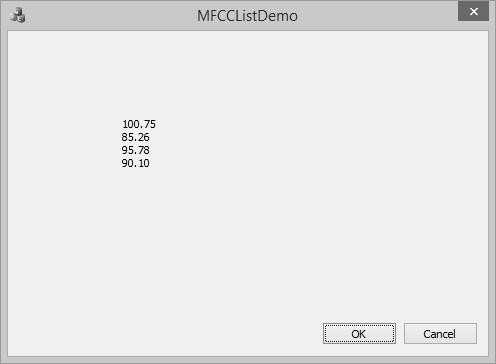
Let us remove the element, which has 95.78 as its value.
BOOL CMFCCListDemoDlg::OnInitDialog() {
   CDialogEx::OnInitDialog();

   // Set the icon for this dialog. The framework does this automatically
   // when the application's main window is not a dialog
   SetIcon(m_hIcon, TRUE);              // Set big icon
   SetIcon(m_hIcon, FALSE);             // Set small icon

   // TODO: Add extra initialization here
   CList<double, double>m_list;

   //Add items to the list
   m_list.AddTail(100.75);
   m_list.AddTail(85.26);
   m_list.AddTail(95.78);
   m_list.AddTail(90.1);

   POSITION position = m_list.Find(85.26);
   m_list.InsertBefore(position, 200.0);
   m_list.InsertAfter(position, 300.0);

   position = m_list.Find(300.00);
   m_list.SetAt(position, 400.00);

   position = m_list.Find(95.78);
   m_list.RemoveAt(position);

   //iterate the list
   POSITION pos = m_list.GetHeadPosition();
   while (pos) {
      double nData = m_list.GetNext(pos);
      CString strVal;
      strVal.Format(L"%.2f\n", nData);
      m_strText.Append(strVal);
   }
   UpdateData(FALSE);

   return TRUE; // return TRUE unless you set the focus to a control
}
When the above code is compiled and executed, you will see the following output. You can now see that the value of 95.78 is no longer part of the list.