- Meteor Tutorial
- Meteor - Home
- Meteor - Overview
- Meteor - Environment Setup
- Meteor - First Application
- Meteor - Templates
- Meteor - Collections
- Meteor - Forms
- Meteor - Events
- Meteor - Session
- Meteor - Tracker
- Meteor - Packages
- Meteor - Core API
- Meteor - Check
- Meteor - Blaze
- Meteor - Timers
- Meteor - EJSON
- Meteor - HTTP
- Meteor - Email
- Meteor - Assets
- Meteor - Security
- Meteor - Sorting
- Meteor - Accounts
- Meteor - Methods
- Meteor - Package.js
- Meteor - Publish & Subscribe
- Meteor - Structure
- Meteor - Deployment
- Meteor - Running on mobile
- Meteor - ToDo App
- Meteor - Best Practices
- Meteor Useful Resources
- Meteor - Quick Guide
- Meteor - Useful Resources
- Meteor - Discussion
Meteor - ToDo App
In this chapter, we will learn how to create a simple todo app.
Step1 - Create an App
Open the command prompt and run the following command −
C:\Users\username\Desktop>meteor create todo-app
To see the app, you need to run the app with the meteor command and go to http://localhost:3000
C:\Users\username\Desktop\todo-app>meteor
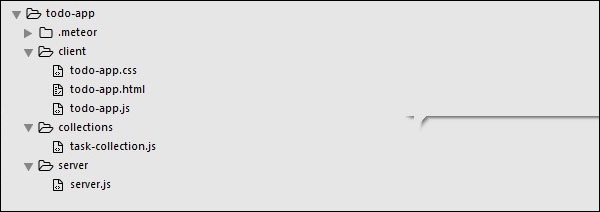
Step2 - Create Folders and Files
Instead of default file structure, we will refactor it. Let's create a client folder, where we will create todo-app.html, todo-app.css and todo-app.js.
C:\Users\username\Desktop\todo-app>mkdir client
C:\Users\username\Desktop\todo-app\client>touch todo-app.html
C:\Users\username\Desktop\todo-app\client>touch todo-app.js
We will also create a server folder with server.js inside.
C:\Users\username\Desktop\todo-app>mkdir server
C:\Users\username\Desktop\todo-app\server>touch server.js
Finally, let's create collections folder with task-collection.js file inside.
C:\Users\username\Desktop\todo-app>mkdir server
C:\Users\username\Desktop\todo-app\collections>touch task-collection.js
You can see the app structure on the following image −
Step 3 - client/todo-app.html
Our first development step is to create HTML for the app. We need an input field where we can add new tasks. The tasks will be in the form of a list with delete and check functionality. We will also have functionalities for showing or hiding completed tasks.
<head>
   <title>Todo App</title>
</head>

<body>
   <h1>Todo List ({{incompleteCount}})</h1>

   <label class = "hide-completed">
      <input type = "checkbox" checked = "{{hideCompleted}}" />
      Hide Completed Tasks
   </label>

   <form class = "new-task">
      <input type = "text" name = "text" placeholder = "Add new tasks" />
   </form>

   <ul>
      {{#each tasks}}
         {{> task}}
      {{/each}}
   </ul>
</body>

<template name = "task">
   <li class = "{{#if checked}}checked{{/if}}">
      <button class = "delete">x</button>
      <input type = "checkbox" checked = "{{checked}}" class = "toggle-checked" />
      <span>{{username}} - {{text}}</span>
   </li>
</template>
Step 4 - collections/task-collection.js
This is the place where we will just create a new MongoDB Collection, so we can use it on both the server and the client side.
Tasks = new Mongo.Collection("tasks");
Step 5 - server/server.js
We will define methods for our app on the server side. These methods will be called from the client. In this file, we will also publish the database query.
// Publishing tasks from the server...

Meteor.publish("tasks", function () {
   return Tasks.find({});
});

// Methods for handling MongoDb Tasks collection data...

Meteor.methods({

   addTask: function (text) {

      Tasks.insert({
         text: text,
         createdAt: new Date(),
      });
   },

   deleteTask: function (taskId) {
      var task = Tasks.findOne(taskId);
      Tasks.remove(taskId);
   },

   setChecked: function (taskId, setChecked) {
      var task = Tasks.findOne(taskId);
      Tasks.update(taskId, { $set: { checked: setChecked} });
   }
});
Step 6 - client/todo-app.js
This is the main client JavaScript file. This file can also be refactored but we will write all client side code here. First, we subscribe to the task collection that is published on the server. Then, we create helpers to be able to handle the app logic, and finally, we define the events that will call the methods from the server.
// Subscribing to the published tasks
Meteor.subscribe("tasks");

// Show/Hide functionality
Template.body.helpers({

   tasks: function () {

      if (Session.get("hideCompleted")) {

         // If hide completed is checked, filter tasks
         return Tasks.find({checked: {$ne: true}}, {sort: {createdAt: -1}});
      } else {

         // Otherwise, return all of the tasks
         return Tasks.find({}, {sort: {createdAt: -1}});
      }
   },

   hideCompleted: function () {
      return Session.get("hideCompleted");
   },

   incompleteCount: function () {
      return Tasks.find({checked: {$ne: true}}).count();
   }
});

// Events for creating new tasks and Show/Hide functionality.
// Calling methods from the server

Template.body.events({

   "submit .new-task": function (event) {
      event.preventDefault();
      var text = event.target.text.value;

      Meteor.call("addTask", text);
      event.target.text.value = "";
   },

   "change .hide-completed input": function (event) {
      Session.set("hideCompleted", event.target.checked);
   }
});

// Events for Deleting and Check/Uncheck functionality
Template.task.events({

   "click .toggle-checked": function () {

      // Set the checked property to the opposite of its current value
      Meteor.call("setChecked", this._id, ! this.checked);
   },

   "click .delete": function () {
      Meteor.call("deleteTask", this._id);
   }
});
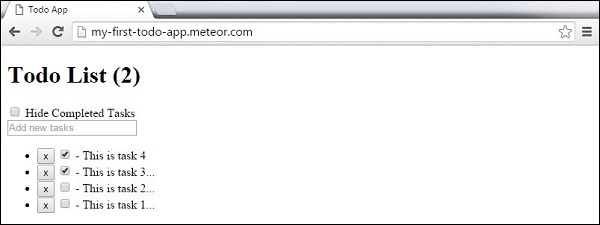
Step 7 - Deploy
After we are done with the development, we can deploy the app from the command prompt window. The deployment name of our app will be my-first-todo-app.
C:\Users\username\Desktop\todo-app>meteor deploy my-first-todo-app
We can open the http://my-first-todo-app.meteor.com/ to start using our app.