
- Mahout Tutorial
- Mahout - Home
- Mahout - Introduction
- Mahout - Machine Learning
- Mahout - Environment
- Mahout - Recommendation
- Mahout - Clustering
- Mahout - Classification
- Mahout Useful Resources
- Mahout - Quick Guide
- Mahout - Resources
- Mahout - Discussion
Mahout - Quick Guide
Mahout - Introduction
We are living in a day and age where information is available in abundance. The information overload has scaled to such heights that sometimes it becomes difficult to manage our little mailboxes! Imagine the volume of data and records some of the popular websites (the likes of Facebook, Twitter, and Youtube) have to collect and manage on a daily basis. It is not uncommon even for lesser known websites to receive huge amounts of information in bulk.
Normally we fall back on data mining algorithms to analyze bulk data to identify trends and draw conclusions. However, no data mining algorithm can be efficient enough to process very large datasets and provide outcomes in quick time, unless the computational tasks are run on multiple machines distributed over the cloud.
We now have new frameworks that allow us to break down a computation task into multiple segments and run each segment on a different machine. Mahout is such a data mining framework that normally runs coupled with the Hadoop infrastructure at its background to manage huge volumes of data.
What is Apache Mahout?
A mahout is one who drives an elephant as its master. The name comes from its close association with Apache Hadoop which uses an elephant as its logo.
Hadoop is an open-source framework from Apache that allows to store and process big data in a distributed environment across clusters of computers using simple programming models.
Apache Mahout is an open source project that is primarily used for creating scalable machine learning algorithms. It implements popular machine learning techniques such as:
- Recommendation
- Classification
- Clustering
Apache Mahout started as a sub-project of Apache’s Lucene in 2008. In 2010, Mahout became a top level project of Apache.
Features of Mahout
The primitive features of Apache Mahout are listed below.
The algorithms of Mahout are written on top of Hadoop, so it works well in distributed environment. Mahout uses the Apache Hadoop library to scale effectively in the cloud.
Mahout offers the coder a ready-to-use framework for doing data mining tasks on large volumes of data.
Mahout lets applications to analyze large sets of data effectively and in quick time.
Includes several MapReduce enabled clustering implementations such as k-means, fuzzy k-means, Canopy, Dirichlet, and Mean-Shift.
Supports Distributed Naive Bayes and Complementary Naive Bayes classification implementations.
Comes with distributed fitness function capabilities for evolutionary programming.
Includes matrix and vector libraries.
Applications of Mahout
Companies such as Adobe, Facebook, LinkedIn, Foursquare, Twitter, and Yahoo use Mahout internally.
Foursquare helps you in finding out places, food, and entertainment available in a particular area. It uses the recommender engine of Mahout.
Twitter uses Mahout for user interest modelling.
Yahoo! uses Mahout for pattern mining.
Mahout - Machine Learning
Apache Mahout is a highly scalable machine learning library that enables developers to use optimized algorithms. Mahout implements popular machine learning techniques such as recommendation, classification, and clustering. Therefore, it is prudent to have a brief section on machine learning before we move further.
What is Machine Learning?
Machine learning is a branch of science that deals with programming the systems in such a way that they automatically learn and improve with experience. Here, learning means recognizing and understanding the input data and making wise decisions based on the supplied data.
It is very difficult to cater to all the decisions based on all possible inputs. To tackle this problem, algorithms are developed. These algorithms build knowledge from specific data and past experience with the principles of statistics, probability theory, logic, combinatorial optimization, search, reinforcement learning, and control theory.
The developed algorithms form the basis of various applications such as:
- Vision processing
- Language processing
- Forecasting (e.g., stock market trends)
- Pattern recognition
- Games
- Data mining
- Expert systems
- Robotics
Machine learning is a vast area and it is quite beyond the scope of this tutorial to cover all its features. There are several ways to implement machine learning techniques, however the most commonly used ones are supervised and unsupervised learning.
Supervised Learning
Supervised learning deals with learning a function from available training data. A supervised learning algorithm analyzes the training data and produces an inferred function, which can be used for mapping new examples. Common examples of supervised learning include:
- classifying e-mails as spam,
- labeling webpages based on their content, and
- voice recognition.
There are many supervised learning algorithms such as neural networks, Support Vector Machines (SVMs), and Naive Bayes classifiers. Mahout implements Naive Bayes classifier.
Unsupervised Learning
Unsupervised learning makes sense of unlabeled data without having any predefined dataset for its training. Unsupervised learning is an extremely powerful tool for analyzing available data and look for patterns and trends. It is most commonly used for clustering similar input into logical groups. Common approaches to unsupervised learning include:
- k-means
- self-organizing maps, and
- hierarchical clustering
Recommendation
Recommendation is a popular technique that provides close recommendations based on user information such as previous purchases, clicks, and ratings.
Amazon uses this technique to display a list of recommended items that you might be interested in, drawing information from your past actions. There are recommender engines that work behind Amazon to capture user behavior and recommend selected items based on your earlier actions.
Facebook uses the recommender technique to identify and recommend the “people you may know list”.

Classification
Classification, also known as categorization, is a machine learning technique that uses known data to determine how the new data should be classified into a set of existing categories. Classification is a form of supervised learning.
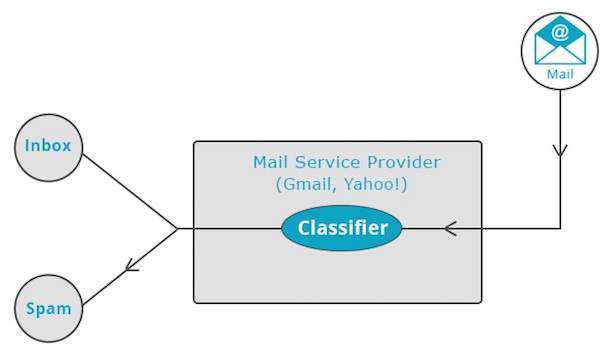
Mail service providers such as Yahoo! and Gmail use this technique to decide whether a new mail should be classified as a spam. The categorization algorithm trains itself by analyzing user habits of marking certain mails as spams. Based on that, the classifier decides whether a future mail should be deposited in your inbox or in the spams folder.
iTunes application uses classification to prepare playlists.
Clustering
Clustering is used to form groups or clusters of similar data based on common characteristics. Clustering is a form of unsupervised learning.
Search engines such as Google and Yahoo! use clustering techniques to group data with similar characteristics.
Newsgroups use clustering techniques to group various articles based on related topics.
The clustering engine goes through the input data completely and based on the characteristics of the data, it will decide under which cluster it should be grouped. Take a look at the following example.

Our library of tutorials contains topics on various subjects. When we receive a new tutorial at TutorialsPoint, it gets processed by a clustering engine that decides, based on its content, where it should be grouped.
Mahout - Environment
This chapter teaches you how to setup mahout. Java and Hadoop are the prerequisites of mahout. Below given are the steps to download and install Java, Hadoop, and Mahout.
Pre-Installation Setup
Before installing Hadoop into Linux environment, we need to set up Linux using ssh (Secure Shell). Follow the steps mentioned below for setting up the Linux environment.
Creating a User
It is recommended to create a separate user for Hadoop to isolate the Hadoop file system from the Unix file system. Follow the steps given below to create a user:
Open root using the command “su”.
- Create a user from the root account using the command “useradd username”.
Now you can open an existing user account using the command “su username”.
Open the Linux terminal and type the following commands to create a user.
$ su
password:
# useradd hadoop
# passwd hadoop
New passwd:
Retype new passwd
SSH Setup and Key Generation
SSH setup is required to perform different operations on a cluster such as starting, stopping, and distributed daemon shell operations. To authenticate different users of Hadoop, it is required to provide public/private key pair for a Hadoop user and share it with different users.
The following commands are used to generate a key value pair using SSH, copy the public keys form id_rsa.pub to authorized_keys, and provide owner, read and write permissions to authorized_keys file respectively.
$ ssh-keygen -t rsa
$ cat ~/.ssh/id_rsa.pub >> ~/.ssh/authorized_keys
$ chmod 0600 ~/.ssh/authorized_keys
Verifying ssh
ssh localhost
Installing Java
Java is the main prerequisite for Hadoop and HBase. First of all, you should verify the existence of Java in your system using “java -version”. The syntax of Java version command is given below.
$ java -version
It should produce the following output.
java version "1.7.0_71"
Java(TM) SE Runtime Environment (build 1.7.0_71-b13)
Java HotSpot(TM) Client VM (build 25.0-b02, mixed mode)
If you don’t have Java installed in your system, then follow the steps given below for installing Java.
Step 1
Download java (JDK <latest version> - X64.tar.gz) by visiting the following link: Oracle
Then jdk-7u71-linux-x64.tar.gz is downloaded onto your system.
Step 2
Generally, you find the downloaded Java file in the Downloads folder. Verify it and extract the jdk-7u71-linux-x64.gz file using the following commands.
$ cd Downloads/
$ ls
jdk-7u71-linux-x64.gz
$ tar zxf jdk-7u71-linux-x64.gz
$ ls
jdk1.7.0_71 jdk-7u71-linux-x64.gz
Step 3
To make Java available to all the users, you need to move it to the location “/usr/local/”. Open root, and type the following commands.
$ su
password:
# mv jdk1.7.0_71 /usr/local/
# exit
Step 4
For setting up PATH and JAVA_HOME variables, add the following commands to ~/.bashrc file.
export JAVA_HOME=/usr/local/jdk1.7.0_71
export PATH= $PATH:$JAVA_HOME/bin
Now, verify the java -version command from terminal as explained above.
Downloading Hadoop
After installing Java, you need to install Hadoop initially. Verify the existence of Hadoop using “Hadoop version” command as shown below.
hadoop version
It should produce the following output:
Hadoop 2.6.0
Compiled by jenkins on 2014-11-13T21:10Z
Compiled with protoc 2.5.0
From source with checksum 18e43357c8f927c0695f1e9522859d6a
This command was run using /home/hadoop/hadoop/share/hadoop/common/hadoopcommon-2.6.0.jar
If your system is unable to locate Hadoop, then download Hadoop and have it installed on your system. Follow the commands given below to do so.
Download and extract hadoop-2.6.0 from apache software foundation using the following commands.
$ su
password:
# cd /usr/local
# wget http://mirrors.advancedhosters.com/apache/hadoop/common/hadoop-
2.6.0/hadoop-2.6.0-src.tar.gz
# tar xzf hadoop-2.6.0-src.tar.gz
# mv hadoop-2.6.0/* hadoop/
# exit
Installing Hadoop
Install Hadoop in any of the required modes. Here, we are demonstrating HBase functionalities in pseudo-distributed mode, therefore install Hadoop in pseudo-distributed mode.
Follow the steps given below to install Hadoop 2.4.1 on your system.
Step 1: Setting up Hadoop
You can set Hadoop environment variables by appending the following commands to ~/.bashrc file.
export HADOOP_HOME=/usr/local/hadoop
export HADOOP_MAPRED_HOME=$HADOOP_HOME
export HADOOP_COMMON_HOME=$HADOOP_HOME
export HADOOP_HDFS_HOME=$HADOOP_HOME

export YARN_HOME=$HADOOP_HOME
export HADOOP_COMMON_LIB_NATIVE_DIR=$HADOOP_HOME/lib/native

export PATH=$PATH:$HADOOP_HOME/sbin:$HADOOP_HOME/bin
export HADOOP_INSTALL=$HADOOP_HOME
Now, apply all changes into the currently running system.
$ source ~/.bashrc
Step 2: Hadoop Configuration
You can find all the Hadoop configuration files at the location “$HADOOP_HOME/etc/hadoop”. It is required to make changes in those configuration files according to your Hadoop infrastructure.
$ cd $HADOOP_HOME/etc/hadoop
In order to develop Hadoop programs in Java, you need to reset the Java environment variables in hadoop-env.sh file by replacing JAVA_HOME value with the location of Java in your system.
export JAVA_HOME=/usr/local/jdk1.7.0_71
Given below are the list of files which you have to edit to configure Hadoop.
core-site.xml
The core-site.xml file contains information such as the port number used for Hadoop instance, memory allocated for file system, memory limit for storing data, and the size of Read/Write buffers.
Open core-site.xml and add the following property in between the <configuration>, </configuration> tags:
<configuration>
   <property>
      <name>fs.default.name</name>
      <value>hdfs://localhost:9000</value>
   </property>
</configuration>
hdfs-site.xm
The hdfs-site.xml file contains information such as the value of replication data, namenode path, and datanode paths of your local file systems. It means the place where you want to store the Hadoop infrastructure.
Let us assume the following data:
dfs.replication (data replication value) = 1

(In the below given path /hadoop/ is the user name.
hadoopinfra/hdfs/namenode is the directory created by hdfs file system.)
namenode path = //home/hadoop/hadoopinfra/hdfs/namenode

(hadoopinfra/hdfs/datanode is the directory created by hdfs file system.)
datanode path = //home/hadoop/hadoopinfra/hdfs/datanode
Open this file and add the following properties in between the <configuration>, </configuration> tags in this file.
<configuration>
   <property>
      <name>dfs.replication</name>
      <value>1</value>
   </property>

   <property>
      <name>dfs.name.dir</name>
      <value>file:///home/hadoop/hadoopinfra/hdfs/namenode</value>
   </property>

   <property>
      <name>dfs.data.dir</name>
      <value>file:///home/hadoop/hadoopinfra/hdfs/datanode</value>
   </property>
</configuration>
Note: In the above file, all the property values are user defined. You can make changes according to your Hadoop infrastructure.
mapred-site.xml
This file is used to configure yarn into Hadoop. Open mapred-site.xml file and add the following property in between the <configuration>, </configuration> tags in this file.
<configuration>
   <property>
      <name>yarn.nodemanager.aux-services</name>
      <value>mapreduce_shuffle</value>
   </property>
</configuration>
mapred-site.xml
This file is used to specify which MapReduce framework we are using. By default, Hadoop contains a template of mapred-site.xml. First of all, it is required to copy the file from mapred-site.xml.template to mapred-site.xml file using the following command.
$ cp mapred-site.xml.template mapred-site.xml
Open mapred-site.xml file and add the following properties in between the <configuration>, </configuration> tags in this file.
<configuration>
   <property>
      <name>mapreduce.framework.name</name>
      <value>yarn</value>
   </property>
</configuration>
Verifying Hadoop Installation
The following steps are used to verify the Hadoop installation.
Step 1: Name Node Setup
Set up the namenode using the command “hdfs namenode -format” as follows:
$ cd ~
$ hdfs namenode -format
The expected result is as follows:
10/24/14 21:30:55 INFO namenode.NameNode: STARTUP_MSG:
/************************************************************
STARTUP_MSG: Starting NameNode
STARTUP_MSG: host = localhost/192.168.1.11
STARTUP_MSG: args = [-format]
STARTUP_MSG: version = 2.4.1
...
...
10/24/14 21:30:56 INFO common.Storage: Storage directory
/home/hadoop/hadoopinfra/hdfs/namenode has been successfully formatted.
10/24/14 21:30:56 INFO namenode.NNStorageRetentionManager: Going to retain
1 images with txid >= 0
10/24/14 21:30:56 INFO util.ExitUtil: Exiting with status 0
10/24/14 21:30:56 INFO namenode.NameNode: SHUTDOWN_MSG:
/************************************************************
SHUTDOWN_MSG: Shutting down NameNode at localhost/192.168.1.11
************************************************************/
Step 2: Verifying Hadoop dfs
The following command is used to start dfs. This command starts your Hadoop file system.
$ start-dfs.sh
The expected output is as follows:
10/24/14 21:37:56
Starting namenodes on [localhost]
localhost: starting namenode, logging to /home/hadoop/hadoop-
2.4.1/logs/hadoop-hadoop-namenode-localhost.out
localhost: starting datanode, logging to /home/hadoop/hadoop-
2.4.1/logs/hadoop-hadoop-datanode-localhost.out
Starting secondary namenodes [0.0.0.0]
Step 3: Verifying Yarn Script
The following command is used to start yarn script. Executing this command will start your yarn demons.
$ start-yarn.sh
The expected output is as follows:
starting yarn daemons
starting resource manager, logging to /home/hadoop/hadoop-2.4.1/logs/yarn-
hadoop-resourcemanager-localhost.out
localhost: starting node manager, logging to /home/hadoop/hadoop-
2.4.1/logs/yarn-hadoop-nodemanager-localhost.out
Step 4: Accessing Hadoop on Browser
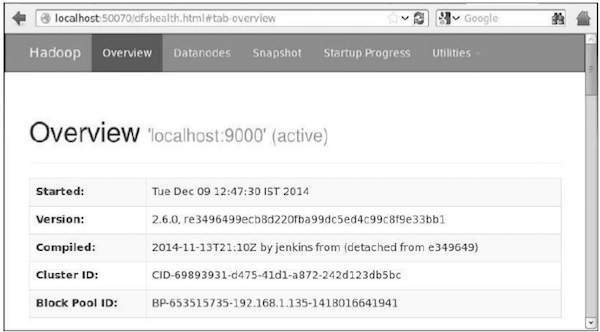
The default port number to access hadoop is 50070. Use the following URL to get Hadoop services on your browser.
http://localhost:50070/
Step 5: Verify All Applications for Cluster
The default port number to access all application of cluster is 8088. Use the following URL to visit this service.
http://localhost:8088/

Downloading Mahout
Mahout is available in the website Mahout. Download Mahout from the link provided in the website. Here is the screenshot of the website.

Step 1
Download Apache mahout from the link https://mahout.apache.org/general/downloads using the following command.
[Hadoop@localhost ~]$ wget
http://mirror.nexcess.net/apache/mahout/0.9/mahout-distribution-0.9.tar.gz
Then mahout-distribution-0.9.tar.gz will be downloaded in your system.
Step2
Browse through the folder where mahout-distribution-0.9.tar.gz is stored and extract the downloaded jar file as shown below.
[Hadoop@localhost ~]$ tar zxvf mahout-distribution-0.9.tar.gz
Maven Repository
Given below is the pom.xml to build Apache Mahout using Eclipse.
<dependency>
   <groupId>org.apache.mahout</groupId>
   <artifactId>mahout-core</artifactId>
   <version>0.9</version>
</dependency>

<dependency>
   <groupId>org.apache.mahout</groupId>
   <artifactId>mahout-math</artifactId>
   <version>${mahout.version}</version>
</dependency>

<dependency>
   <groupId>org.apache.mahout</groupId>
   <artifactId>mahout-integration</artifactId>
   <version>${mahout.version}</version>
</dependency>
Mahout - Recommendation
This chapter covers the popular machine learning technique called recommendation, its mechanisms, and how to write an application implementing Mahout recommendation.
Recommendation
Ever wondered how Amazon comes up with a list of recommended items to draw your attention to a particular product that you might be interested in!
Suppose you want to purchase the book “Mahout in Action” from Amazon:
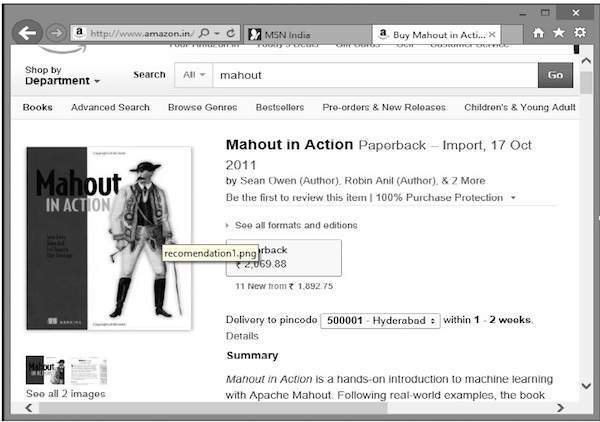
Along with the selected product, Amazon also displays a list of related recommended items, as shown below.

Such recommendation lists are produced with the help of recommender engines. Mahout provides recommender engines of several types such as:
- user-based recommenders,
- item-based recommenders, and
- several other algorithms.
Mahout Recommender Engine
Mahout has a non-distributed, non-Hadoop-based recommender engine. You should pass a text document having user preferences for items. And the output of this engine would be the estimated preferences of a particular user for other items.
Example
Consider a website that sells consumer goods such as mobiles, gadgets, and their accessories. If we want to implement the features of Mahout in such a site, then we can build a recommender engine. This engine analyzes past purchase data of the users and recommends new products based on that.
The components provided by Mahout to build a recommender engine are as follows:
- DataModel
- UserSimilarity
- ItemSimilarity
- UserNeighborhood
- Recommender
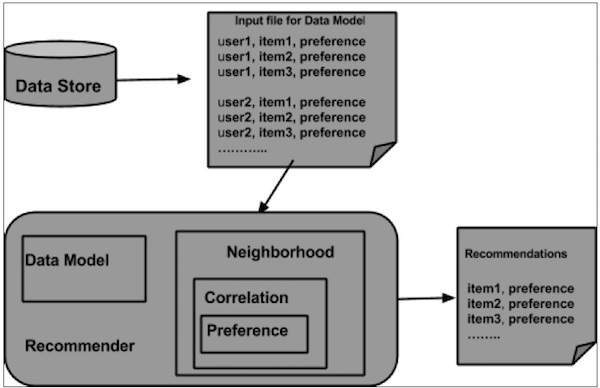
From the data store, the data model is prepared and is passed as an input to the recommender engine. The Recommender engine generates the recommendations for a particular user. Given below is the architecture of recommender engine.
Architecture of Recommender Engine
Building a Recommender using Mahout
Here are the steps to develop a simple recommender:
Step1: Create DataModel Object
The constructor of PearsonCorrelationSimilarity class requires a data model object, which holds a file that contains the Users, Items, and Preferences details of a product. Here is the sample data model file:
1,00,1.0
1,01,2.0
1,02,5.0
1,03,5.0
1,04,5.0

2,00,1.0
2,01,2.0
2,05,5.0
2,06,4.5
2,02,5.0

3,01,2.5
3,02,5.0
3,03,4.0
3,04,3.0

4,00,5.0
4,01,5.0
4,02,5.0
4,03,0.0
The DataModel object requires the file object, which contains the path of the input file. Create the DataModel object as shown below.
DataModel datamodel = new FileDataModel(new File("input file"));
Step2: Create UserSimilarity Object
Create UserSimilarity object using PearsonCorrelationSimilarity class as shown below:
UserSimilarity similarity = new PearsonCorrelationSimilarity(datamodel);
Step3: Create UserNeighborhood object
This object computes a "neighborhood" of users like a given user. There are two types of neighborhoods:
NearestNUserNeighborhood - This class computes a neighborhood consisting of the nearest n users to a given user. "Nearest" is defined by the given UserSimilarity.
ThresholdUserNeighborhood - This class computes a neighborhood consisting of all the users whose similarity to the given user meets or exceeds a certain threshold. Similarity is defined by the given UserSimilarity.
Here we are using ThresholdUserNeighborhood and set the limit of preference to 3.0.
UserNeighborhood neighborhood = new ThresholdUserNeighborhood(3.0, similarity, model);
Step4: Create Recommender Object
Create UserbasedRecomender object. Pass all the above created objects to its constructor as shown below.
UserBasedRecommender recommender = new GenericUserBasedRecommender(model, neighborhood, similarity);
Step5: Recommend Items to a User
Recommend products to a user using the recommend() method of Recommender interface. This method requires two parameters. The first represents the user id of the user to whom we need to send the recommendations, and the second represents the number of recommendations to be sent. Here is the usage of recommender() method:
List<RecommendedItem> recommendations = recommender.recommend(2, 3);

for (RecommendedItem recommendation : recommendations) {
   System.out.println(recommendation);
 }
Example Program
Given below is an example program to set recommendation. Prepare the recommendations for the user with user id 2.
import java.io.File;
import java.util.List;

import org.apache.mahout.cf.taste.impl.model.file.FileDataModel;
import org.apache.mahout.cf.taste.impl.neighborhood.ThresholdUserNeighborhood;
import org.apache.mahout.cf.taste.impl.recommender.GenericUserBasedRecommender;
import org.apache.mahout.cf.taste.impl.similarity.PearsonCorrelationSimilarity;
import org.apache.mahout.cf.taste.model.DataModel;
import org.apache.mahout.cf.taste.neighborhood.UserNeighborhood;
import org.apache.mahout.cf.taste.recommender.RecommendedItem;
import org.apache.mahout.cf.taste.recommender.UserBasedRecommender;
import org.apache.mahout.cf.taste.similarity.UserSimilarity;

public class Recommender {
   public static void main(String args[]){
      try{
         //Creating data model
         DataModel datamodel = new FileDataModel(new File("data")); //data

         //Creating UserSimilarity object.
         UserSimilarity usersimilarity = new PearsonCorrelationSimilarity(datamodel);

         //Creating UserNeighbourHHood object.
         UserNeighborhood userneighborhood = new ThresholdUserNeighborhood(3.0, usersimilarity, datamodel);

         //Create UserRecomender
         UserBasedRecommender recommender = new GenericUserBasedRecommender(datamodel, userneighborhood, usersimilarity);

         List<RecommendedItem> recommendations = recommender.recommend(2, 3);

         for (RecommendedItem recommendation : recommendations) {
            System.out.println(recommendation);
         }

      }catch(Exception e){}

   }
  }
Compile the program using the following commands:
javac Recommender.java
java Recommender
It should produce the following output:
RecommendedItem [item:3, value:4.5]
RecommendedItem [item:4, value:4.0]
Mahout - Clustering
Clustering is the procedure to organize elements or items of a given collection into groups based on the similarity between the items. For example, the applications related to online news publishing group their news articles using clustering.
Applications of Clustering
Clustering is broadly used in many applications such as market research, pattern recognition, data analysis, and image processing.
Clustering can help marketers discover distinct groups in their customer basis. And they can characterize their customer groups based on purchasing patterns.
In the field of biology, it can be used to derive plant and animal taxonomies, categorize genes with similar functionality and gain insight into structures inherent in populations.
Clustering helps in identification of areas of similar land use in an earth observation database.
Clustering also helps in classifying documents on the web for information discovery.
Clustering is used in outlier detection applications such as detection of credit card fraud.
As a data mining function, Cluster Analysis serves as a tool to gain insight into the distribution of data to observe characteristics of each cluster.
Using Mahout, we can cluster a given set of data. The steps required are as follows:
Algorithm You need to select a suitable clustering algorithm to group the elements of a cluster.
Similarity and Dissimilarity You need to have a rule in place to verify the similarity between the newly encountered elements and the elements in the groups.
Stopping Condition A stopping condition is required to define the point where no clustering is required.
Procedure of Clustering
To cluster the given data you need to -
Start the Hadoop server. Create required directories for storing files in Hadoop File System. (Create directories for input file, sequence file, and clustered output in case of canopy).
Copy the input file to the Hadoop File system from Unix file system.
Prepare the sequence file from the input data.
Run any of the available clustering algorithms.
Get the clustered data.
Starting Hadoop
Mahout works with Hadoop, hence make sure that the Hadoop server is up and running.
$ cd HADOOP_HOME/bin
$ start-all.sh
Preparing Input File Directories
Create directories in the Hadoop file system to store the input file, sequence files, and clustered data using the following command:
$ hadoop fs -p mkdir /mahout_data
$ hadoop fs -p mkdir /clustered_data
$ hadoop fs -p mkdir /mahout_seq
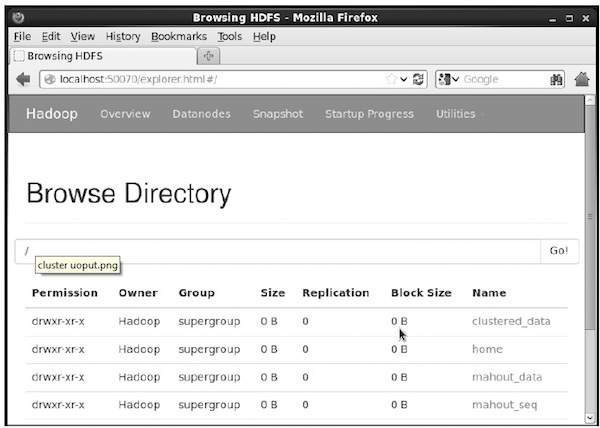
You can verify whether the directory is created using the hadoop web interface in the following URL - http://localhost:50070/
It gives you the output as shown below:
Copying Input File to HDFS
Now, copy the input data file from the Linux file system to mahout_data directory in the Hadoop File System as shown below. Assume your input file is mydata.txt and it is in the /home/Hadoop/data/ directory.
$ hadoop fs -put /home/Hadoop/data/mydata.txt /mahout_data/
Preparing the Sequence File
Mahout provides you a utility to convert the given input file in to a sequence file format. This utility requires two parameters.
- The input file directory where the original data resides.
- The output file directory where the clustered data is to be stored.
Given below is the help prompt of mahout seqdirectory utility.
Step 1: Browse to the Mahout home directory. You can get help of the utility as shown below:
[Hadoop@localhost bin]$ ./mahout seqdirectory --help
Job-Specific Options:
--input (-i) input Path to job input directory.
--output (-o) output The directory pathname for output.
--overwrite (-ow) If present, overwrite the output directory
Generate the sequence file using the utility using the following syntax:
mahout seqdirectory -i <input file path> -o <output directory>
Example
mahout seqdirectory
-i hdfs://localhost:9000/mahout_seq/
-o hdfs://localhost:9000/clustered_data/
Clustering Algorithms
Mahout supports two main algorithms for clustering namely:
- Canopy clustering
- K-means clustering
Canopy Clustering
Canopy clustering is a simple and fast technique used by Mahout for clustering purpose. The objects will be treated as points in a plain space. This technique is often used as an initial step in other clustering techniques such as k-means clustering. You can run a Canopy job using the following syntax:
mahout canopy -i <input vectors directory>
-o <output directory>
-t1 <threshold value 1>
-t2 <threshold value 2>
Canopy job requires an input file directory with the sequence file and an output directory where the clustered data is to be stored.
Example
mahout canopy -i hdfs://localhost:9000/mahout_seq/mydata.seq
-o hdfs://localhost:9000/clustered_data
-t1 20
-t2 30
You will get the clustered data generated in the given output directory.
K-means Clustering
K-means clustering is an important clustering algorithm. The k in k-means clustering algorithm represents the number of clusters the data is to be divided into. For example, the k value specified to this algorithm is selected as 3, the algorithm is going to divide the data into 3 clusters.
Each object will be represented as vector in space. Initially k points will be chosen by the algorithm randomly and treated as centers, every object closest to each center are clustered. There are several algorithms for the distance measure and the user should choose the required one.
Creating Vector Files
Unlike Canopy algorithm, the k-means algorithm requires vector files as input, therefore you have to create vector files.
To generate vector files from sequence file format, Mahout provides the seq2parse utility.
Given below are some of the options of seq2parse utility. Create vector files using these options.
$MAHOUT_HOME/bin/mahout seq2sparse
--analyzerName (-a) analyzerName  The class name of the analyzer
--chunkSize (-chunk) chunkSize    The chunkSize in MegaBytes.
--output (-o) output              The directory pathname for o/p
--input (-i) input                Path to job input directory.
After creating vectors, proceed with k-means algorithm. The syntax to run k-means job is as follows:
mahout kmeans -i <input vectors directory>
-c  <input clusters directory>
-o  <output working directory>
-dm <Distance Measure technique>
-x  <maximum number of iterations>
-k  <number of initial clusters>
K-means clustering job requires input vector directory, output clusters directory, distance measure, maximum number of iterations to be carried out, and an integer value representing the number of clusters the input data is to be divided into.
Mahout - Classification
What is Classification?
Classification is a machine learning technique that uses known data to determine how the new data should be classified into a set of existing categories. For example,
iTunes application uses classification to prepare playlists.
Mail service providers such as Yahoo! and Gmail use this technique to decide whether a new mail should be classified as a spam. The categorization algorithm trains itself by analyzing user habits of marking certain mails as spams. Based on that, the classifier decides whether a future mail should be deposited in your inbox or in the spams folder.
How Classification Works
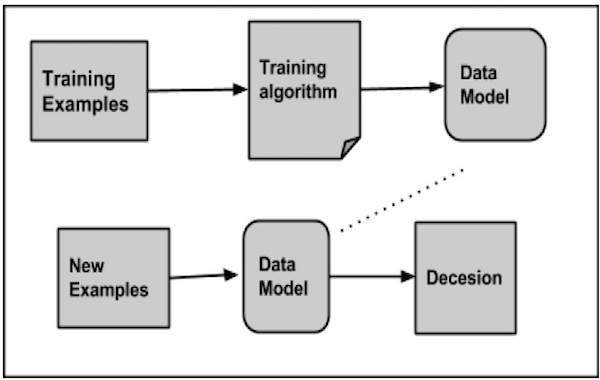
While classifying a given set of data, the classifier system performs the following actions:
- Initially a new data model is prepared using any of the learning algorithms.
- Then the prepared data model is tested.
- Thereafter, this data model is used to evaluate the new data and to determine its class.
Applications of Classification
Credit card fraud detection - The Classification mechanism is used to predict credit card frauds. Using historical information of previous frauds, the classifier can predict which future transactions may turn into frauds.
Spam e-mails - Depending on the characteristics of previous spam mails, the classifier determines whether a newly encountered e-mail should be sent to the spam folder.
Naive Bayes Classifier
Mahout uses the Naive Bayes classifier algorithm. It uses two implementations:
- Distributed Naive Bayes classification
- Complementary Naive Bayes classification
Naive Bayes is a simple technique for constructing classifiers. It is not a single algorithm for training such classifiers, but a family of algorithms. A Bayes classifier constructs models to classify problem instances. These classifications are made using the available data.
An advantage of naive Bayes is that it only requires a small amount of training data to estimate the parameters necessary for classification.
For some types of probability models, naive Bayes classifiers can be trained very efficiently in a supervised learning setting.
Despite its oversimplified assumptions, naive Bayes classifiers have worked quite well in many complex real-world situations.
Procedure of Classification
The following steps are to be followed to implement Classification:
- Generate example data
- Create sequence files from data
- Convert sequence files to vectors
- Train the vectors
- Test the vectors
Step1: Generate Example Data
Generate or download the data to be classified. For example, you can get the 20 newsgroups example data from the following link: http://people.csail.mit.edu/jrennie/20Newsgroups/20news-bydate.tar.gz
Create a directory for storing input data. Download the example as shown below.
$ mkdir classification_example
$ cd classification_example
$tar xzvf 20news-bydate.tar.gz
wget http://people.csail.mit.edu/jrennie/20Newsgroups/20news-bydate.tar.gz
Step 2: Create Sequence Files
Create sequence file from the example using seqdirectory utility. The syntax to generate sequence is given below:
mahout seqdirectory -i <input file path> -o <output directory>
Step 3: Convert Sequence Files to Vectors
Create vector files from sequence files using seq2parse utility. The options of seq2parse utility are given below:
$MAHOUT_HOME/bin/mahout seq2sparse
--analyzerName (-a) analyzerName  The class name of the analyzer
--chunkSize (-chunk) chunkSize    The chunkSize in MegaBytes.
--output (-o) output              The directory pathname for o/p
--input (-i) input                Path to job input directory.
Step 4: Train the Vectors
Train the generated vectors using the trainnb utility. The options to use trainnb utility are given below:
mahout trainnb
 -i ${PATH_TO_TFIDF_VECTORS}
 -el
 -o ${PATH_TO_MODEL}/model
 -li ${PATH_TO_MODEL}/labelindex
 -ow
 -c
Step 5: Test the Vectors
Test the vectors using testnb utility. The options to use testnb utility are given below:
mahout testnb
 -i ${PATH_TO_TFIDF_TEST_VECTORS}
 -m ${PATH_TO_MODEL}/model
 -l ${PATH_TO_MODEL}/labelindex
 -ow
 -o ${PATH_TO_OUTPUT}
 -c
 -seq