- Jython Tutorial
- Jython - Home
- Jython - Overview
- Jython - Installation
- Jython - Importing Java Libraries
- Jython - Variables and Data Types
- Jython - Using Java Collection Types
- Jython - Decision Control
- Jython - Loops
- Jython - Functions
- Jython - Modules
- Jython - Package
- Jython - Java Application
- Jython - Eclipse Plugin
- Jython - A Project in Eclipse
- Jython - NetBeans Plugin & Project
- Jython - Servlets
- Jython - JDBC
- Jython - Using the Swing GUI library
- Jython - Layout Management
- Jython - Event Handling
- Jython - Menus
- Jython - Dialogs
- Jython Useful Resources
- Jython - Quick Guide
- Jython - Useful Resources
- Jython - Discussion
Jython - Layout Management
Layout managers in Java are classes those, which manage the placement of controls in the container objects like Frame, Dialog or Panel. Layout managers maintain the relative positioning of controls in a frame, even if the resolution changes or the frame itself is resized.
These classes implement the Layout interface. The following Layout managers are defined in the AWT library −
- BorderLayout
- FlowLayout
- GridLayout
- CardLayout
- GridBagLayout
The following Layout Managers are defined in the Swing library −
- BoxLayout
- GroupLayout
- ScrollPaneLayout
- SpringLayout
We shall use AWT layout managers as well as swing layout managers in the following examples.
- Absolute Layout
- Flow Layout
- Grid Layout
- Border Layout
- Box Layout
- Group Layout
Let us now discuss each of these in detail.
Absolute Layout
Before we explore all the above Layout managers, we must look at absolute positioning of the controls in a container. We have to set the layout method of the frame object to ‘None’.
frame.setLayout(None)
Then place the control by calling the setBounds() method. It takes four arguments - x position, y position, width and height.
For example - To place a button object at the absolute position and with the absolute size.
btn = JButton("Add")
btn.setBounds(60,80,60,20)
Similarly, all controls can be placed by properly allocating position and size. This layout is relatively easy to use, but fails to retain its appearance when the window either is resized, or if the program is executed when screen resolution changes.
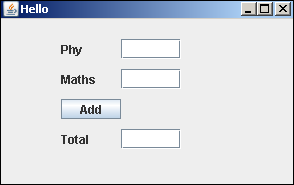
In the following Jython script, three Jlabel objects are used to display text “phy”, “maths” and “Total” respectively. In front of these three - JTextField objects are placed. A Button object is placed above the “Total” label.
First of all the JFrame window is created with a layout set to none.
frame = JFrame("Hello")
frame.setDefaultCloseOperation(JFrame.EXIT_ON_CLOSE)
frame.setLocation(100,100)
frame.setSize(300,200)
frame.setLayout(None)
Then different controls are added according to their absolute position and size. The complete code is given below −
from javax.swing import JFrame, JLabel, JButton, JTextField

frame = JFrame("Hello")
frame.setDefaultCloseOperation(JFrame.EXIT_ON_CLOSE)
frame.setLocation(100,100)
frame.setSize(300,200)
frame.setLayout(None)

lbl1 = JLabel("Phy")
lbl1.setBounds(60,20,40,20)
txt1 = JTextField(10)
txt1.setBounds(120,20,60,20)
lbl2 = JLabel("Maths")
lbl2.setBounds(60,50,40,20)
txt2 = JTextField(10)
txt2.setBounds(120, 50, 60,20)
btn = JButton("Add")
btn.setBounds(60,80,60,20)
lbl3 = JLabel("Total")
lbl3.setBounds(60,110,40,20)
txt3 = JTextField(10)
txt3.setBounds(120, 110, 60,20)

frame.add(lbl1)
frame.add(txt1)
frame.add(lbl2)
frame.add(txt2)
frame.add(btn)
frame.add(lbl3)
frame.add(txt3)
frame.setVisible(True)
The output for the above code is as follows.
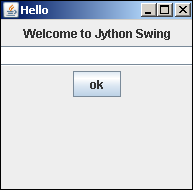
Jython FlowLayout
The FlowLayout is the default layout manager for container classes. It arranges control from left to right and then from top to bottom direction.
In following example, a Jlabel object, a JTextField object and a JButton object are to be displayed in a JFrame using FlowLayout manager. To start with, let us import the required classes from the javax.swing package and the java.awt package.
from javax.swing import JFrame, JLabel, JButton, JTextField
from java.awt import FlowLayout
Then create a JFrame object and set its Location as well as the size properties.
frame = JFrame("Hello")
frame.setDefaultCloseOperation(JFrame.EXIT_ON_CLOSE)
frame.setLocation(100,100)
frame.setSize(200,200)
Set the layout manager for the frame as FlowLayout.
frame.setLayout(FlowLayout())
Now declare objects for JLabel, JTextfield and JButton classes.
label = JLabel("Welcome to Jython Swing")
txt = JTextField(30)
btn = JButton("ok")
Finally add these controls in the frame by calling the add() method of the JFrame class.
frame.add(label)
frame.add(txt)
frame.add(btn)
To display the frame, set its visible property to true. The complete Jython script and its output is as given below −
from javax.swing import JFrame, JLabel, JButton, JTextField
from java.awt import FlowLayout

frame = JFrame("Hello")
frame.setDefaultCloseOperation(JFrame.EXIT_ON_CLOSE)
frame.setLocation(100,100)
frame.setSize(200,200)

frame.setLayout(FlowLayout())

label = JLabel("Welcome to Jython Swing")
txt = JTextField(30)
btn = JButton("ok")

frame.add(label)
frame.add(txt)
frame.add(btn)
frame.setVisible(True)
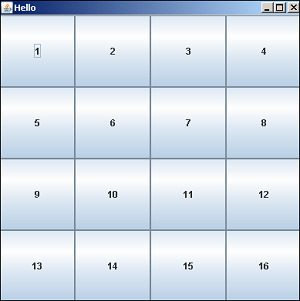
Jython GridLayout
The Gridlayout manager allows placement of controls in a rectangular grid. One control is placed in each cell of the grid.
In following example, the GridLayout is applied to a JFrame object dividing it in to 4 rows and 4 columns. A JButton object is to be placed in each cell of the grid.
Let us first import the required libraries −
from javax.swing import JFrame, JButton
from java.awt import GridLayout
Then create the JFrame container −
frame = JFrame("Hello")
frame.setDefaultCloseOperation(JFrame.EXIT_ON_CLOSE)
frame.setLocation(100,100)
frame.setSize(400,400)
Now, apply GridLayout by specifying its dimensions as 4 by 4.
frame.setLayout(GridLayout(4,4))
We should now use two FOR loops, each going from 1 to 4, so sixteen JButton objects are placed in subsequent cells.
k = 0
frame.setLayout(GridLayout(4,4))
for i in range(1,5):
   for j in range(1,5):
      k = k+1
      frame.add(JButton(str(k)))
Finally set visibility of frame to true. The complete Jython code is given below.
from javax.swing import JFrame, JButton
from java.awt import GridLayout

frame = JFrame("Hello")
frame.setDefaultCloseOperation(JFrame.EXIT_ON_CLOSE)
frame.setLocation(100,100)
frame.setSize(400,400)

frame.setLayout(GridLayout(4,4))

k = 0
for i in range(1,5):
   for j in range(1,5):
      k = k+1
      frame.add(JButton(str(k)))

frame.setVisible(True)
The output of the above code is as follows −
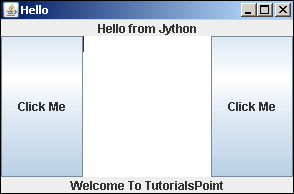
Jython BorderLayout
The BorderLayout manager divides the container in five geographical regions and places with one component in each region. These regions are represented by defined constants as follows −
- BorderLayout.NORTH
- BorderLayout.SOUTH
- BorderLayout.EAST
- BorderLayout.WEST
- BorderLayout.CENTER
Let us consider the following example −
Jython BoxLayout
The BoxLayout class is defined in the javax.swing package. It is used to arrange components in the container either vertically or horizontally. The direction is determined by the following constants −
- X_AXIS
- Y_AXIS
- LINE_AXIS
- PAGE_AXIS
The integer constant specifies the axis along which the container's components should be laid out. When the container has the default component orientation, LINE_AXIS specifies that the components be laid out from left to right, and PAGE_AXIS specifies that the components be laid out from top to bottom.
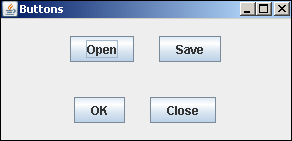
In the following example, panel (of JPanel class) is added in a JFrame object. Vertical BoxLayout is applied to it and two more panels, top and bottom, are added to it. These two internal panels have two buttons each added in the horizontal Boxlayout.
Let us first create the top-level JFrame window.
frame = JFrame()
frame.setTitle("Buttons")
frame.setDefaultCloseOperation(JFrame.EXIT_ON_CLOSE)
frame.setSize(300, 150)
The JPanel object is declared having a vertical BoxLayout. Add it in top-level frame.
panel = JPanel()
panel.setLayout(BoxLayout(panel, BoxLayout.Y_AXIS))
frame.add(panel)
In this panel, two more panels top and bottom are added to it. Each of them have two JButton objects added to them horizontally with a space holder of 25 pixels separating them.
###top panel
top = JPanel()
top.setLayout(BoxLayout(top, BoxLayout.X_AXIS))
b1 = JButton("OK")
b2 = JButton("Close")
top.add(Box.createVerticalGlue())
top.add(b1)
top.add(Box.createRigidArea(Dimension(25, 0)))
top.add(b2)
Similarly, the bottom panel is constructed.
###bottom panel
bottom = JPanel()
bottom.setLayout(BoxLayout(bottom, BoxLayout.X_AXIS))
b3 = JButton("Open")
b4 = JButton("Save")
bottom.add(b3)
bottom.add(Box.createRigidArea(Dimension(25, 0)))
bottom.add(b4)
bottom.add(Box.createVerticalGlue())
Note that the createRigidArea() function is used to create a space of 25 pixels between two buttons. Also the createVerticalGlue() function occupies the leading or the trailing space in the layout.
To start with, add the top and bottom panels and set the visibility property of the frame to true. The complete code is as follows −
from java.awt import Dimension
from javax.swing import JButton, JFrame,JPanel,BoxLayout,Box

frame = JFrame()
frame.setTitle("Buttons")
frame.setDefaultCloseOperation(JFrame.EXIT_ON_CLOSE)
frame.setSize(300, 150)

panel = JPanel()
panel.setLayout(BoxLayout(panel, BoxLayout.Y_AXIS))
frame.add(panel)

###top panel
top = JPanel()
top.setLayout(BoxLayout(top, BoxLayout.X_AXIS))
b1 = JButton("OK")
b2 = JButton("Close")
top.add(Box.createVerticalGlue())
top.add(b1)
top.add(Box.createRigidArea(Dimension(25, 0)))
top.add(b2)

###bottom panel
bottom = JPanel()
bottom.setLayout(BoxLayout(bottom, BoxLayout.X_AXIS))
b3 = JButton("Open")
b4 = JButton("Save")
bottom.add(b3)
bottom.add(Box.createRigidArea(Dimension(25, 0)))
bottom.add(b4)
bottom.add(Box.createVerticalGlue())

panel.add(bottom)
panel.add(top)
frame.setVisible(True)
The above code will generate the following output.
Jython GroupLayout
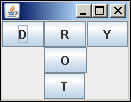
The GroupLayout manager groups the components in a hierarchical manner. The grouping is done by two classes, SequentialGroup and ParallelGroup, both implement Group interface in Java.
The layout procedure is divided in two steps. In one-step, components are placed along with the horizontal axis, and in second along vertical axis. Each component must be defined twice in the layout.
There are two types of arrangements, sequential and parallel. In both, we can arrange components sequentially or in parallel. In horizontal arrangement, row is called sequential group and column is called parallel group. On the other hand, in parallel arrangement, row of element is a parallel group and a column, which is called sequential.
In following example, five buttons are arranged in such a way that three each appear in row and column. To start with, Add a Jpanel object in a JFrame window and set its layout as Grouplayout.
frame =  JFrame()
panel =  JPanel()
frame.setDefaultCloseOperation(JFrame.EXIT_ON_CLOSE)
layout =  GroupLayout(panel)
panel.setLayout(layout)
Then construct the JButton objects −
buttonD = JButton("D")
buttonR = JButton("R")
buttonY = JButton("Y")
buttonO = JButton("O")
buttonT = JButton("T")
Next, we create a SequentialGroup named LeftToRight to which buttonD and buttonY are added. In between them, a ParallelGroup ColumnMiddle (with other three buttons added vertically) is placed.
leftToRight = layout.createSequentialGroup()
leftToRight.addComponent(buttonD)
columnMiddle = layout.createParallelGroup()
columnMiddle.addComponent(buttonR)
columnMiddle.addComponent(buttonO)
columnMiddle.addComponent(buttonT)
leftToRight.addGroup(columnMiddle)
leftToRight.addComponent(buttonY)
Now comes the definition of vertical SequentialGroup called TopToBottom. Add a ParallelGroup row of three buttons and then rest two buttons vertically.
topToBottom = layout.createSequentialGroup()
rowTop = layout.createParallelGroup()
rowTop.addComponent(buttonD)
rowTop.addComponent(buttonR)
rowTop.addComponent(buttonY)
topToBottom.addGroup(rowTop)
topToBottom.addComponent(buttonO)
topToBottom.addComponent(buttonT)
Finally, set LeftToRight group horizontally and TopToBottom group vertically to the layout object. The complete code is given below −
from javax.swing import JButton, JFrame,JPanel,GroupLayout

frame = JFrame()
panel = JPanel()
frame.setDefaultCloseOperation(JFrame.EXIT_ON_CLOSE)
layout = GroupLayout(panel)
panel.setLayout(layout)

buttonD = JButton("D")
buttonR = JButton("R")
buttonY = JButton("Y")
buttonO = JButton("O")
buttonT = JButton("T")

leftToRight = layout.createSequentialGroup()
leftToRight.addComponent(buttonD)
columnMiddle = layout.createParallelGroup()
columnMiddle.addComponent(buttonR)
columnMiddle.addComponent(buttonO)
columnMiddle.addComponent(buttonT)
leftToRight.addGroup(columnMiddle)
leftToRight.addComponent(buttonY)

topToBottom = layout.createSequentialGroup()
rowTop = layout.createParallelGroup()
rowTop.addComponent(buttonD)
rowTop.addComponent(buttonR)
rowTop.addComponent(buttonY)
topToBottom.addGroup(rowTop)
topToBottom.addComponent(buttonO)
topToBottom.addComponent(buttonT)

layout.setHorizontalGroup(leftToRight)
layout.setVerticalGroup(topToBottom)

frame.add(panel)
frame.pack()
frame.setVisible(True)
The output of the above code is as follows −