- JSF Tutorial
- JSF - Home
- JSF - Overview
- JSF - Environment Setup
- JSF - Architecture
- JSF - Life Cycle
- JSF - First Application
- JSF - Managed Beans
- JSF - Page Navigation
- JSF - Basic Tags
- JSF - Facelet Tags
- JSF - Convertor Tags
- JSF - Validator Tags
- JSF - DataTable
- JSF - Composite Components
- JSF - Ajax
- JSF - Event Handling
- JSF - JDBC Integration
- JSF - Spring Integration
- JSF - Expression Language
- JSF - Internationalization
- JSF Useful Resources
- JSF - Quick Guide
- JSF - Useful Resources
- JSF - Discussion
JSF - Edit Data of a DataTable
In this section, we'll showcase the adding editing capability to a row in a dataTable.
Example Application
Let us create a test JSF application to test the above functionality.
| Step | Description |
|---|---|
| 1 | Create a project with a name helloworld under a package com.tutorialspoint.test as explained in the JSF - Display DataTable sub-chapter of JSF - Data Tables chapter. |
| 2 | Modify home.xhtml as explained below. Keep the rest of the files unchanged. |
| 3 | Compile and run the application to make sure the business logic is working as per the requirements. |
| 4 | Finally, build the application in the form of war file and deploy it in Apache Tomcat Webserver. |
| 5 | Launch your web application using appropriate URL as explained below in the last step. |
home.xhtml
<?xml version = "1.0" encoding = "UTF-8"?>
<!DOCTYPE html PUBLIC "-//W3C//DTD XHTML 1.0 Transitional//EN"
"http://www.w3.org/TR/xhtml1/DTD/xhtml1-transitional.dtd">

<html xmlns = "http://www.w3.org/1999/xhtml"
xmlns:h = "http://java.sun.com/jsf/html"
xmlns:f = "http://java.sun.com/jsf/core">

   <h:head>
      <title>JSF tutorial</title>
      <h:outputStylesheet library = "css" name = "styles.css"  />
   </h:head>

   <h:body>
      <h2>DataTable Example</h2>

      <h:form>
         <h:dataTable value = "#{userData.employees}" var = "employee"
            styleClass = "employeeTable"
            headerClass = "employeeTableHeader"
            rowClasses = "employeeTableOddRow,employeeTableEvenRow">

            <h:column>
               <f:facet name = "header">Name</f:facet>
               <h:inputText value = "#{employee.name}"
                  size = "10" rendered = "#{employee.canEdit}" />
               <h:outputText value = "#{employee.name}"
                  rendered = "#{not employee.canEdit}" />
            </h:column>

            <h:column>
               <f:facet name = "header">Department</f:facet>
               <h:inputText value = "#{employee.department}"
                  size = "20" rendered = "#{employee.canEdit}" />
               <h:outputText value = "#{employee.department}"
                  rendered = "#{not employee.canEdit}" />
            </h:column>

            <h:column>
               <f:facet name = "header">Age</f:facet>
               <h:inputText value = "#{employee.age}" size = "5"
                  rendered = "#{employee.canEdit}" />
               <h:outputText value = "#{employee.age}"
                  rendered = "#{not employee.canEdit}" />
            </h:column>

            <h:column>
               <f:facet name = "header">Salary</f:facet>
               <h:inputText value = "#{employee.salary}"
                  size = "5" rendered = "#{employee.canEdit}" />
               <h:outputText value = "#{employee.salary}"
                  rendered = "#{not employee.canEdit}" />
            </h:column>

            <h:column>
               <f:facet name = "header">Edit</f:facet>
               <h:commandButton value = "Edit"
                  action = "#{userData.editEmployee}"
                  rendered = "#{not employee.canEdit}">
                  <f:setPropertyActionListener
                  target = "#{userData.employee}" value = "#{employee}" />
               </h:commandButton>
            </h:column>
         </h:dataTable>
         <br/>

         <h:commandButton value = "Save Employees"
            action = "#{userData.saveEmployees}" />
      </h:form>

   </h:body>
</html>
Once you are ready with all the changes done, let us compile and run the application as we did in JSF - First Application chapter. If everything is fine with your application, this will produce the following result.

Click the edit button of any row. Following will be the output.
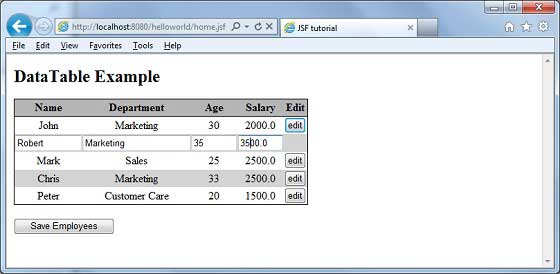
Click Save Employees button to save the edit. Following will be the output.

jsf_data_tables.htm
Advertisements