- JPA Tutorial
- JPA - Home
- JPA - Introduction
- JPA - Architecture
- JPA - ORM Components
- JPA - Installation
- JPA - Entity Managers
- JPA - JPQL
- JPA - Advanced Mappings
- JPA - Entity Relationships
- JPA - Criteria API
- JPA Useful Resources
- JPA - Quick Guide
- JPA - Useful Resources
JPA - Entity Managers
This chapter takes you through simple example with JPA. Let us consider employee management as example. It means the employee management is creating, updating, finding, and deleting an employee. As mentioned above we are using MySQL database for database operations.
The main modules for this example are as follows:
Model or POJO
Employee.java
Persistence
Persistence.xml
Service
CreatingEmployee.java
UpdatingEmployee.java
FindingEmployee.java
DeletingEmployee.java
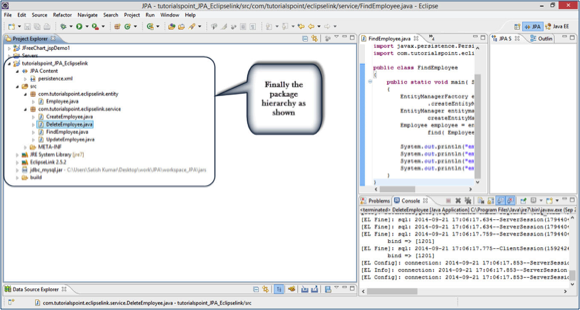
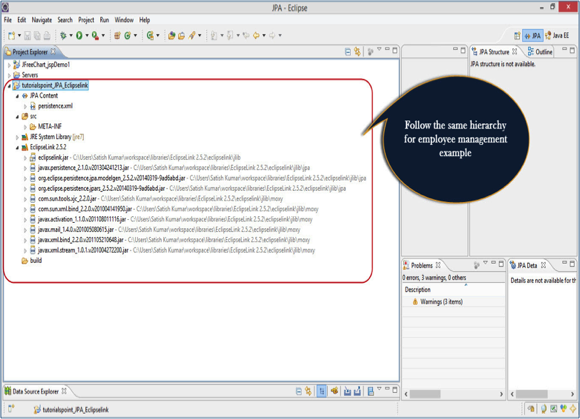
Let us take the package hierarchy which we have used in the JPA installation with Eclipselink. Follow the hierarchy for this example as below:
Creating Entities
Entities are nothing but beans or Models, in this example we will use Employee as entity. eid, ename, salary, and deg are the attributes of this entity. It contains default constructor, setter and getter methods of those attributes.
In the above shown hierarchy, create a package named ‘com.tutorialspoint.eclipselink.entity’, under ‘src’ (Source) package. Create a class named Employee.java under given package as follows:
package com.tutorialspoint.eclipselink.entity;

import javax.persistence.Entity;
import javax.persistence.GeneratedValue;
import javax.persistence.GenerationType;
import javax.persistence.Id;
import javax.persistence.Table;

@Entity
@Table
public class Employee {

   @Id
   @GeneratedValue(strategy = GenerationType.AUTO)

   private int eid;
   private String ename;
   private double salary;
   private String deg;

   public Employee(int eid, String ename, double salary, String deg) {
      super( );
      this.eid = eid;
      this.ename = ename;
      this.salary = salary;
      this.deg = deg;
   }

   public Employee( ) {
      super();
   }

   public int getEid( ) {
      return eid;
   }

   public void setEid(int eid) {
      this.eid = eid;
   }

   public String getEname( ) {
      return ename;
   }

   public void setEname(String ename) {
      this.ename = ename;
   }

   public double getSalary( ) {
      return salary;
   }

   public void setSalary(double salary) {
      this.salary = salary;
   }

   public String getDeg( ) {
      return deg;
   }

   public void setDeg(String deg) {
      this.deg = deg;
   }

   @Override
   public String toString() {
      return "Employee [eid=" + eid + ", ename=" + ename + ", salary=" + salary + ", deg=" + deg + "]";
   }
}
In the above code, we have used @Entity annotation to make this POJO class as entity.
Before going to next module we need to create database for relational entity, which will register the database in persistence.xml file. Open MySQL workbench and type query as follows:
create database jpadb
use jpadb
Persistence.xml
This module plays a crucial role in the concept of JPA. In this xml file we will register the database and specify the entity class.
In the above shown package hierarchy, persistence.xml under JPA Content package is as follows:
<?xml version="1.0" encoding="UTF-8"?>

<persistence version="2.0" xmlns="http://java.sun.com/xml/ns/persistence"
   xmlns:xsi="http://www.w3.org/2001/XMLSchema-instance"
   xsi:schemaLocation="http://java.sun.com/xml/ns/persistence
   http://java.sun.com/xml/ns/persistence/persistence_2_0.xsd">

   <persistence-unit name="Eclipselink_JPA" transaction-type="RESOURCE_LOCAL">

      <class>com.tutorialspoint.eclipselink.entity.Employee</class>

      <properties>
         <property name="javax.persistence.jdbc.url" value="jdbc:mysql://localhost:3306/jpadb"/>
         <property name="javax.persistence.jdbc.user" value="root"/>
         <property name="javax.persistence.jdbc.password" value="root"/>
         <property name="javax.persistence.jdbc.driver" value="com.mysql.jdbc.Driver"/>
         <property name="eclipselink.logging.level" value="FINE"/>
         <property name="eclipselink.ddl-generation" value="create-tables"/>
      </properties>

   </persistence-unit>
</persistence>
In the above xml, <persistence-unit> tag is defined with specific name for JPA persistence. The <class> tag defines entity class with package name. The <properties> tag defines all the properties, and <property> tag defines each property such as database registration, URL specification, username, and password. These are the Eclipselink properties. This file will configure the database.
Persistence Operations
Persistence operations are used against database and they are load and store operations. In a business component all the persistence operations fall under service classes.
In the above shown package hierarchy, create a package named ‘com.tutorialspoint.eclipselink.service’, under ‘src’ (source) package. All the service classes named as CreateEmloyee.java, UpdateEmployee.java, FindEmployee.java, and DeleteEmployee.java. comes under the given package as follows:
Create Employee
Creating an Employee class named as CreateEmployee.java as follows:
package com.tutorialspoint.eclipselink.service;

import javax.persistence.EntityManager;
import javax.persistence.EntityManagerFactory;
import javax.persistence.Persistence;
import com.tutorialspoint.eclipselink.entity.Employee;

public class CreateEmployee {

   public static void main( String[ ] args ) {

      EntityManagerFactory emfactory = Persistence.createEntityManagerFactory( "Eclipselink_JPA" );

      EntityManager entitymanager = emfactory.createEntityManager( );
      entitymanager.getTransaction( ).begin( );

      Employee employee = new Employee( );
      employee.setEid( 1201 );
      employee.setEname( "Gopal" );
      employee.setSalary( 40000 );
      employee.setDeg( "Technical Manager" );

      entitymanager.persist( employee );
      entitymanager.getTransaction( ).commit( );

      entitymanager.close( );
      emfactory.close( );
   }
}
In the above code the createEntityManagerFactory () creates a persistence unit by providing the same unique name which we provide for persistence-unit in persistent.xml file. The entitymanagerfactory object will create the entitymanger instance by using createEntityManager () method. The entitymanager object creates entitytransaction instance for transaction management. By using entitymanager object, we can persist entities into database.
After compilation and execution of the above program you will get notifications from eclipselink library on the console panel of eclipse IDE.
For result, open the MySQL workbench and type the following queries.
use jpadb
select * from employee
The effected database table named employee will be shown in a tabular format as follows:
| Eid | Ename | Salary | Deg |
|---|---|---|---|
| 1201 | Gopal | 40000 | Technical Manager |
Update Employee
To Update an employee, we need to get record form database, make changes, and finally committ it. The class named UpdateEmployee.java is shown as follows:
package com.tutorialspoint.eclipselink.service;

import javax.persistence.EntityManager;
import javax.persistence.EntityManagerFactory;
import javax.persistence.Persistence;
import com.tutorialspoint.eclipselink.entity.Employee;

public class UpdateEmployee {
   public static void main( String[ ] args ) {
      EntityManagerFactory emfactory = Persistence.createEntityManagerFactory( "Eclipselink_JPA" );

      EntityManager entitymanager = emfactory.createEntityManager( );
      entitymanager.getTransaction( ).begin( );
      Employee employee = entitymanager.find( Employee.class, 1201 );

      //before update
      System.out.println( employee );
      employee.setSalary( 46000 );
      entitymanager.getTransaction( ).commit( );

      //after update
      System.out.println( employee );
      entitymanager.close();
      emfactory.close();
   }
}
After compilation and execution of the above program you will get notifications from Eclipselink library on the console panel of eclipse IDE.
For result, open the MySQL workbench and type the following queries.
use jpadb
select * from employee
The effected database table named employee will be shown in a tabular format as follows:
| Eid | Ename | Salary | Deg |
|---|---|---|---|
| 1201 | Gopal | 46000 | Technical Manager |
The salary of employee, 1201 is updated to 46000.
Find Employee
To Find an employee we will get record from database and display it. In this operation, EntityTransaction is not involved any transaction is not applied while retrieving a record.
The class named FindEmployee.java as follows.
package com.tutorialspoint.eclipselink.service;

import javax.persistence.EntityManager;
import javax.persistence.EntityManagerFactory;
import javax.persistence.Persistence;
import com.tutorialspoint.eclipselink.entity.Employee;

public class FindEmployee {
   public static void main( String[ ] args ) {

      EntityManagerFactory emfactory = Persistence.createEntityManagerFactory( "Eclipselink_JPA" );
      EntityManager entitymanager = emfactory.createEntityManager();
      Employee employee = entitymanager.find( Employee.class, 1201 );

      System.out.println("employee ID = " + employee.getEid( ));
      System.out.println("employee NAME = " + employee.getEname( ));
      System.out.println("employee SALARY = " + employee.getSalary( ));
      System.out.println("employee DESIGNATION = " + employee.getDeg( ));
   }
}
After compilation and execution of the above program you will get output from Eclipselink library on the console panel of eclipse IDE as follows:
employee ID = 1201
employee NAME = Gopal
employee SALARY = 46000.0
employee DESIGNATION = Technical Manager
Deleting Employee
To Delete an Employee, first we will find the record and then delete it. Here EntityTransaction plays an important role.
The class named DeleteEmployee.java as follows:
package com.tutorialspoint.eclipselink.service;

import javax.persistence.EntityManager;
import javax.persistence.EntityManagerFactory;
import javax.persistence.Persistence;
import com.tutorialspoint.eclipselink.entity.Employee;

public class DeleteEmployee {
   public static void main( String[ ] args ) {

      EntityManagerFactory emfactory = Persistence.createEntityManagerFactory( "Eclipselink_JPA" );
      EntityManager entitymanager = emfactory.createEntityManager( );
      entitymanager.getTransaction( ).begin( );

      Employee employee = entitymanager.find( Employee.class, 1201 );
      entitymanager.remove( employee );
      entitymanager.getTransaction( ).commit( );
      entitymanager.close( );
      emfactory.close( );
   }
}
After compilation and execution of the above program you will get notifications from Eclipselink library on the console panel of eclipse IDE.
For result, open the MySQL workbench and type the following queries.
use jpadb
select * from employee
The effected database named employee will have null records.
After completion of all the modules in this example, the package and file hierarchy is shown as follows: