- Joomla Basics Tutorial
- Joomla - Home
- Joomla - Overview
- Joomla - Installation
- Joomla - Architecture
- Joomla - Control Panel
- Joomla - Toolbar
- Joomla - Menus Menu
- Joomla - Content Menu
- Joomla - Components Menu
- Joomla - Extensions Menu
- Joomla - Help Menu
- Joomla Menus
- Joomla - Create Menus
- Joomla - Adding Menu Items
- Joomla - Modify Menu Items
- Joomla - Creating Submenus
- Joomla Modules
- Joomla - Create Modules
- Joomla - Breadcrumb Module
- Joomla - Feed Display Module
- Joomla - Footer Module
- Joomla - Latest News Module
- Joomla - Search Module
- Joomla - Random Image Module
- Joomla - Who's Online Module
- Joomla - Syndicate Module
- Joomla - Donation Module
- Joomla Global Settings
- Joomla - System Settings
- Joomla - Media Settings
- Joomla - Language Manager
- Joomla - Private Messages
- Joomla - Mass Emailing
- Joomla - Cache Management
- Joomla - Users Setting
- Joomla - Debug
- Joomla Advanced
- Joomla - Template Manager
- Joomla - Customize Template
- Joomla - Adding Template
- Joomla - Creating Template
- Joomla - Customize Logo
- Joomla - Category Management
- Joomla - Adding Content
- Joomla - Formatting Content
- Joomla - Article Metadata
- Joomla - Adding Banners
- Joomla - Adding Contacts
- Joomla - Adding News Feed
- Joomla - Adding Forum
- Joomla - Adding Web Links
- Joomla - Plugin Manager
- Joomla - Extension Manager
- Joomla - Website Backup
- Joomla - Website SEO
- Joomla Useful Resources
- Joomla - Questions and Answers
- Joomla - Quick Guide
- Joomla - Useful Resources
- Joomla - Discussion
Joomla - Adding Content
In this chapter, we will study how to add content on the Joomla website.
Adding Content
Following are the simple steps to add content in Joomla.
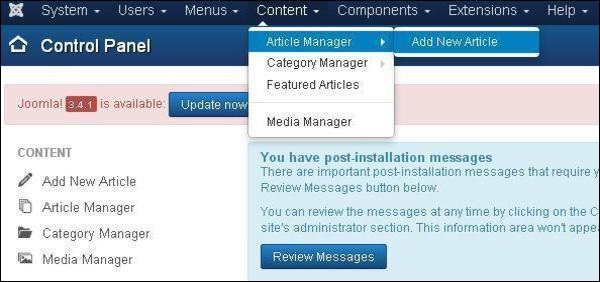
Step 1 − Click on Content → Article Manager → Add New Article as shown below.
Step 2 − After clicking on Add New Article, you will get the editor page of the Article Manager as shown below.
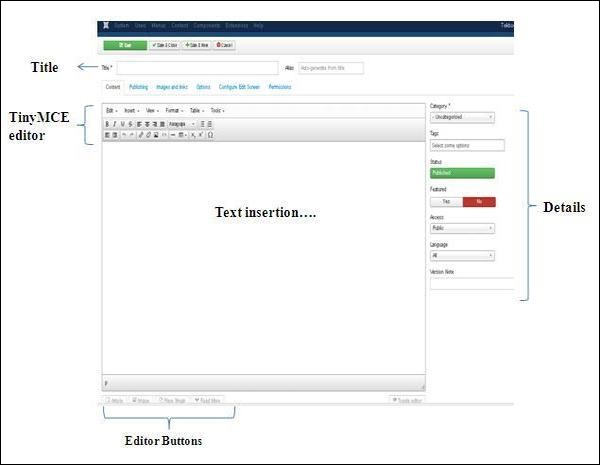
Following are the details of the fields on editor page of the Article Manager.
Title
.jpg)
Title − It is used to write the title of the article. This title gets displayed on the page.
Alias − It is auto generated from the given title name.
TinyMCE editor
It is a WYSIWYG Editor, which is similar to a word processor interface where we can edit the contents of the article.
.jpg)
First Row − They appear on the top of the Editor page and contain a group of related commands.
Edit − Undo, Redo and Cut, Copy, Paste, Select all.
Insert − Insert image, Insert link, Horizontal line, Special Character.
View − Visual Aids.
Format − Bold, italic, underline and various formats are available in this group.
Table − It is used to display the table format in the article by using row and columns.
Tools − It displays the source code of your article in html format and the code will be displayed in a new popup window.
Second Row − In this row, we can see that there are 4 buttons present −
The first button is used to make font bold, italic, underlined and strikethrough.
The second button is used to do the alignment of the content i.e. Left, center, right and full.
The third button is used to select pre-defined format for the text i.e. Paragraph, heading, text or pre.
The fourth button is used to display the list format either by using bullet or numbers.
Third Row −
The first button is used for indentation of paragraphs or text, either indent to the left side or right side.
The second button is used to undo or redo the content.
The third button is used to insert or remove the link, insert images and display the source code of your article in html format.
The fourth button is used to add a horizontal line and add tables by using a dropdown option.
The fifth button is used to superscript and subscript the text.
The sixth button is used to insert the special character in the text.
Details
Category − It is used to select the category for your article.
Tags − It is used to display the tags on the front-end page.
Status − You can select any of the following status for your article −
Published − Items get published on the website.
Unpublished − Items do not get published on the website.
Archived − Items will not get displayed in the menu list as well as on blogs.
Trashed − Items will be deleted from the site.
Featured − It is used, whether to display the article on the home page or not by using the buttons YES/NO.
Access − You can select an access level for your item from the list box.
Language − It selects the language for its item.
Version Note − It is used to note the version of the item. It is optional.
Text Insertion
It is used for writing the content of an article.
Editor Buttons
Five buttons present at the bottom of the text editor as shown below are the editor buttons.
.jpg)
Article Button − Click on Article button a window pops-up as shown below. Here, we can select the required article to view.
.jpg)
Image − Click on the Image button, a window pops-up as shown below. Here, you can add the details of the images. After filling all the fields, click on Insert Button.
.jpg)
Directory − Search the particular directory present in image folder.
Image URL − Insert image URL.
Image Description − Write brief description about particular image.
Image Title − Write the name of the image.
Image Float − Set the image location.
Caption − Write a caption for the image.
Caption Class − It calls Joomla libraries to load the image.
Page Break − Click on Page Break button, a window pop-up will get displayed as shown below.
.jpg)
Page Title − Enter the title of the page.
Table of Contents Alias − Enter the table content alias.
Read More − Click on the Read More button, The red dotted line gets displayed in the editor. The further information part of the article gets displayed after the read dotted lines or sometimes it displays the entire article.
Toggle editor − TinyMCE editor will get displayed or its get invisible.
Toolbar
Following are the toolbar options −
Save − Saves the contents and stays on the same screen.
Save & Close − Saves the content and closes the screen.
Save & New − Saves the content and opens a new content page.
Cancel − Cancels the content changes made into it and returns to the previous screen without saving.