- Java & MySQL Tutorial
- Java & MySQL - Home
- Java & MySQL - Overview
- Java & MySQL - Environment Setup
- Java & MySQL - Sample Code
- Java & MySQL - Connections
- Java & MySQL - Exceptions
- Java & MySQL Statements
- Java & MySQL - Statement
- Java & MySQL - PreparedStatement
- Java & MySQL - CallableStatement
- Java & MySQL Result
- Java & MySQL - Result Set
- Java & MySQL - Navigate Result Set
- Java & MySQL - View Result Set
- Java & MySQL - Update Result Set
- Java & MySQL Transactions
- Java & MySQL - Transactions
- Java & MySQL - Commit & Rollback
- Java & MySQL - SavePoint Transactions
- Java & MySQL Batch Processing
- Java & MySQL - Batch Processing
- Batch Processing - Statement
- Batch Processing - PreparedStatement
- Java & MySQL Streaming
- Java & MySQL - Streaming Data
- Java & MySQL Examples
- Java & MySQL - Create Database
- Java & MySQL - Select Database
- Java & MySQL - Drop Database
- Java & MySQL - Create Tables
- Java & MySQL - Drop Tables
- Java & MySQL - Insert Records
- Java & MySQL - Select Records
- Java & MySQL - Update Records
- Java & MySQL - Delete Records
- Java & MySQL - Where Clause
- Java & MySQL - Like Clause
- Java & MySQL - Sorting Data
- Java & MySQL Useful Resources
- Java & MySQL - Quick Guide
- Java & MySQL - Useful Resources
- Java & MySQL - Discussion
Java & MySQL - Quick Guide
Java & MySQL - Overview
JDBC stands for Java Database Connectivity, which is a standard Java API for database-independent connectivity between the Java programming language and a wide range of databases.
The JDBC library includes APIs for each of the tasks mentioned below that are commonly associated with database usage.
Making a connection to a database.
Creating SQL or MySQL statements.
Executing SQL or MySQL queries in the database.
Viewing & Modifying the resulting records.
Fundamentally, JDBC is a specification that provides a complete set of interfaces that allows for portable access to an underlying database. Java can be used to write different types of executables, such as −
Java Applications
Java Applets
Java Servlets
Java ServerPages (JSPs)
Enterprise JavaBeans (EJBs).
All of these different executables are able to use a JDBC driver to access a database, and take advantage of the stored data.
JDBC provides the same capabilities as ODBC, allowing Java programs to contain database-independent code.
Pre-Requisite
Before moving further, you need to have a good understanding of the following two subjects −
JDBC Architecture
The JDBC API supports both two-tier and three-tier processing models for database access but in general, JDBC Architecture consists of two layers −
JDBC API − This provides the application-to-JDBC Manager connection.
JDBC Driver API − This supports the JDBC Manager-to-Driver Connection.
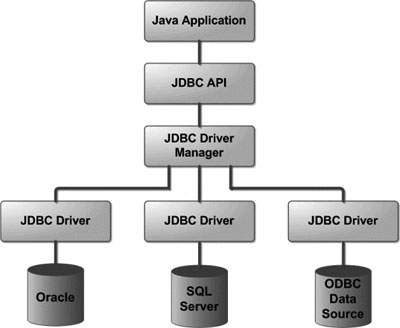
The JDBC API uses a driver manager and database-specific drivers to provide transparent connectivity to heterogeneous databases.
The JDBC driver manager ensures that the correct driver is used to access each data source. The driver manager is capable of supporting multiple concurrent drivers connected to multiple heterogeneous databases.
Following is the architectural diagram, which shows the location of the driver manager with respect to the JDBC drivers and the Java application −
Common JDBC Components
The JDBC API provides the following interfaces and classes −
DriverManager − This class manages a list of database drivers. Matches connection requests from the java application with the proper database driver using communication sub protocol. The first driver that recognizes a certain subprotocol under JDBC will be used to establish a database Connection.
Driver − This interface handles the communications with the database server. You will interact directly with Driver objects very rarely. Instead, you use DriverManager objects, which manages objects of this type. It also abstracts the details associated with working with Driver objects.
Connection − This interface with all methods for contacting a database. The connection object represents communication context, i.e., all communication with database is through connection object only.
Statement − You use objects created from this interface to submit the SQL statements to the database. Some derived interfaces accept parameters in addition to executing stored procedures.
ResultSet − These objects hold data retrieved from a database after you execute an SQL query using Statement objects. It acts as an iterator to allow you to move through its data.
SQLException − This class handles any errors that occur in a database application.
The JDBC 4.0 Packages
The java.sql and javax.sql are the primary packages for JDBC 4.0. This is the latest JDBC version at the time of writing this tutorial. It offers the main classes for interacting with your data sources.
The new features in these packages include changes in the following areas −
Automatic database driver loading.
Exception handling improvements.
Enhanced BLOB/CLOB functionality.
Connection and statement interface enhancements.
National character set support.
SQL ROWID access.
SQL 2003 XML data type support.
Annotations.
Java & MySQL - Environment Setup
To start developing with JDBC, you should setup your JDBC environment by following the steps shown below. We assume that you are working on a Windows platform.
Install Java
Java SE is available for download for free. To download click here, please download a version compatible with your operating system.
Follow the instructions to download Java, and run the .exe to install Java on your machine. Once you have installed Java on your machine, you would need to set environment variables to point to correct installation directories.
Setting Up the Path for Windows 2000/XP
Assuming you have installed Java in c:\Program Files\java\jdk directory −
Right-click on 'My Computer' and select 'Properties'.
Click on the 'Environment variables' button under the 'Advanced' tab.
Now, edit the 'Path' variable and add the path to the Java executable directory at the end of it. For example, if the path is currently set to
C:\Windows\System32, then edit it the following way
C:\Windows\System32;c:\Program Files\java\jdk\bin
Setting Up the Path for Windows 95/98/ME
Assuming you have installed Java in c:\Program Files\java\jdk directory −
Edit the 'C:\autoexec.bat' file and add the following line at the end −
SET PATH = %PATH%;C:\Program Files\java\jdk\bin
Setting Up the Path for Linux, UNIX, Solaris, FreeBSD
Environment variable PATH should be set to point to where the Java binaries have been installed. Refer to your shell documentation if you have trouble doing this.
For example, if you use bash as your shell, then you would add the following line at the end of your .bashrc −
export PATH = /path/to/java:$PATH'
You automatically get both JDBC packages java.sql and javax.sql, when you install J2SE Development Kit.
Install Database
The most important thing you will need, of course is an actual running database with a table that you can query and modify.
Install a database that is most suitable for you. You can have plenty of choices and most common are −
MySQL DB − MySQL is an open source database. You can download it from MySQL Official Site. We recommend downloading the full Windows installation.
In addition, download and install MySQL Administrator as well as MySQL Query Browser. These are GUI based tools that will make your development much easier.
Finally, download and unzip MySQL Connector/J (the MySQL JDBC driver) in a convenient directory. For the purpose of this tutorial we will assume that you have installed the driver at C:\Program Files\MySQL\mysql-connector-java-5.1.8.
Accordingly, set CLASSPATH variable to C:\Program Files\MySQL\mysql-connector-java-5.1.8\mysql-connector-java-5.1.8-bin.jar. Your driver version may vary based on your installation.
Set Database Credential
When we install MySQL database, its administrator ID is set to root and it gives provision to set a password of your choice.
Using root ID and password you can either create another user ID and password, or you can use root ID and password for your JDBC application.
There are various database operations like database creation and deletion, which would need administrator ID and password.
For rest of the JDBC tutorial, we would use MySQL Database with guest as ID and guest123 as password.
If you do not have sufficient privilege to create new users, then you can ask your Database Administrator (DBA) to create a user ID and password for you.
Create Database
To create the TUTORIALSPOINT database, use the following steps −
Step 1
Open a Command Prompt and change to the installation directory as follows −
C:\>
C:\>cd Program Files\MySQL\bin
C:\Program Files\MySQL\bin>
Note − The path to mysqld.exe may vary depending on the install location of MySQL on your system. You can also check documentation on how to start and stop your database server.
Step 2
Start the database server by executing the following command, if it is already not running.
C:\Program Files\MySQL\bin>mysqld
C:\Program Files\MySQL\bin>
Step 3
Create the TUTORIALSPOINT database by executing the following command −
C:\Program Files\MySQL\bin> mysqladmin create TUTORIALSPOINT -u guest -p
Enter password: ********
C:\Program Files\MySQL\bin>
Create Table
To create the Employees table in TUTORIALSPOINT database, use the following steps −
Step 1
Open a Command Prompt and change to the installation directory as follows −
C:\>
C:\>cd Program Files\MySQL\bin
C:\Program Files\MySQL\bin>
Step 2
Login to the database as follows −
C:\Program Files\MySQL\bin>mysql -u guest -p
Enter password: ********
mysql>
Step 3
Create the table Employees as follows −
mysql> use TUTORIALSPOINT;
mysql> create table Employees
    -> (
    -> id int not null,
    -> age int not null,
    -> first varchar (255),
    -> last varchar (255)
    -> );
Query OK, 0 rows affected (0.08 sec)
mysql>
Create Data Records
Finally you create few records in Employee table as follows −
mysql> INSERT INTO Employees VALUES (100, 18, 'Zara', 'Ali');
Query OK, 1 row affected (0.05 sec)

mysql> INSERT INTO Employees VALUES (101, 25, 'Mahnaz', 'Fatma');
Query OK, 1 row affected (0.00 sec)

mysql> INSERT INTO Employees VALUES (102, 30, 'Zaid', 'Khan');
Query OK, 1 row affected (0.00 sec)

mysql> INSERT INTO Employees VALUES (103, 28, 'Sumit', 'Mittal');
Query OK, 1 row affected (0.00 sec)

mysql>
For a complete understanding on MySQL database, study the MySQL Tutorial.
Now you are ready to start experimenting with JDBC. Next chapter gives you a sample example on JDBC Programming.
Java & MySQL - Sample Code
This chapter provides an example of how to create a simple java based application to access MySQL database. This will show you how to open a database connection, execute a SQL query, and display the results.
All the steps mentioned in this template example, would be explained in subsequent chapters of this tutorial.
Creating JDBC Application
There are following six steps involved in building a JDBC application −
Import the packages − Requires that you include the packages containing the JDBC classes needed for database programming. Most often, using import java.sql.* will suffice.
Open a connection − Requires using the DriverManager.getConnection() method to create a Connection object, which represents a physical connection with the database.
Execute a query − Requires using an object of type Statement for building and submitting an SQL statement to the database.
Extract data from result set − Requires that you use the appropriate ResultSet.getXXX() method to retrieve the data from the result set.
Clean up the environment − Requires explicitly closing all database resources versus relying on the JVM's garbage collection.
Sample Code
This sample example can serve as a template when you need to create your own JDBC application in the future.
This sample code has been written based on the environment and database setup done in the previous chapter.
Copy and paste the following example in TestApplication.java, compile and run as follows −
import java.sql.*;

public class TestApplication {
   static final String DB_URL = "jdbc:mysql://localhost/TUTORIALSPOINT";
   static final String USER = "guest";
   static final String PASS = "guest123";
   static final String QUERY = "SELECT id, first, last, age FROM Employees";

   public static void main(String[] args) {
      // Open a connection
      try(Connection conn = DriverManager.getConnection(DB_URL, USER, PASS);
         Statement stmt = conn.createStatement();
         ResultSet rs = stmt.executeQuery(QUERY);) {
         // Extract data from result set
         while (rs.next()) {
            // Retrieve by column name
            System.out.print("ID: " + rs.getInt("id"));
            System.out.print(", Age: " + rs.getInt("age"));
            System.out.print(", First: " + rs.getString("first"));
            System.out.println(", Last: " + rs.getString("last"));
         }
      } catch (SQLException e) {
         e.printStackTrace();
      }
   }
}
Now let us compile the above example as follows −
C:\>javac TestApplication.java
C:\>
When you run TestApplication, it produces the following result −
C:\>java TestApplication
ID: 100, Age: 18, First: Zara, Last: Ali
ID: 101, Age: 25, First: Mahnaz, Last: Fatma
ID: 102, Age: 30, First: Zaid, Last: Khan
ID: 103, Age: 28, First: Sumit, Last: Mittal
C:\>
Java & MySQL - Connections
After you've installed the appropriate driver, it is time to establish a database connection using JDBC.
The programming involved to establish a JDBC connection is fairly simple. Here are these simple three steps −
Import JDBC Packages − Add import statements to your Java program to import required classes in your Java code.
Database URL Formulation − This is to create a properly formatted address that points to the database to which you wish to connect.
Create Connection Object − Finally, code a call to the DriverManager object's getConnection( ) method to establish actual database connection.
Import JDBC Packages
The Import statements tell the Java compiler where to find the classes you reference in your code and are placed at the very beginning of your source code.
To use the standard JDBC package, which allows you to select, insert, update, and delete data in SQL tables, add the following imports to your source code −
import java.sql.* ;  // for standard JDBC programs
import java.math.* ; // for BigDecimal and BigInteger support
Register JDBC Driver
You must have the required JDBC driver in the classpath. In current case, you set CLASSPATH variable to C:\Program Files\MySQL\mysql-connector-java-5.1.8\mysql-connector-java-5.1.8-bin.jar. Your driver version may vary based on your installation.
Database URL Formulation
After you've loaded the driver, you can establish a connection using the DriverManager.getConnection() method. For easy reference, let me list the three overloaded DriverManager.getConnection() methods −
getConnection(String url)
getConnection(String url, Properties prop)
getConnection(String url, String user, String password)
Here each form requires a database URL. A database URL is an address that points to your database.
Formulating a database URL is where most of the problems associated with establishing a connection occurs.
Following table lists down the MySQL JDBC driver name and database URL.
| RDBMS | JDBC driver name | URL format |
|---|---|---|
| MySQL | com.mysql.jdbc.Driver | jdbc:mysql://hostname/ databaseName |
All the highlighted part in URL format is static and you need to change only the remaining part as per your database setup.
Create Connection Object
We have listed down three forms of DriverManager.getConnection() method to create a connection object.
Using a Database URL with a username and password
The most commonly used form of getConnection() requires you to pass a database URL, a username, and a password −
As you are using MySQL driver, you'll specify a host:port:databaseName value for the database portion of the URL.
If you have a host at TCP/IP address 192.0.0.1 with a host name of localhost, and your MySQL listener is configured to listen on port 3306 as default, and your database name is TUTORIALSPOINT, then complete database URL would be −
jdbc:mysql://localhost/TUTORIALSPOINT
Now you have to call getConnection() method with appropriate username and password to get a Connection object as follows −
String URL = "jdbc:mysql://localhost/TUTORIALSPOINT";
String USER = "guest";
String PASS = "password"
Connection conn = DriverManager.getConnection(URL, USER, PASS);
Using a Database URL and a Properties Object
A third form of the DriverManager.getConnection( ) method requires a database URL and a Properties object −
DriverManager.getConnection(String url, Properties info);
A Properties object holds a set of keyword-value pairs. It is used to pass driver properties to the driver during a call to the getConnection() method.
To make the same connection made by the previous examples, use the following code −
import java.util.*;

String URL = "jdbc:mysql://localhost/TUTORIALSPOINT";
Properties info = new Properties( );
info.put( "user", "guest" );
info.put( "password", "guest123" );

Connection conn = DriverManager.getConnection(URL, info);
For a better understanding, we suggest you to study our Java & MySQL - Sample Code tutorial.
Now let us compile the above example as follows −
C:\>javac FirstExample.java
C:\>
When you run FirstExample, it produces the following result −
C:\>java FirstExample
ID: 100, Age: 18, First: Zara, Last: Ali
ID: 101, Age: 25, First: Mahnaz, Last: Fatma
ID: 102, Age: 30, First: Zaid, Last: Khan
ID: 103, Age: 28, First: Sumit, Last: Mittal
C:\>
Java & MySQL - Exceptions Handling
Exception handling allows you to handle exceptional conditions such as program-defined errors in a controlled fashion.
When an exception condition occurs, an exception is thrown. The term thrown means that current program execution stops, and the control is redirected to the nearest applicable catch clause. If no applicable catch clause exists, then the program's execution ends.
JDBC Exception handling is very similar to the Java Exception handling but for JDBC, the most common exception you'll deal with is java.sql.SQLException.
SQLException Methods
An SQLException can occur both in the driver and the database. When such an exception occurs, an object of type SQLException will be passed to the catch clause.
The passed SQLException object has the following methods available for retrieving additional information about the exception −
| Method | Description |
|---|---|
| getErrorCode( ) | Gets the error number associated with the exception. |
| getMessage( ) | Gets the JDBC driver's error message for an error, handled by the driver or gets the Oracle error number and message for a database error. |
| getSQLState( ) | Gets the XOPEN SQLstate string. For a JDBC driver error, no useful information is returned from this method. For a database error, the five-digit XOPEN SQLstate code is returned. This method can return null. |
| getNextException( ) | Gets the next Exception object in the exception chain. |
| printStackTrace( ) | Prints the current exception, or throwable, and it's backtrace to a standard error stream. |
| printStackTrace(PrintStream s) | Prints this throwable and its backtrace to the print stream you specify. |
| printStackTrace(PrintWriter w) | Prints this throwable and it's backtrace to the print writer you specify. |
By utilizing the information available from the Exception object, you can catch an exception and continue your program appropriately. Here is the general form of a try block −
try {
   // Your risky code goes between these curly braces!!!
}
catch(Exception ex) {
   // Your exception handling code goes between these
   // curly braces
}
finally {
   // Your must-always-be-executed code goes between these
   // curly braces. Like closing database connection.
}
Example
Study the following example code to understand the usage of try....catch...finally blocks.
This code has been written based on the environment and database setup done in the previous chapter.
import java.sql.CallableStatement;
import java.sql.Connection;
import java.sql.DriverManager;
import java.sql.SQLException;

public class TestApplication {
   static final String DB_URL = "jdbc:mysql://localhost/TUTORIALSPOINT";
   static final String USER = "guest";
   static final String PASS = "guest123";
   static final String QUERY = "{call getEmpName (?, ?)}";

   public static void main(String[] args) {
      // Open a connection
      try(Connection conn = DriverManager.getConnection(DB_URL, USER, PASS);
         CallableStatement stmt = conn.prepareCall(QUERY);
      ) {
         // Bind values into the parameters.
         stmt.setInt(1, 1);  // This would set ID
         // Because second parameter is OUT so register it
         stmt.registerOutParameter(2, java.sql.Types.VARCHAR);
         //Use execute method to run stored procedure.
         System.out.println("Executing stored procedure..." );
         stmt.execute();
         //Retrieve employee name with getXXX method
         String empName = stmt.getString(2);
         System.out.println("Emp Name with ID: 1 is " + empName);
      } catch (SQLException e) {
         e.printStackTrace();
      }
   }
}
Now let us compile the above example as follows −
C:\>javac TestApplication.java
C:\>
When you run TestApplication, it produces the following result if there is no problem, otherwise the corresponding error would be caught and error message would be displayed −
C:\>java TestApplication
Executing stored procedure...
Emp Name with ID: 1 is Zara
C:\>
Java & MySQL - Statement
JDBC Statement interface defines the methods and properties to enable send SQL commands to MySQL database and retrieve data from the database. Statement is used for general-purpose access to your database. It is useful when you are using static SQL statements at runtime. The Statement interface cannot accept parameters.
Before you can use a Statement object to execute a SQL statement, you need to create one using the Connection object's createStatement( ) method, as in the following example −
Statement stmt = null;
try {
   stmt = conn.createStatement( );
   . . .
}
catch (SQLException e) {
   . . .
}
finally {
   . . .
}
Once you've created a Statement object, you can then use it to execute an SQL statement with one of its three execute methods.
boolean execute (String SQL) − Returns a boolean value of true if a ResultSet object can be retrieved; otherwise, it returns false. Use this method to execute SQL DDL statements or when you need to use truly dynamic SQL.
int executeUpdate (String SQL) − Returns the number of rows affected by the execution of the SQL statement. Use this method to execute SQL statements for which you expect to get a number of rows affected - for example, an INSERT, UPDATE, or DELETE statement.
ResultSet executeQuery (String SQL) − Returns a ResultSet object. Use this method when you expect to get a result set, as you would with a SELECT statement.
Closing Statement Object
Just as you close a Connection object to save database resources, for the same reason you should also close the Statement object.
A simple call to the close() method will do the job. If you close the Connection object first, it will close the Statement object as well. However, you should always explicitly close the Statement object to ensure proper cleanup.
Statement stmt = null;
try {
   stmt = conn.createStatement( );
   . . .
}
catch (SQLException e) {
   . . .
}
finally {
   stmt.close();
}
We're using try with resources which handles the resource closure automatically. Following example demonstrates all of the above said concepts.
This code has been written based on the environment and database setup done in the previous chapter.
Copy and paste the following example in TestApplication.java, compile and run as follows −
import java.sql.Connection;
import java.sql.DriverManager;
import java.sql.ResultSet;
import java.sql.SQLException;
import java.sql.Statement;

public class TestApplication {
   static final String DB_URL = "jdbc:mysql://localhost/TUTORIALSPOINT";
   static final String USER = "guest";
   static final String PASS = "guest123";
   static final String QUERY = "SELECT id, first, last, age FROM Employees";
   static final String UPDATE_QUERY = "UPDATE Employees set age=30 WHERE id=103";

   public static void main(String[] args) {
      // Open a connection
      try(Connection conn = DriverManager.getConnection(DB_URL, USER, PASS);
         Statement stmt = conn.createStatement();
         ) {
         // Let us check if it returns a true Result Set or not.
         Boolean ret = stmt.execute(UPDATE_QUERY);
         System.out.println("Return value is : " + ret.toString() );

         // Let us update age of the record with ID = 103;
         int rows = stmt.executeUpdate(UPDATE_QUERY);
         System.out.println("Rows impacted : " + rows );

         // Let us select all the records and display them.
         ResultSet rs = stmt.executeQuery(QUERY);

         // Extract data from result set
         while (rs.next()) {
            // Retrieve by column name
            System.out.print("ID: " + rs.getInt("id"));
            System.out.print(", Age: " + rs.getInt("age"));
            System.out.print(", First: " + rs.getString("first"));
            System.out.println(", Last: " + rs.getString("last"));
         }
         rs.close();
      } catch (SQLException e) {
         e.printStackTrace();
      }
   }
}
Now let us compile the above example as follows −
C:\>javac TestApplication.java
C:\>
When you run TestApplication, it produces the following result −
C:\>java TestApplication
Return value is : false
Rows impacted : 1
ID: 100, Age: 18, First: Zara, Last: Ali
ID: 101, Age: 25, First: Mehnaz, Last: Fatma
ID: 102, Age: 30, First: Zaid, Last: Khan
ID: 103, Age: 30, First: Sumit, Last: Mittal
C:\>
Java & MySQL - PreparedStatement
The PreparedStatement interface extends the Statement interface, which gives you added functionality with a couple of advantages over a generic Statement object.
This statement gives you the flexibility of supplying arguments dynamically.
Creating PreparedStatement Object
PreparedStatement pstmt = null;
try {
   String SQL = "Update Employees SET age = ? WHERE id = ?";
   pstmt = conn.prepareStatement(SQL);
   . . .
}
catch (SQLException e) {
   . . .
}
finally {
   . . .
}
All parameters in JDBC are represented by the ? symbol, which is known as the parameter marker. You must supply values for every parameter before executing the SQL statement.
The setXXX() methods bind values to the parameters, where XXX represents the Java data type of the value you wish to bind to the input parameter. If you forget to supply the values, you will receive an SQLException.
Each parameter marker is referred by its ordinal position. The first marker represents position 1, the next position 2, and so forth. This method differs from that of Java array indices, which starts at 0.
All of the Statement object's methods for interacting with the database (a) execute(), (b) executeQuery(), and (c) executeUpdate() also work with the PreparedStatement object. However, the methods are modified to use SQL statements that can input the parameters.
Closing PreparedStatement Object
Just as you close a Statement object, for the same reason you should also close the PreparedStatement object.
A simple call to the close() method will do the job. If you close the Connection object first, it will close the PreparedStatement object as well. However, you should always explicitly close the PreparedStatement object to ensure proper cleanup.
PreparedStatement pstmt = null;
try {
   String SQL = "Update Employees SET age = ? WHERE id = ?";
   pstmt = conn.prepareStatement(SQL);
   . . .
}
catch (SQLException e) {
   . . .
}
finally {
   pstmt.close();
}
We're using try with resources which handles the resource closure automatically. Following example demonstrates all of the above said concepts.
This code has been written based on the environment and database setup done in the previous chapter.
Copy and paste the following example in TestApplication.java, compile and run as follows −
import java.sql.Connection;
import java.sql.DriverManager;
import java.sql.PreparedStatement;
import java.sql.ResultSet;
import java.sql.SQLException;

public class TestApplication {
   static final String DB_URL = "jdbc:mysql://localhost/TUTORIALSPOINT";
   static final String USER = "guest";
   static final String PASS = "guest123";
   static final String QUERY = "SELECT id, first, last, age FROM Employees";
   static final String UPDATE_QUERY = "UPDATE Employees set age=? WHERE id=?";

   public static void main(String[] args) {
      // Open a connection
      try(Connection conn = DriverManager.getConnection(DB_URL, USER, PASS);
         PreparedStatement stmt = conn.prepareStatement(UPDATE_QUERY);
      ) {
         // Bind values into the parameters.
         stmt.setInt(1, 35);  // This would set age
         stmt.setInt(2, 102); // This would set ID

         // Let us update age of the record with ID = 102;
         int rows = stmt.executeUpdate();
         System.out.println("Rows impacted : " + rows );

         // Let us select all the records and display them.
         ResultSet rs = stmt.executeQuery(QUERY);

         // Extract data from result set
         while (rs.next()) {
            // Retrieve by column name
            System.out.print("ID: " + rs.getInt("id"));
            System.out.print(", Age: " + rs.getInt("age"));
            System.out.print(", First: " + rs.getString("first"));
            System.out.println(", Last: " + rs.getString("last"));
         }
         rs.close();
      } catch (SQLException e) {
         e.printStackTrace();
      }
   }
}
Now let us compile the above example as follows −
C:\>javac TestApplication.java
C:\>
When you run TestApplication, it produces the following result −
C:\>java TestApplication
Return value is : false
Rows impacted : 1
ID: 100, Age: 18, First: Zara, Last: Ali
ID: 101, Age: 25, First: Mehnaz, Last: Fatma
ID: 102, Age: 35, First: Zaid, Last: Khan
ID: 103, Age: 30, First: Sumit, Last: Mittal
C:\>
Java & MySQL - CallableStatement
The CallableStatement interface is used to execute a call to a database stored procedure.
Suppose, you need to execute the following stored procedure in TUTORIALSPOINT database −
DELIMITER $$

DROP PROCEDURE IF EXISTS `TUTORIALSPOINT`.`getEmpName` $$
CREATE PROCEDURE `TUTORIALSPOINT`.`getEmpName`
   (IN EMP_ID INT, OUT EMP_FIRST VARCHAR(255))
BEGIN
   SELECT first INTO EMP_FIRST
   FROM Employees
   WHERE ID = EMP_ID;
END $$

DELIMITER ;
Three types of parameters exist − IN, OUT, and INOUT. The PreparedStatement object only uses the IN parameter. The CallableStatement object can use all the three.
Here are the definitions of each −
| Parameter | Description |
|---|---|
| IN | A parameter whose value is unknown when the SQL statement is created. You bind values to IN parameters with the setXXX() methods. |
| OUT | A parameter whose value is supplied by the SQL statement it returns. You retrieve values from theOUT parameters with the getXXX() methods. |
| INOUT | A parameter that provides both input and output values. You bind variables with the setXXX() methods and retrieve values with the getXXX() methods. |
The following code snippet shows how to employ the Connection.prepareCall() method to instantiate a CallableStatement object based on the preceding stored procedure −
CallableStatement cstmt = null;
try {
   String SQL = "{call getEmpName (?, ?)}";
   cstmt = conn.prepareCall (SQL);
   . . .
}
catch (SQLException e) {
   . . .
}
finally {
   . . .
}
The String variable SQL, represents the stored procedure, with parameter placeholders.
Using the CallableStatement objects is much like using the PreparedStatement objects. You must bind values to all the parameters before executing the statement, or you will receive an SQLException.
If you have IN parameters, just follow the same rules and techniques that apply to a PreparedStatement object; use the setXXX() method that corresponds to the Java data type you are binding.
When you use OUT and INOUT parameters you must employ an additional CallableStatement method, registerOutParameter(). The registerOutParameter() method binds the JDBC data type, to the data type that the stored procedure is expected to return.
Once you call your stored procedure, you retrieve the value from the OUT parameter with the appropriate getXXX() method. This method casts the retrieved value of SQL type to a Java data type.
Closing CallableStatement Object
Just as you close other Statement object, for the same reason you should also close the CallableStatement object.
A simple call to the close() method will do the job. If you close the Connection object first, it will close the CallableStatement object as well. However, you should always explicitly close the CallableStatement object to ensure proper cleanup.
CallableStatement cstmt = null;
try {
   String SQL = "{call getEmpName (?, ?)}";
   cstmt = conn.prepareCall (SQL);
   . . .
}
catch (SQLException e) {
   . . .
}
finally {
   cstmt.close();
}
We're using try with resources which handles the resource closure automatically. Following example demonstrates all of the above said concepts.
This code has been written based on the environment and database setup done in the previous chapter.
Copy and paste the following example in TestApplication.java, compile and run as follows −
import java.sql.CallableStatement;
import java.sql.Connection;
import java.sql.DriverManager;
import java.sql.SQLException;

public class TestApplication {
   static final String DB_URL = "jdbc:mysql://localhost/TUTORIALSPOINT";
   static final String USER = "guest";
   static final String PASS = "guest123";
   static final String QUERY = "{call getEmpName (?, ?)}";

   public static void main(String[] args) {
      // Open a connection
      try(Connection conn = DriverManager.getConnection(DB_URL, USER, PASS);
         CallableStatement stmt = conn.prepareCall(QUERY);
      ) {
         // Bind values into the parameters.
         stmt.setInt(1, 102);  // This would set ID
         // Because second parameter is OUT so register it
         stmt.registerOutParameter(2, java.sql.Types.VARCHAR);
         //Use execute method to run stored procedure.
         System.out.println("Executing stored procedure..." );
         stmt.execute();
         //Retrieve employee name with getXXX method
         String empName = stmt.getString(2);
         System.out.println("Emp Name with ID: 102 is " + empName);
      } catch (SQLException e) {
         e.printStackTrace();
      }
   }
}
Now let us compile the above example as follows −
C:\>javac TestApplication.java
C:\>
When you run TestApplication, it produces the following result −
C:\>java TestApplication
Executing stored procedure...
Emp Name with ID: 102 is Zaid
C:\>
JDBC SQL Escape Syntax
The escape syntax gives you the flexibility to use database specific features unavailable to you by using standard JDBC methods and properties.
The general SQL escape syntax format is as follows −
{keyword 'parameters'}
Here are the following escape sequences, which you would find very useful while performing the JDBC programming −
d, t, ts Keywords
They help identify date, time, and timestamp literals. As you know, no two DBMSs represent time and date the same way. This escape syntax tells the driver to render the date or time in the target database's format. For Example −
{d 'yyyy-mm-dd'}
Where yyyy = year, mm = month; dd = date. Using this syntax {d '2009-09-03'} is March 9, 2009.
Here is a simple example showing how to INSERT date in a table −
//Create a Statement object
stmt = conn.createStatement();
//Insert data ==> ID, First Name, Last Name, DOB
String sql="INSERT INTO STUDENTS VALUES" +
   "(100,'Zara','Ali', {d '2001-12-16'})";

stmt.executeUpdate(sql);
Similarly, you can use one of the following two syntaxes, either t or ts −
{t 'hh:mm:ss'}
Where hh = hour; mm = minute; ss = second. Using this syntax {t '13:30:29'} is 1:30:29 PM.
{ts 'yyyy-mm-dd hh:mm:ss'}
This is combined syntax of the above two syntax for 'd' and 't' to represent timestamp.
escape Keyword
This keyword identifies the escape character used in LIKE clauses. Useful when using the SQL wildcard %, which matches zero or more characters. For example −
String sql = "SELECT symbol FROM MathSymbols WHERE symbol LIKE '\%' {escape '\'}";
stmt.execute(sql);
If you use the backslash character (\) as the escape character, you also have to use two backslash characters in your Java String literal, because the backslash is also a Java escape character.
fn Keyword
This keyword represents scalar functions used in a DBMS. For example, you can use SQL function length to get the length of a string −
{fn length('Hello World')}
This returns 11, the length of the character string 'Hello World'.
call Keyword
This keyword is used to call the stored procedures. For example, for a stored procedure requiring an IN parameter, use the following syntax −
{call my_procedure(?)};
For a stored procedure requiring an IN parameter and returning an OUT parameter, use the following syntax −
{? = call my_procedure(?)};
oj Keyword
This keyword is used to signify outer joins. The syntax is as follows −
{oj outer-join}
Where outer-join = table {LEFT|RIGHT|FULL} OUTERJOIN {table | outer-join} on search-condition. For example −
String sql = "SELECT Employees FROM {oj ThisTable RIGHT OUTER JOIN ThatTable on id = '100'}";
stmt.execute(sql);
Java & MySQL - ResultSet
The SQL statements that read data from a database query, return the data in a result set. The SELECT statement is the standard way to select rows from a database and view them in a result set. The java.sql.ResultSet interface represents the result set of a database query.
A ResultSet object maintains a cursor that points to the current row in the result set. The term "result set" refers to the row and column data contained in a ResultSet object.
The methods of the ResultSet interface can be broken down into three categories −
Navigational methods − Used to move the cursor around.
Get methods − Used to view the data in the columns of the current row being pointed by the cursor.
Update methods − Used to update the data in the columns of the current row. The updates can then be updated in the underlying database as well.
The cursor is movable based on the properties of the ResultSet. These properties are designated when the corresponding Statement that generates the ResultSet is created.
JDBC provides the following connection methods to create statements with desired ResultSet −
createStatement(int RSType, int RSConcurrency);
prepareStatement(String SQL, int RSType, int RSConcurrency);
prepareCall(String sql, int RSType, int RSConcurrency);
The first argument indicates the type of a ResultSet object and the second argument is one of two ResultSet constants for specifying whether a result set is read-only or updatable.
Type of ResultSet
The possible RSType are given below. If you do not specify any ResultSet type, you will automatically get one that is TYPE_FORWARD_ONLY.
| Type | Description |
|---|---|
| ResultSet.TYPE_FORWARD_ONLY | The cursor can only move forward in the result set. |
| ResultSet.TYPE_SCROLL_INSENSITIVE | The cursor can scroll forward and backward, and the result set is not sensitive to changes made by others to the database that occur after the result set was created. |
| ResultSet.TYPE_SCROLL_SENSITIVE. | The cursor can scroll forward and backward, and the result set is sensitive to changes made by others to the database that occur after the result set was created. |
Concurrency of ResultSet
The possible RSConcurrency are given below. If you do not specify any Concurrency type, you will automatically get one that is CONCUR_READ_ONLY.
| Concurrency | Description |
|---|---|
| ResultSet.CONCUR_READ_ONLY | Creates a read-only result set. This is the default |
| ResultSet.CONCUR_UPDATABLE | Creates an updateable result set. |
All our examples written so far can be written as follows, which initializes a Statement object to create a forward-only, read only ResultSet object −
try(
   Statement stmt = conn.createStatement(
      ResultSet.TYPE_FORWARD_ONLY,
      ResultSet.CONCUR_READ_ONLY);)
}
catch(Exception ex) {
   ....
}
finally {
   ....
}
Java & MySQL - Navigating a ResultSet
There are several methods in the ResultSet interface that involve moving the cursor, including −
| S.N. | Methods & Description |
|---|---|
| 1 | public void beforeFirst() throws SQLException
Moves the cursor just before the first row. |
| 2 | public void afterLast() throws SQLException
Moves the cursor just after the last row. |
| 3 | public boolean first() throws SQLException
Moves the cursor to the first row. |
| 4 | public void last() throws SQLException
Moves the cursor to the last row. |
| 5 | public boolean absolute(int row) throws SQLException
Moves the cursor to the specified row. |
| 6 | public boolean relative(int row) throws SQLException
Moves the cursor the given number of rows forward or backward, from where it is currently pointing. |
| 7 | public boolean previous() throws SQLException
Moves the cursor to the previous row. This method returns false if the previous row is off the result set. |
| 8 | public boolean next() throws SQLException
Moves the cursor to the next row. This method returns false if there are no more rows in the result set. |
| 9 | public int getRow() throws SQLException
Returns the row number that the cursor is pointing to. |
| 10 | public void moveToInsertRow() throws SQLException
Moves the cursor to a special row in the result set that can be used to insert a new row into the database. The current cursor location is remembered. |
| 11 | public void moveToCurrentRow() throws SQLException
Moves the cursor back to the current row if the cursor is currently at the insert row; otherwise, this method does nothing |
Following is the example which makes use of few navigation methods described.
This sample code has been written based on the environment and database setup done in the previous chapters.
Copy and paste the following example in TestApplication.java, compile and run as follows −
import java.sql.Connection;
import java.sql.DriverManager;
import java.sql.ResultSet;
import java.sql.SQLException;
import java.sql.Statement;

public class TestApplication {
   static final String DB_URL = "jdbc:mysql://localhost/TUTORIALSPOINT";
   static final String USER = "guest";
   static final String PASS = "guest123";
   static final String QUERY = "SELECT id, first, last, age FROM Employees";

   public static void main(String[] args) {
      // Open a connection
      try(Connection conn = DriverManager.getConnection(DB_URL, USER, PASS);
         Statement stmt = conn.createStatement(
         ResultSet.TYPE_SCROLL_INSENSITIVE,
         ResultSet.CONCUR_READ_ONLY);
         ResultSet rs = stmt.executeQuery(QUERY);
      ) {
         // Move cursor to the last row.
         System.out.println("Moving cursor to the last...");
         rs.last();

         // Extract data from result set
         System.out.println("Displaying record...");
         //Retrieve by column name
         int id  = rs.getInt("id");
         int age = rs.getInt("age");
         String first = rs.getString("first");
         String last = rs.getString("last");

         // Display values
         System.out.print("ID: " + id);
         System.out.print(", Age: " + age);
         System.out.print(", First: " + first);
         System.out.println(", Last: " + last);

         // Move cursor to the first row.
         System.out.println("Moving cursor to the first row...");
         rs.first();

         // Extract data from result set
         System.out.println("Displaying record...");
         // Retrieve by column name
         id  = rs.getInt("id");
         age = rs.getInt("age");
         first = rs.getString("first");
         last = rs.getString("last");

         // Display values
         System.out.print("ID: " + id);
         System.out.print(", Age: " + age);
         System.out.print(", First: " + first);
         System.out.println(", Last: " + last);
         // Move cursor to the first row.

         System.out.println("Moving cursor to the next row...");
         rs.next();

         // Extract data from result set
         System.out.println("Displaying record...");
         id  = rs.getInt("id");
         age = rs.getInt("age");
         first = rs.getString("first");
         last = rs.getString("last");

         // Display values
         System.out.print("ID: " + id);
         System.out.print(", Age: " + age);
         System.out.print(", First: " + first);
         System.out.println(", Last: " + last);

      } catch (SQLException e) {
         e.printStackTrace();
      }
   }
}
Now let us compile the above example as follows −
C:\>javac TestApplication.java
C:\>
When you run TestApplication, it produces the following result −
C:\>java TestApplication
Moving cursor to the last...
Displaying record...
ID: 103, Age: 30, First: Sumit, Last: Mittal
Moving cursor to the first row...
Displaying record...
ID: 100, Age: 18, First: Zara, Last: Ali
Moving cursor to the next row...
Displaying record...
ID: 101, Age: 25, First: Mehnaz, Last: Fatma
C:\>
Java & MySQL - Viewing a ResultSet
The ResultSet interface contains dozens of methods for getting the data of the current row.
There is a get method for each of the possible data types, and each get method has two versions −
One that takes in a column name.
One that takes in a column index.
For example, if the column you are interested in viewing contains an int, you need to use one of the getInt() methods of ResultSet −
| S.N. | Methods & Description |
|---|---|
| 1 | public int getInt(String columnName) throws SQLException
Returns the int in the current row in the column named columnName. |
| 2 | public int getInt(int columnIndex) throws SQLException
Returns the int in the current row in the specified column index. The column index starts at 1, meaning the first column of a row is 1, the second column of a row is 2, and so on. |
Similarly, there are get methods in the ResultSet interface for each of the eight Java primitive types, as well as common types such as java.lang.String, java.lang.Object, and java.net.URL.
There are also methods for getting SQL data types java.sql.Date, java.sql.Time, java.sql.TimeStamp, java.sql.Clob, and java.sql.Blob. Check the documentation for more information about using these SQL data types.
Following is the example which makes use of few viewing methods described.
This sample code has been written based on the environment and database setup done in the previous chapters.
Copy and paste the following example in TestApplication.java, compile and run as follows −
import java.sql.Connection;
import java.sql.DriverManager;
import java.sql.ResultSet;
import java.sql.SQLException;
import java.sql.Statement;

public class TestApplication {
   static final String DB_URL = "jdbc:mysql://localhost/TUTORIALSPOINT";
   static final String USER = "guest";
   static final String PASS = "guest123";
   static final String QUERY = "SELECT id, first, last, age FROM Employees";

   public static void main(String[] args) {
      // Open a connection
      try(Connection conn = DriverManager.getConnection(DB_URL, USER, PASS);
         Statement stmt = conn.createStatement(
         ResultSet.TYPE_SCROLL_INSENSITIVE,
         ResultSet.CONCUR_READ_ONLY);
         ResultSet rs = stmt.executeQuery(QUERY);
      ) {
         // Move cursor to the last row.
         System.out.println("Moving cursor to the last...");
         rs.last();

         // Extract data from result set
         System.out.println("Displaying record...");
         //Retrieve by column name
         int id  = rs.getInt("id");
         int age = rs.getInt("age");
         String first = rs.getString("first");
         String last = rs.getString("last");

         // Display values
         System.out.print("ID: " + id);
         System.out.print(", Age: " + age);
         System.out.print(", First: " + first);
         System.out.println(", Last: " + last);

         // Move cursor to the first row.
         System.out.println("Moving cursor to the first row...");
         rs.first();

         // Extract data from result set
         System.out.println("Displaying record...");
         // Retrieve by column name
         id  = rs.getInt("id");
         age = rs.getInt("age");
         first = rs.getString("first");
         last = rs.getString("last");

         // Display values
         System.out.print("ID: " + id);
         System.out.print(", Age: " + age);
         System.out.print(", First: " + first);
         System.out.println(", Last: " + last);
         // Move cursor to the first row.

         System.out.println("Moving cursor to the next row...");
         rs.next();

         // Extract data from result set
         System.out.println("Displaying record...");
         id  = rs.getInt("id");
         age = rs.getInt("age");
         first = rs.getString("first");
         last = rs.getString("last");

         // Display values
         System.out.print("ID: " + id);
         System.out.print(", Age: " + age);
         System.out.print(", First: " + first);
         System.out.println(", Last: " + last);

      } catch (SQLException e) {
         e.printStackTrace();
      }
   }
}
Now let us compile the above example as follows −
C:\>javac TestApplication.java
C:\>
When you run TestApplication, it produces the following result −
C:\>java TestApplication
Moving cursor to the last...
Displaying record...
ID: 103, Age: 30, First: Sumit, Last: Mittal
Moving cursor to the first row...
Displaying record...
ID: 100, Age: 18, First: Zara, Last: Ali
Moving cursor to the next row...
Displaying record...
ID: 101, Age: 25, First: Mehnaz, Last: Fatma
C:\>
Java & MySQL - Updating a ResultSet
The ResultSet interface contains a collection of update methods for updating the data of a result set.
As with the get methods, there are two update methods for each data type −
One that takes in a column name.
One that takes in a column index.
For example, to update a String column of the current row of a result set, you would use one of the following updateString() methods −
| S.N. | Methods & Description |
|---|---|
| 1 | public void updateString(int columnIndex, String s) throws SQLException
Changes the String in the specified column to the value of s. |
| 2 | public void updateString(String columnName, String s) throws SQLException
Similar to the previous method, except that the column is specified by its name instead of its index. |
There are update methods for the eight primitive data types, as well as String, Object, URL, and the SQL data types in the java.sql package.
Updating a row in the result set changes the columns of the current row in the ResultSet object, but not in the underlying database. To update your changes to the row in the database, you need to invoke one of the following methods.
| S.N. | Methods & Description |
|---|---|
| 1 | public void updateRow()
Updates the current row by updating the corresponding row in the database. |
| 2 | public void deleteRow()
Deletes the current row from the database |
| 3 | public void refreshRow()
Refreshes the data in the result set to reflect any recent changes in the database. |
| 4 | public void cancelRowUpdates()
Cancels any updates made on the current row. |
| 5 | public void insertRow()
Inserts a row into the database. This method can only be invoked when the cursor is pointing to the insert row. |
Following is the example, which makes use of the ResultSet.CONCUR_UPDATABLE and ResultSet.TYPE_SCROLL_INSENSITIVE described in the Result Set tutorial. This example would explain INSERT, UPDATE and DELETE operation on a table.
It should be noted that tables you are working on should have Primary Key set properly. Let's update our referece table first.
Drop the table and Create the table Employees again as follows −
mysql> use TUTORIALSPOINT;
mysql> drop table Employees;
Query OK, 0 rows affected (0.08 sec)
mysql> create table Employees
    -> (
    -> id int primary key auto_increment,
    -> age int not null,
    -> first varchar (255),
    -> last varchar (255)
    -> );
Query OK, 0 rows affected (0.08 sec)
mysql>
Create Data Records
Finally you create few records in Employee table as follows −
mysql> INSERT INTO Employees(AGE, FIRST, LAST) VALUES (18, 'Zara', 'Ali');
Query OK, 1 row affected (0.05 sec)

mysql> INSERT INTO Employees(AGE, FIRST, LAST) VALUES (25, 'Mahnaz', 'Fatma');
Query OK, 1 row affected (0.00 sec)

mysql> INSERT INTO Employees(AGE, FIRST, LAST) VALUES (30, 'Zaid', 'Khan');
Query OK, 1 row affected (0.00 sec)

mysql> INSERT INTO Employees(AGE, FIRST, LAST) VALUES (28, 'Sumit', 'Mittal');
Query OK, 1 row affected (0.00 sec)

mysql>
Copy and paste the following example in TestApplication.java, compile and run as follows −
import java.sql.Connection;
import java.sql.DriverManager;
import java.sql.ResultSet;
import java.sql.SQLException;
import java.sql.Statement;

public class TestApplication {
   static final String DB_URL = "jdbc:mysql://localhost/TUTORIALSPOINT";
   static final String USER = "guest";
   static final String PASS = "guest123";
   static final String QUERY = "SELECT id, first, last, age FROM Employees";

   public static void printResultSet(ResultSet rs) throws SQLException{
      // Ensure we start with first row
      rs.beforeFirst();
      while(rs.next()){
         // Display values
         System.out.print("ID: " + rs.getInt("id"));
         System.out.print(", Age: " + rs.getInt("age"));
         System.out.print(", First: " + rs.getString("first"));
         System.out.println(", Last: " + rs.getString("last"));
      }
      System.out.println();
   }

   public static void main(String[] args) {
      // Open a connection
      try(Connection conn = DriverManager.getConnection(DB_URL, USER, PASS);
         Statement stmt = conn.createStatement(
         ResultSet.TYPE_SCROLL_INSENSITIVE,
         ResultSet.CONCUR_UPDATABLE);
         ResultSet rs = stmt.executeQuery(QUERY);
      ) {

         System.out.println("List result set for reference....");
         printResultSet(rs);

         // Loop through result set and add 5 in age
         // Move to Before first position so while-loop works properly
         rs.beforeFirst();
         //STEP 7: Extract data from result set
         while(rs.next()){
            // Retrieve by column name
            int newAge = rs.getInt("age") + 5;
            rs.updateDouble( "age", newAge );
            rs.updateRow();
         }
         System.out.println("List result set showing new ages...");
         printResultSet(rs);

         // Insert a record into the table.
         // Move to insert row and add column data with updateXXX()
         System.out.println("Inserting a new record...");
         rs.moveToInsertRow();
         rs.updateString("first","John");
         rs.updateString("last","Paul");
         rs.updateInt("age",40);
         // Commit row
         rs.insertRow();

         System.out.println("List result set showing new set...");
         printResultSet(rs);

      } catch (SQLException e) {
         e.printStackTrace();
      }
   }
}
Now let us compile the above example as follows −
C:\>javac TestApplication.java
C:\>
When you run TestApplication, it produces the following result −
C:\>java TestApplication
List result set for reference....
ID: 1, Age: 18, First: Zara, Last: Ali
ID: 2, Age: 25, First: Mahnaz, Last: Fatma
ID: 3, Age: 30, First: Zaid, Last: Khan
ID: 4, Age: 28, First: Sumit, Last: Mittal

List result set showing new ages...
ID: 1, Age: 23, First: Zara, Last: Ali
ID: 2, Age: 30, First: Mahnaz, Last: Fatma
ID: 3, Age: 35, First: Zaid, Last: Khan
ID: 4, Age: 33, First: Sumit, Last: Mittal

Inserting a new record...
List result set showing new set...
ID: 1, Age: 23, First: Zara, Last: Ali
ID: 2, Age: 30, First: Mahnaz, Last: Fatma
ID: 3, Age: 35, First: Zaid, Last: Khan
ID: 4, Age: 33, First: Sumit, Last: Mittal
ID: 5, Age: 40, First: John, Last: Paul

List the record before deleting...
ID: 1, Age: 23, First: Zara, Last: Ali
ID: 2, Age: 30, First: Mahnaz, Last: Fatma
ID: 3, Age: 35, First: Zaid, Last: Khan
ID: 4, Age: 33, First: Sumit, Last: Mittal
ID: 5, Age: 40, First: John, Last: Paul
C:\>
Java & MySQL - Transactions
If your JDBC Connection is in auto-commit mode, which it is by default, then every SQL statement is committed to the database upon its completion.
That may be fine for simple applications, but there are three reasons why you may want to turn off the auto-commit and manage your own transactions −
To increase performance.
To maintain the integrity of business processes.
To use distributed transactions.
Transactions enable you to control if, and when, changes are applied to the database. It treats a single SQL statement or a group of SQL statements as one logical unit, and if any statement fails, the whole transaction fails.
To enable manual- transaction support instead of the auto-commit mode that the JDBC driver uses by default, use the Connection object's setAutoCommit() method. If you pass a boolean false to setAutoCommit( ), you turn off auto-commit. You can pass a boolean true to turn it back on again.
For example, if you have a Connection object named conn, code the following to turn off auto-commit −
conn.setAutoCommit(false);
Commit & Rollback
Once you are done with your changes and you want to commit the changes then call commit() method on connection object as follows −
conn.commit( );
Otherwise, to roll back updates to the database made using the Connection named conn, use the following code −
conn.rollback( );
Using Savepoints
The new JDBC 3.0 Savepoint interface gives you the additional transactional control.
When you set a savepoint you define a logical rollback point within a transaction. If an error occurs past a savepoint, you can use the rollback method to undo either all the changes or only the changes made after the savepoint.
The Connection object has two new methods that help you manage savepoints −
setSavepoint(String savepointName) − Defines a new savepoint. It also returns a Savepoint object.
releaseSavepoint(Savepoint savepointName) − Deletes a savepoint. Notice that it requires a Savepoint object as a parameter. This object is usually a savepoint generated by the setSavepoint() method.
There is one rollback (String savepointName) method, which rolls back work to the specified savepoint.
Java & MySQL - Commit & Rollback
Once you are done with your changes and you want to commit the changes then call commit() method on connection object as follows −
conn.commit( );
Otherwise, to roll back updates to the database made using the Connection named conn, use the following code −
conn.rollback( );
The following example illustrates the use of a commit and rollback object −
try{
   //Assume a valid connection object conn
   conn.setAutoCommit(false);
   Statement stmt = conn.createStatement();

   String SQL = "INSERT INTO Employees  " +
                "VALUES (106, 20, 'Rita', 'Tez')";
   stmt.executeUpdate(SQL);
   //Submit a malformed SQL statement that breaks
   String SQL = "INSERTED IN Employees  " +
                "VALUES (107, 22, 'Sita', 'Singh')";
   stmt.executeUpdate(SQL);
   // If there is no error.
   conn.commit();
}catch(SQLException se){
   // If there is any error.
   conn.rollback();
}
In this case, none of the above INSERT statement would success and everything would be rolled back.
Following is the example, which makes use of commit and rollback described.
This sample code has been written based on the environment and database setup done in the previous chapters.
Copy and paste the following example in TestApplication.java, compile and run as follows −
import java.sql.Connection;
import java.sql.DriverManager;
import java.sql.ResultSet;
import java.sql.SQLException;
import java.sql.Statement;

public class TestApplication {
   static final String DB_URL = "jdbc:mysql://localhost/TUTORIALSPOINT";
   static final String USER = "guest";
   static final String PASS = "guest123";
   static final String QUERY = "SELECT id, first, last, age FROM Employees";
   static final String INSERT_QUERY = "INSERT INTO Employees (first, last, age) values('Rita', 'Tez', 20)";
   static final String INSERT_QUERY_2 = "INSERT INTO Employees (first, last, age) values('Sita', 'Singh', 20)";

   public static void printResultSet(ResultSet rs) throws SQLException{
      // Ensure we start with first row
      rs.beforeFirst();
      while(rs.next()){
         // Display values
         System.out.print("ID: " + rs.getInt("id"));
         System.out.print(", Age: " + rs.getInt("age"));
         System.out.print(", First: " + rs.getString("first"));
         System.out.println(", Last: " + rs.getString("last"));
      }
      System.out.println();
   }

   public static void main(String[] args) {

      Connection conn = null;
      Statement stmt = null;
      try{
         // Open a connection
         System.out.println("Connecting to database...");
         conn = DriverManager.getConnection(DB_URL,USER,PASS);

         // Set auto commit as false.
         conn.setAutoCommit(false);

         // Execute a query to create statment with
         // required arguments for RS example.
         System.out.println("Creating statement...");
         stmt = conn.createStatement(
            ResultSet.TYPE_SCROLL_INSENSITIVE,
            ResultSet.CONCUR_UPDATABLE);

         // INSERT a row into Employees table
         System.out.println("Inserting one row....");
         stmt.executeUpdate(INSERT_QUERY);

         // INSERT one more row into Employees table
         stmt.executeUpdate(INSERT_QUERY_2);

         // Commit data here.
         System.out.println("Commiting data here....");
         conn.commit();

         // Now list all the available records.
         String sql = "SELECT id, first, last, age FROM Employees";
         ResultSet rs = stmt.executeQuery(sql);
         System.out.println("List result set for reference....");
         printResultSet(rs);

         // Clean-up environment
         rs.close();
         stmt.close();
         conn.close();
      }catch(SQLException se){
         se.printStackTrace();
         // If there is an error then rollback the changes.
         System.out.println("Rolling back data here....");
         try{
            if(conn!=null)
               conn.rollback();
            }catch(SQLException se2){
               se2.printStackTrace();
            }
         }catch(Exception e){
            e.printStackTrace();
         }finally{
            // finally block used to close resources
         try{
            if(stmt!=null)
               stmt.close();
         }catch(SQLException se2){
            se2.printStackTrace();
         }
            try{
               if(conn!=null)
                  conn.close();
            }catch(SQLException se){
               se.printStackTrace();
         }
      }
   }
}
Now let us compile the above example as follows −
C:\>javac TestApplication.java
C:\>
When you run TestApplication, it produces the following result −
C:\>java TestApplication
Connecting to database...
Creating statement...
Inserting one row....
Commiting data here....
List result set for reference....
ID: 1, Age: 23, First: Zara, Last: Ali
ID: 2, Age: 30, First: Mahnaz, Last: Fatma
ID: 3, Age: 35, First: Zaid, Last: Khan
ID: 4, Age: 33, First: Sumit, Last: Mittal
ID: 5, Age: 40, First: John, Last: Paul
ID: 6, Age: 20, First: Rita, Last: Tez
ID: 7, Age: 20, First: Sita, Last: Singh
C:\>
Java & MySQL - SavePoint
The new JDBC 3.0 Savepoint interface gives you the additional transactional control. Most modern DBMS, support savepoints within their environments such as Oracle's PL/SQL.
When you set a savepoint you define a logical rollback point within a transaction. If an error occurs past a savepoint, you can use the rollback method to undo either all the changes or only the changes made after the savepoint.
The Connection object has two new methods that help you manage savepoints −
setSavepoint(String savepointName) − Defines a new savepoint. It also returns a Savepoint object.
releaseSavepoint(Savepoint savepointName) − Deletes a savepoint. Notice that it requires a Savepoint object as a parameter. This object is usually a savepoint generated by the setSavepoint() method.
There is one rollback (String savepointName) method, which rolls back work to the specified savepoint.
The following example illustrates the use of a Savepoint object −
try{
   //Assume a valid connection object conn
   conn.setAutoCommit(false);
   Statement stmt = conn.createStatement();

   //set a Savepoint
   Savepoint savepoint1 = conn.setSavepoint("Savepoint1");
   String SQL = "INSERT INTO Employees " +
                "VALUES (106, 20, 'Rita', 'Tez')";
   stmt.executeUpdate(SQL);
   //Submit a malformed SQL statement that breaks
   String SQL = "INSERTED IN Employees " +
                "VALUES (107, 22, 'Sita', 'Tez')";
   stmt.executeUpdate(SQL);
   // If there is no error, commit the changes.
   conn.commit();

}catch(SQLException se){
   // If there is any error.
   conn.rollback(savepoint1);
}
In this case, none of the above INSERT statement would success and everything would be rolled back.
Following is the example, which makes use of setSavepoint and rollback described.
This sample code has been written based on the environment and database setup done in the previous chapters.
Copy and paste the following example in TestApplication.java, compile and run as follows −
import java.sql.Connection;
import java.sql.DriverManager;
import java.sql.ResultSet;
import java.sql.SQLException;
import java.sql.Savepoint;
import java.sql.Statement;

public class TestApplication {
   static final String DB_URL = "jdbc:mysql://localhost/TUTORIALSPOINT";
   static final String USER = "guest";
   static final String PASS = "guest123";
   static final String QUERY = "SELECT id, first, last, age FROM Employees";
   static final String DELETE_QUERY = "DELETE FROM Employees WHERE ID = 8";
   static final String DELETE_QUERY_1 = "DELETE FROM Employees WHERE ID = 9";

   public static void printResultSet(ResultSet rs) throws SQLException{
      // Ensure we start with first row
      rs.beforeFirst();
      while(rs.next()){
         // Display values
         System.out.print("ID: " + rs.getInt("id"));
         System.out.print(", Age: " + rs.getInt("age"));
         System.out.print(", First: " + rs.getString("first"));
         System.out.println(", Last: " + rs.getString("last"));
      }
      System.out.println();
   }

   public static void main(String[] args) {
      // Open a connection
      try(Connection conn = DriverManager.getConnection(DB_URL, USER, PASS);
         Statement stmt = conn.createStatement(
            ResultSet.TYPE_SCROLL_INSENSITIVE,
            ResultSet.CONCUR_UPDATABLE);
      ) {

         conn.setAutoCommit(false);
         ResultSet rs = stmt.executeQuery(QUERY);
         System.out.println("List result set for reference....");
         printResultSet(rs);

         // delete row having ID = 8
         // But save point before doing so.
         Savepoint savepoint1 = conn.setSavepoint("ROWS_DELETED_1");
         System.out.println("Deleting row....");
         stmt.executeUpdate(DELETE_QUERY);
         // Rollback the changes after save point 1.
         conn.rollback(savepoint1);

         // delete rows having ID = 9
         // But save point before doing so.
         conn.setSavepoint("ROWS_DELETED_2");
         System.out.println("Deleting row....");

         stmt.executeUpdate(DELETE_QUERY_1);

         rs = stmt.executeQuery(QUERY);
         System.out.println("List result set for reference....");
         printResultSet(rs);

         // Clean-up environment
         rs.close();

      } catch (SQLException e) {
         e.printStackTrace();
      }
   }
}
Now, let us compile the above example as follows −
C:\>javac TestApplication.java
C:\>
When you run TestApplication, it produces the following result −
C:\>java TestApplication
List result set for reference....
ID: 1, Age: 23, First: Zara, Last: Ali
ID: 2, Age: 30, First: Mahnaz, Last: Fatma
ID: 3, Age: 35, First: Zaid, Last: Khan
ID: 4, Age: 33, First: Sumit, Last: Mittal
ID: 5, Age: 40, First: John, Last: Paul
ID: 7, Age: 20, First: Sita, Last: Singh
ID: 8, Age: 20, First: Rita, Last: Tez
ID: 9, Age: 20, First: Sita, Last: Singh

Deleting row....
Deleting row....
List result set for reference....
ID: 1, Age: 23, First: Zara, Last: Ali
ID: 2, Age: 30, First: Mahnaz, Last: Fatma
ID: 3, Age: 35, First: Zaid, Last: Khan
ID: 4, Age: 33, First: Sumit, Last: Mittal
ID: 5, Age: 40, First: John, Last: Paul
ID: 7, Age: 20, First: Sita, Last: Singh
ID: 8, Age: 20, First: Rita, Last: Tez
C:\>
Java & MySQL - Batch Processing
Batch Processing allows you to group related SQL statements into a batch and submit them with one call to the database.
When you send several SQL statements to the database at once, you reduce the amount of communication overhead, thereby improving performance.
JDBC drivers are not required to support this feature. You should use the DatabaseMetaData.supportsBatchUpdates() method to determine if the target database supports batch update processing. The method returns true if your JDBC driver supports this feature.
The addBatch() method of Statement, PreparedStatement, and CallableStatement is used to add individual statements to the batch. The executeBatch() is used to start the execution of all the statements grouped together.
The executeBatch() returns an array of integers, and each element of the array represents the update count for the respective update statement.
Just as you can add statements to a batch for processing, you can remove them with the clearBatch() method. This method removes all the statements you added with the addBatch() method. However, you cannot selectively choose which statement to remove.
Batching with Statement Object
Here is a typical sequence of steps to use Batch Processing with Statement Object −
Create a Statement object using either createStatement() methods.
Set auto-commit to false using setAutoCommit().
Add as many as SQL statements you like into batch using addBatch() method on created statement object.
Execute all the SQL statements using executeBatch() method on created statement object.
Finally, commit all the changes using commit() method.
Example
The following code snippet provides an example of a batch update using Statement object −
// Create statement object
Statement stmt = conn.createStatement();

// Set auto-commit to false
conn.setAutoCommit(false);

// Create SQL statement
String SQL = "INSERT INTO Employees (id, first, last, age) " +
             "VALUES(200,'Zia', 'Ali', 30)";
// Add above SQL statement in the batch.
stmt.addBatch(SQL);

// Create one more SQL statement
String SQL = "INSERT INTO Employees (id, first, last, age) " +
             "VALUES(201,'Raj', 'Kumar', 35)";
// Add above SQL statement in the batch.
stmt.addBatch(SQL);

// Create one more SQL statement
String SQL = "UPDATE Employees SET age = 35 " +
             "WHERE id = 100";
// Add above SQL statement in the batch.
stmt.addBatch(SQL);

// Create an int[] to hold returned values
int[] count = stmt.executeBatch();

//Explicitly commit statements to apply changes
conn.commit();
Batching with PrepareStatement Object
Here is a typical sequence of steps to use Batch Processing with PrepareStatement Object −
Create SQL statements with placeholders.
Create PrepareStatement object using either prepareStatement() methods.
Set auto-commit to false using setAutoCommit().
Add as many as SQL statements you like into batch using addBatch() method on created statement object.
Execute all the SQL statements using executeBatch() method on created statement object.
Finally, commit all the changes using commit() method.
The following code snippet provides an example of a batch update using PrepareStatement object −
// Create SQL statement
String SQL = "INSERT INTO Employees (id, first, last, age) " +
             "VALUES(?, ?, ?, ?)";

// Create PrepareStatement object
PreparedStatemen pstmt = conn.prepareStatement(SQL);

//Set auto-commit to false
conn.setAutoCommit(false);

// Set the variables
pstmt.setInt( 1, 400 );
pstmt.setString( 2, "Pappu" );
pstmt.setString( 3, "Singh" );
pstmt.setInt( 4, 33 );
// Add it to the batch
pstmt.addBatch();

// Set the variables
pstmt.setInt( 1, 401 );
pstmt.setString( 2, "Pawan" );
pstmt.setString( 3, "Singh" );
pstmt.setInt( 4, 31 );
// Add it to the batch
pstmt.addBatch();

//add more batches
.
.
.
.
//Create an int[] to hold returned values
int[] count = stmt.executeBatch();

//Explicitly commit statements to apply changes
conn.commit();
Java & MySQL - Batching with Statement Object
Here is a typical sequence of steps to use Batch Processing with Statement Object −
Create a Statement object using either createStatement() methods.
Set auto-commit to false using setAutoCommit().
Add as many as SQL statements you like into batch using addBatch() method on created statement object.
Execute all the SQL statements using executeBatch() method on created statement object.
Finally, commit all the changes using commit() method.
This sample code has been written based on the environment and database setup done in the previous chapters.
Copy and paste the following example in TestApplication.java, compile and run as follows −
import java.sql.Connection;
import java.sql.DriverManager;
import java.sql.ResultSet;
import java.sql.SQLException;
import java.sql.Statement;

public class TestApplication {
   static final String DB_URL = "jdbc:mysql://localhost/TUTORIALSPOINT";
   static final String USER = "guest";
   static final String PASS = "guest123";

   public static void printResultSet(ResultSet rs) throws SQLException{
      // Ensure we start with first row
      rs.beforeFirst();
      while(rs.next()){
         // Display values
         System.out.print("ID: " + rs.getInt("id"));
         System.out.print(", Age: " + rs.getInt("age"));
         System.out.print(", First: " + rs.getString("first"));
         System.out.println(", Last: " + rs.getString("last"));
      }
      System.out.println();
   }

   public static void main(String[] args) {
      // Open a connection
      try(Connection conn = DriverManager.getConnection(DB_URL, USER, PASS);
         Statement stmt = conn.createStatement(
            ResultSet.TYPE_SCROLL_INSENSITIVE,
            ResultSet.CONCUR_UPDATABLE)
            ) {
         conn.setAutoCommit(false);

         ResultSet rs = stmt.executeQuery("Select * from Employees");
         printResultSet(rs);

         // Create SQL statement
         String SQL = "INSERT INTO Employees (first, last, age) " +
            "VALUES('Zia', 'Ali', 30)";
         // Add above SQL statement in the batch.
         stmt.addBatch(SQL);

         // Create one more SQL statement
         SQL = "INSERT INTO Employees (first, last, age) " +
            "VALUES('Raj', 'Kumar', 35)";
         // Add above SQL statement in the batch.
         stmt.addBatch(SQL);

         // Create one more SQL statement
         SQL = "UPDATE Employees SET age = 35 " +
         "WHERE id = 7";
         // Add above SQL statement in the batch.
         stmt.addBatch(SQL);

         // Create an int[] to hold returned values
         int[] count = stmt.executeBatch();

         //Explicitly commit statements to apply changes
         conn.commit();

         rs = stmt.executeQuery("Select * from Employees");
         printResultSet(rs);

         stmt.close();
         rs.close();

      } catch (SQLException e) {
         e.printStackTrace();
      }
   }
}
Now let us compile the above example as follows −
C:\>javac TestApplication.java
C:\>
When you run TestApplication, it produces the following result −
C:\>java TestApplication
ID: 1, Age: 23, First: Zara, Last: Ali
ID: 2, Age: 30, First: Mahnaz, Last: Fatma
ID: 3, Age: 35, First: Zaid, Last: Khan
ID: 4, Age: 33, First: Sumit, Last: Mittal
ID: 5, Age: 40, First: John, Last: Paul
ID: 7, Age: 20, First: Sita, Last: Singh
ID: 8, Age: 20, First: Rita, Last: Tez
ID: 9, Age: 20, First: Sita, Last: Singh

ID: 1, Age: 23, First: Zara, Last: Ali
ID: 2, Age: 30, First: Mahnaz, Last: Fatma
ID: 3, Age: 35, First: Zaid, Last: Khan
ID: 4, Age: 33, First: Sumit, Last: Mittal
ID: 5, Age: 40, First: John, Last: Paul
ID: 7, Age: 35, First: Sita, Last: Singh
ID: 8, Age: 20, First: Rita, Last: Tez
ID: 9, Age: 20, First: Sita, Last: Singh
ID: 10, Age: 30, First: Zia, Last: Ali
ID: 11, Age: 35, First: Raj, Last: Kumar
C:\>
Java & MySQL - Batching with PrepareStatement Object
Here is a typical sequence of steps to use Batch Processing with PrepareStatement Object −
Create SQL statements with placeholders.
Create PrepareStatement object using either prepareStatement() methods.
Set auto-commit to false using setAutoCommit().
Add as many as SQL statements you like into batch using addBatch() method on created statement object.
Execute all the SQL statements using executeBatch() method on created statement object.
Finally, commit all the changes using commit() method.
This sample code has been written based on the environment and database setup done in the previous chapters.
Copy and paste the following example in TestApplication.java, compile and run as follows −
import java.sql.Connection;
import java.sql.DriverManager;
import java.sql.PreparedStatement;
import java.sql.ResultSet;
import java.sql.SQLException;
import java.sql.Statement;

public class TestApplication {
   static final String DB_URL = "jdbc:mysql://localhost/TUTORIALSPOINT";
   static final String USER = "guest";
   static final String PASS = "guest123";
   static final String INSERT_QUERY = "INSERT INTO Employees(first,last,age) VALUES(?, ?, ?)";

   public static void printResultSet(ResultSet rs) throws SQLException{
      // Ensure we start with first row
      rs.beforeFirst();
      while(rs.next()){
         // Display values
         System.out.print("ID: " + rs.getInt("id"));
         System.out.print(", Age: " + rs.getInt("age"));
         System.out.print(", First: " + rs.getString("first"));
         System.out.println(", Last: " + rs.getString("last"));
      }
      System.out.println();
   }

   public static void main(String[] args) {
      // Open a connection
      try(Connection conn = DriverManager.getConnection(DB_URL, USER, PASS);
         PreparedStatement stmt = conn.prepareStatement(INSERT_QUERY,
            ResultSet.TYPE_SCROLL_INSENSITIVE,
            ResultSet.CONCUR_UPDATABLE)
      ) {
         conn.setAutoCommit(false);

         ResultSet rs = stmt.executeQuery("Select * from Employees");
         printResultSet(rs);

         // Set the variables
         stmt.setString( 1, "Pappu" );
         stmt.setString( 2, "Singh" );
         stmt.setInt( 3, 33 );
         // Add it to the batch
         stmt.addBatch();

         // Set the variables
         stmt.setString( 1, "Pawan" );
         stmt.setString( 2, "Singh" );
         stmt.setInt( 3, 31 );
         // Add it to the batch
         stmt.addBatch();

         // Create an int[] to hold returned values
         int[] count = stmt.executeBatch();

         //Explicitly commit statements to apply changes
         conn.commit();

         rs = stmt.executeQuery("Select * from Employees");
         printResultSet(rs);

         stmt.close();
         rs.close();

      } catch (SQLException e) {
         e.printStackTrace();
      }
   }
}
Now let us compile the above example as follows −
C:\>javac TestApplication.java
C:\>
When you run TestApplication, it produces the following result −
C:\>java TestApplication
ID: 1, Age: 23, First: Zara, Last: Ali
ID: 2, Age: 30, First: Mahnaz, Last: Fatma
ID: 3, Age: 35, First: Zaid, Last: Khan
ID: 4, Age: 33, First: Sumit, Last: Mittal
ID: 5, Age: 40, First: John, Last: Paul
ID: 7, Age: 35, First: Sita, Last: Singh
ID: 8, Age: 20, First: Rita, Last: Tez
ID: 9, Age: 20, First: Sita, Last: Singh
ID: 10, Age: 30, First: Zia, Last: Ali
ID: 11, Age: 35, First: Raj, Last: Kumar
ID: 12, Age: 33, First: Pappu, Last: Singh
ID: 13, Age: 31, First: Pawan, Last: Singh
C:\>
Java & MySQL - Streaming Data
A PreparedStatement object has the ability to use input and output streams to supply parameter data. This enables you to place entire files into database columns that can hold large values, such as CLOB and BLOB data types.
There are following methods, which can be used to stream data −
setAsciiStream() − This method is used to supply large ASCII values.
setCharacterStream() − This method is used to supply large UNICODE values.
setBinaryStream() − This method is used to supply large binary values.
The setXXXStream() method requires an extra parameter, the file size, besides the parameter placeholder. This parameter informs the driver how much data should be sent to the database using the stream.
This example would create a database table XML_Data and then XML content would be written into this table.
Copy and paste the following example in TestApplication.java, compile and run as follows −
import java.io.ByteArrayInputStream;
import java.io.ByteArrayOutputStream;
import java.io.File;
import java.io.FileInputStream;
import java.io.FileNotFoundException;
import java.io.IOException;
import java.io.InputStream;
import java.sql.Connection;
import java.sql.DriverManager;
import java.sql.PreparedStatement;
import java.sql.ResultSet;
import java.sql.SQLException;
import java.sql.Statement;

public class TestApplication {
   static final String DB_URL = "jdbc:mysql://localhost/TUTORIALSPOINT";
   static final String USER = "guest";
   static final String PASS = "guest123";
   static final String QUERY = "SELECT Data FROM XML_Data WHERE id=100";
   static final String INSERT_QUERY="INSERT INTO XML_Data VALUES (?,?)";
   static final String CREATE_TABLE_QUERY = "CREATE TABLE XML_Data (id INTEGER, Data LONG)";
   static final String DROP_TABLE_QUERY = "DROP TABLE XML_Data";
   static final String XML_DATA = "<Employee><id>100</id><first>Zara</first><last>Ali</last><Salary>10000</Salary><Dob>18-08-1978</Dob></Employee>";

   public static void createXMLTable(Statement stmt)
      throws SQLException{
      System.out.println("Creating XML_Data table..." );
      //Drop table first if it exists.
      try{
         stmt.executeUpdate(DROP_TABLE_QUERY);
      }catch(SQLException se){
      }
      stmt.executeUpdate(CREATE_TABLE_QUERY);
   }

   public static void main(String[] args) {
      // Open a connection
      try(Connection conn = DriverManager.getConnection(DB_URL, USER, PASS);
         Statement stmt = conn.createStatement();
         PreparedStatement pstmt = conn.prepareStatement(INSERT_QUERY);
      ) {
         createXMLTable(stmt);

         ByteArrayInputStream bis = new ByteArrayInputStream(XML_DATA.getBytes());

         pstmt.setInt(1,100);
         pstmt.setAsciiStream(2,bis,XML_DATA.getBytes().length);
         pstmt.execute();

         //Close input stream
         bis.close();

         ResultSet rs = stmt.executeQuery(QUERY);
         // Get the first row
         if (rs.next ()){
            //Retrieve data from input stream
            InputStream xmlInputStream = rs.getAsciiStream (1);
            int c;
            ByteArrayOutputStream bos = new ByteArrayOutputStream();
            while (( c = xmlInputStream.read ()) != -1)
               bos.write(c);
            //Print results
            System.out.println(bos.toString());
         }
         // Clean-up environment
         rs.close();

      } catch (SQLException | IOException e) {
         e.printStackTrace();
      }
   }
}
Now let us compile the above example as follows −
C:\>javac TestApplication.java
C:\>
When you run TestApplication, it produces the following result −
C:\>java TestApplication
Creating XML_Data table...
<Employee><id>100</id><first>Zara</first><last>Ali</last><Salary>10000</Salary><Dob>18-08-1978</Dob></Employee>
C:\>
Java & MySQL - Create Database Example
This tutorial provides an example on how to create a Database using JDBC application. Before executing the following example, make sure you have the following in place −
You should have admin privilege to create a database in the given schema. To execute the following example, you need to replace the username and password with your actual user name and password.
Your MySQL is up and running.
Required Steps
The following steps are required to create a new Database using JDBC application −
Import the packages − Requires that you include the packages containing the JDBC classes needed for database programming. Most often, using import java.sql.* will suffice.
Open a connection − Requires using the DriverManager.getConnection() method to create a Connection object, which represents a physical connection with the database server.
To create a new database, you need not give any database name while preparing database URL as mentioned in the below example.
Execute a query − Requires using an object of type Statement for building and submitting an SQL statement to the database.
Clean up the environment − try with resources automatically closes the resources.
Sample Code
Copy and paste the following example in TestApplication.java, compile and run as follows −
import java.sql.Connection;
import java.sql.DriverManager;
import java.sql.SQLException;
import java.sql.Statement;

public class TestApplication {
   static final String DB_URL = "jdbc:mysql://localhost/";
   static final String USER = "guest";
   static final String PASS = "guest123";

   public static void main(String[] args) {
      // Open a connection
      try(Connection conn = DriverManager.getConnection(DB_URL, USER, PASS);
         Statement stmt = conn.createStatement();
      ) {
         String sql = "CREATE DATABASE STUDENTS";
         stmt.executeUpdate(sql);
         System.out.println("Database created successfully...");
      } catch (SQLException e) {
         e.printStackTrace();
      }
   }
}
Now let us compile the above example as follows −
C:\>javac TestApplication.java
C:\>
When you run TestApplication, it produces the following result −
C:\>java TestApplication
Database created successfully...
C:\>
Java & MySQL - Select Database Example
This chapter provides an example on how to select a Database using JDBC application. Before executing the following example, make sure you have the following in place −
To execute the following example you need to replace the username and password with your actual user name and password.
Your MySQL database you are using, is up and running.
Required Steps
The following steps are required to create a new Database using JDBC application −
Import the packages − Requires that you include the packages containing the JDBC classes needed for the database programming. Most often, using import java.sql.* will suffice.
Open a connection − Requires using the DriverManager.getConnection() method to create a Connection object, which represents a physical connection with a selected database.
Selection of database is made while you prepare database URL. Following example would make connection with STUDENTS database.
Clean up the environment − try with resources automatically closes the resources.
Sample Code
Copy and paste the following example in TestApplication.java, compile and run as follows −
import java.sql.Connection;
import java.sql.DriverManager;
import java.sql.SQLException;
import java.sql.Statement;

public class TestApplication {
   static final String DB_URL = "jdbc:mysql://localhost/TUTORIALSPOINT";
   static final String USER = "guest";
   static final String PASS = "guest123";

   public static void main(String[] args) {
      System.out.println("Connecting to a selected database...");
      // Open a connection
      try(Connection conn = DriverManager.getConnection(DB_URL, USER, PASS);) {
         System.out.println("Connected database successfully...");
      } catch (SQLException e) {
         e.printStackTrace();
      }
   }
}
Now let us compile the above example as follows −
C:\>javac TestApplication.java
C:\>
When you run TestApplication, it produces the following result −
C:\>java TestApplication
Connecting to a selected database...
Connected database successfully...
C:\>
Java & MySQL - Drop Database Example
This chapter provides an example on how to drop an existing Database using JDBC application. Before executing the following example, make sure you have the following in place −
To execute the following example you need to replace the username and password with your actual user name and password.
Your MySQL is up and running.
NOTE − This is a serious operation and you have to make a firm decision before proceeding to delete a database because everything you have in your database would be lost.
Required Steps
The following steps are required to create a new Database using JDBC application −
Import the packages − Requires that you include the packages containing the JDBC classes needed for database programming. Most often, using import java.sql.* will suffice.
Open a connection − Requires using the DriverManager.getConnection() method to create a Connection object, which represents a physical connection with a database server.
Deleting a database does not require database name to be in your database URL. Following example would delete STUDENTS database.
Execute a query − Requires using an object of type Statement for building and submitting an SQL statement to delete the database.
Clean up the environment − try with resources automatically closes the resources.
Sample Code
Copy and paste the following example in TestApplication.java, compile and run as follows −
import java.sql.Connection;
import java.sql.DriverManager;
import java.sql.SQLException;
import java.sql.Statement;

public class TestApplication {
   static final String DB_URL = "jdbc:mysql://localhost/";
   static final String USER = "guest";
   static final String PASS = "guest123";

   public static void main(String[] args) {
      // Open a connection
      try(Connection conn = DriverManager.getConnection(DB_URL, USER, PASS);
         Statement stmt = conn.createStatement();
      ) {
         String sql = "DROP DATABASE STUDENTS";
         stmt.executeUpdate(sql);
         System.out.println("Database dropped successfully...");
      } catch (SQLException e) {
         e.printStackTrace();
      }
   }
}
Now let us compile the above example as follows −
C:\>javac TestApplication.java
C:\>
When you run TestApplication, it produces the following result −
C:\>java TestApplication
Database dropped successfully...
C:\>
Java & MySQL - Create Table Example
This chapter provides an example on how to create a table using JDBC application. Before executing the following example, make sure you have the following in place −
To execute the following example you can replace the username and password with your actual user name and password.
Your MySQL is up and running.
Required Steps
The following steps are required to create a new Database using JDBC application −
Import the packages − Requires that you include the packages containing the JDBC classes needed for database programming. Most often, using import java.sql.* will suffice.
Open a connection − Requires using the DriverManager.getConnection() method to create a Connection object, which represents a physical connection with a database server.
Execute a query − Requires using an object of type Statement for building and submitting an SQL statement to create a table in a seleted database.
Clean up the environment − try with resources automatically closes the resources.
Sample Code
Copy and paste the following example in TestApplication.java, compile and run as follows −
import java.sql.Connection;
import java.sql.DriverManager;
import java.sql.SQLException;
import java.sql.Statement;

public class TestApplication {
   static final String DB_URL = "jdbc:mysql://localhost/TUTORIALSPOINT";
   static final String USER = "guest";
   static final String PASS = "guest123";

   public static void main(String[] args) {
      // Open a connection
      try(Connection conn = DriverManager.getConnection(DB_URL, USER, PASS);
         Statement stmt = conn.createStatement();
      ) {
          String sql = "CREATE TABLE REGISTRATION " +
                   "(id INTEGER not NULL, " +
                   " first VARCHAR(255), " +
                   " last VARCHAR(255), " +
                   " age INTEGER, " +
                   " PRIMARY KEY ( id ))";

         stmt.executeUpdate(sql);
         System.out.println("Created table in given database...");
      } catch (SQLException e) {
         e.printStackTrace();
      }
   }
}
Now let us compile the above example as follows −
C:\>javac TestApplication.java
C:\>
When you run TestApplication, it produces the following result −
C:\>java TestApplication
Created table in given database...
C:\>
Java & MySQL - Drop Table Example
This chapter provides an example on how to delete a table using JDBC application. Before executing the following example, make sure you have the following in place −
To execute the following example you can replace the username and password with your actual user name and password.
Your MySQL database you are using, is up and running.
NOTE − This is a serious operation and you have to make a firm decision before proceeding to delete a table, because everything you have in your table would be lost.
Required Steps
The following steps are required to create a new Database using JDBC application −
Import the packages − Requires that you include the packages containing the JDBC classes needed for database programming. Most often, using import java.sql.* will suffice.
Open a connection − Requires using the DriverManager.getConnection() method to create a Connection object, which represents a physical connection with a database server.
Execute a query − Requires using an object of type Statement for building and submitting an SQL statement to drop a table in a seleted database.
Clean up the environment − try with resources automatically closes the resources.
Sample Code
Copy and paste the following example in TestApplication.java, compile and run as follows −
import java.sql.Connection;
import java.sql.DriverManager;
import java.sql.SQLException;
import java.sql.Statement;

public class TestApplication {
   static final String DB_URL = "jdbc:mysql://localhost/TUTORIALSPOINT";
   static final String USER = "guest";
   static final String PASS = "guest123";

   public static void main(String[] args) {
      // Open a connection
      try(Connection conn = DriverManager.getConnection(DB_URL, USER, PASS);
         Statement stmt = conn.createStatement();
      ) {
         String sql = "DROP TABLE REGISTRATION";
         stmt.executeUpdate(sql);
         System.out.println("Table deleted in given database...");
      } catch (SQLException e) {
         e.printStackTrace();
      }
   }
}
Now let us compile the above example as follows −
C:\>javac TestApplication.java
C:\>
When you run TestApplication, it produces the following result −
C:\>java TestApplication
Table deleted in given database...
C:\>
Java & MySQL - Insert Records Example
This chapter provides an example on how to insert records in a table using JDBC application. Before executing following example, make sure you have the following in place −
To execute the following example you can replace the username and password with your actual user name and password.
Your MySQL database you are using is up and running.
Required Steps
The following steps are required to create a new Database using JDBC application −
Import the packages − Requires that you include the packages containing the JDBC classes needed for database programming. Most often, using import java.sql.* will suffice.
Register the JDBC driver − Requires that you initialize a driver so you can open a communications channel with the database.
Open a connection − Requires using the DriverManager.getConnection() method to create a Connection object, which represents a physical connection with a database server.
Execute a query − Requires using an object of type Statement for building and submitting an SQL statement to insert records into a table.
Clean up the environment − try with resources automatically closes the resources.
Sample Code
Copy and paste the following example in TestApplication.java, compile and run as follows −
import java.sql.Connection;
import java.sql.DriverManager;
import java.sql.SQLException;
import java.sql.Statement;

public class TestApplication {
   static final String DB_URL = "jdbc:mysql://localhost/TUTORIALSPOINT";
   static final String USER = "guest";
   static final String PASS = "guest123";

   public static void main(String[] args) {
      // Open a connection
      try(Connection conn = DriverManager.getConnection(DB_URL, USER, PASS);
         Statement stmt = conn.createStatement();
      ) {
         // Execute a query
         System.out.println("Inserting records into the table...");
         String sql = "INSERT INTO Registration VALUES (100, 'Zara', 'Ali', 18)";
         stmt.executeUpdate(sql);
         sql = "INSERT INTO Registration VALUES (101, 'Mahnaz', 'Fatma', 25)";
         stmt.executeUpdate(sql);
         sql = "INSERT INTO Registration VALUES (102, 'Zaid', 'Khan', 30)";
         stmt.executeUpdate(sql);
         sql = "INSERT INTO Registration VALUES(103, 'Sumit', 'Mittal', 28)";
         stmt.executeUpdate(sql);
         System.out.println("Inserted records into the table...");
      } catch (SQLException e) {
         e.printStackTrace();
      }
   }
}
Now let us compile the above example as follows −
C:\>javac TestApplication.java
C:\>
When you run TestApplication, it produces the following result −
C:\>java TestApplication
Inserting records into the table...
Inserted records into the table...
C:\>
Java & MySQL - Select Records Example
This chapter provides an example on how to select/ fetch records from a table using JDBC application. Before executing the following example, make sure you have the following in place −
To execute the following example you can replace the username and password with your actual user name and password.
Your MySQL database you are using is up and running.
Required Steps
The following steps are required to create a new Database using JDBC application −
Import the packages − Requires that you include the packages containing the JDBC classes needed for database programming. Most often, using import java.sql.* will suffice.
Open a connection − Requires using the DriverManager.getConnection() method to create a Connection object, which represents a physical connection with a database server.
Execute a query − Requires using an object of type Statement for building and submitting an SQL statement to select (i.e. fetch ) records from a table.
Extract Data − Once SQL query is executed, you can fetch records from the table.
Clean up the environment − try with resources automatically closes the resources.
Sample Code
Copy and paste the following example in TestApplication.java, compile and run as follows −
import java.sql.Connection;
import java.sql.DriverManager;
import java.sql.ResultSet;
import java.sql.SQLException;
import java.sql.Statement;

public class TestApplication {
   static final String DB_URL = "jdbc:mysql://localhost/TUTORIALSPOINT";
   static final String USER = "guest";
   static final String PASS = "guest123";
   static final String QUERY = "SELECT id, first, last, age FROM Registration";

   public static void main(String[] args) {
      // Open a connection
      try(Connection conn = DriverManager.getConnection(DB_URL, USER, PASS);
         Statement stmt = conn.createStatement();
         ResultSet rs = stmt.executeQuery(QUERY);
      ) {
         while(rs.next()){
            //Display values
            System.out.print("ID: " + rs.getInt("id"));
            System.out.print(", Age: " + rs.getInt("age"));
            System.out.print(", First: " + rs.getString("first"));
            System.out.println(", Last: " + rs.getString("last"));
         }
      } catch (SQLException e) {
         e.printStackTrace();
      }
   }
}
Now let us compile the above example as follows −
C:\>javac TestApplication.java
C:\>
When you run TestApplication, it produces the following result −
C:\>java TestApplication
ID: 100, Age: 18, First: Zara, Last: Ali
ID: 101, Age: 25, First: Mahnaz, Last: Fatma
ID: 102, Age: 30, First: Zaid, Last: Khan
ID: 103, Age: 28, First: Sumit, Last: Mittal
C:\>
Java & MySQL - Update Records Example
This chapter provides an example on how to update records in a table using JDBC application. Before executing the following example, make sure you have the following in place −
To execute the following example you can replace the username and password with your actual user name and password.
Your MySQL database you are using is up and running.
Required Steps
The following steps are required to create a new Database using JDBC application −
Import the packages − Requires that you include the packages containing the JDBC classes needed for database programming. Most often, using import java.sql.* will suffice.
Open a connection − Requires using the DriverManager.getConnection() method to create a Connection object, which represents a physical connection with a database server.
Execute a query − Requires using an object of type Statement for building and submitting an SQL statement to update records in a table. This Query makes use of IN and WHERE clause to update conditional records.
Clean up the environment − try with resources automatically closes the resources.
Sample Code
Copy and paste the following example in TestApplication.java, compile and run as follows −
import java.sql.Connection;
import java.sql.DriverManager;
import java.sql.ResultSet;
import java.sql.SQLException;
import java.sql.Statement;

public class TestApplication {
   static final String DB_URL = "jdbc:mysql://localhost/TUTORIALSPOINT";
   static final String USER = "guest";
   static final String PASS = "guest123";
   static final String QUERY = "SELECT id, first, last, age FROM Registration";

   public static void main(String[] args) {
      // Open a connection
      try(Connection conn = DriverManager.getConnection(DB_URL, USER, PASS);
         Statement stmt = conn.createStatement();
      ) {
         String sql = "UPDATE Registration " +
            "SET age = 30 WHERE id in (100, 101)";
         stmt.executeUpdate(sql);
         ResultSet rs = stmt.executeQuery(QUERY);
         while(rs.next()){
            //Display values
            System.out.print("ID: " + rs.getInt("id"));
            System.out.print(", Age: " + rs.getInt("age"));
            System.out.print(", First: " + rs.getString("first"));
            System.out.println(", Last: " + rs.getString("last"));
         }
         rs.close();
      } catch (SQLException e) {
         e.printStackTrace();
      }
   }
}
Now let us compile the above example as follows −
C:\>javac TestApplication.java
C:\>
When you run TestApplication, it produces the following result −
C:\>java TestApplication
ID: 100, Age: 30, First: Zara, Last: Ali
ID: 101, Age: 30, First: Mahnaz, Last: Fatma
ID: 102, Age: 30, First: Zaid, Last: Khan
ID: 103, Age: 28, First: Sumit, Last: Mittal
C:\>
Java & MySQL - Delete Records Example
This chapter provides an example on how to delete records from a table using JDBC application. Before executing following example, make sure you have the following in place −
To execute the following example you can replace the username and password with your actual user name and password.
Your MySQL database you are using is up and running.
Required Steps
The following steps are required to create a new Database using JDBC application −
Import the packages − Requires that you include the packages containing the JDBC classes needed for database programming. Most often, using import java.sql.* will suffice.
Register the JDBC driver − Requires that you initialize a driver so you can open a communications channel with the database.
Open a connection − Requires using the DriverManager.getConnection() method to create a Connection object, which represents a physical connection with a database server.
Execute a query − Requires using an object of type Statement for building and submitting an SQL statement to delete records from a table. This Query makes use of the WHERE clause to delete conditional records.
Clean up the environment − try with resources automatically closes the resources.
Sample Code
Copy and paste the following example in TestApplication.java, compile and run as follows −
import java.sql.Connection;
import java.sql.DriverManager;
import java.sql.ResultSet;
import java.sql.SQLException;
import java.sql.Statement;

public class TestApplication {
   static final String DB_URL = "jdbc:mysql://localhost/TUTORIALSPOINT";
   static final String USER = "guest";
   static final String PASS = "guest123";
   static final String QUERY = "SELECT id, first, last, age FROM Registration";

   public static void main(String[] args) {
      // Open a connection
      try(Connection conn = DriverManager.getConnection(DB_URL, USER, PASS);
         Statement stmt = conn.createStatement();
      ) {
         String sql = "DELETE FROM Registration " +
            "WHERE id = 101";
         stmt.executeUpdate(sql);
         ResultSet rs = stmt.executeQuery(QUERY);
         while(rs.next()){
            //Display values
            System.out.print("ID: " + rs.getInt("id"));
            System.out.print(", Age: " + rs.getInt("age"));
            System.out.print(", First: " + rs.getString("first"));
            System.out.println(", Last: " + rs.getString("last"));
         }
         rs.close();
      } catch (SQLException e) {
         e.printStackTrace();
      }
   }
}
Now let us compile the above example as follows −
C:\>javac TestApplication.java
C:\>
When you run TestApplication, it produces the following result −
C:\>java TestApplication
ID: 100, Age: 30, First: Zara, Last: Ali
ID: 102, Age: 30, First: Zaid, Last: Khan
ID: 103, Age: 28, First: Sumit, Last: Mittal
C:\>
Java & MySQL - WHERE Clause Example
This chapter provides an example on how to select records from a table using JDBC application. This would add additional conditions using WHERE clause while selecting records from the table. Before executing the following example, make sure you have the following in place −
To execute the following example you can replace the username and password with your actual user name and password.
Your MySQL database you are using, is up and running.
Required Steps
The following steps are required to create a new Database using JDBC application −
Import the packages − Requires that you include the packages containing the JDBC classes needed for the database programming. Most often, using import java.sql.* will suffice.
Register the JDBC driver − Requires that you initialize a driver so you can open a communications channel with the database.
Open a connection − Requires using the DriverManager.getConnection() method to create a Connection object, which represents a physical connection with a database server.
Execute a query − Requires using an object of type Statement for building and submitting an SQL statement to fetch records from a table, which meet the given condition. This Query makes use of the WHERE clause to select records.
Clean up the environment − try with resources automatically closes the resources.
Sample Code
Copy and paste the following example in TestApplication.java, compile and run as follows −
import java.sql.Connection;
import java.sql.DriverManager;
import java.sql.ResultSet;
import java.sql.SQLException;
import java.sql.Statement;

public class TestApplication {
   static final String DB_URL = "jdbc:mysql://localhost/TUTORIALSPOINT";
   static final String USER = "guest";
   static final String PASS = "guest123";
   static final String QUERY = "SELECT id, first, last, age FROM Registration";

   public static void main(String[] args) {
      // Open a connection
      try(Connection conn = DriverManager.getConnection(DB_URL, USER, PASS);
         Statement stmt = conn.createStatement();) {
         System.out.println("Fetching records without condition...");
         ResultSet rs = stmt.executeQuery(QUERY);
         while(rs.next()){
            //Display values
            System.out.print("ID: " + rs.getInt("id"));
            System.out.print(", Age: " + rs.getInt("age"));
            System.out.print(", First: " + rs.getString("first"));
            System.out.println(", Last: " + rs.getString("last"));
         }

         // Select all records having ID equal or greater than 101
         System.out.println("Fetching records with condition...");
         String sql = "SELECT id, first, last, age FROM Registration" +
            " WHERE id >= 101 ";
         rs = stmt.executeQuery(sql);

         while(rs.next()){
            //Display values
            System.out.print("ID: " + rs.getInt("id"));
            System.out.print(", Age: " + rs.getInt("age"));
            System.out.print(", First: " + rs.getString("first"));
            System.out.println(", Last: " + rs.getString("last"));
         }
         rs.close();
      } catch (SQLException e) {
         e.printStackTrace();
      }
   }
}
Now let us compile the above example as follows −
C:\>javac TestApplication.java
C:\>
When you run TestApplication, it produces the following result −
C:\>java TestApplication
Fetching records without condition...
ID: 100, Age: 30, First: Zara, Last: Ali
ID: 102, Age: 30, First: Zaid, Last: Khan
ID: 103, Age: 28, First: Sumit, Last: Mittal
Fetching records with condition...
ID: 102, Age: 30, First: Zaid, Last: Khan
ID: 103, Age: 28, First: Sumit, Last: Mittal
C:\>
Java & MySQL - LIKE Clause Example
This chapter provides an example on how to select records from a table using JDBC application. This would add additional conditions using LIKE clause while selecting records from the table. Before executing the following example, make sure you have the following in place −
To execute the following example you can replace the username and password with your actual user name and password.
Your MySQL database you are using, is up and running.
Required Steps
The following steps are required to create a new Database using JDBC application −
Import the packages − Requires that you include the packages containing the JDBC classes needed for database programming. Most often, using import java.sql.* will suffice.
Open a connection − Requires using the DriverManager.getConnection() method to create a Connection object, which represents a physical connection with a database server.
Execute a query − Requires using an object of type Statement for building and submitting an SQL statement to fetch records from a table which meet given condition. This Query makes use of LIKE clause to select records to select all the students whose first name starts with "za".
Clean up the environment − try with resources automatically closes the resources.
Sample Code
Copy and paste the following example in TestApplication.java, compile and run as follows −
import java.sql.Connection;
import java.sql.DriverManager;
import java.sql.ResultSet;
import java.sql.SQLException;
import java.sql.Statement;

public class TestApplication {
   static final String DB_URL = "jdbc:mysql://localhost/TUTORIALSPOINT";
   static final String USER = "guest";
   static final String PASS = "guest123";
   static final String QUERY = "SELECT id, first, last, age FROM Registration";

   public static void main(String[] args) {
      // Open a connection
      try(Connection conn = DriverManager.getConnection(DB_URL, USER, PASS);
         Statement stmt = conn.createStatement();) {
         System.out.println("Fetching records without condition...");
         ResultSet rs = stmt.executeQuery(QUERY);
         while(rs.next()){
            //Display values
            System.out.print("ID: " + rs.getInt("id"));
            System.out.print(", Age: " + rs.getInt("age"));
            System.out.print(", First: " + rs.getString("first"));
            System.out.println(", Last: " + rs.getString("last"));
         }

         // Select all records having ID equal or greater than 101
         System.out.println("Fetching records with condition...");
         String sql = "SELECT id, first, last, age FROM Registration" +
            " WHERE first LIKE '%za%'";
         rs = stmt.executeQuery(sql);

         while(rs.next()){
            //Display values
            System.out.print("ID: " + rs.getInt("id"));
            System.out.print(", Age: " + rs.getInt("age"));
            System.out.print(", First: " + rs.getString("first"));
            System.out.println(", Last: " + rs.getString("last"));
         }
         rs.close();
      } catch (SQLException e) {
         e.printStackTrace();
      }
   }
}
Now let us compile the above example as follows −
C:\>javac TestApplication.java
C:\>
When you run TestApplication, it produces the following result −
C:\>java TestApplication
Fetching records without condition...
ID: 100, Age: 30, First: Zara, Last: Ali
ID: 102, Age: 30, First: Zaid, Last: Khan
ID: 103, Age: 28, First: Sumit, Last: Mittal
Fetching records with condition...
ID: 100, Age: 30, First: Zara, Last: Ali
ID: 102, Age: 30, First: Zaid, Last: Khan
C:\>
Java & MySQL - Sorting Data Example
This chapter provides an example on how to sort records from a table using JDBC application. This would use asc and desc keywords to sort records in ascending or descending order. Before executing the following example, make sure you have the following in place −
To execute the following example you can replace the username and password with your actual user name and password.
Your MySQL database you are using, is up and running.
Required Steps
The following steps are required to create a new Database using JDBC application −
Import the packages − Requires that you include the packages containing the JDBC classes needed for database programming. Most often, using import java.sql.* will suffice.
Open a connection − Requires using the DriverManager.getConnection() method to create a Connection object, which represents a physical connection with a database server.
Execute a query − Requires using an object of type Statement for building and submitting an SQL statement to sort records from a table. These Queries make use of asc and desc clauses to sort data in ascending and descening orders.
Clean up the environment − try with resources automatically closes the resources.
Sample Code
Copy and paste the following example in TestApplication.java, compile and run as follows −
import java.sql.Connection;
import java.sql.DriverManager;
import java.sql.ResultSet;
import java.sql.SQLException;
import java.sql.Statement;

public class TestApplication {
   static final String DB_URL = "jdbc:mysql://localhost/TUTORIALSPOINT";
   static final String USER = "guest";
   static final String PASS = "guest123";
   static final String QUERY = "SELECT id, first, last, age FROM Registration";

   public static void main(String[] args) {
      // Open a connection
      try(Connection conn = DriverManager.getConnection(DB_URL, USER, PASS);
         Statement stmt = conn.createStatement();) {
         System.out.println("Fetching records in ascending order...");
         ResultSet rs = stmt.executeQuery(QUERY + " ORDER BY first ASC");
         while(rs.next()){
            //Display values
            System.out.print("ID: " + rs.getInt("id"));
            System.out.print(", Age: " + rs.getInt("age"));
            System.out.print(", First: " + rs.getString("first"));
            System.out.println(", Last: " + rs.getString("last"));
         }

         System.out.println("Fetching records in descending order...");
         rs = stmt.executeQuery(QUERY + " ORDER BY first DESC");
         while(rs.next()){
            //Display values
            System.out.print("ID: " + rs.getInt("id"));
            System.out.print(", Age: " + rs.getInt("age"));
            System.out.print(", First: " + rs.getString("first"));
            System.out.println(", Last: " + rs.getString("last"));
         }
         rs.close();
      } catch (SQLException e) {
         e.printStackTrace();
      }
   }
}
Now let us compile the above example as follows −
C:\>javac TestApplication.java
C:\>
When you run TestApplication, it produces the following result −
C:\>java TestApplication
Fetching records in ascending order...
ID: 103, Age: 28, First: Sumit, Last: Mittal
ID: 102, Age: 30, First: Zaid, Last: Khan
ID: 100, Age: 30, First: Zara, Last: Ali
Fetching records in descending order...
ID: 100, Age: 30, First: Zara, Last: Ali
ID: 102, Age: 30, First: Zaid, Last: Khan
ID: 103, Age: 28, First: Sumit, Last: Mittal
C:\>