- Java 9 Tutorial
- Java 9 - Home
- Java 9 - Overview
- Java 9 - Environment Setup
- Java 9 - Module System
- Java 9 - REPL (JShell)
- Java 9 - Improved JavaDocs
- Java 9 - Multirelease JAR
- Java 9 - Collection Factory Methods
- Java 9 - Private Interface Methods
- Java 9 - Process API Improvements
- Java 9 - Stream API Improvements
- Try With Resources improvement
- Enhanced @Deprecated Annotation
- Inner Class Diamond Operator
- Optional Class Improvements
- Java 9 - Multiresolution Image API
- CompletableFuture API Improvements
- Java 9 - Miscellaneous Features
- java9 Useful Resources
- Java 9 - Questions and Answers
- Java 9 - Quick Guide
- Java 9 - Useful Resources
- Java 9 - Discussion
Java 9 - Quick Guide
Java 9 - Overview
JAVA 9 (aka jdk 1.9) is a major release of JAVA programming language development. Its initial version was released on 21 Sep 2017. The main goals of Java 9 release are −
To make JDK and Java Standard Edition platform modular based in the sense that it can be scalled down to small computing devices well.
To improve the overall security of the JDK and Java Implementations.
To make build process and maintainance of java code libraries and large applications easy for for JAVA SE and EE platforms.
To design and implement a standard module system for the Java Platform which can be applied on both Platform and JDK easily.
New Features
There are 90+ enhancements added to Java 8, the most significant ones are mentioned below −
Module − A new kind of Java programing component introduced as module, which is a named, self-describing collection of code and data.
REPL (JShell) − Read-Eval-Print Loop (REPL) capability added to the Java platform.
HTTP 2 Client − new HTTPClient API supporting websockets and HTTP 2 streams and server push features.
Improved JavaDocs − Supports HTML5 output generation. Provides a search box to generated API documentation.
Multirelease JAR − Enhances the JAR format so that multiple, Java release-specific versions of class files can coexist in a single archive.
Collection Factory Methods − New static factory methods for List, Set, and Map interfaces to create immutable instances of those collections.
Private Interface Methods − Enhanced interfaces with private and private static methods.
Process API Improvements − Improved API to control and manage operating system processes.
Stream API Improvements − Enhanced security and robustness by allowing incoming streams of object-serialization data to be filtered.
Try With Resources improvement − Now final variables can be used as resources in the try-with-resources statement.
Enhanced @Deprecated Annotation − @Deprecated annotation revamped to provide more information about the status and intended disposition of an API.
Inner Class Diamond Operator − Allow the diamond operator to be used with anonymous classes if the argument type of the inferred type can be denoted.
Optional Class Improvements − New useful methods are added to java.util.Optional class.
Multiresolution Image API − Supports encapsulation of a set of images with different resolutions into a single multiresolution image.
CompletableFuture API improvements − The asynchronous mechanisms of the CompletableFuture class can perform an action when the process exits with ProcessHandle.onExit method.
Lightweight JSON − A lightweight API introduced to consume and generating documents and data streams via json in java 9.
Reactive Streams API − A new Reactive Streams API in Java SE 9 has been introduced to support reactive programming in java 9.
Java 9 - Environment Setup
Local Environment Setup
If you want to set up your own environment for Java programming language, then this section guides you through the whole process. Please follow the steps given below to set up your Java environment.
Java SE is available for download for free. To download click here, please download a version compatible with your operating system.
Follow the instructions to download Java, and run the .exe to install Java on your machine. Once you have installed Java on your machine, you would need to set environment variables to point to correct installation directories.
Setting Up the Path for Windows 2000/XP
Assuming you have installed Java in c:\Program Files\java\jdk directory −
Right-click on 'My Computer' and select 'Properties'.
Click on the 'Environment variables' button under the 'Advanced' tab.
Now, edit the 'Path' variable and add the path to the Java executable directory at the end of it. For example, if the path is currently set to
C:\Windows\System32, then edit it the following way
C:\Windows\System32;c:\Program Files\java\jdk\bin
Setting Up the Path for Windows 95/98/ME
Assuming you have installed Java in c:\Program Files\java\jdk directory −
Edit the 'C:\autoexec.bat' file and add the following line at the end −
SET PATH = %PATH%;C:\Program Files\java\jdk\bin
Setting Up the Path for Linux, UNIX, Solaris, FreeBSD
Environment variable PATH should be set to point to where the Java binaries have been installed. Refer to your shell documentation if you have trouble doing this.
For example, if you use bash as your shell, then you would add the following line at the end of your .bashrc −
export PATH = /path/to/java:$PATH'
Popular Java Editors
To write Java programs, you need a text editor. There are even more sophisticated IDEs available in the market. The most popular ones are briefly described below −
Notepad − On Windows machine, you can use any simple text editor like Notepad (recommended for this tutorial) or WordPad. Notepad++ is also a free text editor which enhanced facilities.
Netbeans − It is a Java IDE that is open-source and free which can be downloaded from https://www.netbeans.org/index.html.
Eclipse − It is also a Java IDE developed by the Eclipse open-source community and can be downloaded from https://www.eclipse.org/.
IDE or Integrated Development Environment, provides all common tools and facilities to aid in programming, such as source code editor, build tools and debuggers etc.
Java 9 - Module System
Java 9, a new kind of programming component called module has been introduced. A module is a self-describing collection of code and data and has a name to identify it.
Features
With the Modules component, following enhancements has been added in Java 9 −
A new optional phase,link time, is introduced. This phase is in-between compile time and run time. During this phase, a set of modules can be assembled and optimized, making a custom runtime image using jlink tool.
javac, jlink, and java have additional options to specify module paths, which further locate definitions of modules.
JAR format updated as modular JAR, which contains module-info.class file in its root directory.
JMOD format introduced, a packaging format (similar to JAR) which can include native code and configuration files.
Creating Module
Following the steps to create a module say com.tutorialspoint.greetings.
Step 1
Create a folder C:\>JAVA\src. Now create a folder com.tutorialspoint.greetings which is same as the name of module we're creating.
Step 2
Create module-info.java in C:\>JAVA\src\com.tutorialspoint.greetings folder with following code.
module-info.java
module com.tutorialspoint.greetings { }
module-info.java is the file which is used to create module. In this step we've created a module named com.tutorialspoint.greetings. By convention this file should reside in the folder whose name is same as module name.
Step 3
Add the source code in the module. Create Java9Tester.java in C:\>JAVA\src\com.tutorialspoint.greetings\com\tutorialspoint\greetings folder with following code.
Java9Tester.java
package com.tutorialspoint.greetings;

public class Java9Tester {
   public static void main(String[] args) {
      System.out.println("Hello World!");
   }
}
By convention, the source code of a module to lie in same directory which is the name of the module.
Step 4
Create a folder C:\>JAVA\mods. Now create a folder com.tutorialspoint.greetings which is same as the name of module we've created. Now compile the module to mods directory.
C:/ > JAVA > javac -d mods/com.tutorialspoint.greetings
   src/com.tutorialspoint.greetings/module-info.java
   src/com.tutorialspoint.greetings/com/tutorialspoint/greetings/Java9Tester.java
Step 5
Let's run the module to see the result. Run the following command.
C:/ > JAVA > java --module-path mods -m com.tutorialspoint.greetings/com.tutorialspoint.greetings.Java9Tester
Here module-path provides the module location as mods and -m signifies the main module.
Output
It will print the following output on console.
Hello World!
Java 9 - REPL (JShell)
REPL stands for Read-Eval-Print Loop. With JShell, java has REPL capability. Using REPL, we can code and test java based logic without compiling using javac and see the result of calculations directly.
Running JShell
Open command prompt and type jshell.
$ jshell
|  Welcome to JShell -- Version 9-ea
|  For an introduction type: /help intro
jshell>
Viewing JShell commands
Type /help once jshell command starts running.
jshell> /help
|  Type a Java language expression, statement, or declaration.
|  Or type one of the following commands:
|  /list [<name or id>|-all|-start]
|  list the source you have typed
|  /edit <name or id>
|  edit a source entry referenced by name or id
|  /drop <name or id>
|  delete a source entry referenced by name or id
|  /save [-all|-history|-start] <file>
|  Save snippet source to a file.
|  /open <file>
|  open a file as source input
|  /vars [<name or id>|-all|-start]
|  list the declared variables and their values
|  /methods [<name or id>|-all|-start]
|  list the declared methods and their signatures
|  /types [<name or id>|-all|-start]
|  list the declared types
|  /imports
|  list the imported items
Running JShell command
Type /imports once jshell command starts running and see the used imports.
jshell> /imports
|    import java.io.*
|    import java.math.*
|    import java.net.*
|    import java.nio.file.*
|    import java.util.*
|    import java.util.concurrent.*
|    import java.util.function.*
|    import java.util.prefs.*
|    import java.util.regex.*
|    import java.util.stream.*
jshell>
Running Calculations in JShell.
Try running simple calculations in JShell.
jshell> 3+1
$1 ==> 4
jshell> 13%7
$2 ==> 6
jshell> $2
$2 ==> 6
jshell>
Creating and using functions in JShell
Create a function doubled() to take int and return its doubled value.
jshell> int doubled(int i){ return i*2;}
|  created method doubled(int)
jshell> doubled(6)
$3 ==> 12
jshell>
Exiting JShell
Type /exit.
jshell> /exit
| Goodbye
Java 9 - Improved JavaDocs
Java documentation can be generated using javadoc tool. It currently generates documentation in html 4.0 format. In java 9, we can generate documentation in html 5 format by using -html5 option in command line arguments.
Old style java documentation
Consider the following code in C:/JAVA folder.
Tester.java
/**
 * @author MahKumar
 * @version 0.1
 */
public class Tester {
   /**
   * Default method to be run to print
   * <p>Hello world</p>
   * @param args command line arguments
   */
   public static void main(String []args) {
      System.out.println("Hello World");
   }
}
Now run the javadoc tool of jdk 7 to generate documentation.
C:\JAVA>javadoc -d C:/JAVA Tester.java
Loading source file tester.java...
Constructing Javadoc information...
Standard Doclet version 1.7.0_21
Building tree for all the packages and classes...
Generating C:\JAVA\Tester.html...
Generating C:\JAVA\package-frame.html...
Generating C:\JAVA\package-summary.html...
Generating C:\JAVA\package-tree.html...
Generating C:\JAVA\constant-values.html...
Building index for all the packages and classes...
Generating C:\JAVA\overview-tree.html...
Generating C:\JAVA\index-all.html...
Generating C:\JAVA\deprecated-list.html...
Building index for all classes...
Generating C:\JAVA\allclasses-frame.html...
Generating C:\JAVA\allclasses-noframe.html...
Generating C:\JAVA\index.html...
Generating C:\JAVA\help-doc.html...
It will create the java documentation page in C:/JAVA directory and you will see the following output.
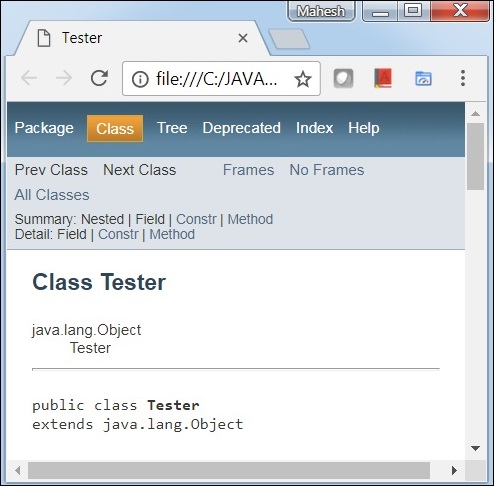
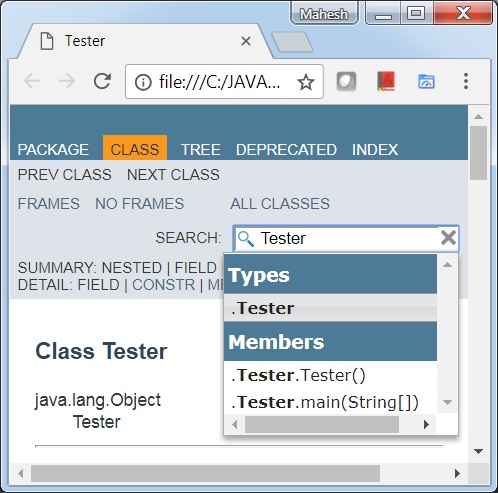
New java documentation with Search and HTML5 support
Run the javadoc tool of jdk 9 with -html5 flag to generate new type of documentation.
C:\JAVA> javadoc -d C:/JAVA -html5 Tester.java
Loading source file Tester.java...
Constructing Javadoc information...
Standard Doclet version 9.0.1
Building tree for all the packages and classes...
Generating C:\JAVA\Tester.html...
Generating C:\JAVA\package-frame.html...
Generating C:\JAVA\package-summary.html...
Generating C:\JAVA\package-tree.html...
Generating C:\JAVA\constant-values.html...
Building index for all the packages and classes...
Generating C:\JAVA\overview-tree.html...
Generating C:\JAVA\index-all.html...
Generating C:\JAVA\deprecated-list.html...
Building index for all classes...
Generating C:\JAVA\allclasses-frame.html...
Generating C:\JAVA\allclasses-frame.html...
Generating C:\JAVA\allclasses-noframe.html...
Generating C:\JAVA\allclasses-noframe.html...
Generating C:\JAVA\index.html...
Generating C:\JAVA\help-doc.html...
It will create the updated java documentation page in D:/test directory and you will see the following output.
Java 9 - Multirelease JAR
In java 9, a new feature is introduced where a jar format has been enhanced to have different versions of java class or resources can be maintained and used as per the platform. In JAR, a file MANIFEST.MF file has a entry Multi-Release: true in its main section. META-INF directory also contains a versions subdirectory whose subdirectories (starting with 9 for Java 9 ) store version-specific classes and resource files.
In this example, we'll be using a multi-release jar to have two versions of Tester.java file, one for jdk 7 and one for jdk 9 and run it on different jdk versions.
Steps
Step 1 − Create a folder c:/test/java7/com/tutorialspoint. Create Test.java with following content −
Tester.java
package com.tutorialspoint;

public class Tester {
   public static void main(String[] args) {
      System.out.println("Inside java 7");
   }
}
Step 2 − Create a folder c:/test/java9/com/tutorialspoint. Create Test.java with following content −
Tester.java
package com.tutorialspoint;

public class Tester {
   public static void main(String[] args) {
      System.out.println("Inside java 9");
   }
}
Compile the source codes.
C:\test > javac --release 9 java9/com/tutorialspoint/Tester.java

C:\JAVA > javac --release 7 java7/com/tutorialspoint/Tester.java
Create the multi-release jar
C:\JAVA > jar -c -f test.jar -C java7 . --release 9 -C java9.
Warning: entry META-INF/versions/9/com/tutorialspoint/Tester.java,
   multiple resources with same name
Run with JDK 7
C:\JAVA > java -cp test.jar com.tutorialspoint.Tester
Inside Java 7
Run with JDK 9
C:\JAVA > java -cp test.jar com.tutorialspoint.Tester
Inside Java 9
Java 9 - Collection Factory Methods
With Java 9, new factory methods are added to List, Set and Map interfaces to create immutable instances. These factory methods are convenience factory methods to create a collection in less verbose and in concise way.
Old way to create collections
import java.util.ArrayList;
import java.util.Collections;
import java.util.HashMap;
import java.util.HashSet;
import java.util.List;
import java.util.Map;
import java.util.Set;

public class Tester {

   public static void main(String []args) {
      Set<String> set = new HashSet<>();
      set.add("A");
      set.add("B");
      set.add("C");
      set = Collections.unmodifiableSet(set);
      System.out.println(set);
      List<String> list = new ArrayList<>();

      list.add("A");
      list.add("B");
      list.add("C");
      list = Collections.unmodifiableList(list);
      System.out.println(list);
      Map<String, String> map = new HashMap<>();

      map.put("A","Apple");
      map.put("B","Boy");
      map.put("C","Cat");
      map = Collections.unmodifiableMap(map);
      System.out.println(map);
   }
}
Output
It will print the following output.
[A, B, C]
[A, B, C]
{A=Apple, B=Boy, C=Cat}
New Methods
With java 9, following methods are added to List, Set and Map interfaces along with their overloaded counterparts.
static <E> List<E> of(E e1, E e2, E e3);
static <E> Set<E>  of(E e1, E e2, E e3);
static <K,V> Map<K,V> of(K k1, V v1, K k2, V v2, K k3, V v3);
static <K,V> Map<K,V> ofEntries(Map.Entry<? extends K,? extends V>... entries)
Points to Note
For List and Set interfaces, of(...) method is overloaded to have 0 to 10 parameters and one with var args parameter.
For Map interface, of(...) method is overloaded to have 0 to 10 parameters.
In case of more than 10 paramters for Map interface, ofEntries(...) method can be used accepting var args parameter.
New way to create collections
import java.util.ArrayList;
import java.util.Collections;
import java.util.HashMap;
import java.util.HashSet;
import java.util.List;
import java.util.AbstractMap;
import java.util.Map;
import java.util.Set;

public class Tester {

   public static void main(String []args) {
      Set<String> set = Set.of("A", "B", "C");
      System.out.println(set);
      List<String> list = List.of("A", "B", "C");
      System.out.println(list);
      Map<String, String> map = Map.of("A","Apple","B","Boy","C","Cat");
      System.out.println(map);

      Map<String, String> map1 = Map.ofEntries (
         new AbstractMap.SimpleEntry<>("A","Apple"),
         new AbstractMap.SimpleEntry<>("B","Boy"),
         new AbstractMap.SimpleEntry<>("C","Cat"));
      System.out.println(map1);
   }
}
Output
It will print the following output.
[A, B, C]
[A, B, C]
{A=Apple, B=Boy, C=Cat}
{A=Apple, B=Boy, C=Cat}
Java 9 - Private Interface Methods
Prior to java 8, interfaces can have following type of variables/methods.
- Constant variables
- Abstract methods
So we cannot have method implementation in interfaces or more precisely a default implementation prior to Java 8. See the example.
public class Tester {
   public static void main(String []args) {
      LogOracle log = new LogOracle();
      log.logInfo("");
      log.logWarn("");
      log.logError("");
      log.logFatal("");
      LogMySql log1 = new LogMySql();
      log1.logInfo("");
      log1.logWarn("");
      log1.logError("");
      log1.logFatal("");
   }
}

final class LogOracle implements Logging {
   @Override
   public void logInfo(String message) {
      getConnection();
      System.out.println("Log Message : " + "INFO");
      closeConnection();
   }

   @Override
   public void logWarn(String message) {
      getConnection();
      System.out.println("Log Message : " + "WARN");
      closeConnection();
   }

   @Override
   public void logError(String message) {
      getConnection();
      System.out.println("Log Message : " + "ERROR");
      closeConnection();
   }

   @Override
   public void logFatal(String message) {
      getConnection();
      System.out.println("Log Message : " + "FATAL");
      closeConnection();
   }

   @Override
   public void getConnection() {
      System.out.println("Open Database connection");
   }

   @Override
   public void closeConnection() {
      System.out.println("Close Database connection");
   }
}

final class LogMySql implements Logging {
   @Override
   public void logInfo(String message) {
      getConnection();
      System.out.println("Log Message : " + "INFO");
      closeConnection();
   }

   @Override
   public void logWarn(String message) {
      getConnection();
      System.out.println("Log Message : " + "WARN");
      closeConnection();
   }

   @Override
   public void logError(String message) {
      getConnection();
      System.out.println("Log Message : " + "ERROR");
      closeConnection();
   }

   @Override
   public void logFatal(String message) {
      getConnection();
      System.out.println("Log Message : " + "FATAL");
      closeConnection();
   }

   @Override
   public void getConnection() {
      System.out.println("Open Database connection");
   }

   @Override
   public void closeConnection() {
      System.out.println("Close Database connection");
   }
}

interface Logging {
   String ORACLE = "Oracle_Database";
   String MYSQL = "MySql_Database";

   void logInfo(String message);
   void logWarn(String message);
   void logError(String message);
   void logFatal(String message);

   void getConnection();
   void closeConnection();
}
Output
You will see the following output.
Open Database connection
Log Message : INFO
Close Database connection
Open Database connection
Log Message : WARN
Close Database connection
Open Database connection
Log Message : ERROR
Close Database connection
Open Database connection
Log Message : FATAL
Close Database connection
In above example, each log method has its own implementation. With Java 8 interfaces can have following type of variables/methods.
- Constant variables
- Abstract methods
- Default methods
- Static methods
Let's have default implementation and static methods in interface itself using Java 8.
public class Tester {
   public static void main(String []args) {
      LogOracle log = new LogOracle();
      log.logInfo("");
      log.logWarn("");
      log.logError("");
      log.logFatal("");
      LogMySql log1 = new LogMySql();
      log1.logInfo("");
      log1.logWarn("");
      log1.logError("");
      log1.logFatal("");
   }
}

final class LogOracle implements Logging {
}

final class LogMySql implements Logging {
}

interface Logging {
   String ORACLE = "Oracle_Database";
   String MYSQL = "MySql_Database";

   default void logInfo(String message) {
      getConnection();
      System.out.println("Log Message : " + "INFO");
      closeConnection();
   }

   default void logWarn(String message) {
      getConnection();
      System.out.println("Log Message : " + "WARN");
      closeConnection();
   }

   default void logError(String message) {
      getConnection();
      System.out.println("Log Message : " + "ERROR");
      closeConnection();
   }

   default void logFatal(String message) {
      getConnection();
      System.out.println("Log Message : " + "FATAL");
      closeConnection();
   }

   static void getConnection() {
      System.out.println("Open Database connection");
   }
   static void closeConnection() {
      System.out.println("Close Database connection");
   }
}
Output
You will see the following output.
Open Database connection
Log Message : INFO
Close Database connection
Open Database connection
Log Message : WARN
Close Database connection
Open Database connection
Log Message : ERROR
Close Database connection
Open Database connection
Log Message : FATAL
Close Database connection
In above example, we're having repeation again. With Java 9 interfaces can have following type of variables/methods.
- Constant variables
- Abstract methods
- Default methods
- Static methods
- Private methods
- Private Static methods
Let's have private methods and use them in Java 9.
public class Tester {
   public static void main(String []args) {
      LogOracle log = new LogOracle();
      log.logInfo("");
      log.logWarn("");
      log.logError("");
      log.logFatal("");
      LogMySql log1 = new LogMySql();
      log1.logInfo("");
      log1.logWarn("");
      log1.logError("");
      log1.logFatal("");
   }
}

final class LogOracle implements Logging {
}

final class LogMySql implements Logging {
}

interface Logging {
   String ORACLE = "Oracle_Database";
   String MYSQL = "MySql_Database";

   private void log(String message, String prefix) {
      getConnection();
      System.out.println("Log Message : " + prefix);
      closeConnection();
   }

   default void logInfo(String message) {
      log(message, "INFO");
   }

   default void logWarn(String message) {
      log(message, "WARN");
   }

   default void logError(String message) {
      log(message, "ERROR");
   }

   default void logFatal(String message) {
      log(message, "FATAL");
   }

   private static void getConnection() {
      System.out.println("Open Database connection");
   }

   private static void closeConnection() {
      System.out.println("Close Database connection");
   }
}
Output
You will see the following output.
Open Database connection
Log Message : INFO
Close Database connection
Open Database connection
Log Message : WARN
Close Database connection
Open Database connection
Log Message : ERROR
Close Database connection
Open Database connection
Log Message : FATAL
Close Database connection
Java 9 - Process API Improvements
In Java 9 Process API which is responsible to control and manage operating system processes has been improved considerably. ProcessHandle Class now provides process's native process ID, start time, accumulated CPU time, arguments, command, user, parent process, and descendants. ProcessHandle class also provides method to check processes' liveness and to destroy processes. It has onExit method, the CompletableFuture class can perform action asynchronously when process exits.
Tester.java
import java.time.ZoneId;
import java.util.stream.Stream;
import java.util.stream.Collectors;
import java.io.IOException;

public class Tester {
   public static void main(String[] args) throws IOException {
      ProcessBuilder pb = new ProcessBuilder("notepad.exe");
      String np = "Not Present";
      Process p = pb.start();
      ProcessHandle.Info info = p.info();
      System.out.printf("Process ID : %s%n", p.pid());
      System.out.printf("Command name : %s%n", info.command().orElse(np));
      System.out.printf("Command line : %s%n", info.commandLine().orElse(np));

      System.out.printf("Start time: %s%n",
         info.startInstant().map(i -> i.atZone(ZoneId.systemDefault())
         .toLocalDateTime().toString()).orElse(np));

      System.out.printf("Arguments : %s%n",
         info.arguments().map(a -> Stream.of(a).collect(
            Collectors.joining(" "))).orElse(np));

      System.out.printf("User : %s%n", info.user().orElse(np));
   }
}
Output
You will see the following output.
Process ID : 5800
Command name : C:\Windows\System32\notepad.exe
Command line : Not Present
Start time: 2017-11-04T21:35:03.626
Arguments : Not Present
User: administrator
Java 9 - Stream API Improvements
Streams were introduced in Java to help developers perform aggregate operations from a sequence of objects. With Java 9, few more methods are added to make streams better.
takeWhile(Predicate Interface)
Syntax
default Stream<T> takeWhile(Predicate<? super T> predicate)
takeWhile method takes all the values until the predicate returns false. It returns, in case of ordered stream, a stream consisting of the longest prefix of elements taken from this stream matching the given predicate.
Example
import java.util.stream.Stream;

public class Tester {
   public static void main(String[] args) {
      Stream.of("a","b","c","","e","f").takeWhile(s->!s.isEmpty())
         .forEach(System.out::print);
   }
}
Output
takeWhile method takes all a, b, and c values, then once string is empty, it stopped executing.
abc
dropWhile(Predicate Interface)
Syntax
default Stream<T> dropWhile(Predicate<? super T> predicate)
dropWhile method throw away all the values at the start until the predicate returns true. It returns, in case of ordered stream, a stream consisting of the remaining elements of this stream after dropping the longest prefix of elements matching the given predicate.
Example
import java.util.stream.Stream;

public class Tester {
   public static void main(String[] args) {
      Stream.of("a","b","c","","e","f").dropWhile(s-> !s.isEmpty())
      .forEach(System.out::print);
      System.out.println();
      Stream.of("a","b","c","","e","","f").dropWhile(s-> !s.isEmpty())
      .forEach(System.out::print);
   }
}
Output
dropWhile method drops a,b and c values, then once string is empty, it takes all the values.
ef
ef
iterate
Syntax
static <T> Stream<T> iterate(T seed, Predicate<? super T> hasNext, UnaryOperator<T> next)
iterate method now has hasNext predicate as parameter which stops the loop once hasNext predicate returns false.
Example
import java.util.stream.IntStream;

public class Tester {
   public static void main(String[] args) {
      IntStream.iterate(3, x -> x < 10, x -> x+ 3).forEach(System.out::println);
   }
}
Output
3
6
9
ofNullable
Syntax
static <T> Stream<T> ofNullable(T t)
ofNullable method is introduced to prevent NullPointerExceptions and to avoid null checks for streams. This method returns a sequential Stream containing single element, if non-null, otherwise returns an empty Stream.
Example
import java.util.stream.Stream;

public class Tester {
   public static void main(String[] args) {
      long count = Stream.ofNullable(100).count();
      System.out.println(count);

      count = Stream.ofNullable(null).count();
      System.out.println(count);
   }
}
Output
1
0
Java 9 - Try With Resources improvement
The try-with-resources statement is a try statement with one or more resources duly declared. Here resource is an object which should be closed once it is no more required. The try-with-resources statement ensures that each resource is closed after the requirement finishes. Any object implementing java.lang.AutoCloseable or java.io.Closeable, interface can be used as a resource.
Prior to Java 9, resources are to be declared before try or inside try statement as shown below in given example. In this example, we'll use BufferedReader as resource to read a string and then BufferedReader is to be closed.
Tester.java
import java.io.BufferedReader;
import java.io.IOException;
import java.io.Reader;
import java.io.StringReader;

public class Tester {
   public static void main(String[] args) throws IOException {
      System.out.println(readData("test"));
   }

   static String readData(String message) throws IOException {
      Reader inputString = new StringReader(message);
      BufferedReader br = new BufferedReader(inputString);
      try (BufferedReader br1 = br) {
         return br1.readLine();
      }
   }
}
Output
test
Here we need to declare a resource br1 within try statment and then use it. In Java9, we don't need to declare br1 anymore and following program will give the same result.
Tester.java
import java.io.BufferedReader;
import java.io.IOException;
import java.io.Reader;
import java.io.StringReader;

public class Tester {
   public static void main(String[] args) throws IOException {
      System.out.println(readData("test"));
   }

   static String readData(String message) throws IOException {
      Reader inputString = new StringReader(message);
      BufferedReader br = new BufferedReader(inputString);
      try (br) {
         return br.readLine();
      }
   }
}
Output
test
Java 9 - Enhanced @Deprecated Annotation
@Deprecated annotation was introduced in java 5 version. A program element annotated with @Deprecated means it should not be used for any of the following reasons −
- Its usage may leads to errors.
- It may be incompatible in future version.
- It may be removed in future version.
- A better and efficient alternative has superseeded it.
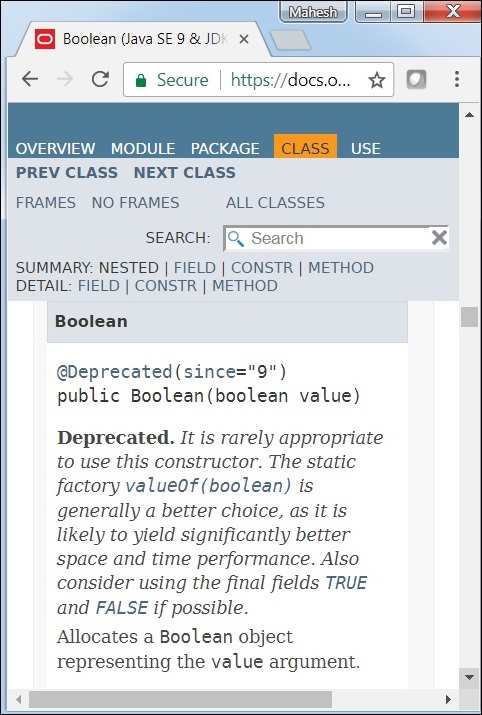
Compiler generates warnings whenever a deprecated element is used. With Java 9, two new enhancements are made to @Deprecated annotation.
forRemoval − Indicates whether the annotated element is subject to removal in a future version. The default value is false.
since − Returns the version in which the annotated element became deprecated. The default value is the empty string.
Deprecated with since
Following example of Boolean class javadoc on Java 9 illustrate the use of since attribute on @Deprecated annotation.
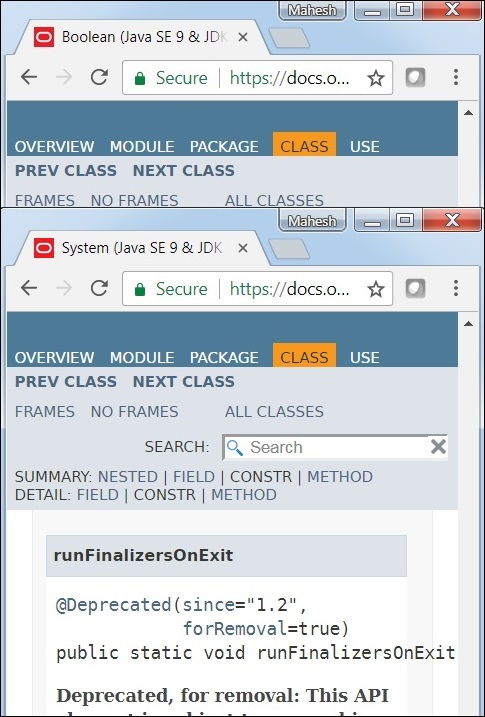
Deprecated with forRemoval
Following example of System class javadoc on Java 9 illustrate the use of forRemoval attribute on @Deprecated annotation.
Java 9 - Inner Class Diamond Operator
Diamond operator was introduced in java 7 to make code more readable but it could not be used with Anonymous inner classes. In java 9, it can be used with annonymous class as well to simplify code and improves readability. Consider the following code prior to Java 9.
Tester.java
public class Tester {
   public static void main(String[] args) {
         Handler<Integer> intHandler = new Handler<Integer>(1) {

         @Override
         public void handle() {
            System.out.println(content);
         }
      };

      intHandler.handle();
      Handler<? extends Number> intHandler1 = new Handler<Number>(2) {

         @Override
         public void handle() {
            System.out.println(content);
         }
      };

      intHandler1.handle();
      Handler<?> handler = new Handler<Object>("test") {

         @Override
         public void handle() {
            System.out.println(content);
         }
      };

      handler.handle();
   }
}

abstract class Handler<T> {
   public T content;

   public Handler(T content) {
      this.content = content;
   }

   abstract void handle();
}
Output
1
2
Test
With Java 9, we can use <> operator with anonymous class as well as shown below.
Tester.java
public class Tester {
   public static void main(String[] args) {
         Handler<Integer> intHandler = new Handler<>(1) {

         @Override
         public void handle() {
            System.out.println(content);
         }
      };

      intHandler.handle();
      Handler<? extends Number> intHandler1 = new Handler<>(2) {

         @Override
         public void handle() {
            System.out.println(content);
         }
      };

      intHandler1.handle();
      Handler<?> handler = new Handler<>("test") {

         @Override
         public void handle() {
            System.out.println(content);
         }
      };

      handler.handle();
   }
}

abstract class Handler<T> {
   public T content;

   public Handler(T content) {
      this.content = content;
   }

   abstract void handle();
}
Output
1
2
Test
Java 9 - Optional Class Improvements
Optional Class was introduced in Java 8 to avoid null checks and NullPointerException issues. In java 9, three new methods are added to improve its functionality.
- stream()
- ifPresentOrElse()
- or()
stream() method
Syntax
public Stream<T> stream()
If a value is present, it returns a sequential Stream containing only that value, otherwise returns an empty Stream.
Example
import java.util.Arrays;
import java.util.List;
import java.util.Optional;
import java.util.stream.Collectors;
import java.util.stream.Stream;

public class Tester {
public static void main(String[] args) {
   List<Optional<String>> list = Arrays.asList (
      Optional.empty(),
      Optional.of("A"),
      Optional.empty(),
      Optional.of("B"));

   //filter the list based to print non-empty values

   //if optional is non-empty, get the value in stream, otherwise return empty
   List<String> filteredList = list.stream()
      .flatMap(o -> o.isPresent() ? Stream.of(o.get()) : Stream.empty())
      .collect(Collectors.toList());

   //Optional::stream method will return a stream of either one
   //or zero element if data is present or not.
   List<String> filteredListJava9 = list.stream()
      .flatMap(Optional::stream)
      .collect(Collectors.toList());

      System.out.println(filteredList);
      System.out.println(filteredListJava9);
   }
}
Output
[A, B]
[A, B]
ifPresentOrElse() method
Syntax
public void ifPresentOrElse(Consumer<? super T> action, Runnable emptyAction)
If a value is present, performs the given action with the value, otherwise performs the given empty-based action.
Example
import java.util.Optional;

public class Tester {
   public static void main(String[] args) {
      Optional<Integer> optional = Optional.of(1);

      optional.ifPresentOrElse( x -> System.out.println("Value: " + x),() ->
         System.out.println("Not Present."));

      optional = Optional.empty();

      optional.ifPresentOrElse( x -> System.out.println("Value: " + x),() ->
         System.out.println("Not Present."));
   }
}
Output
Value: 1
Not Present.
or() method
Syntax
public Optional<T> or(Supplier<? extends Optional<? extends T>> supplier)
If a value is present, returns an Optional describing the value, otherwise returns an Optional produced by the supplying function.
Example
import java.util.Optional;
import java.util.function.Supplier;

public class Tester {
   public static void main(String[] args) {
      Optional<String> optional1 = Optional.of("Mahesh");

      Supplier<Optional<String>> supplierString = () -> Optional.of("Not Present");

      optional1 = optional1.or( supplierString);

      optional1.ifPresent( x -> System.out.println("Value: " + x));

      optional1 = Optional.empty();

      optional1 = optional1.or( supplierString);

      optional1.ifPresent( x -> System.out.println("Value: " + x));
   }
}
Output
Value: Mahesh
Value: Not Present
Java 9 - Multiresolution Image API
With Java 9, a new multi-resolution image API has been introduced which supports multiple images with different resolution variants. This API allows a set of images with different resolution to be used as a single multi-resolution image. Following are major operations of multi-resolution image.
Image getResolutionVariant(double destImageWidth, double destImageHeight) − Gets a specific image which is best variant to represent this logical image at the indicated size.
List<Image> getResolutionVariants() − Gets a readable list of all resolution variants.
Example
import java.io.IOException;
import java.net.URL;
import java.net.MalformedURLException;
import java.util.ArrayList;
import java.util.List;
import java.awt.Image;
import java.awt.image.MultiResolutionImage;
import java.awt.image.BaseMultiResolutionImage;

import javax.imageio.ImageIO;

public class Tester {
   public static void main(String[] args) throws IOException, MalformedURLException {

      List<String> imgUrls = List.of("http://www.tutorialspoint.com/java9/images/logo.png",
         "http://www.tutorialspoint.com/java9/images/mini_logo.png",
         "http://www.tutorialspoint.com/java9/images/large_logo.png");

      List<Image> images = new ArrayList<Image>();

      for (String url : imgUrls) {
         images.add(ImageIO.read(new URL(url)));
      }

      // read all images into one multiresolution image
      MultiResolutionImage multiResolutionImage =
         new BaseMultiResolutionImage(images.toArray(new Image[0]));

      // get all variants of images
      List<Image> variants = multiResolutionImage.getResolutionVariants();

      System.out.println("Total number of images: " + variants.size());

      for (Image img : variants) {
         System.out.println(img);
      }

      // get a resolution-specific image variant for each indicated size
      Image variant1 = multiResolutionImage.getResolutionVariant(156, 45);
      System.out.printf("\nImage for destination[%d,%d]: [%d,%d]",
         156, 45, variant1.getWidth(null), variant1.getHeight(null));

      Image variant2 = multiResolutionImage.getResolutionVariant(311, 89);
      System.out.printf("\nImage for destination[%d,%d]: [%d,%d]", 311, 89,
         variant2.getWidth(null), variant2.getHeight(null));

      Image variant3 = multiResolutionImage.getResolutionVariant(622, 178);
      System.out.printf("\nImage for destination[%d,%d]: [%d,%d]", 622, 178,
         variant3.getWidth(null), variant3.getHeight(null));

      Image variant4 = multiResolutionImage.getResolutionVariant(300, 300);
      System.out.printf("\nImage for destination[%d,%d]: [%d,%d]", 300, 300,
         variant4.getWidth(null), variant4.getHeight(null));
   }
}
Output
Total number of images: 3
BufferedImage@7ce6a65d: type = 6 ColorModel: #pixelBits = 32 numComponents = 4
color space =java.awt.color.ICC_ColorSpace@548ad73b transparency = 3
has alpha = true isAlphaPre = false ByteInterleavedRaster: width =311
height = 89 #numDataElements 4 dataOff[0] = 3

BufferedImage@4c762604: type = 6 ColorModel: #pixelBits = 32 numComponents = 4
color space =java.awt.color.ICC_ColorSpace@548ad73b transparency = 3
has alpha = true isAlphaPre = false ByteInterleavedRaster: width =156
height = 45 #numDataElements 4 dataOff[0] = 3

BufferedImage@2641e737: type = 6 ColorModel: #pixelBits = 32 numComponents = 4
color space =java.awt.color.ICC_ColorSpace@548ad73b transparency = 3
has alpha = true isAlphaPre = false ByteInterleavedRaster: width =622
height = 178 #numDataElements 4 dataOff[0] = 3

Image for destination[156,45]: [311,89]
Image for destination[311,89]: [311,89]
Image for destination[622,178]: [622,178]
Image for destination[300,300]: [622,178]
CompletableFuture API Improvements
CompletableFuture class was introduced in Java 8 to represent the Future which can be completed by setting its value and status explicity. It can be used as java.util.concurrent.CompletionStage. It supports dependent functions and actions which got triggered upon the future's completion. In java 9 CompletableFuture API has been enhanced further. Following are the relevant changes done to the API.
- Support for delays and timeouts.
- Improved support for subclassing.
- New factory methods added.
Support for delays and timeouts
public CompletableFuture<T> completeOnTimeout(T value, long timeout, TimeUnit unit)
This method completes this CompletableFuture with the given value if not otherwise completed before the given timeout.
public CompletableFuture<T> orTimeout(long timeout, TimeUnit unit)
This method exceptionally completes this CompletableFuture with a TimeoutException if not otherwise completed before the given timeout.
Improved support for subclassing
public Executor defaultExecutor()
It returns the default Executor used for async methods that do not specify an Executor. This method may be overridden in subclasses to return an Executor to provide one independent thread as minimum.
public <U> CompletableFuture<U> newIncompleteFuture()
Returns a new incomplete CompletableFuture of the type to be returned by a CompletionStage method. Subclasses of CompletableFuture class should override this method to return an instance of the same class as this CompletableFuture. The default implementation returns an instance of class CompletableFuture.
New factory Methods
public static <U> CompletableFuture<U> completedFuture(U value)
This factory method returns a new CompletableFuture which is already completed with the given value.
public static <U> CompletionStage<U> completedStage(U value)
This factory method returns a new CompletionStage which is already completed with the given value and supports only those methods present in interface CompletionStage.
public static <U> CompletionStage<U> failedStage(Throwable ex)
This factory method returns a new CompletionStage which is already completed exceptionally with the given exception and supports only those methods present in interface CompletionStage.
Java 9 - Miscellaneous features
Apart from mentioned features, with Java 9, a lot more enhancements are done to JDK platform. Some of them are listed below.
- GC (Garbage Collector) Improvements
- Stack-Walking API
- Filter Incoming Serialization Data
- Deprecate the Applet API
- Indify String Concatenation
- Enhanced Method Handles
- Java Platform Logging API and Service
- Compact Strings
- Parser API for Nashorn