- GWT Tutorial
- GWT - Home
- GWT - Overview
- GWT - Environment Setup
- GWT - Applications
- GWT - Create Application
- GWT - Deploy Application
- GWT - Style with CSS
- GWT - Basic Widgets
- GWT - Form Widgets
- GWT - Complex widgets
- GWT - Layout Panels
- GWT - Event Handling
- GWT - Custom Widgets
- GWT - UIBinder
- GWT - RPC Communication
- GWT - JUnit Integration
- GWT - Debugging Application
- GWT - Internationalization
- GWT - History Class
- GWT - Bookmark Support
- GWT - Logging Framework
- GWT Useful Resources
- GWT - Questions and Answers
- GWT - Quick Guide
- GWT - Useful Resources
- GWT - Discussion
GWT - TextArea Widget
Introduction
The TextArea widget represents a text box that allows multiple lines of text to be entered.
Class Declaration
Following is the declaration for com.google.gwt.user.client.ui.TextArea class −
public class TextArea
   extends TextBoxBase
      implements HasDirection
CSS Style Rules
Following default CSS Style rules will be applied to all the TextBox widget. You can override it as per your requirements.
.gwt-TextArea {}

.gwt-TextArea-readonly {}
Class Constructors
| Sr.No. | Constructor & Description |
|---|---|
| 1 |
TextArea() Creates an empty text area. |
Class Methods
| Sr.No. | Function name & Description |
|---|---|
| 1 |
int getCharacterWidth() Gets the requested width of the text box (this is not an exact value, as not all characters are created equal). |
| 2 |
int getCursorPos() Gets the current position of the cursor (this also serves as the beginning of the text selection). |
| 3 |
HasDirection.Direction getDirection() Gets the directionality of the widget. |
| 4 |
int getSelectionLength() Gets the length of the current text selection. |
| 5 |
int getVisibleLines() Gets the number of text lines that are visible. |
| 6 |
void setCharacterWidth(int width) Sets the requested width of the text box (this is not an exact value, as not all characters are created equal). |
| 7 |
void setDirection(HasDirection.Direction direction) Sets the directionality for a widget. |
| 8 |
void setVisibleLines(int lines) Sets the number of text lines that are visible. |
Methods Inherited
This class inherits methods from the following classes −
com.google.gwt.user.client.ui.UIObject
com.google.gwt.user.client.ui.Widget
com.google.gwt.user.client.ui.FocusWidget
com.google.gwt.user.client.ui.TextBoxBase
java.lang.Object
TextBox Widget Example
This example will take you through simple steps to show usage of a TextBox Widget in GWT. Follow the following steps to update the GWT application we created in GWT - Create Application chapter −
| Step | Description |
|---|---|
| 1 | Create a project with a name HelloWorld under a package com.tutorialspoint as explained in the GWT - Create Application chapter. |
| 2 | Modify HelloWorld.gwt.xml, HelloWorld.css, HelloWorld.html and HelloWorld.java as explained below. Keep rest of the files unchanged. |
| 3 | Compile and run the application to verify the result of the implemented logic. |
Following is the content of the modified module descriptor src/com.tutorialspoint/HelloWorld.gwt.xml.
<?xml version = "1.0" encoding = "UTF-8"?>
<module rename-to = 'helloworld'>
   <!-- Inherit the core Web Toolkit stuff.                        -->
   <inherits name = 'com.google.gwt.user.User'/>

   <!-- Inherit the default GWT style sheet.                       -->
   <inherits name = 'com.google.gwt.user.theme.clean.Clean'/>

   <!-- Specify the app entry point class.                         -->
   <entry-point class = 'com.tutorialspoint.client.HelloWorld'/>

   <!-- Specify the paths for translatable code                    -->
   <source path = 'client'/>
   <source path = 'shared'/>

</module>
Following is the content of the modified Style Sheet file war/HelloWorld.css.
body {
   text-align: center;
   font-family: verdana, sans-serif;
}

h1 {
   font-size: 2em;
   font-weight: bold;
   color: #777777;
   margin: 40px 0px 70px;
   text-align: center;
}

.gwt-TextArea {
   color: green;
}

.gwt-TextArea-readonly {
   background-color: yellow;
}
Following is the content of the modified HTML host file war/HelloWorld.html.
<html>
   <head>
      <title>Hello World</title>
      <link rel = "stylesheet" href = "HelloWorld.css"/>
      <script language = "javascript" src = "helloworld/helloworld.nocache.js">
      </script>
   </head>

   <body>
      <h1>TextArea Widget Demonstration</h1>
      <div id = "gwtContainer"></div>
   </body>
</html>
Let us have following content of Java file src/com.tutorialspoint/HelloWorld.java which will demonstrate use of TextBox widget.
package com.tutorialspoint.client;

import com.google.gwt.core.client.EntryPoint;
import com.google.gwt.user.client.ui.RootPanel;
import com.google.gwt.user.client.ui.TextArea;
import com.google.gwt.user.client.ui.VerticalPanel;

public class HelloWorld implements EntryPoint {
   public void onModuleLoad() {
      //create textarea elements
      TextArea textArea1 = new TextArea();
      TextArea textArea2 = new TextArea();

      //set width as 10 characters
      textArea1.setCharacterWidth(20);
      textArea2.setCharacterWidth(20);

      //set height as 5 lines
      textArea1.setVisibleLines(5);
      textArea2.setVisibleLines(5);

      //add text to text area
      textArea2.setText(" Hello World! \n Be Happy! \n Stay Cool!");

      //set textbox as readonly
      textArea2.setReadOnly(true);

      // Add text boxes to the root panel.
      VerticalPanel panel = new VerticalPanel();
      panel.setSpacing(10);
      panel.add(textArea1);
      panel.add(textArea2);

      RootPanel.get("gwtContainer").add(panel);
   }
}
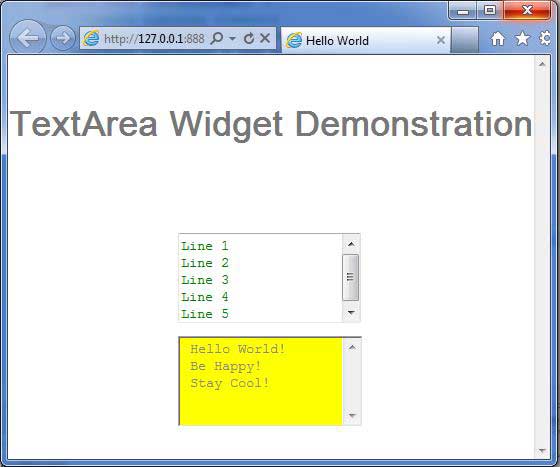
Once you are ready with all the changes done, let us compile and run the application in development mode as we did in GWT - Create Application chapter. If everything is fine with your application, this will produce following result −