- Grunt Tutorial
- Grunt - Home
- Grunt - Overview
- Grunt - Features
- Grunt - Installing
- Grunt - Getting started
- Grunt - Configuring Tasks
- Grunt - Sample File
- Grunt - Creating Tasks
- Grunt Useful Resources
- Grunt - Quick Guide
- Grunt - Useful Resources
- Grunt - Discussion
Grunt - Quick Guide
Grunt - Overview
What is Grunt?
Grunt is a JavaScript Task Runner which can be used as a command line tool for JavaScript objects. It is a task manager written on top of NodeJS.
Why Use Grunt?
Grunt can perform repetitive tasks very easily, such as compilation, unit testing, minifying files, running tests, etc.
Grunt includes built-in tasks that extend the functionality of your plugins and scripts.
The ecosystem of Grunt is huge; you can automate anything with very less effort.
History
The first lines of source code were added to GruntJS in 2011. The Grunt v0.4 was released on February 18, 2013. The Grunt v0.4.5 was released on May 12, 2014. The stable version of Grunt is 1.0.0 rc1 which was released on February 11, 2016.
Advantages
Using Grunt, you can perform minification, compilation, and testing of files easily.
Grunt unifies the workflows of web developers.
You can easily work with a new codebase using Grunt because it contains less infrastructure.
It speeds up the development workflow and enhances the performance of projects.
Disadvantages
Whenever npm packages are updated, you need to wait until the author of the Grunt updates it.
Every task is designed to do a specified work. If you want to extend a specified task, then you need to use some tricks to get the work done.
Grunt includes a large number of configuration parameters for individual plugins. Usually, Grunt configuration files are longer in length.
Grunt - Features
Grunt is a JavaScript based task runner which means it can automate repetitive tasks in a workflow and it can be used as a command line tool for JavaScript objects.
Some of the most prominent features of GruntJS are listed below −
Grunt makes the workflow as easy as writing a setup file.
You can automate repetitive tasks with minimum effort.
Grunt is a popular task runner based on NodeJS. It is flexible and widely adopted.
It has a straightforward approach which includes tasks in JS and config in JSON.
Grunt minifies JavaScript, CSS files, testing files, compiling CSS preprocessor files (SASS, LESS), etc.
Grunt includes built-in tasks that extend the functionality of your plugins and scripts.
It speeds up the development workflow and enhances the performance of projects.
You can easily work with a new codebase using Grunt because it contains less infrastructure.
The ecosystem of Grunt is huge; you can automate anything with very less effort.
Grunt reduces the chance of getting errors while performing repetitive tasks.
Grunt currently has over 4000 plugins.
It can be used in big production sites.
Grunt - Installing
This chapter provides a step-by-step procedure of how to install Grunt on your system.
System Requirements for Grunt
Operating System − Cross-platform
Browser Support − IE (Internet Explorer 8+), Firefox, Google Chrome, Safari, Opera
Installation of Grunt
Step 1 − We need NodeJs to run Grunt. To download NodeJs, open the link https://nodejs.org/en/,you will see a screen as shown below −
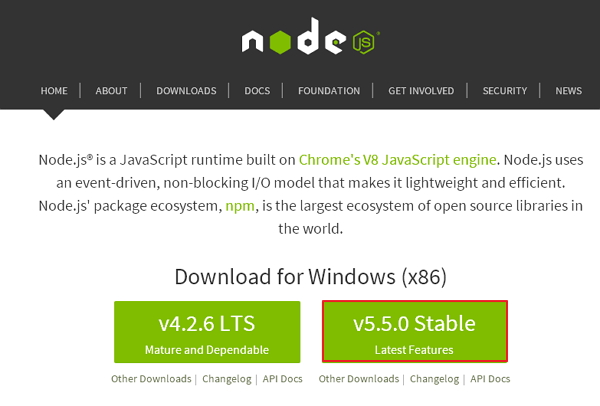
Download the Latest Features version of the zip file.
Step 2 − Next, run the setup to install the NodeJs on your computer.
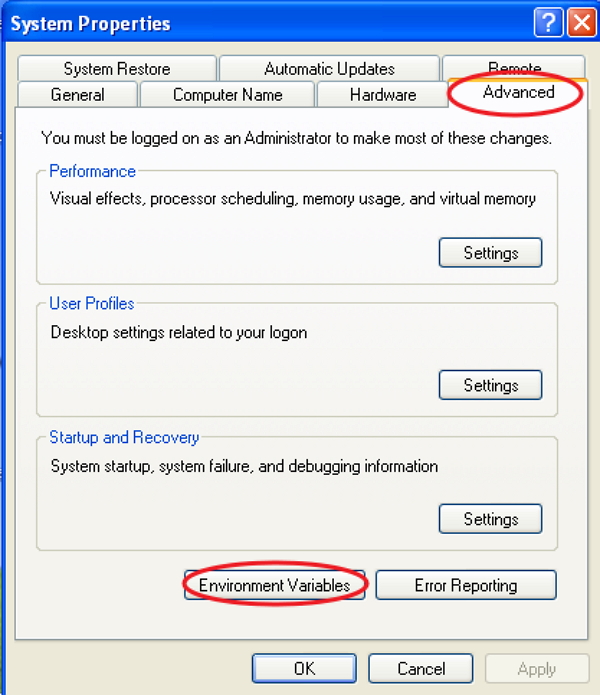
Step 3 − Next, you need to set environment variables.
Path User Variable
- Right click on My Computer.
- Select Properties.
- Next, select Advanced tab and click on Environment Variables.
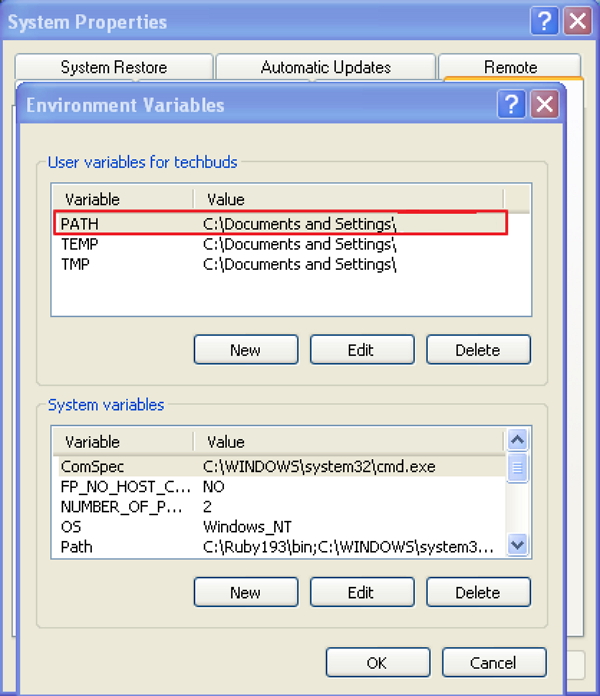
Under Environment Variables window, double click on the PATH as shown in the screen.
You will get an Edit User Variable window as shown. Add NodeJs folder path in the Variable Value field as C:\Program Files\nodejs\node_modules\npm. If the path is set already for other files, then you need to put a semicolon(;) after that and add the NodeJs path as shown below −
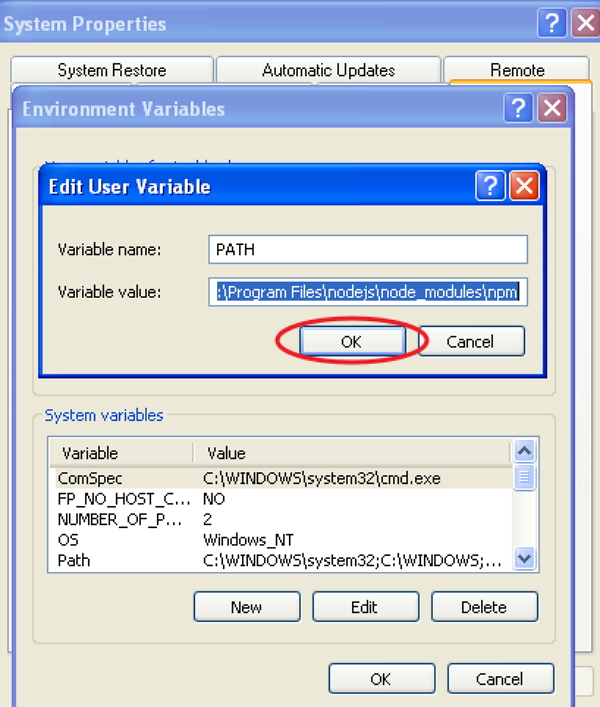
At the end, click the OK button.
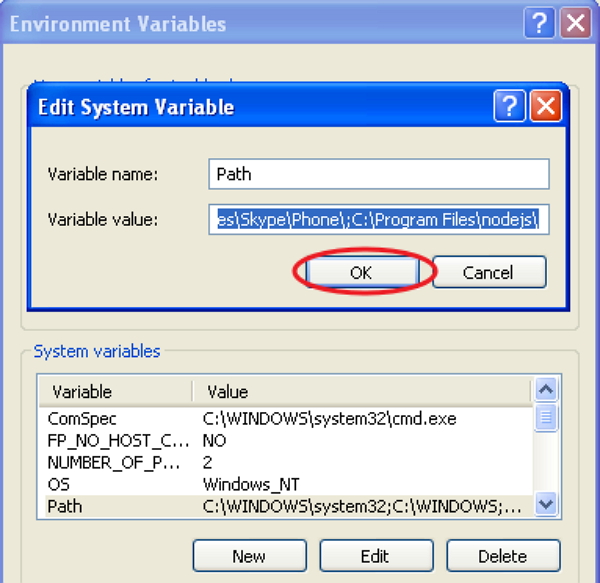
System Variable
Under System variables, double click on Path as shown in the following screen.
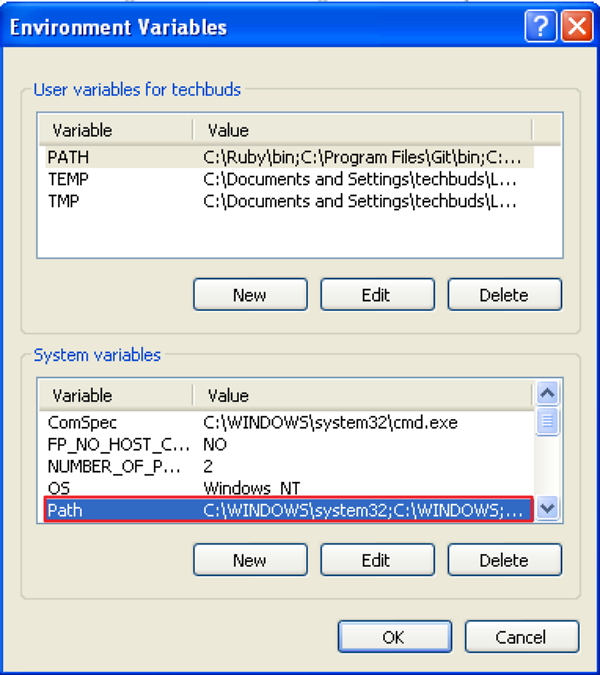
You will get an Edit System Variable window as shown. Add NodeJs folder path in the Variable Value field as C:\Program Files\nodejs\ and click OK as shown below −
Step 4 − To install grunt on your system you need to install Grunt's command line interface (CLI) globally as shown below −
npm install -g grunt-cli
Running the above command will put the grunt command in your system path, which makes it to run from any directory.
Installing the grunt-cli does not install Grunt task runner. The role of the grunt-cli is to run the version of Grunt which has been installed next to a Gruntfile. It allows a machine to install multiple versions of Grunt simultaneously.
Step 5 − Now, we shall create configuration files in order to run Grunt.
package.json
The package.json file is placed in the root directory of the project, beside to the Gruntfile. The package.json is used to correctly run each listed dependency whenever you run the command npm install in the same folder as package.json.
TThe basic package.json can be created by typing the following command in the command prompt −
npm init
The basic package.json file will be as shown below −
{
   "name": "tutorialspoint",
   "version": "0.1.0",
   "devDependencies": {
      "grunt-contrib-jshint": "~0.10.0",
      "grunt-contrib-nodeunit": "~0.4.1",
      "grunt-contrib-uglify": "~0.5.0"
   }
}
You can add Grunt and gruntplugins into an existing pacakge.json file through the following command −
npm install <module> --save-dev
In the above command, <module> represents the module to be installed locally. The above command will also add the <module> to devDependencies automatically.
For instance, the following command will install latest the latest version of Grunt and adds it to your devDependencies −
npm install grunt --save-dev
Gruntfile.js
The Gruntfile.js file is used to define our configuration for Grunt. It is the place where our settings will be written. The basic Gruntfile.js file is as shown below −
// our wrapper function (required by grunt and its plugins)
// all configuration goes inside this function
module.exports = function(grunt) {
   // CONFIGURE GRUNT
   grunt.initConfig({
      // get the configuration info from package.json file
      // this way we can use things like name and version (pkg.name)
      pkg: grunt.file.readJSON('package.json'),

      // all of our configuration goes here
      uglify: {
         // uglify task configuration
         options: {},
         build: {}
      }
   });

   // log something
   grunt.log.write('Hello world! Welcome to Tutorialspoint!!\n');

   // Load the plugin that provides the "uglify" task.
   grunt.loadNpmTasks('grunt-contrib-uglify');

   // Default task(s).
   grunt.registerTask('default', ['uglify']);
};
Grunt - Getting Started
To make use of Grunt, you need to have Node.js installed. The installation of Node.js has been explained in the previous chapter. You can install Grunt and Grunt plugins by using Node.js package manager.
Before setting up Grunt on system, you can update the Node package manager by using the following command −
npm update -g npm
If you are using Mac or Linux, you need to use sudo word at the beginning of the command line to grant administrator access as shown below −
sudo npm update -g npm
CLI Installation
CLI stands for Command Line Interface that runs the version of Grunt which has been installed. To get started with Grunt, you need to install Grunt's command line interface (CLI) globally as shown below −
npm install -g grunt-cli
Running the above command will put the grunt command in your system path, which makes it to run from any directory. You cannot install Grunt task runner by installing grunt-cli. It allows a machine to install multiple versions of Grunt simultaneously.
Working of CLI
The CLI looks for the installed Grunt on your system by using require() system whenever Grunt is run. Using grunt-cli, you can run Grunt from any directory in your project. If you are using locally installed Grunt, then grunt-cli uses locally installed Grunt library and applies the configuration from the Grunt file.
Working with an existing and new project
If you are working with an already configured project that includes package.json and Gruntfile, then follow the simple steps as specified below −
- Find the path to the project's root directory.
- You can install dependencies using the npm install command.
- Run Grunt using the grunt command.
If you are creating a new project, then include the two files package.json and Gruntfile to your project.
package.json − The package.json file is placed in the root directory of the project and it is used to run each listed dependency whenever you run the command npm install in the same folder.
Gruntfile.js − The Gruntfile.js file is used to write configuration settings for the project.
package.json
The package.json file is placed in the root directory of the project, beside the Gruntfile and is used to run each listed dependency whenever you run the command npm install in the same folder.
You can create the package.jsonin different ways as listed below −
- You can grunt-init to create package.json file.
- You can also create package.json file by using the npm-init command.
You can write specification as shown below −
{
   "name": "tutorialspoint",
   "version": "0.1.0",
   "devDependencies": {
      "grunt-contrib-jshint": "~0.10.0",
      "grunt-contrib-nodeunit": "~0.4.1",
      "grunt-contrib-uglify": "~0.5.0"
   }
}
You can add Grunt and gruntplugins into an existing pacakge.json file by using the following command −
npm install <module> --save-dev
Here, <module> represents the module to be installed locally. The above command will install the specified module and automatically add it to the devDependencies section.
For instance, the following command will install the latest version of Grunt and add it to your devDependencies −
npm install grunt --save-dev
Gruntfile
The Gruntfile.js file is a default place where your configuration settings will go for Grunt. The Grunt file includes the following parts −
- The wrapper function
- Project and task configuration
- Loading Grunt plugins and tasks
- Custom tasks
The basic Gruntfile.js file is as shown below −
// our wrapper function (required by grunt and its plugins)
// all configuration goes inside this function
module.exports = function(grunt) {

   // CONFIGURE GRUNT
   grunt.initConfig({
      // get the configuration info from package.json file
      // this way we can use things like name and version (pkg.name)
      pkg: grunt.file.readJSON('package.json'),

      // all of our configuration goes here

   });

   // Load the plugin that provides the "uglify" task
   grunt.loadNpmTasks('grunt-contrib-uglify');

   // Default task(s)
   grunt.registerTask('default', ['uglify']);
};
Wrapper Function
In the above code, module.exports is a wrapper function where the entire configuration goes inside this function. It is a way of displaying configuration to the rest of application.
module.exports = function(grunt) {
   //do grunt-related things here
}
Project and Task Configuration
You can configure Grunt tasks, once your Grunt configuration is ready. The project configuration can be written in the grunt.initConfig() section. Inside the grunt.initConfig() function, take the configuration information from package.json file and save it to pkg. You can call your project name using pkg.name and version with pkg.version.
Loading Grunt Plugins and Tasks
Load the tasks from a specified plugin by using the grunt.loadNpmTasks method. You can install the plugin locally by using npm and it must be relative to the Gruntfile. You can load the plugin with a simple command as shown below −
grunt.task.loadNpmTasks(pluginName)
Custom Tasks
When you are running Grunt through command line, the Grunt will look for the default task. In the above code, we are using a task called uglify which can be run using gruntcommand. This is same as explicitly running grunt uglify command and you can specify the number of tasks in the array.
grunt.registerTask('default', ['uglify']);
Grunt - Configuring Tasks
You can define project-specific configuration data for Grunt in the Gruntfile.js file.
Grunt Configuration
The task configuration data can be initialized in the Gruntfile by using the grunt.initConfig() method. Inside the grunt.initConfig() function, take the configuration information from package.json file. The configuration will contain a task named properties and any arbitrary data.
grunt.initConfig({
   jshint: {
      // configuration for jshint task
   },
   cssmin: {
      // configuration for cssmin task
   },
   // Arbitrary non-task-specific properties
   my_files: ['dir1/*.js', 'dir2/*.js'],
});
Task Configuration and Targets
When you are running a task, Grunt looks for the configuration under task-named property. We will define tasks with multiple configurations and target options as shown below −
grunt.initConfig({
   jshint: {
      myfile1: {
         // configuration for "myfile1" target options
      },
      myfile2: {
         // configuration for "myfile2" target options
      },
   },
   cssmin: {
      myfile3: {
         // configuration for "myfile3" target options
      },
   },
});
Here, jshint task has myfile1 and myfile2 targets and cssmin task has myfile3 target. When you are running the grunt jshint, it will iterate over both task and target to process the specified target's configuration.
Options
Define the options property inside task configuration which overrides the task defaults. Each target includes options property that overrides the task-level options. It will be having the following format −
grunt.initConfig({
   jshint: {
      options: {
         // task-level options that overrides task defaults
      },
      myfile: {
         options: {
            // "myfile" target options overrides task defaults
         },
      },

      myfile1: {
         // there is no option, target will use task-level options
      },
   },
});
Files
Grunt provides some ideas for specifying on which files the task should operate and uses different ways to specify the src-dest file mappings. Following are some of the additional properties which are supported by the src and dest mappings −
filter − It is a function that specifies matched src file path and returns true or false values.
nonull − It defines the non matching patterns when it is set to true.
dot − It matches the file names starting with a period or otherwise.
matchBase − It matches the patterns which contains slashes with the basename of the path.
expand − It processes the src-dest file mapping.
Compact Format
It specifies the src-dest file mapping per target that can be used for read-only tasks and require only src property and no dest property.
grunt.initConfig({
   jshint: {
      myfile1: {
         src: ['src/file1.js','src/file2.js']
      },
   },
   cssmin: {
      myfile2: {
         src: ['src/file3.js','src/file4.js'],
         dest: 'dest/destfile.js',
      },
   },
});
Files Object Format
It specifies the src-dest file mapping per target in which the property name is dest file and its value is src file.
grunt.initConfig({
   jshint: {
      myfile1: {
         files: {
            'dest/destfile.js':['src/file1.js','src/file2.js'],
            'dest/destfile1.js':['src/file3.js','src/file4.js'],
         },
      },
      myfile2: {
         files: {
            'dest/destfile2.js':['src/file22.js','src/file23.js'],
            'dest/destfile21.js':['src/file24.js','src/file25.js'],
         },
      },
   },
});
Files Array Format
It specifies the src-dest file mapping per target by using additional properties per mapping.
grunt.initConfig({
   jshint: {
      myfile1: {
         files: [
            {src:['src/file1.js','src/file2.js'],dest:'dest/file3.js'},
            {src:['src/file4.js','src/file4.js'],dest:'dest/file5.js'},
         ],
      },
      myfile2: {
         files: [
            {src:['src/file6.js','src/file7.js'],dest:'dest/file8/', nonull:true},
            {src:['src/file9.js','src/file10.js'],dest:'dest/file11/', filter:'isFalse'},
         ],
      },
   },
});
Older Formats
The dest-as-target file format was there before the existence of the multitasks where the destination file path is name of the target. The following format is deprecated and it is not to be used in the code.
grunt.initConfig({
   jshint: {
      'dest/destfile2.js':['src/file3.js','src/file4.js'],
      'dest/destfile5.js':['src/file6.js','src/file7.js'],
   },
});
Custom Filter Function
You can help the target files with a great level of detail by using the filter property. The following format cleans files only if it matches an actual file.
grunt.initConfig({
   clean: {
      myfile:{
         src: ['temp/**/*'],
         filter: 'isFile',
      },
   },
});
Globbing Patterns
Globbing means expanding the file name. Grunt supports globbing by using the built-in node-glob and minimatch libraries. The globbing pattern includes the following points −
- * matches any number of characters, but not /.
- ? matches a single character, but not /.
- ** matches a number of characters including /.
- {} specifies comma separated list of "or" expressions.
- ! will negate the pattern match at the beginning.
For Example −
{src: 'myfile/file1.js', dest: ...} // it specifies the single file

{src: 'myfile/*.js', dest: ...} //it matches all the files ending wth .js

{src: 'myfile/{file1,file2}*.js', dest: ...} //defines the single node glob pattern

{src: ['myfile/*.js', '!myfile/file1.js'], dest: ...} // all files will display in alpha

// order except for file1.js
Building the Files Object Dynamically
When you are working with individual files, you can use additional properties to build a files list dynamically. When you set the expand property to true, it will enable some of the following properties −
cwd matches all src to this path.
src matches the patterns to match, relative to the cwd.
dest property specifies destination path prefix.
ext will replace an existing extension with a value generated in dest paths.
extDot indicates where the period indicating the extension is located. It uses either the first period or the last period; by default, it is set to the first period
flatten removes all path parts from the dest paths.
rename specifies a string containing the new destination and filename.
The Rename Property
It is a unique JavaScript function which returns a string and you cannot use a string value for rename. In the following example, the copy task will create a backup of README.md.
grunt.initConfig({
   copy: {
      backup: {
         files: [{
            expand: true,
            src: ['docs/README.md'],    // creating a backup of README.md
            rename: function () {       // specifies the rename function
               return 'docs/BACKUP.txt'; // returns a string with the complete destination
            }
         }]
      }
   }
});
Templates
You can specify the templates using <% %> delimiters. They will be expanded automatically when they are read from the config. It includes two types of properties −
<%= prop.subprop %> property is used to expand the value ofprop.subprop in the config which can reference the string values, arrays and other objects.
<% %> property executes the inline JavaScript code which is used for control flow or looping.
For Example −
grunt.initConfig({
   concat: {
      myfile: {
         options: {
            banner: '/* <%= val %> */\n',
         },
         src: ['<%= myval %>', 'file3/*.js'],
         dest: 'build/<%= file3 %>.js',
      },
   },
   // properties used in task configuration templates
   file1: 'c',
   file2: 'b<%= file1 %>d',
   file3: 'a<%= file2 %>e',
   myval: ['file1/*.js', 'file2/*.js'],
});
Importing External Data
You can import external data from package.json file. The grunt-contrib-uglify plugin can be used to minify the source file and it creates a banner comment using metadata. You can use grunt.file.readJSON and grunt.file.readYAML for importing JSON and YAML data.
For Example −
grunt.initConfig({
   pkg: grunt.file.readJSON('package.json'),
   uglify: {
      options: {
         banner: '/*! <%= pkg.name %> <%= grunt.template.today("yyyy-mm-dd") %> */\n'
      },
      dist: {
         src: 'src/<%= pkg.name %>.js',
         dest: 'dist/<%= pkg.name %>.min.js'
      }
   }
});
Grunt - Sample File
In this chapter, let us create a simple Grunt file using the following plugins −
- grunt-contrib-uglify
- grunt-contrib-concat
- grunt-contrib-jshint
- grunt-contrib-watch
Install all the above plugins and follow the steps given below to create a simple Gruntfile.js −
Step 1 − You need to create a wrapper function, which encapsulates the configurations for your Grunt.
module.exports = function(grunt) {};
Step 2 − Initialize your configuration object as shown below −
grunt.initConfig({});
Step 3 − Next, read the project settings from the package.json file into the pkg property. It enables us to refer to the properties values within yourpackage.json file.
pkg: grunt.file.readJSON('package.json')
Step 4 − Next, you can define configurations for tasks. Let us create our first task concat to concatenate all the files that are present in the src/ folder and store the concatenated .js file under the dist/ folder.
concat: {
   options: {
      // define a string to insert between files in the concatenated output
      separator: ';'
   },
   dist: {
      // files needs to be concatenated
      src: ['src/**/*.js'],
      // location of the concatenated output JS file
      dest: 'dist/<%= pkg.name %>.js'
   }
}
Step 5 − Now, let us create another task called uglify to minify our JavaScript.
uglify: {
   options: {
      // banner will be inserted at the top of the output which displays the date and time
      banner: '/*! <%= pkg.name %> <%= grunt.template.today() %> */\n'
   },
   dist: {
      files: {
         'dist/<%= pkg.name %>.min.js': ['<%= concat.dist.dest %>']
      }
   }
}
The above task creates a file within the dist/ folder which contains the minified .js files. The <%= concat.dist.dest %> will instruct uglify to minify the file that concat task generates.
Step 6 − Let us configure JSHint plugin by creating jshint task.
jshint: {
   // define the files to lint
   files: ['Gruntfile.js', 'src/**/*.js'],
   // configure JSHint
   options: {
      // more options here if you want to override JSHint defaults
      globals: {
         jQuery: true,
      }
   }
}
The above jshint task accepts an array of files and then an object of options. The above task will look for any coding violation in Gruntfile.js and src/**/*.js files.
Step 7 − Next, we have the watch task which looks for changes in any of the specified files and runs the tasks you specify.
watch: {
   files: ['<%= jshint.files %>'],
   tasks: ['jshint']
}
Step 8 − Next, we have to load Grunt plugins which have all been installed via _npm.
grunt.loadNpmTasks('grunt-contrib-uglify');

grunt.loadNpmTasks('grunt-contrib-jshint');

grunt.loadNpmTasks('grunt-contrib-watch');

grunt.loadNpmTasks('grunt-contrib-concat');
Step 9 − Finally, we have to define the default task.
grunt.registerTask('default', ['jshint', 'concat', 'uglify']);
The default task can be run by just typing the grunt command on command line.
Here is your complete Gruntfile.js −
module.exports = function(grunt) {

   grunt.initConfig({
      pkg: grunt.file.readJSON('package.json'),
      concat: {
         options: {
            separator: ';'
         },
         dist: {
            src: ['src/**/*.js'],
            dest: 'dist/<%= pkg.name %>.js'
         }
      },
      uglify: {
         options: {
            banner: '/*! <%= pkg.name %> <%= grunt.template.today() %> */\n'
         },
         dist: {
            files: {
               'dist/<%= pkg.name %>.min.js': ['<%= concat.dist.dest %>']
            }
         }
      },
      jshint: {
         // define the files to lint
         files: ['Gruntfile.js', 'src/**/*.js'],
         // configure JSHint
         options: {
            // more options here if you want to override JSHint defaults
            globals: {
               jQuery: true,
            }
         }
      },
      watch: {
         files: ['<%= jshint.files %>'],
         tasks: ['jshint']
      }
   });

   grunt.loadNpmTasks('grunt-contrib-uglify');
   grunt.loadNpmTasks('grunt-contrib-jshint');
   grunt.loadNpmTasks('grunt-contrib-watch');
   grunt.loadNpmTasks('grunt-contrib-concat');

   grunt.registerTask('default', ['jshint', 'concat', 'uglify']);

};
Grunt - Creating Tasks
In this chapter, let us learn about creating tasks. Whenever you run Grunt, one or more tasks are specified to run that notifies Grunt what you would like it to do. If you specify the default task, then it will run by default.
Alias Tasks
Whenever a list of tasks is specified, one or more other tasks can be aliased by a new task. Running the alias will in turn run every specified tasks in the taskList. The taskList argument should be an array of tasks as shown below −
grunt.registerTask(taskName, [description, ] taskList)
For instance, when you define a taskList with jshint, concat, and uglify tasks and specify the taskName as default, all the listed tasks will be run automatically if Grunt is executed without specifying any tasks.
grunt.registerTask('default', ['jshint', 'concat', 'uglify']);
You can also specify task arguments as shown below −
grunt.registerTask('dist', ['concat:dist', 'uglify:dist']);
In the above task, the alias dist runs both the concat and uglify tasks.
Multi Tasks
Whenever you run multiple tasks, Grunt searches for a property of the same name in the Grunt configuration. These tasks can have multiple configurations, which will be defined using arbitrarily named targets.
When you specify both a task and target, only the specified target configuration will be processed.
grunt concat:foo
The above command will run only the target foo.
When you specify only a task, then all the targets will be processed.
grunt concat
The above command will iterate over all the targets of concat task.
When you rename a task with grunt.task.renameTask, a property with new task name is searched in the config object by Grunt.
grunt.initConfig({
   log: {
      foo: [1, 2, 3],
      bar: 'Welcome to tutorialspoint',
      sap: true
   }
});

grunt.registerMultiTask('log', 'Log stuff.', function() {
   grunt.log.writeln(this.target + ': ' + this.data);
});
In the above example, multi task will log foo: 1,2,3 if Grunt was run through grunt log:foo or it will log bar: Welcome to tutorialspoint whenever run through grunt log:bar. It will log foo: 1,2,3 then bar: Welcome to tutorialspoint then sap: true when Grunt runs as grunt log.
Basic Tasks
Whenever you run a basic task, Grunt will not search the configuration or environment. Instead it runs the task function which is specified, passes any colon-separated arguments specified in as function arguments.
grunt.registerTask(taskName, [description, ] taskFunction)
In the following example, the task logs foo, testing 123 if Grunt is executed through grunt foo:testing:123 command. Whenever the task is run without arguments as grunt foo, the task will log foo, no args.
grunt.registerTask('foo', 'A simple task to logs stuff.', function(arg1, arg2) {
   if (arguments.length === 0) {
      grunt.log.writeln(this.name + ", no args");
   } else {
      grunt.log.writeln(this.name + ", " + arg1 + " " + arg2);
   }
});
Custom Tasks
If you do not want to follow multi task structure, you can define your custom task as shown below −
grunt.registerTask('default', 'My "default" task description.', function() {
  grunt.log.writeln('Currently running the "default" task.');
});
It is possible to run a task within another task as shown below −
grunt.registerTask('foo', 'My "foo" task.', function() {
   // Enqueue bar and baz tasks, to run after foo completes, in-order.
   grunt.task.run('bar', 'baz');
   // Or:
   grunt.task.run(['bar', 'baz']);
});
You can also create asynchronous tasks as shown below −
grunt.registerTask('asyncfoo', 'My "asyncfoo" task.', function() {
   // Force task into async mode and grab a handle to the done() function.
   var done = this.async();
   // Run some sync stuff.
   grunt.log.writeln('Processing your task..');
   // Run some async stuff.
   setTimeout(function() {
      grunt.log.writeln('Finished!');
      done();
   }, 1000);
});
You can create tasks which can access their name and arguments as shown below −
grunt.registerTask('foo', 'My task "foo" .', function(a, b) {
   grunt.log.writeln(this.name, a, b);
});

// Usage:
// grunt foo
//   logs: "foo", undefined, undefined
// grunt foo:bar
//   logs: "foo", "bar", undefined
// grunt foo:bar:baz
//   logs: "foo", "bar", "baz"
You can create your task in such a way that, whenever any errors are logged, the tasks can fail as shown below −
grunt.registerTask('foo', 'My task "foo" .', function() {
   if (failureOfSomeKind) {
      grunt.log.error('This is an error message.');
   }

   // If this task had errors then fail by returning false
   if (ifErrors) { return false; }

   grunt.log.writeln('This is success message');
});
Whenever a task fails, every following task will be terminated unless --force was specified.
grunt.registerTask('foo', 'My task "foo" .', function() {
   // Fail synchronously.
   return false;
});

grunt.registerTask('bar', 'My task "bar" .', function() {
   var done = this.async();
   setTimeout(function() {
      // Fail asynchronously.
      done(false);
   }, 1000);
});
Tasks can be dependent on other tasks for successful execution. Remember that the grunt.task.requires will not actually execute other task(s), instead it will only check to see whether it has executed and not failed.
grunt.registerTask('foo', 'My task "foo" .', function() {
   return false;
});

grunt.registerTask('bar', 'My task "bar" .', function() {
   // Fail task if foo task failed or never ran.
   grunt.task.requires('foo');
   // This code executes if the foo task executed successfully.
   grunt.log.writeln('Hello, World.. Welcome to Tutorialspoint!..');
});

// Usage:
// grunt foo bar doesn't log, because foo failed to execute.
// **Note: This is an example of space-separated sequential commands,
// (similar to executing two lines of code: `grunt foo` then `grunt bar`)
// grunt bar doesn't log, because foo never ran.
Tasks can even fail whenever required configuration properties are not found.
grunt.registerTask('foo', 'My task "foo" .', function() {
   // Fail task if meta.name config properties is missing
   // Format 1: String
   grunt.config.requires('meta.name');
   // or Format 2: Array
   grunt.config.requires(['meta', 'name']);
   // Log... conditionally.
   grunt.log.writeln('This only log if meta.name is defined in the config.');
});
Tasks can access the configuration properties as shown below −
grunt.registerTask('foo', 'My task "foo" .', function() {
   // Log the value of the property. Returns null if the property is undefined.
   grunt.log.writeln('The meta.name property is: ' + grunt.config('meta.name'));
   // Also logs the value of the property. Returns null if the property is undefined.
   grunt.log.writeln('The meta.name property is: ' + grunt.config(['meta', 'name']));
});