- Grav Basics Tutorial
- Grav - Home
- Grav - Overview
- Grav - Installation
- Grav Content
- Grav - Pages
- Grav - Markdown Syntax
- Grav - Page Linking
- Grav - Image Linking
- Grav - Media
- Grav - Modular Pages
- Grav - Multi Language
- Grav Themes
- Grav - Themes Basics
- Grav - Theme Tutorial
- Grav - Twig Filters & Functions
- Grav - Theme Variables
- Grav - Asset Manager
- Grav - Theme Customization
- Grav Administration Panel
- Grav - Admin Introduction
- Grav - Admin Dashboard
- Grav - Configuration System
- Grav - Configuration Site
- Grav - Administration Panel Pages
- Grav - Page Editor Options
- Grav - Page Editor Advanced
- Grav Advanced
- Grav - Blueprints
- Grav - Performance & Caching
- Grav - Debugging & Logging
- Grav - CLI
- Grav - GPM
- Grav - Development
- Grav - Lifecycle
- Grav - YAML Syntax
- Grav - Forms
- Grav Hosting
- Grav - Web Hostings
- Grav Troubleshooting
- Grav - Server Error
- Grav - Permission
- Grav Useful Resources
- Grav - Interview Questions
- Grav - Quick Guide
- Grav - Useful Resources
- Grav - Discussion
Grav - Quick Guide
Grav - Overview
Grav is a flat-file based content management system. This system does not use database to store the content, instead it uses a text (.txt) file or a markdown (.md) file to store the content. The flat-file part refers to the readable text and it handles the content in an easy way which can be simple for a developer.
Grav was developed by the Rocket Theme team. It runs on PHP and is an open-source CMS like Joomla, Wordpress or Drupal.
Why Grav?
Grav is now the fastest flat-file content management system. It is easier to publish and manage content with Grav. It allows a developer to handle content very easily by storing content in files (such as text or markdown files) rather than in database.
Grav helps you build a simple, manageable and a quick site. It costs less than the database driven CMS and is useful with I/O for file handling, when you don't have enough resources.
Features of Grav
It is a fast, easy and powerful flat-file web platform.
It is used to build websites with no extra tools or html knowledge.
It uses text file or markdown file to store the content.
It doesn't use database, so this mitigates the instances of bottlenecking.
It uses PHP based template provided by Twig which is parsed directly into PHP that makes it fast.
Advantages
It is not based on database CMS, so it's very easy to install and will be ready to use when you upload the files to the server.
It uses Markdown text files to make things easy. Using this, the content is dynamically converted to HTML and displayed in the browser.
In case of security, Grav doesn't have admin area and database. So there is no chance of hacking into account or in the database to access the important data.
You can easily backup all the files to keep the backup copy of your website, since there is no database to backup.
It is a piece of software which doesn't require more time to learn.
Disadvantages
You might come across instances where unauthorized users may access your content from the files directly as there is no database for the files.
It is difficult to build complex websites using Grav CMS.
Grav - Installation
In this chapter, we will understand the installation of Grav. We will discuss the software requirements for Grav and also how to download it.
Software Requirements for Grav
Let us now understand the software requirements for Grav.
Web Server
- WAMP (Windows)
- LAMP (Linux)
- XAMP (Multi-platform)
- MAMP (Macintosh)
- Nginx
- Microsoft IIS
Operating System − Cross-platform
Browser Support − IE (Internet Explorer 8+), Firefox, Google Chrome, Safari, Opera
PHP Compatibility − PHP 5.4 or higher
Text Editors
- Sublime Text (Mac / Windows/ Linux)
- Atom (Mac / Windows)
- Notepad ++ (Windows)
- Bluefish (Mac / Windows/ Linux)
Download Grav
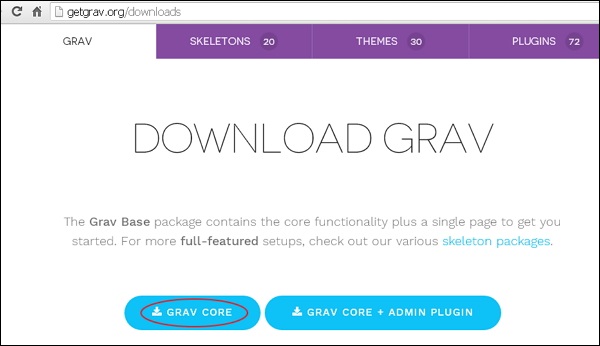
Click on this link https://getgrav.org/downloads and follow the steps as shown in the screenshot given below to download Grav.
Unzip the downloaded Grav file into your web server.
Setup Wizard
Installation of Grav is a very simple process. Follow the steps given below for Grav setup.
Download the zip file and extract it to your web server or local host. Rename the folder from its current name that you want to use to refer to your site.
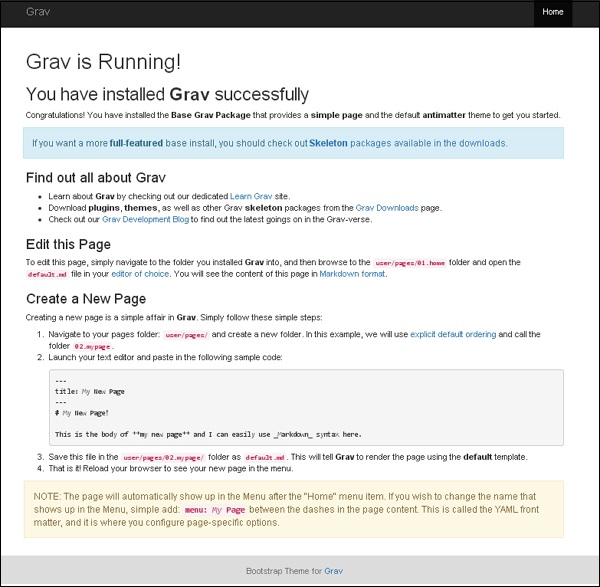
Open your browser and navigate to localhost/<your_folder_name>, you will be redirected to a screen which shows you have installed Grav successfully as in the following screenshot.
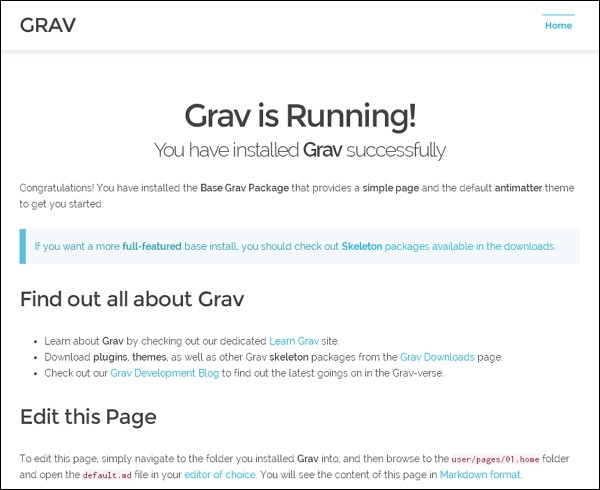
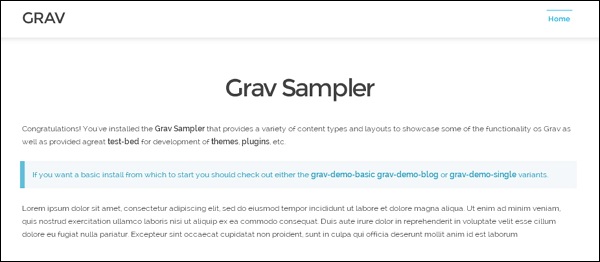
Grav comes with a sample page that helps you get started. In the above screenshot, you can see the home link which has displayed a sample page.
Grav - Pages
In this chapter, let us study about Grav Pages. Pages can be defined as building blocks of the site. Pages combine contents and navigations; this makes work easier even for the inexperienced users.
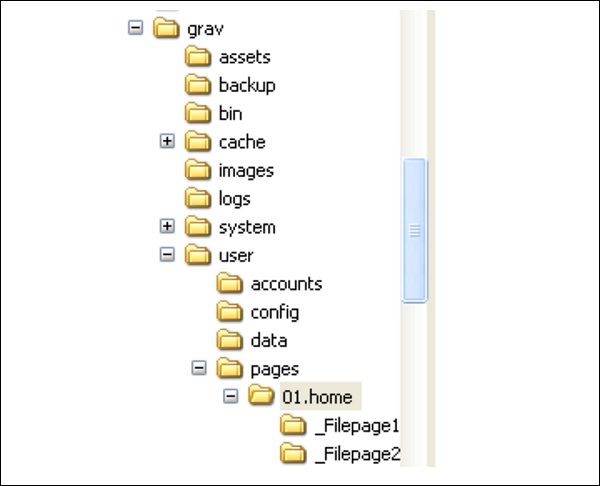
To begin with, let us know how to create a simple page. All user contents will be stored under user/pages/ folder. There will be only one folder called 01.home. The numeric portion of the folder is optional; it expresses the order of your pages (for example, 01 will come before 02) and explicitly informs Grav that this page should be visible in menu.
Let us now see how to create a new page.
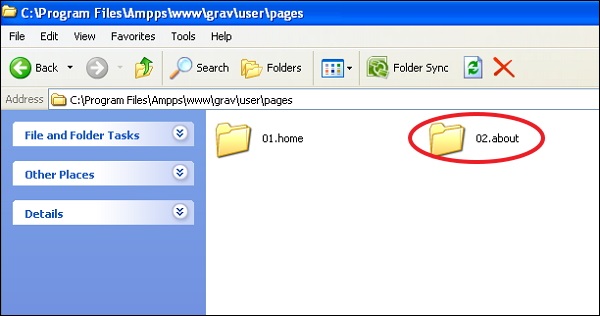
Step 1 − Create a folder under /user/pages/; for example, 02.about as shown in the following screenshot.
Step 2 − Create a file called default.md inside the newly created 02.about folder with the following content.
---
title: About Us
---

# About Us Page!

This is the body of **about us page**.
The above code uses some Markdown syntax explained briefly below. You can study in detail about Markdown in Markdown chapter.
The content between the --- indicators are the Page Headers.
# or hashes syntax in Markdown indicates a title which will be converted to <h1> header in HTML.
** markers indicates bold text or <b> in HTML.
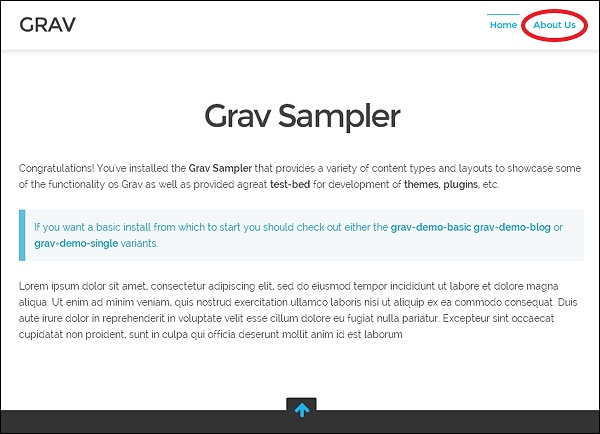
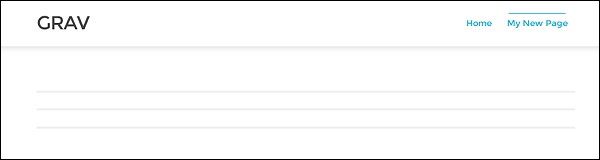
Step 3 − Reload your browser and you can see new page in menu as shown in the following screenshot.
Page Types
Grav Pages supports 3 types of pages −
- Standard Page.
- Listing Page.
- Modular Page.
Standard Page
Standard Pages are most basic type of pages such as blog post, contact form, error page etc. By default, a page is considered as a Standard Page. You are welcomed by a Standard Page as soon as you download and install the Base Grav package. You will see the following page when you install Base Grav package.
Listing Page
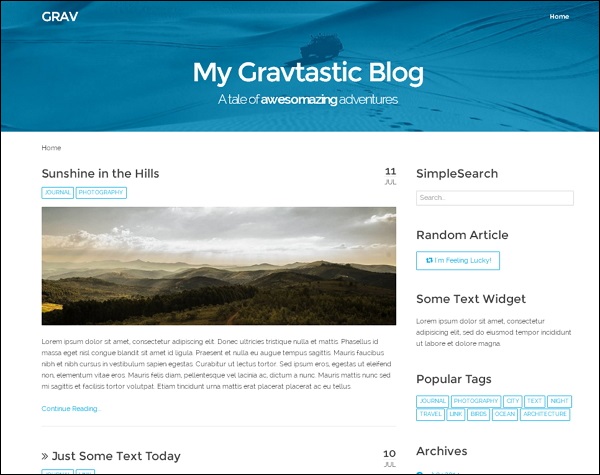
Listing Page is an extension of a standard page which has a reference to a collection of pages. The easiest way to set up the listing page is to create child pages below the listing page. A blog listing page is a fine example for this.
A sample Blog Skeleton with Listing Page can be found in the Grav Downloads. A sample one is shown in the following screenshot.
Modular Page
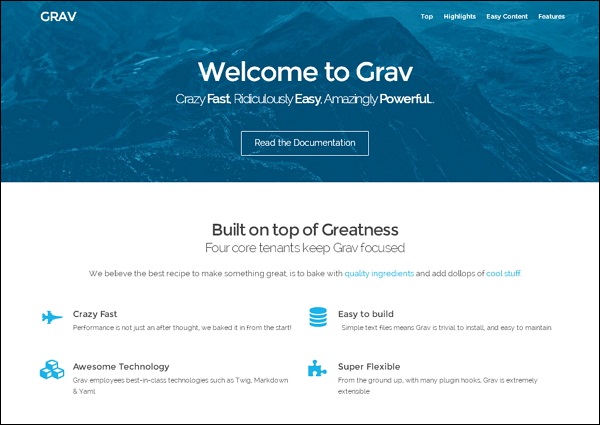
Modular Page is a form of listing page which builds a single page from its child pages. This allows us to build very complex one-page layouts from smaller modular content pages. This can be achieved by building the modular page from multiple modular folders found in the page’s primary folder.
A sample one-page skeleton using a Modular Page can be found in the Grav Downloads. A sample one is shown in the following screenshot.
Folders
The /user/pages folder will contain contents for their respective pages. The folders inside the /user/pages folder are automatically treated as menus by Grav and used for the purpose of ordering. For example, the 01.home folder will be treated as home. Ordering is also to be maintained, i.e, 01.home will come before 02.about.
You should provide an entry-point so that it specifies the browser where to go when you point browser to root of your site. For example, if you enter http://mysite.com in your browser, Grav expects an alias home/ by default, but you can override the home location by changing the home.alias option in the Grav configuration file.
Underscore ( _ ) before the folder name is identified as Modular folders, which is a special folder type that is intended to be used only along modular content. For example, for the folder such as pages/02.about, slug would default to about, and the URL will be http://mysite.com/about.
If the folder name is not prefixed with numbers, that page is considered to be invisible and will not be displayed in navigation. For example, the if user/pages/ has /contact folder, will not be displayed in navigation. This can be overridden in the page itself inside the header section by setting visible to true as shown below to make it visible in navigation.
---
title: contact
visible: true
---
By default a page is visible in the navigation if the surrounding folders have numerical prefixes.The valid values for setting visibility are true or false.
Ordering
There are many ways to control ordering of the folder, one of the important way is to set content.order.by of the page configuration settings. The options are listed below.
default − File system can be used for ordering, i.e., 01.home before 02.about.
title − Title can be used for ordering which is defined in each page.
date − Ordering can be based on date which is defined in each page.
folder − Folder name consisting of any numerical prefix, e.g. 01., will be removed.
basename − Ordering is based on the alphabetic folder without numeric order.
modified − Modified timestamp of the page can also be used.
header.x − Any of the page header field can be used for ordering.
manual − Using order_manual variable ordering can be made.
random − Randomizing your order can also be done.
Manual order is specifically defined by providing a list of options to the content.order.custom configuration setting. You can set the pages.order.dir and the pages.order.by options to override the default behavior in the Grav system configuration file.
Page File
The page inside the page folder should be created as .md file, i.e., Markdown formatted file; it is markdown with YAML front matter. The default will be the standard name for main template and you can give it any name. An example for a simple page is shown below −
---
title: Title of the page
taxonomy:
   category: blog page
---
# Title of the page

Lorem ipsum dolor sit amet, consectetur adipiscing elit. Pellentesque porttitor eu
felis sed ornare. Sed a mauris venenatis, pulvinar velit vel, dictum enim. Phasellus
ac rutrum velit. **Nunc lorem** purus, hendrerit sit amet augue aliquet, iaculis
ultricies nisl. Suspendisse tincidunt euismod risus. Nunc a accumsan purus.
Contents between --- markers is known as the YAML front matter and this YAML front matter consists of basic YAML settings. In the above example, we are setting title and taxonomy to the blog page. The section after the pair of --- markers is the actual content that we see on our site.
Summary Size and Separator
The default size of the summary can be set in site.yaml used via page.summary(). This is useful for blogs where just the summary information is needed and not the full page content. You can use the manual summary separator also known as summary delimiter: === and ensure you put this in your content with blank lines above and below it, as shown below.
Lorem ipsum dolor sit amet, consectetur adipiscing elit, sed do eiusmod tempor
incididunt ut labore et dolore magna aliqua.

===

Lorem ipsum dolor sit amet, consectetur adipiscing elit, sed do eiusmod tempor incididunt
ut labore et dolore magna aliqua. Ut enim ad minim veniam, quis nostrud exercitation
ullamco laboris nisi ut aliquip ex ea commodo consequat. Duis aute irure dolor in
reprehenderit in voluptate velit esse cillum dolore eu fugiat nulla pariatur. Excepteur
sint occaecat cupidatat non proident, sunt in culpa qui officia deserunt mollit anim id
est laborum."
The text above the separator will be used when referenced by page.summary() and the full content when referenced by page.content().
Finding other Pages
Grav has feature called find() method to find another page and perform actions on that page.
For example, if you want to list all the company location on a particular page, use the following markdown rule −
# Locations
<ul>
   {% for loc in page.find('/locations').children if loc != page %}
      <li><a href="{{loc.url}}">{{ loc.title }}</a></li>
   {% endfor %}
</ul>
Grav - Markdown Syntax
Markdown syntax is defined as writing plain text in an easy to read and easy to write format, which is later converted into HTML code. Symbols like (*) or (`) are used in markdown syntax. These symbols are used to bold, creating headers and organize your content.
To use Markdown syntax, you must create a .md file in your user/pages/02.mypage folder. Enable Markdown Syntax in your \user\config\system.yaml configuration file.
.jpg)
There are many benefits of using Markdown syntax, some of them are as follows.
It is easy to learn and has minimum characters.
When you use markdown there are very few chances of having errors.
Valid XHTML output.
Your content and visual display is kept separate so that it does not affect the look of your website.
You can use any text editor or markdown application.
In the following sections, we will discuss the main elements of HTML that are used in markdown.
Headings
Each heading tag is created with # for each heading, i.e., from h1 to h6 the number of # increases as shown.
	#my new Heading
	##my new Heading
	###my new Heading
	####my new Heading
	#####my new Heading
	######my new Heading
Open the .md file in a browser as localhost/Grav/mypage; you will receive the following result −

Comments
You can write comments in the following format.
<!—
   This is my new comment
-->
Open the .md file in a browser as localhost/Grav/mypage; you will receive the following result −

Horizontal rules
Horizontal rules are used to create a thematic break in between paragraphs. You can create breaks between paragraphs using any of the following methods.
___ − Three underscores
--- − Three dashes
*** − Three asterisks
Open the md file in a browser as localhost/Grav/mypage; you will receive the following result −
Body Copy
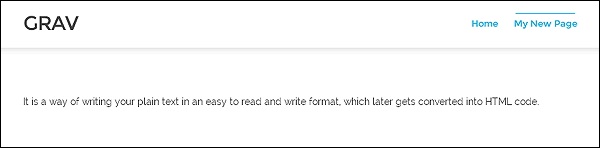
Body copy can be defined as writing text in normal format in markdown syntax, no (p) tag is used
Example
It is a way of writing your plain text in an easy to read and write format,
which later gets converted into HTML code.
Open the .md file in a browser as localhost/Grav/mypage; you will receive the following result −
Emphasis
Emphasis are the writing formats in markdown syntax that are used to bold, italicize or strikethrough a portion of text. Let us discuss them below −
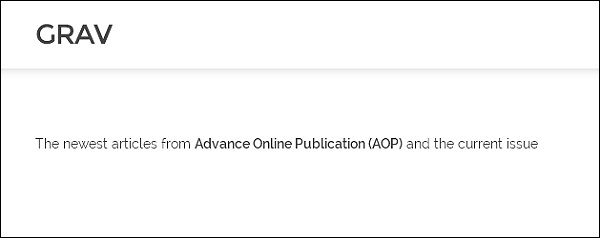
Bold
A portion of text can be made bold using two (**) signs at either sides.
Example
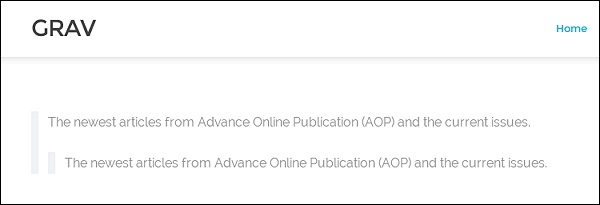
The newest articles from **Advance Online Publication (AOP)** and the current issue.
In this example, we have to show ‘Advance Online Publication (AOP)’ word as bold.
Open the .md file in a browser as localhost/Grav/mypage, you will receive the following result −
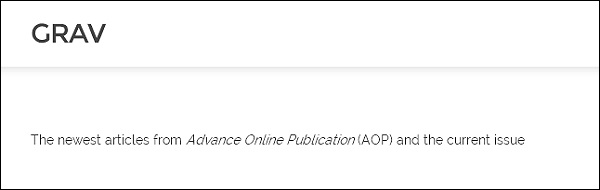
Italics
Use “_” (underscores) sign at either sides of the word to italicize the text.
Example
The newest articles from _Advance Online Publication_ (AOP) and the current issues.
In this example, we have to italicize “Advance Online Publication” (AOP) word.
Open the .md file in a browser as localhost/Grav/mypage. This will give you the following result −
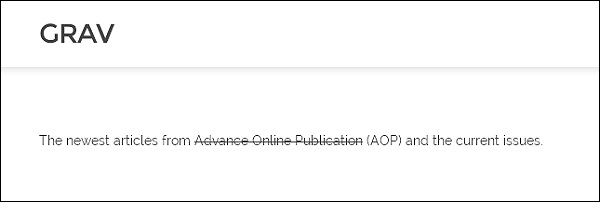
Strikethrough
Use two "~~" (tildes) on either sides of the word to strikethrough the word.
Example
The newest articles from ~~Advance Online Publication~~ (AOP) and the current issues.
In this example, we have to strike “Advance Online Publication” (AOP) word.
Open the .md file in a browser as localhost/Grav/mypage. This will give you the following result −
Blockquote
To create a block quote, you must add an > sign before the sentence or the word.
Example
>The newest articles from Advance Online Publication (AOP) and the current issues.
In this example we have used a > sign before the sentence.
Open the .md file in a browser as localhost/Grav/mypage; you will receive the following result −

Blockquote can also be used in the following way −
>The newest articles from Advance Online Publication (AOP) and the current issues.
>>> The newest articles from Advance Online Publication (AOP) and the current issues.
Open the .md file in a browser as localhost/Grav/mypage; you will receive the following result −
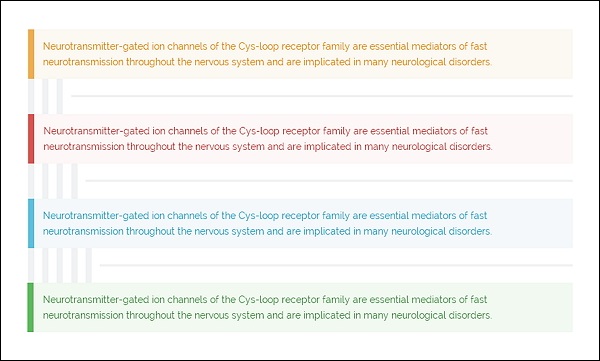
Notices
Notices can be used to inform or notify about something important.
There are four types of notices − yellow, red, blue and green.
Yellow
You must use the >>> sign before a yellow notice type that describes !Info or information.
Example
>>>Neurotransmitter-gated ion channels of the Cys-loop receptor family are essential
mediators of fast neurotransmission throughout the nervous system and are implicated
in many neurological disorders.
Red
Use four >>>> signs before a red notice for a Warning.
Example
>>>>Neurotransmitter-gated ion channels of the Cys-loop receptor family are essential
mediators of fast neurotransmission throughout the nervous system and are implicated
in many neurological disorders.
Blue
Use five >>>>> signs for a Blue notice type, this describes a Note.
Example
>>>>>Neurotransmitter-gated ion channels of the Cys-loop receptor family are essential
mediators of fast neurotransmission throughout the nervous system and are implicated
in many neurological disorders.
Green
Use six >>>>>> signs before a Green notice type, this describes a Tip.
Example
>>>>>>Neurotransmitter-gated ion channels of the Cys-loop receptor family are essential
mediators of fast neurotransmission throughout the nervous system and are implicated
in many neurological disorders.
Open the md file in a browser as localhost/Grav/mypage; you will receive the following result −
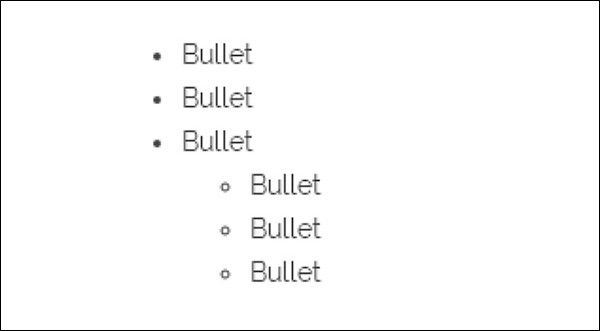
Lists
In this section, we will understand how the unordered and ordered lists work in Grav.
Unordered
In an unordered list, bullets are used. Use *, - , +. symbols for bullets. Use the symbol with space before any text and the bullet will be displayed.
Example
+ Bullet
+ Bullet
+ Bullet
   -Bullet
   -Bullet
   -Bullet
   *Bullet
Open the .md file in a browser as localhost/Grav/mypage; you will receive the following result −
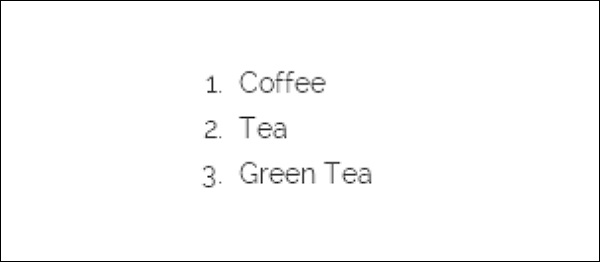
Ordered
Add the numbers before you list something.
Example
1. Coffee
2. Tea
3. Green Tea
Open the .md file in a browser as localhost/Grav/mypage. This will give you the following result −
Code
In this section, we will understand how the Inline and block code “fences” work in Grav.
Inline Code
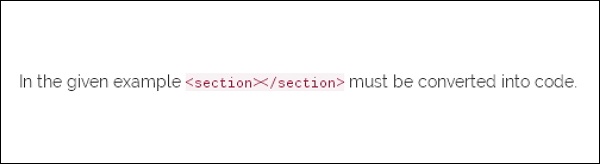
Make inline code using (`) for using codes in markdown.
Example
In the given example, '<section></section>' must be converted into code.
Open the .md file in a browser as localhost/Grav/mypage you will receive the following result −
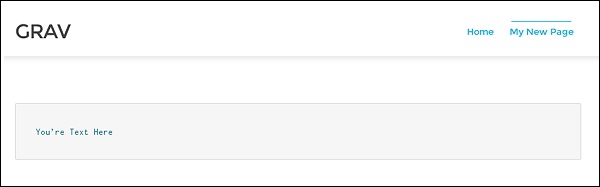
Block code “fences”
Use (```) fences if you want to block multiple lines of code.
Example
```
You’re Text Here

```
Open the .md file in a browser as localhost/Grav/mypage; you will receive the following result −
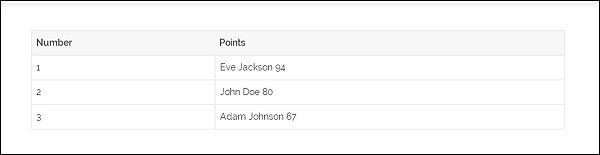
Tables
In Grav, tables are created by using pipes and dashes under the header section. Pipes must not be vertically aligned.
Example
| Number  |    Points       |
| ------  | -----------     |
|   1     | Eve Jackson 94  |
|   2     | John Doe 80     |
|   3     | Adam Johnson 67 |
Open the .md file in a browser as localhost/Grav/mypage; you will receive the following result −
Right Aligned Text
To get the table contents at the right, you must add a colon on the right side of the dashes below headings.
| Number |     Points      |
| ------:| -----------:    |
|   1    | Eve Jackson 94  |
|   2    | John Doe 80     |
|   3    | Adam Johnson 67 |
Open the .md file in a browser as localhost/Grav/mypage; you will receive the following result −
.jpg)
Links
In this section, we will understand how links work in Grav.
Basic Links
Links are made with the help of ([]) square brackets and (()) parenthesis. In [] brackets, you must write the content and in () write the domain name.
Example
[Follow the Given link](http://www.google.com)
Open the .md file in a browser as localhost/Grav/mypage; you will receive the following result −

Add a Title
In this section, we will understand how to add a title in .md file.
Example
[Google](https://www.gogle.com/google/ "Visit Google!")
Open the .md file in a browser as localhost/Grav/mypage; you will receive the following result −
.jpg)
Images
Images are similar to a link but have an exclamation point at the start of the syntax.
Example
![Nature] (/Grav/images/Grav-images.jpg)
Open the .md file in a browser as localhost/Grav/mypage you will receive the following result −
Grav - Page Linking
In this chapter, we will understand how to link pages in Grav. You can link one page to another in a simple way and even remote pages can be linked with page linking. Grav has many responsive linking options. If you have used HTML to link the files before, then it's very easy to understand page linking in Grav.
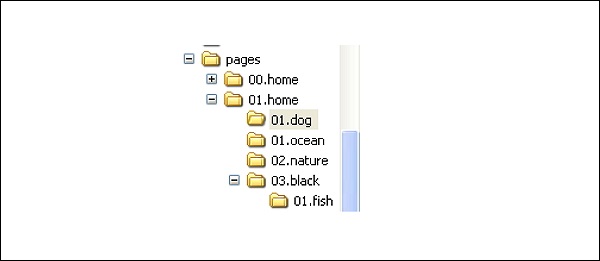
Given below is a basic example of a Grav site's Pages directory. We will use the following directory as an example as shown in the image.
Given below are a few common components of Grav link.
[Linked Content](../path/slug/page)
[] − Specifies to write the text or alternate content that is linked. In HTML, we use <a href=""> and </a> to place the content.
() − URL is placed in this bracket, which is directly placed after the square bracket.
../ − Indicates a move up by one directory.
There are 4 types of links used in the content as listed below −
Slug Relative
Directory Relative
Absolute
Remote
Slug Relative
Internal links are not limited to some names within your file/directory structure. The Slugs can be pulled from both header and fallback directory name, which later helps you to create links easily as there is no need of remembering any specific filename but can remember a relevant slug. The Grav's templating engine uses names of file to know which template to apply.
[link](../dog)
The above code fetches you the following result −
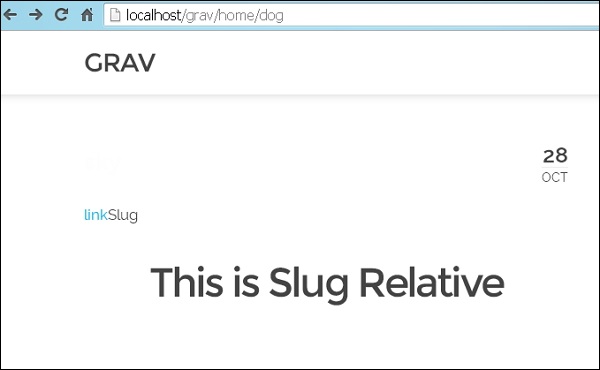
In the above example, you must move up a directory and load the default page that is located in the pages/01.home/02.nature/item.md directory from pages/01.home/02.dog/item.md. The file, item.md does not have assigned slug, so Grav uses the directory name.
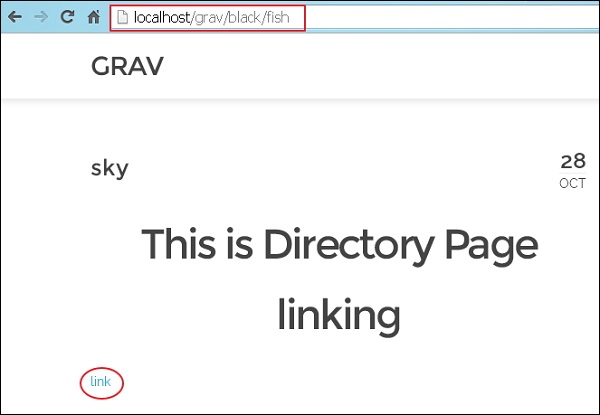
Next, you find a similar example, linking from pages/01.home/01.dog/item.md to pages/02.black/01.fish/item.md, but when it loads the item.md file, a slug will be assigned to the file of 01.fish.
[link](../../black/fish)
The above code gives you the following result −

You will now see that the default slug folder name will be replaced with black slug in the header of item.md.
Directory Relative
Destinations set relative is used to link the current page which can be an image file or any other file as required. The location of the file is as important as that of the destination. If the file is moved while changing the path, the link can be broken. As long as a file remains consistent you can switch easily between a local development server and a live server with different domain name. Links should work without any issues.
You will point the link of your file directly by name, instead of its directory or slug. You can create a link from pages/01.home/01.dog/item.md to pages/02.black/01.fish/item.md use the command as shown below.
[link](../../02.black/01.fish/item.md)
The above code gives you the following result −
Both the folders are moved up, as shown by ../../, and then at the bottom two folders, pointing directly to item.md file.
Absolute Links
It is similar to relative links, based in your /user/pages/ directory in Grav. Further, this can be done with two methods.
Slug Relative style
Directory Relative style
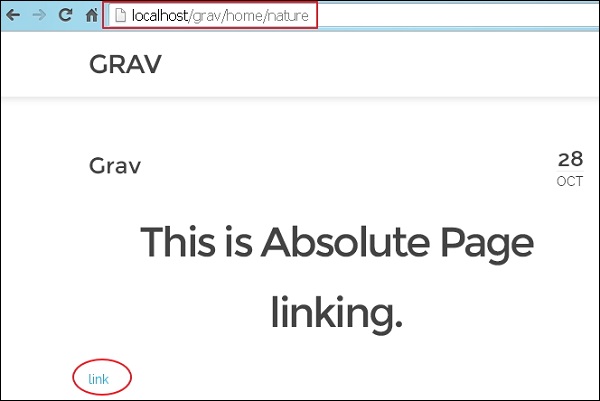
Slug Relative Style
You can do it similarly as the slug relative type. It uses the directory name in the path. It eliminates the errors of order and changes later by breaking the link. It changes the number of the folder name at the start that leads in breaking of link.
Given below is an example of absolute link, the link opens with /. It specifies that absolute link is made in pages/01.home/01.dog/item.md in the Slug style.
[link](/home/nature)
The above code gives you the following result −
Directory relative style is more consistent when it is used with services like GitHub. They don't have the benefit of Grav's flexibility. Below you can see an example of an absolute link made to pages/01.home/01.dog/item.md using Directory Relative style.
[link](/01.home/01.dog)
Remote
Remote links allow you to link directly to any file or document through its URL. There is no need to include your own site's content.
The following example shows you how to link to TutorialsPoint page.
[link](http://www.tutorialspoint.com)
The above code gives you the following result −

You can link directly to any URL, including secured HTTPS links.
Grav - Image Linking
In this chapter, we will understand image linking in Grav. Grav allows you to link images from one page to another and even to remote pages. If you have linked the files using HTML, that would be very easy to understand image linking in Grav.
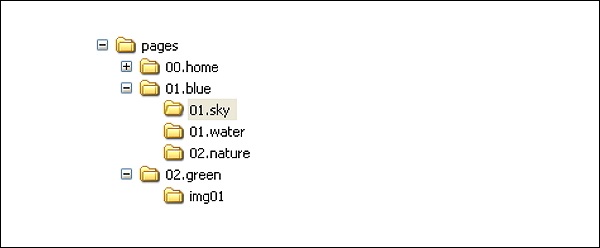
Using this structure, we will see how to display media files in the page using different types of links. Every folder under this structure contains images and there is a special directory under /02.green/img01 which acts as a page but contains only media files.
Let's look into some of the common elements of Grav markdown-based image tag.

! − It indicates an image tag when you place it at the beginning of markdown link tag.
[] − It specifies optional alt-text for the image.
() − It is placed directly after the square bracket which contains file path.
../ − It indicates a move up a directory.
Grav uses five types of image links as listed below −
Slug Relative
Directory Relative
Absolute
Remote
Media Actions on Images
Slug Relative
It sets relative image links to the current page and links another file in the same directory. While using relative links, the location of the source file is as important as that of the destination. If you change the path in the file while moving, then the link can be broken. The advantage of using this image linking structure is that you can switch between local development server and a live server with a different domain name, as long as the file structure stays constant.
Example

Here ../ indicates that your link moves up one folder and then down one folder and img.jpg is the destination.
When you use the above path, you will receive the following output −

Grav supports slugs in the header of the page's primary markdown file and this slug takes the place of the folder name for the given page.
If 01.sky folder has a slug set through its .md file, i.e., /pages/01.blue/01.sky/text.md, then the header of the file would be as −
---
title: Sky
slug: test-slug
taxonomy:
   category: blog
---
In the above code, we have set the slug test-slug which is an optional. Once you set the slug, you can then link to the media file which will have Slug Relative or Absolute URL set for the link.
Directory Relative
In this type of link, you can set directory relative image links to the current page. Instead of using the URL slugs, you can reference through the full path with their folder names in directory relative image links.
Example

When you use the above path, it will display the output as shown below −

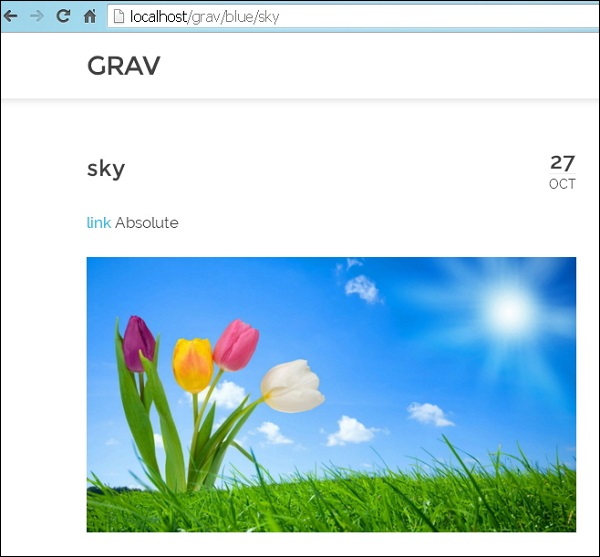
Absolute
Absolute links are same as relative links but the only difference is that they are relative to the root of the site and present in the /user/pages/ directory.
You can use absolute links in two different ways −
You can use Slug Relative style that includes slug or directory names in the path and commonly used in absolute linking.
You can use Absolute Link which opens the link with a/.

When you use the above path, you will receive the following output −
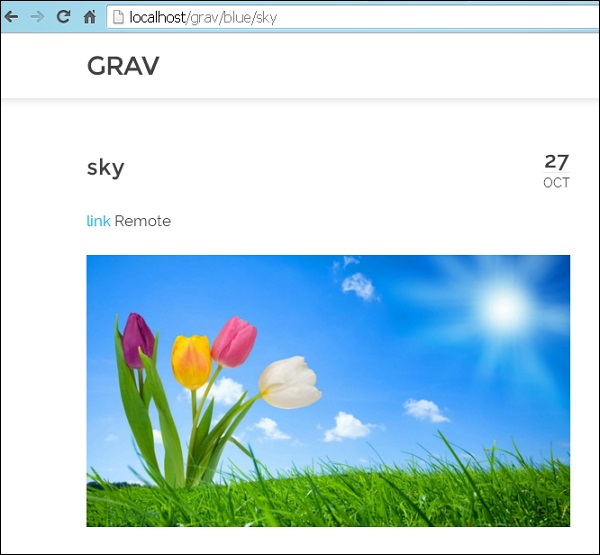
Remote
Remote image links allow displaying any media file directly through its URL. These links do not include your own site's content. The following example shows how to display image using remote URL −

When you click on the link as shown in the image below, it will display the image from the given URL.
Media Actions on Images
Images associated with pages enable us to use the advantage of Grav's media actions. You can display some media files like images, videos and other files when creating content in Grav.
Example
You can load an image by using the format given below −

When you use the above path, you will receive an output as shown below −

Grav - Media
Media files contain different types of display content such as images, videos, and many other files. Grav finds and processes these files automatically to be used by any page. By using the built in functionality of the page, you can access metadata and modify the media dynamically.
Smart-caching is used by Grav that creates in-cache generated media when necessary. This way all can use the cached version instead of generating media again and again.
Supported Media Files
Following are the media file types that are supported by Grav −
Image − jpg, jpeg, png
Animated Image − gif
vectorized Image − svg
Video − mp4, mov, m4v, swf
Data/information − txt, doc, pdf, html, zip, gz
Display Modes
Following are a few types of display modes in Grav −
Source − It is the visual display of the image, video or a file.
text − Textual presentation of media files.
thumbnail − Thumbnail image for the media file.
Locating Thumbnails
You can locate the thumbnails using three locations −
In the same folder where your media files exists − [media-name].[media-extension].thumb.[thumb-extension]; here, media-name and media-extension are name and extension of the actual media file and thumb-extension is extension that is supported by the image media type.
User Folder − user/images/media/thumb-[media-extension].png; here, media-extension is extension of the actual media file.
System folder − system/images/media/thumb-[media-extension].png; here, media-extension is the extension of the actual media file.
Lightboxes and Links
Grav gives an output of an anchor tag that contains some of the elements for the lightbox plugin to read. If you want to use a lightbox library which is not included in your plugins, then you can use the following attributes to create your own plugin.
rel − Indicates the lightbox link. The value is lightbox.
href − It is a URL to the media object.
data-width − Set the width of the lightbox chosen by the user.
data-height − Set the height of the lightbox chosen by the user.
data-srcset − srcset string is used in case of image media.
Actions
Builder pattern in Grav is used to handle media, to perform multiple actions. There are some kinds of actions which are supported for all medium while there are some that are available only for specific medium.
General
There are 6 types of general actions that are available for the media types. Each action is explained below.
| Sr.No. | Action & Description |
|---|---|
| 1 | url()
url() gives back raw url path to media. |
| 2 | html([title][, alt][, classes]
The output will have a valid html Tag for media. |
| 3 | display(mode) It is used to switch between different display modes. When you switch to display mode, all the actions will be reset. |
| 4 | link()
Actions applied before link will apply to the target of the link. |
| 5 | lightbox([width, height])
Lightbox is similar to link action but has a little difference that it creates a link with some extra attributes. |
| 6 | Thumbnail
Select in between page and default for any type of media file and this can be done manually. |
Actions on Images
The following table lists out a few actions that are applied on images.
| Sr.No. | Action & Description |
|---|---|
| 1 | resize(width, height, [background])
Changes the width and height of the image by resizing. |
| 2 | forceResize(width, height)
Stretches the image as required irrespect of original ratio. |
| 3 | cropResize(width, height)
Resizes the image to smaller or larger size according to its width and height. |
| 4 | crop(x, y, width, height)
Crops the image as described by width and height from the x and y location. |
| 5 | cropZoom(width, height)
Helps zoom and crop the images as per the request. |
| 6 | quality(value)
Sets value for the image quality between 0 and 100. |
| 7 | negate()
Colours get inverted in negation. |
| 8 | brightness(value)
With a value of -255 to +255, brightness filter is added to the image. |
| 9 | contrast(value)
The value from -100 to +100 is used to apply the contrast filter to the image. |
| 10 | grayscale()
he grayscale filter is used to process the image. |
| 11 | emboss()
The embossing filter is also used to process the image. |
| 12 | smooth(value)
The smoothing filter is applied to the images by setting the value from -10 to +10. |
| 13 | sharp()
The sharpening filter is added on the image. |
| 14 | edge()
The edge finding filter is added on the image. |
| 15 | colorize(red, green, blue)
Colorizes the image by adjusting red, green and blue colours. |
| 16 | sepia()
The sepia filter is added to give a vintage look. |
Animation and Vectorizing images and videos
Animated and vectorized actions are done on images and videos. Following is the action that takes place on images and videos.
| Sr.No. | Action & Description |
|---|---|
| 1 | resize(width, height)
The resize action will set width, height, data-width and data-height attributes. |
Combinations
Grav has image manipulation functionality that makes it easy to work with images.

The above code will generate an output as shown below −

Responsive images
Following table lists out a few types of responsive images.
| Sr.No. | Action & Description |
|---|---|
| 1 | Higher density displays
Add a suffix to the filename and u can add higher density image to the page. |
| 2 | Sizes with media queries
Add a suffix to the filename and u can add higher density image to the page. |
Metafiles
image1.jpg, archive.zip or any other reference has the ability to set variables or can be overridden by a metafile. These files then take the format of <filename>.meta.yaml. For example, if you have an image as image2.jpg, then your metafile can be created as image2.jpg.meta.yaml. The content must be in yaml syntax. You can add any files or metadata you like using this method.
Grav - Modular Pages
Modular pages are difficult to understand at first but once you get to know about it, it would be very easy to work with. It enables to create a single page from its child pages. It has the ability to build complex one page layouts from modular content pages.
Modular pages are set as non-routable because they cannot be reached directly through an URL. They are identified by _ (underscore) before the folder name. It is a collection of pages that are displayed one above each to get a single page. For example, user/pages/home/_header..
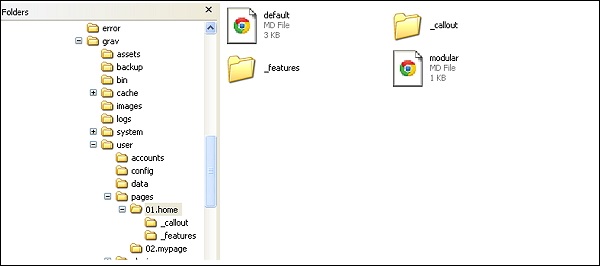
Folder Structure
In case of one-page skeleton, you can find this page in the 01.home folder. In this, you get a single modular .md file that tells which pages must be included and the order of the pages to display. modular.html.twig can be found in your present theme folder.
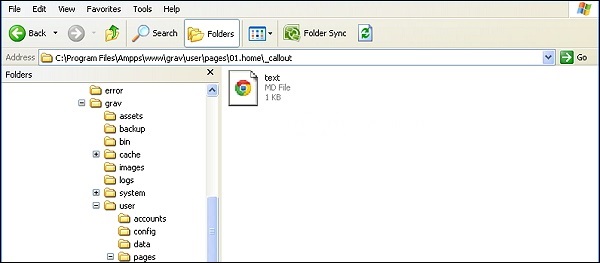
In the image below, you can see a folder structure that has been created for modular pages.
Every sub-folder must contain a .md file that describes a markdown file.
Firstly, you must create sub folders in /users/pages/01.home folder. Next, each folder must contain a .md file and a modular.md file.
When you create the sub folder, the image and file both must be in the same folder.
How to Create Modular Page
To create modular pages, you must follow the given steps.
Step 1 − Create a few pages in /user/pages/01.home/. folder. In the image below, you can see we have created two folders along with a modular.md file.
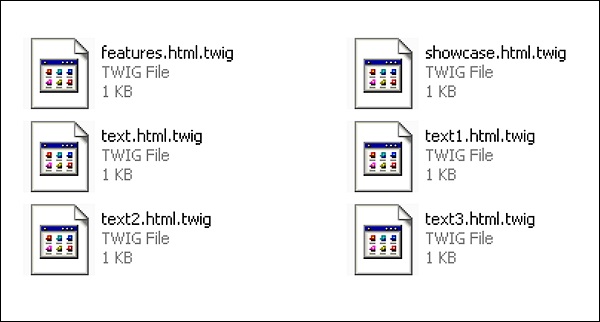
Step 2 − To create a modular page, you must create a file in each folder and name it as text.md.
Step 3 − Next, add your code in text.md file, save it and run the same.
Example
Save all the four pages as .md file. Here we have created 4 pages and named as text.md, text1.md, text2.md and text3.md.
---
title: Bio-diversity
---

## Bio-diversity

Biodiversity refers to the variety of life. It is seen in the number of species in an
[ecosystem](https://simple.wikipedia.org/wiki/Ecosystem) or on the entire [Earth]
(https://simple.wikipedia.org/wiki/Earth). Biodiversity gets used as a measure of the
health of biological systems, and to see if there is a danger that too many species
become[extinct](https://simple.wikipedia.org/wiki/Extinct).
Now, create 4 pages, add them to the \templates\modular folder as shown below.
Next, go to home page and refresh, you can see the changes.
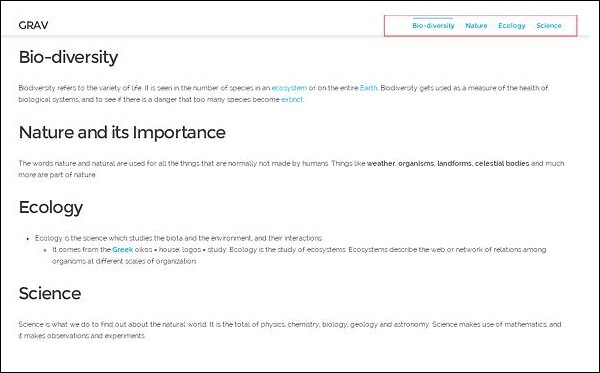
In the new navigation bar, you can see the four file links.
Grav - Multi Language
Multi-Language is defined as the use of different languages in your website. We will learn different procedures that will help you use multi–languages in your Grav site.
Multi – Languages Basics
Basically Grav needs a .md file for the representation of any page. When you enable the multi-language support, it will look for a file like default.en.md or default.fr.md..
Language Configuration
You must first set up some basic language configuration in your user/config/system.yaml file. file.
Language:
   Supported:
      - en
      - Fr
By doing this, you have enabled multi–language support in Grav. In the above code, en means English language and fr means French. This means your site will support these two languages. Here the default language is en (English). If you write Fr (French) first, then that becomes your default language.
Multiple Language Pages
If your default language is set as English, then Grav will look for default.en.md file. If that file is not found, then Grav looks for another language you have set. If both the languages are not found, then it looks for the default.md file.
Example
default.en.md file
---
title: Home
---

# Grav is Running!
## You have installed **Grav** successfully
The above code will generate the following output −

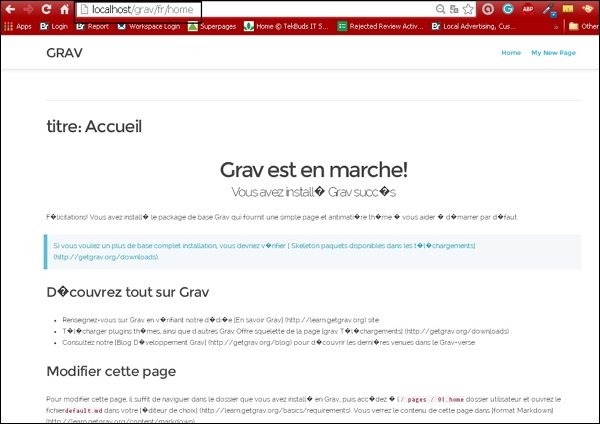
For French as default language, the default.fr.md file will be −
---
titre: Accueil
---

# Grav est en marche!
## Vous avez installé ** ** Grav succès
The above code will generate the following output −
Active Language via URL
If you want to update a URL to your website with a language code, then follow these steps −
Example
If you want your site to be in English, then type the below line in your browser −
http://www.mysite.com/en
If you want your site to be in French, then type the below line in your browser −
http://www.mysite.com/fr
Active Language via Browser
Grav has the ability to get the http_accept_language value and compare them to present supported language. If you want this to function, then enable your user/system.yaml file in the language section as −
language :
   http_accept_language : true
Language-Based Homepage
To have a language based home page, you must enable the following code in your site.yaml file −
home:
   aliases:
      en: /homepage
      fr: /page-d-accueil
In this way, Grav will find out which language to use from the active languages.
The following code will force Grav to redirect you to your default language route. And the include_route option forces to add the language code in your url like http://www.mysite.com/en/home
languages:
   home_redirect:
      include_lang: true
      include_route: false
Language-Based Twig Templates
If your file is default.en.md, then Grav will look for a twig file as default.html.twig. When you need a language–specific twig file, then you must upload it at the root level of the language folder. If your present theme is in templates/default.html.twig you must create a templates/en/ folder and place your English-specific folder in it as: templates/en/default.html.twig
Language Switcher
Language switcher plugin is available at Grav Package Manager (GPM).
Translations via Twig
Use twig filter and t() function. Both function similarly. If you have another twig file, then it lets you to translate from an array.
Plugin and Theme Language Translations
Provide your translations in plugins and themes by creating a languages.yaml file in the root of your theme or plugin (/user/plugins/error/languages.yaml) and must contain all the supported languages.
Translation Overrides
If you want to override translation, then you must put the value pair in the language file in your the user/languages/ folder.
Advanced
Environment – Based Language Handling
It is possible to route users to the correct version of your site according to URL. If your site url is http://english.yoursite.com, an alias for your standard http://www.yoursite.com, then you can create a configuration as /user/english.yoursite.com/config/system.yaml..
languages:
   supported:
      - fr
      - en
It uses inverted language order. In the above code, fr is the default language. If you change the order by keeping en at the top and fr at the bottom, then en becomes the default language.
Language Alias Routes
It is very difficult to switch between different language versions of the same page, you can use the Page.rawRoute() method on your page object. It gets the same raw route for different language translations of a single page. Put the language code in the front to get a proper route.
If you are on page in French with a custom route of −
/ma-page-francaise-personnalisee
English page has the custom route of −
/my-custom-french-page
You get the raw page of the French page and that might be −
/blog/custom/my-page
Then just add the language you want which will be your new URL.
/en/blog/custom/my-page
Translations Support
Grav provides simple mechanism for providing translations in Twig via PHP to be used in themes and plugins. It is enabled by default and uses en language if no specific language is defined. To enable or disable, go to system.yaml file and make the changes.
languages:
   translations: true
You can provide translations in many ways and different places. The first place is system/languages folder. Files must be created in en.yaml, fr.yaml, etc. format. Each yaml file must consist an array or nested arrays of key pairs.
SITE_NAME: My Blog Site
HEADER:
   MAIN_TEXT: Welcome to my new blog site
   SUB_TEXT: Check back daily for the latest news
Session Based Active Language
You can activate session-based storage of the active language. To enable you must have session : enables : true in system.yaml and enable language setting.
languages:
   session_store_active: true
Language Switcher
Install a language switching plugin from GPM.
Setup with language specific domains
Have Environment based language handling configuration to assign default languages. Add this option to your system.yaml; it must be set to true.
pages.redirect_default_route: true
Add the following to your .htaccess file and pick the language slugs and domain names according to your requirements.
# http://www.cheat-sheets.org/saved-copy/mod_rewrite_cheat_sheet.pdf
# http://www.workingwith.me.uk/articles/scripting/mod_rewrite

# handle top level e.g. http://Grav-site.com/de
RewriteRule ^en/?$ "http://Grav-site.com" [R = 301, L]
RewriteRule ^de/?$ "http://Grav-site.de" [R = 301, L]

# handle sub pages, exclude admin path
RewriteCond %{REQUEST_URI} !(admin) [NC]
RewriteRule ^en/(.*)$ "http://Grav-site.com/$1" [R = 301, L]
RewriteCond %{REQUEST_URI} !(admin) [NC]
RewriteRule ^de/(.*)$ "http://Grav-site.de/$1" [R = 301, L]
Grav - Themes Basics
Themes control the looks of your Grav site. Themes in Grav are built with the powerful Twig Templating engine.
Content Pages and Twig Templates
The pages that you create, references a specific template file by name or by setting the template header variable for the page. Using the page name is advised for simpler maintenance.
After installing Grav Base package, you will find the defauld.md file in user/pages/01.home folder. The name of the file, i.e., default tells Grav that this page should be rendered with the twig template default.html.twig placed inside the themes/<mytheme>/templates folder.
For example, if you have a file called contact.md, it will be rendered with twig template as themes/<mytheme>/templates/contact.html.twig.
Theme Organization
In the following sections, we will discuss about theme organization, i.e., its definition, configuration and more.
Definition and Configuration
The information about the theme will be defined in user/themes/antimatter/blueprints.yaml file and form definitions to be used in Administration panel are provided optionally. You will see the following content in user/themes/antimatter/blueprints.yaml file for Antimatter theme.
name: Antimatter
version: 1.6.0
description: "Antimatter is the default theme included with **Grav**"
icon: empire
author:
   name: Team Grav
   email: devs@getgrav.org
   url: http://getgrav.org
homepage: https://github.com/getgrav/grav-theme-antimatter
demo: http://demo.getgrav.org/blog-skeleton
keywords: antimatter, theme, core, modern, fast, responsive, html5, css3
bugs: https://github.com/getgrav/grav-theme-antimatter/issues
license: MIT

form:
   validation: loose
   fields:
      dropdown.enabled:
         type: toggle
         label: Dropdown in navbar
         highlight: 1
         default: 1
         options:
            1: Enabled
            0: Disabled
         validate:
            type: bool
In order to use theme configuration options, you need to provide the default settings in a file called user/themes/<mytheme>/<mytheme>.yaml.
Example
enable: true
Theme and Plugins Events
The ability of theme to interact with Grav via the plugins architecture is another powerful feature of Grav. To achieve this, simply create user/themes/<mytheme>/<mytheme>.php (for example, antimatter.php for default Antimatter theme) file and use the following format.
<?php
namespace Grav\Theme;

use Grav\Common\Theme;

class MyTheme extends Theme {
   public static function getSubscribedEvents() {
      return [
         'onThemeInitialized' => ['onThemeInitialized', 0]
      ];
   }
   public function onThemeInitialized() {
      if ($this->isAdmin()) {
         $this->active = false;
         return;
      }

      $this->enable([
         'onTwigSiteVariables' => ['onTwigSiteVariables', 0]
      ]);
   }
   public function onTwigSiteVariables() {
      $this->grav['assets']
         ->addCss('plugin://css/mytheme-core.css')
         ->addCss('plugin://css/mytheme-custom.css');

      $this->grav['assets']
         ->add('jquery', 101)
         ->addJs('theme://js/jquery.myscript.min.js');
   }
}
Templates
The structure of Grav theme has no set rules except that there must be associated twig templates in templates/ folder for each and every page types content.
Due to this tight coupling between page content and twig template, it's good to create general themes based on the Skeleton packages available in downloads page.
Suppose you want to support modular template in your theme, you have to create modular/ folder and store twig templates files inside it. If you want to support forms, then you should create form/ folder and store form templates in it.
Blueprints
To define forms for options and configuration for every single template files blueprints/ folder is used. These will not be editable via the Administrator Panel and it is optionally used. The theme is fully functional without blueprints folder.
SCSS/LESS/CSS
If you want to develop site with SASS or LESS, then you have to create sub-folders in user/themes/<mytheme>/scss/, or less/ if you want LESS along with a css/ folder.
For automatically generated files which are compiled from SASS or LESS, the css-compiled/ folder is used. In Antimatter theme, scss variant of SASS is used.
Follow these steps to install SASS in your machine.
At the root of the theme, type the command given below to execute scss shell script.
$ ./scss.sh
- Type the following command to directly run it.
$ scss --sourcemap --watch scss:css-compiled
The css-compiled/ will contain all the compiled scss files and css file will be generated inside your theme.
Other Folders
It is recommended to create separate images/, fonts/ and js/ folders in your user/themes/<mytheme>/ folder for any images, fonts and JavaScript files used in your theme.
Theme Example
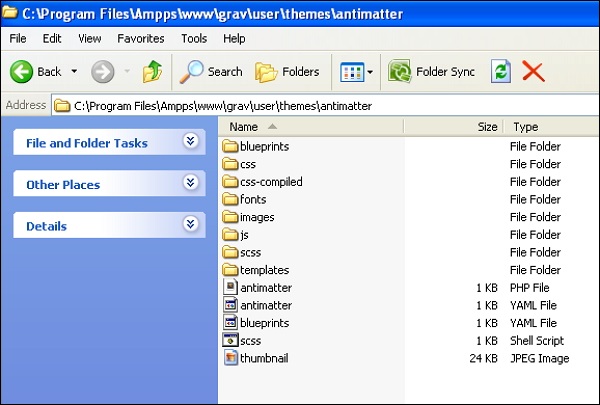
The overall folder structure of the Antimatter theme that we discussed so far is shown below.
Grav - Theme Tutorial
In this chapter, let us create a Grav theme to understand the concept.
Antimatter
When you install the Grav base package, the default Antimatter theme is installed, which uses Nucleus (a simple base set of CSS styling). Nucleus is a lightweight CSS framework that contains essential CSS styling and HTML markup which gives a unique look and feel.
Bootstrap
Let us create a theme that utilizes popular Bootstrap framework. Bootstrap is an open-source and most popular HTML, CSS, and JS framework making front-end web development faster and easier.
The following steps describe the creation of theme −
Step 1: Base Theme setup
There are some key elements to Grav theme as we studied in the Theme Basics chapter which are to be followed in order to create new theme.
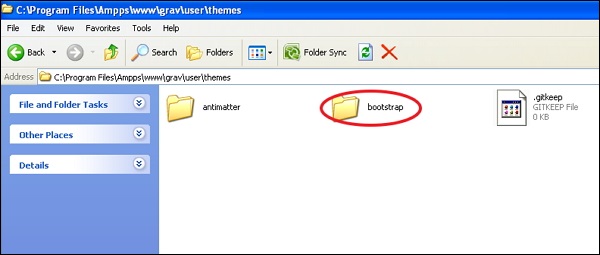
After installing the Grav base package, create a folder called bootstrap under the user/themes folder as shown below.
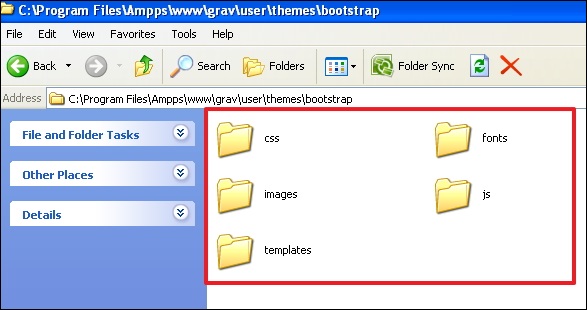
Inside the user/themes/bootstrap folder, create css/, fonts/, images/, js/ and templates/ as shown below.
Create a theme file called bootstrap.php in your user/themes/bootstrap folder and paste the following content in it.
<?php
namespace Grav\Theme;
use Grav\Common\Theme;
class Bootstrap extends Theme {}
Now, create a theme configuration file bootstrap.yaml in themes/bootstrap folder and write the following content in it.
enable: true
We will skip the blueprints folder as we have no configuration options and will use regular CSS for this chapter.
Step 2: Add Bootstrap
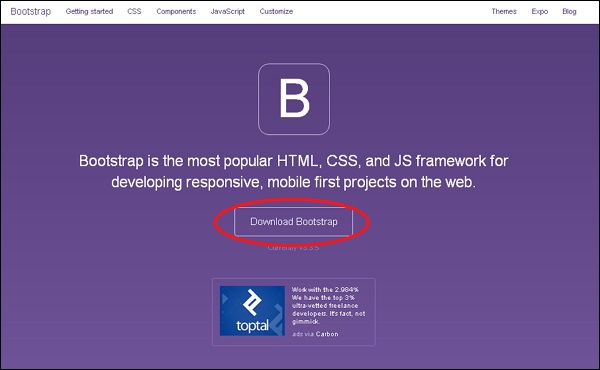
In order to create a bootstrap theme, you must include Bootstrap in your theme. So you need to download the latest Bootstrap package by clicking this link as shown below.
Unzip the package and you will see three folders namely css, fonts and js. Now copy the contents of these 3 folders into similarly named folders in user/themes/bootstrap that were created earlier.
Step 3: Base Template
As we studied in the previous chapter, the content is stored in the default.md file which instructs the Grav to look for the rendering template called default.html.twig. This file includes everything that you need to display a page.
There is a better solution that utilizes the Twig Extends tag which allows you to define the base layout with blocks. This will allow the twig template to extend the base template and provide definitions for blocks defined in the base.
Follow these steps to create a simple Bootstrap base template −
Create a folder called partials in the user/themes/bootstrap/templates folder. This is used to store our base template.
In the partials folder, create a base.html.twig file with the following content.
<!DOCTYPE html>
<html lang = "en">
   <head>
      {% block head %}
      <meta charset = "utf-8">
      <meta http-equiv = "X-UA-Compatible" content = "IE = edge">
      <meta name = "viewport" content = "width = device-width, initial-scale = 1">
      {% if header.description %}
      <meta name = "description" content = "{{ header.description }}">
      {% else %}
      <meta name = "description" content = "{{ site.description }}">
      {% endif %}
      {% if header.robots %}
      <meta name = "robots" content = "{{ header.robots }}">
      {% endif %}
      <link rel = "icon" type = "image/png" href="{{ theme_url }}/images/favicon.png">

      <title>{% if header.title %}{{ header.title }} | {% endif %}{{ site.title }}</title>

      {% block stylesheets %}
         {# Bootstrap core CSS #}
         {% do assets.add('theme://css/bootstrap.min.css',101) %}

      {# Custom styles for this theme #}
         {% do assets.add('theme://css/bootstrap-custom.css',100) %}

         {{ assets.css() }}
      {% endblock %}

      {% block javascripts %}
         {% do assets.add('https://ajax.googleapis.com/ajax/libs/jquery/1.11.1/jquery.min.js', 101) %}
         {% do assets.add('theme://js/bootstrap.min.js') %}

         {% if browser.getBrowser == 'msie' and browser.getVersion >= 8 and browser.getVersion <= 9 %}
            {% do assets.add('https://oss.maxcdn.com/html5shiv/3.7.2/html5shiv.min.js') %}
            {% do assets.add('https://oss.maxcdn.com/respond/1.4.2/respond.min.js') %}
         {% endif %}

         {{ assets.js() }}
      {% endblock %}

      {% endblock head %}
   </head>
      <body>
         {# include the header + navigation #}
         {% include 'partials/header.html.twig' %}

         <div class = "container">
            {% block content %}{% endblock %}
         </div>

         <div class = "footer">
            <div class = "container">
               <p class = "text-muted">Bootstrap Theme for <a href = "http://getgrav.org">Grav</a></p>
            </div>
         </div>
      </body>
   {% block bottom %}{% endblock %}
</html>
Step 4: Breaking it Down
Let's see how the code works in base.html.twig file as shown below.
{% block head %}{% endblock head %} syntax used to define an area in the base Twig template. The head inside the {% endblock head %} is optional.
The if statement tests whether there is a meta description set in the page headers or not. If not set, then template should render by using site.description as defined in the user/config/site.yaml file.
The path of the current theme is given out by the theme_url variable .
The syntax {% do assets.add('theme://css/bootstrap.min.css',101) %} is used to make use of the Asset Manager. The theme:// represents the current theme path and 101 represents the order where the higher value comes first followed by the lower value. We can also provide the CDN links explicitly as −
{% do assets.addCss('http://fonts.googleapis.com/css?family = Open + Sans') %}
or,
{% do assets.addJs(' https://ajax.googleapis.com/ajax/libs/jquery/1.11.3/jquery.min.js') %}
All the JavaScript tags and CSS link tags are rendered by the template when call to {{ assets.css() }} or {{ assets.js() }} is made respectively.
The syntax {# ... #} is used to write comments in Twig.
To include another Twig template {% include 'partials/header.html.twig' %} tag is used.
The content from a template is provided by the {% block content %}{% endblock %} tag.
To add custom JavaScript initialization or analytic codes, the {% block bottom %}{% endblock %} tag is used as placeholder for templates.
Step 5: Header Template
When {% include 'partials/header.html.twig' %} is executed, the Twig rendering engine searches for the Twig template. So create the header.html.twig template file inside user/themes/bootstrap/templates/partials folder with the following content.
<nav class = "navbar navbar-default navbar-inverse navbar-static-top" role = "navigation">
   <div class = "container">
      <div class = "navbar-header">
         <button type = "button" class = "navbar-toggle"
            data-toggle = "collapse" data-target = ".navbar-collapse">
               <span class = "sr-only">Toggle navigation</span>
               <span class = "icon-bar"></span>
               <span class = "icon-bar"></span>
               <span class = "icon-bar"></span>
         </button>
         <a class = "navbar-brand" href = "#">Grav</a>
      </div>

      <div class = "navbar-collapse collapse">
         <ul class = "nav navbar-nav navbar-right">
            {% for page in pages.children %}
            {% if page.visible %}
            {% set current_page = (page.active or page.activeChild) ? 'active' : '' %}
            <li class = "{{ current_page }}"><a href = "{{ page.url }}">{{ page.menu }}</a></li>
            {% endif %}
            {% endfor %}
         </ul>
      </div>

   </div>
</nav>
The above code creates a navbar and displays all menu items automatically whenever a new page is created in the user/pages folder.
Step 6 − Default Template
Each item of the content has a particular file name such as default.md which instructs Grav to search for a template file called default.html.twig. Let us now create the default.html.twig file in your user/themes/bootstrap/templates/ folder with the following content.
{% extends 'partials/base.html.twig' %}
{% block content %}
   {{ page.content }}
{% endblock %}
The above default.html.twig file extends the partials/base.html.twig and tells the base template to use {{ page.content }} for the content block.
Step 7: Theme CSS
In partials/base.html.twig file we referenced to a custom theme css using assets.add('theme://css/bootstrap-custom.css',100), which stores any custom CSS used in your site.
Let us now create a bootstrap-custom.css file in user/themes/bootstrap/css folder with the following content −
/* Restrict the width */
.container {
   width: auto;
   max-width: 960px;
   padding: 0 12px;
}

/* Place footer text center */
.container .text-muted {
   margin: 18px 0;
   text-align: center;
}

/* Sticky footer styles
-------------------------------------------------- */
html {
   position: relative;
   min-height: 80%;
}

body {
   /* Margin bottom by footer height */
   margin-bottom: 60px;
}

.footer {
   position: absolute;
   bottom: 0;
   width: 100%;
   /* Set the fixed height of the footer here */
   height: 50px;
   background-color: #dcdcdc;
}

/* Typography */
/* Tables */
table {
   width: 100%;
   border: 1px solid #f0f0f0;
   margin: 30px 0;
}

th {
   font-weight: bold;
   background: #f9f9f9;
   padding: 5px;
}

td {
   padding: 5px;
   border: 1px solid #f0f0f0;
}

/* Notice Styles */
blockquote {
   padding: 0 0 0 20px !important;
   font-size: 16px;
   color: #666;
}

blockquote > blockquote > blockquote {
   margin: 0;
}

blockquote > blockquote > blockquote p {
   padding: 15px;
   display: block;
   margin-top: 0rem;
   margin-bottom: 0rem;
   border: 1px solid #f0f0f0;
}

blockquote > blockquote > blockquote > p {
   /* Yellow */
   margin-left: -75px;
   color: #8a6d3b;
   background-color: #fcf8e3;
   border-color: #faebcc;
}

blockquote > blockquote > blockquote > blockquote > p {
   /* Red */
   margin-left: -100px;
   color: #a94442;
   background-color: #f2dede;
   border-color: #ebccd1;
}

blockquote > blockquote > blockquote > blockquote > blockquote > p {
   /* Blue */
   margin-left: -125px;
   color: #31708f;
   background-color: #d9edf7;
   border-color: #bce8f1;
}

blockquote > blockquote > blockquote > blockquote > blockquote > blockquote > p {
   /* Green */
   margin-left: -150px;
   color: #3c763d;
   background-color: #dff0d8;
   border-color: #d6e9c6;
}
Step 8: Testing
Change your default theme with the new bootstrap theme. Open the user/config/system.yaml file and edit the line which contains −
pages:
   themes: antimatter
and change the above code to −
pages:
   theme: bootstrap
Now reload your Grav site and you will see the newly installed theme as shown below.
Grav - Twig Filters and Functions
In this chapter, let's study about Twig Filters and Functions. Filters are used to format the data the way you want with the required output too. Functions are used to generate contents.
Twig templates are text files that contain expressions and variables replaced by values. Twig uses three types of tags.
Output tags − The following syntax is used to display the evaluated expressions result here.
{{ Place Your Output Here }}
Action Tags − The following syntax is used to execute statements here.
{% executable statements are placed here %}
Comment tags − The following syntax is used to write comments in the Twig template file.
{# write your comment here #}
Twig Filters
Twig Filters uses the | character to apply filters to Twig variable followed by the filter name. Arguments can be passed in parenthesis similarly like Twig functions.
The following table shows Twig Filters used in Grav −
| Sr.No. | Filter & Description | Example |
|---|---|---|
| 1 | Absolute URL It takes the relative path and converts it to an absolute URL. |
'<img src="/some/path/img.jpg"/>' |absolute_url converts to − <img src="http://learn.getGrav.org/some/path/img.jpg" /> |
| 2 | Camelize It converts a string to CamelCase format. |
'contact_us'| camelize converts to − ContactUs |
| 3 | Contains if it finds the string. |
'This is some string' | contains('some')
the output is − 1 |
| 4 | Defined You can check if some variable is defined or not. If variable is not defined, you can provide a default value. |
set header_image_width =
page.header.header_image_width|defined(900)
It sets header_image_width with value 900 if it’s not defined. |
| 5 | Ends-With You can determine whether a string ends with a given string by using Ends-With filter. |
'this is an example for ends-with filter' | ends_with('filter')
it is displayed as − True |
| 6 | FieldName It filters the field name by changing dot into array notation. |
'field.name'|fieldName it is displayed as − field[name] |
| 7 | Humanize It is used to convert a string to human readable format. |
'some_text_to_read'|humanize it is displayed as − Some text to read |
| 8 | Ksort It sorts an array map using key. |
{% set ritems = {'orange':1, 'apple':2, 'peach':3}|ksort %}
{% for key, value in ritems %}{{ key }}:{{ value }}, {% endfor %}
it is displayed as − apple:2, orange:1, peach:3, |
| 9 | Left Trim It is used to remove white spaces at the beginning of a string and removes the matching character given from the left side of the string. |
'/strip/leading/slash/'|ltrim('/')
it is displayed as − strip/leading/slash/ |
| 10 | Markdown It is used to convert the string containing markdown into HTML using the markdown parser of Grav. |
'## some text with markdown'|markdown it is displayed as −
|
| 11 | MD5 The md5 hash for the string can be created by using this filter. |
'something'|md5 it is displayed as − 437b930db84b8079c2dd804a71936b5f |
| 12 | Monthize By using Monthize filter, we can convert an integer number of days to number of months. |
'61'|monthize it is displayed as − 2 |
| 13 | Nice Time By using the Nice Time filter, we can get a date in nice human readable time format as output. |
page.date|nicetime(false) it is displayed as − 3 hrs ago |
| 14 | Ordinalize Ordinals ( like 1st, 2nd, 3rd ) can be given to integers by using Ordinalize filter. |
'78'| ordinalize it is displayed as − 78th |
| 15 | Pluralize A string can be converted to its plural English form by using Pluralize filter. |
'child'|pluralize it is displayed as − children |
| 16 | Randomize This filter helps randomize the provided list. If parameter contains any values then those values are skipped from randomizing. |
{% set ritems = ['one', 'two', 'three', 'four', 'five', 'six', 'seven', 'eight', 'nine', 'ten']|randomize(3) %}
{% for ritem in ritems %}{{ ritem }}, {% endfor %}
it is displayed as − one, two, three, eight, six, five, nine, seven, ten, four, |
| 17 | Right Trim It is quite similar to left trim except it removes whitespaces and matched character from right side of the string. |
'/strip/leading/slash/'|rtrim('/')
it is displayed as − /strip/leading/slash |
| 18 | Singularize A string can be converted to English singular version by using Singular filter. |
'vehicles'|singularize it is displayed as − vehicle |
| 19 | Safe Email Safe Email filter is used to convert an email address into ASCII characters so that it makes harder for an email to be spammed. |
"someoneemailaddress@domain.com"|safe_email the output is − someoneemailaddress@domain.com |
| 20 | SortByKey It is used to sort the array map using keys. |
{% set people = [{'email':'john@gmail.com', 'id':3}, {'email':'melw@fdd.com', 'id':1}, {'email':'nancy@fb.com', 'id':7}]|sort_by_key('id') %}
{% for person in people %}{{ person.email }}:{{ person.id }}, {% endfor %}
it displays − melw@fdd.com:1, john@gmail.com:3, nancy@fb.com:7, |
| 21 | Starts-With You can determine whether a string starts with a given string by using Starts-With filter. |
'this is an example for starts-with filter' |starts_with('this')
the output is − true |
| 22 | Translate for more detailed information. |
MY_LANGUAGE_KEY_STRING it displays − 'Some text in English' |
| 23 | Translate Admin It translates a string into current language which is set in the user.yaml file. |
|
| 24 | Titleize A string is converted into Title Case format by using Titleize. |
'welcome page'|titleize it is displayed as − Welcome Page |
| 25 | UnderScoreize format by using UnderScoreize filter. |
'ContactUs'|underscorize it is converted to − contact_us |
| 26 | Truncate a string You can use Truncate to truncate a string or shorten the string, you must specify number of characters. |
'one sentence. two sentences'|truncate(5) it truncates to − one s... You can use true as parameter if you don't want to truncate the string to closest sentence-end after the given number of characters. 'one sentence. two sentences'|truncate(5, true) it truncates to − one sentenceYou can also strip HTML text, but you should use striptags filter before truncate filter. '<p>one <strong>sentence<strong>. two sentences</p>'|striptags|truncate(5) it is displayed as − one s |
Twig Functions
Twig Functions are directly called by passing the parameter. Following table lists the functions −
| Sr.No. | Function & Description | Example |
|---|---|---|
| 1 | Array This function cast a value to array. |
array(value) |
| 2 | Authorize This function makes an authenticated user is authorized to see a resource and accepts permission string or array of permission strings. |
authorize(['admin.statistics', 'admin.super']) |
| 3 | Dump It accepts a valid twig variable and dumps it into the Grav debugger panel. However, the debugger should be enabled to see message tab values. |
dump(page.header) |
| 4 | Debug This works same as the dump() function. |
|
| 5 | Gist This function creates the Gist embed code based on the Github Gist ID. |
|
| 6 | Random String Generation This function will create a random string with the specified number of characters. These strings can be used as unique id or key. |
generate_random_string(10) |
| 7 | Repeat This function will repeat the string for given amount of time. |
repeat('Grav ', 10) will repeat Grav 10 times.
|
| 8 | String Generates a random string of specified character length. |
ta (23) |
| 9 | Translate Array It is a function connected with |ta filter. |
|
| 10 | Url This filter will create a URL and it will also convert PHP URL streams into valid HTML resources. If the URL cannot be resolved a default value can be passed. |
url('theme://images/logo.png') | default('http://www.placehold.it/150x100/f4f4f4')
|
| 11 | Translate Using the Translate filter, a string is translated as the |t filter. |
t('SITE_NAME')
is translated to − Site Name |
Grav - Theme Variables
In this chapter, let us understand Theme Variables in Grav. Objects and variables are accessed from twig templates while designing your theme and these objects & variables are read and manipulated by Twig Templating Framework.
Core Objects
Twig template has many core objects; each object has a set of variables and functions.
The following table shows variables with brief description.
| Sr.No. | Variable & Description |
|---|---|
| 1 | {{ base_dir }} We can get Grav installations base file directory by using this variable. |
| 2 | {{ base_url }} The base url of the Grav site can be accessed by using this variable. |
| 3 | {{ base_url_relative }} It returns the relative path of the base url to Grav site. |
| 4 | {{ base_url_absolute }} It returns the absolute path of the base url to Grav site. |
| 5 | {{ theme_dir }} It is used to return the current theme's file directory folder. |
| 6 | {{ theme_url }} It is used to return current theme's relative URL. |
config object
In configuration.yaml file, the config object is set to access any Grav configuration setting.
{{ config.pages.theme }}
It will return the currently configured theme.
site object
Provides an alias to config.site object, representing the configurations set in the site.yaml file.
stylesheets object
These objects provide an array for CSS stylesheet assets to get stored, which can be looped to add CSS to templates.
scripts object
These objects provide an array that consists of JavaScript assets, which is looped over and JavaScripts are added to the templates.
page object
Since the structure of the Grav is defined in pages/ folder, the page object is responsible for representing each page. The page object contains all the information about the page that you are currently working on.
Following table shows methods of the page object.
| Sr.No. | Method & Description | Example |
|---|---|---|
| 1 | summary([size]) It gives a gist of the page content with the specified size provided as a parameter. If size is not specified then the value is obtained from summary.size variable in system/config/site.yaml file. You can also delimiter === in your content. The content before the delimiter will be used for summary. |
{{ page.summary }}
Or
{{ page.summary(80) }}
|
| 2 | content() It is used to get the entire HTML content of the page. |
{{ page.content }}
|
| 3 | headers() It returns the page headers defined in the YAML front-matter of the page. |
title: About Us
author: Johnson
The above headers can be accessed as:
The author of this page is: {{ page.header.author }}
|
| 4 | media() It is used to access all the media files such as images, videos and other files. It will return an array containing all the media associated with a page. |
{% set first_image = page.media|first %}
{% set my_pdf = page.media['myfile.pdf'] %}
{% for image in page.media.images  %}
   {{ image.html }}
{% endfor %}
|
| 5 | title() It is set to return the title of the page which is defined in YAML headers for the page. |
title: My Page |
| 6 | menu() The value of the menu variable is returned which is specified in YAML headers of the page. If the title variable is not set, then it will default to title. |
title: My Blog menu: my blog page |
| 7 | visible() It is used to set the visibility of the page. Usually pages with numeric value followed by period (i.e., 01.foldername) is displayed in menu and the folder name that does not contain numeric value (i.e., foldername) are not visible. We can override it in page header. |
title: About Us visible: true |
| 8 | routable() By using this we can determine whether a page is routable or not routable meaning that whether you can receive content back while pointing your browser to the page. The pages which are not routable can be used in plugins, templates, etc., and these pages cannot be directly accessed. This is set in page headers. |
title: My Page routable: true |
| 9 | slug() By using this variable, we can get direct name as displayed in the URL of the page. |
my-page |
| 10 | url([include_host = false]) It is used to return the page's URL |
{{ page.url }} { # could return /myfolder/mypage #}
Or
{{ page.url(true) }} {# could return http: //mysite.com/ myfolder/mypage #}
|
| 11 | route() It is used to return the internal routing of the page. |
|
| 12 | home() Using this variable you can determine whether the page is configured as home page or not. This returns true when a page is configured as home page and false when not configured. You can find this setting in system.yaml file. |
|
| 13 | root() It determines whether the current page is the root page of the hierarchy or not. It returns true if it's a root page or false if it's not root page. |
|
| 14 | active() You can determine whether the browser is accessing the current page by using this variable. It returns true if browser is accessing this page or false if it's not. |
|
| 15 | modular() By using this variable, we can determine whether this page is modular or not. If this is a modular page then it returns true and false if it's not. |
|
| 16 | activeChild() This variable can determine whether this URI's URL has the URL of the active page; or, in simple words this page's URL in current URL. This is very useful when you are working on navigations and you want to know that whether the pages are iterating over same parent page. |
|
| 17 | find(url) As specified by the route URL, the page object is returned by this variable. |
{% include 'modular/author-detail.html.twig' with {'page': page.find('/authors/ john-bloggs')} %}
|
| 18 | collection() This variable is used to return the group of pages for a context as determined by the collection page headers. |
{% for child in page.collection %}
   {% include 'partials /blog_item.html.twig' with {'page':child, 'truncate':true} %}
{% endfor %}
|
| 19 | isFirst() If the current page is first of it's sibling page, then it returns true else returns false. |
|
| 20 | isLast() If the current page is last of it's sibling page, then it returns true else returns false. |
|
| 21 | nextSibling() With reference to the current position, it returns the next sibling page from the array. |
|
| 22 | prevSibling() With reference to the current position, it returns the previous sibling page from the array. |
|
| 23 | children() As defined in the pages content structure, the array of child pages is returned by this variable. |
|
| 24 | orderBy() The sorted children's order type is returned by this method. The values that may be included are default, title, date and folder and these values configured in page headers. |
|
| 25 | orderDir() The sorted child pages’ order direction is returned by this method. And the values can be either asc(ascending) or desc(descending). Usually these values are configured in page headers. |
|
| 26 | orderManual() This method returns an array consisting of manual page ordering and this ordering will be for any children of the page. This value will be typically set in page headers. |
|
| 27 | maxCount() This variable tells that at most how many children pages are allowed to be returned. Usually the value is specified in page headers. |
|
| 28 | children.count() This variable returns how many child pages are there for a page. |
|
| 29 | children.current() This variable will return the current child item. |
|
| 30 | children.next() This will return the next child item from an array of child pages. |
|
| 31 | children.prev() This will return the previous child item from an array of child pages. |
|
| 32 | children.nth(position) This will return the position of the child in the array of children. |
|
| 33 | parent() In a nested tree structure when you want to navigate back up to the parent page, then you can use this variable. It will return the parent page object for the current page. |
|
| 34 | isPage() By using this variable, you can determine whether this page has an actual .md file or it’s just a folder for routing. |
|
| 35 | isDir() By using this variable you can determine whether current page is only a folder for routing. It returns true or false based on it. |
|
| 36 | id() This will return unique id for the page. |
|
| 37 | modified() It returns the timestamp of when the page was last modified. |
|
| 38 | date() The date timestamp for the page is returned by this method. Usually this is configured in headers that represents the page's or post's date. If no value is provided by default the modified timestamp is used. |
|
| 39 | filePath() By using this, you can get the full file path of the page. |
/Users/yourname/sites/ Grav/user/pages/ 01.home/default.md |
| 40 | filePathClean() This will return the relative path. |
user/pages/ 01.home/default.md |
| 41 | path() This will return a full path to the directory in which the current page is present. |
/Users/yourname /sites/ Grav/user/pages /01.home |
| 42 | folder() This will return the folder name for the page. |
|
| 43 | taxonomy() This will return an array of taxonomy which is connected with the page. |
pages object
Pages object is represented as a nested tree of page objects. This nested tree is very useful while creating navigations, sitemap or finding a particular page.
children method
This returns an array of page objects consisting of child pages. The page object with a tree like structure can be iterated over every page in the folder.
In order to get the top level pages for menu, use the following code.
<ul class = "navigation">
   {% for page in pages.children %}
      {% if page.visible %}
         <li><a href = "{{ page.url }}">{{ page.menu }}</a></li>
      {% endif %}
   {% endfor %}
</ul>
uri object
The part of the current URI can be accessed by using several methods of the Uri object.
http://mysite.com/Grav/section/category/page.json/param1:foo/param2:bar/?query1 = baz&query2 = qux:
The following table shows the methods of Uri object.
| Sr.No. | Method & Description | Example |
|---|---|---|
| 1 | path() The part of the current url can be accessed by using this method. |
uri.path = /section/category/page |
| 2 | paths() The array of path elements is returned by using this method. |
uri.paths = [section, category, page]) |
| 3 | route([absolute = false][, domain = false]) This method returns route with either absolute or relative URL. |
uri.route(true) = http://mysite.com/Grav/ section/category/page Or, uri.route() = /section/category/page) |
| 4 | params() This will return the parameter portion in the URL. |
uri.params = /param1:foo/param2:bar |
| 5 | param(id) This will return the value of the param. |
uri.param('param1') = foo
|
| 6 | query() The query portion of the URL can be accessed by using this method. |
uri.query = query1=bar&query2=qux |
| 7 | query(id) Using this you can access the specific query item. |
uri.query('query1') = bar
|
| 8 | url([include_host = true]) This returns the full URL which may or may not contain host. |
uri.url(false) = Grav/section/ category/page/param:foo?query = bar |
| 9 | extension() This will return the extension or if not provided, then it will return the html. |
uri.extension = json) |
| 10 | host() This return the host of the URL. |
uri.host = mysite.com |
| 11 | base() This will return the base part of the URL. |
uri.base = http://mysite.com |
| 12 | rootUrl([include_host = true]) This will return the Grav instance's root URL. |
uri.rootUrl() = http://mysite.com/Grav |
| 13 | referrer() The referrer information of the page is returned by this method. |
header object
It is an alternate for page.header() of the original page. It is more appropriate to use the original page header when you are looping through the child pages.
content object
It is an alternate for page.content() of the original page.
taxonomy object
All the taxonomy information of the site are contained in the global taxonomy object.
browser object
Grav programmatically determines the platform, browser and version of the user by using built-in support.
{{ browser.platform}}   # windows
{{ browser.browser}}    # chrome
{{ browser.version}}    # 24
Adding Custom Variables
Custom variables are added in several ways. If you are using site-wide variable, then put it in user/config/site.yaml file and you can access it as shown below.
{{ site.my_variable }}
If variable is only for a particular page then you can add it in YAML front-matter and access it by using the page.header object.
For example −
title: My Page
author: John
Author name can be accessed as −
The author of this page is: {{ page.header.author }}
Adding Custom Objects
By using plugins, you can add custom objects to the Twig object. This is an advanced topic and we will see more information in the plugins chapter.
Grav - Asset Manager
In this chapter let's study about Asset Manager. Asset Manager was introduced in Grav 0.9.0 to unify the interface for adding and managing assets like JavaScript and CSS. Adding these assets from themes and plugins will provide advanced capabilities such as ordering and Asset Pipeline. The Asset Pipeline is used to minify and compress the assets so that it reduces the requirements of the browser and also reduces the size of assets.
Asset Manager is a class and available to use in Grav through plugin event hooks. You can also use Asset Manager class directly in themes by using Twig calls.
Configuration
Asset Manager consists of a set of configuration options. The system.yaml file contains the default values; you can override these values in your user/config/system.yaml file.
assets:                     # Configuration for Assets Manager (JS, CSS)
   css_pipeline: false      # The CSS pipeline is the unification of multiple CSS resources into one file
   css_minify: true         # Minify the CSS during pipelining
   css_rewrite: true        # Rewrite any CSS relative URLs during pipelining
   js_pipeline: false       # The JS pipeline is the unification of multiple JS resources into one file
   js_minify: true          # Minify the JS during pipelining
Assets in Themes
Antimatter theme comes as default theme when you install Grav. It shows an example of how to add CSS files in your base.html.twig file which resides in this theme.
{% block stylesheets %}
   {% do assets.addCss('theme://css/pure-0.5.0/grids-min.css', 103) %}
   {% do assets.addCss('theme://css-compiled/nucleus.css',102) %}
   {% do assets.addCss('theme://css-compiled/template.css',101) %}
   {% do assets.addCss('theme://css/custom.css',100) %}
   {% do assets.addCss('theme://css/font-awesome.min.css',100) %}
   {% do assets.addCss('theme://css/slidebars.min.css') %}

   {% if browser.getBrowser == 'msie' and browser.getVersion == 10 %}
      {% do assets.addCss('theme://css/nucleus-ie10.css') %}
   {% endif %}
   {% if browser.getBrowser == 'msie' and browser.getVersion >= 8 and browser.getVersion <= 9 %}
      {% do assets.addCss('theme://css/nucleus-ie9.css') %}
      {% do assets.addJs('theme://js/html5shiv-printshiv.min.js') %}
   {% endif %}
{% endblock %}
{{ assets.css() }}
The above code is explained briefly below.
The region defined in the block twig tag can be replaced or appended to in templates that extend the one and you can see the number of do assets.addCss() calls inside this block.
The {% do %} tag allows you to handle variables without any output which is built into Twig itself.
The CSS assets can be added to Asset Manager by using addCss() method. You can set priority of the stylesheets by passing a numerical value as second parameter. The call to the addCss() method renders out the HTML tags from CSS assets.
The JavaScript assets are used in the same way as the CSS assets. The JavaScript assets within the block twig tags as shown below.
{% block javascripts %}
   {% do assets.addJs('jquery',101) %}
   {% do assets.addJs('theme://js/modernizr.custom.71422.js',100) %}
   {% do assets.addJs('theme://js/antimatter.js') %}
   {% do assets.addJs('theme://js/slidebars.min.js') %}
   {% do assets.addInineJs('alert(\'This is inline!\')') %}
{% endblock %}
{{ assets.js() }}
Adding Assets
Following table lists the different types of add methods −
| Sr.No. | Method & Description |
|---|---|
| 1 | add(asset, [options]) Based on the file extension, the add method matches the asset. It is a proper method for calling one of the direct methods for CSS or JS. You can make use of options to set priority. Whether an asset should be included in combination/minify pipeline or not is controlled by the pipeline attribute. |
| 2 | addCss(asset, [options]) By using this method, you can add assets to the CSS assets. Based on the priority set in the second parameter, the asset is ordered in the list. If no priority is set, then by default 10 is set. Whether an asset should be included in combination/minify pipeline or not is controlled by the pipeline attribute. |
| 3 | addDirCss(directory) By using this method, you can add an entity directory consisting of the CSS assets which will be arranged in alphabetical order. |
| 4 | addInlineCss(css, [options]) You can provide a string of CSS inside inline style tag by using this method. |
| 5 | addJs(asset, [options]) By using this method, you can add assets to the JS assets. If priority is not set, then it sets the default priority to 10. The pipeline attribute determines whether an asset should be included in the combination/minify pipeline or not. |
| 6 | addInlineJs(javascript, [options]) This method allows you to add a string of JS inside the inline script tag. |
| 7 | addDirJs(directory) By using this method, you can add an entity directory consisting of the JS assets, which will be arranged in alphabetical order. |
| 8 | registerCollection(name, array) This method allows you to register an array consisting of CSS or JS assets with a name so that it can be used later by using the add() method. If you are using multiple themes or plugins, then this method is very useful. |
Options
There are many options to pass the array of assets which are explained as shown below −
For CSS
priority − It takes an integer value and the default value will be 100.
pipeline − When an asset is not included in pipeline, it sets to false value. And the default value is set to true.
For JS
priority − Takes integer value and default value will be 100.
pipeline − When an asset is not included in pipeline, false is set. And the default value is set to true.
loading − This option supports 3 values such as empty, async and defer.
group − It consists of a string that specifies unique name for a group. And the default value is set to true.
Example
{% do assets.addJs('theme://js/example.js',
{'priority':101, 'pipeline':true, 'loading':'async', 'group':'top'}) %}
Rendering Assets
The current state of the CSS and JS assets can be rendered by using the following −
css()
Based on all the CSS assets which have been added to Asset Manager, the css() method renders a list consisting of HTML CSS link tags. Based on the pipeline attribute, the list can contain minified file and individual/combined asset.
js()
Based on all the JS assets which have been to Asset Manager, the js() method renders a list consisting of the HTML JS link tags. Based on the pipeline attribute, the list can contain minified file and individual/combined asset.
Named Assets
Grav allows you to register a collection of CSS and JS assets with a name, so that you can use the add assets to Asset Manager by using the registered name. This can be accomplished in Grav by using a feature called named assets. These custom collections are defined in system.yaml; the collections can be used by any theme or plugin.
assets:
   collections:
      jquery: system://assets/jquery/jquery-2.1.3.min.js
      bootstrap:
         - https://maxcdn.bootstrapcdn.com/bootstrap/3.3.4/css/bootstrap.min.css
         - https://maxcdn.bootstrapcdn.com/bootstrap/3.3.4/css/bootstrap-theme.min.css
         - https://maxcdn.bootstrapcdn.com/bootstrap/3.3.4/js/bootstrap.min.js
The registerCollection() method can be used programmatically with the following code −
$assets = $this->Grav['assets'];
   $bootstrapper_bits = [https://maxcdn.bootstrapcdn.com/bootstrap/3.3.4/css/bootstrap.min.css,
      https://maxcdn.bootstrapcdn.com/bootstrap/3.3.4/css/bootstrap-theme.min.css,
      https://maxcdn.bootstrapcdn.com/bootstrap/3.3.4/js/bootstrap.min.js];
   $assets->registerCollection('bootstrap', $bootstrap_bits);
$assets->add('bootstrap', 100);
Grouped Assets
Grav 0.9.43 was introduced with a new feature called Grouped Assets, which allows you to pass options array consisting of optional group while adding Assets. This feature is very useful when you need some JS files or inline JS at specific part of the page.
By using the options syntax, you must specify the group when adding the asset as shown below.
{% do assets.addJs('theme://js/example.js', {'priority':102, 'group':'bottom'}) %}
If no group is set for an asset, then head is set as default group. If you want these assets to render in the bottom group, you must add the following in your theme.
{{ assets.js('bottom') }}
Static Assets
Whenever you want to refer assets without the use of Asset Manager, then you can use the url() helper method. For example, when you want to refer an image from the theme, then you can use the following syntax.
<img src = "{{ url("theme://" ~ widget.image) }}" alt = "{{ widget.text|e }}" />
The url() helper method optionally takes the second parameter to enable the URL to include domain and schema by using true or false values. By default, the value is set to false which displays only the relative URL.
Example
url("theme://somepath/mycss.css", true)
Grav - Theme Customization
In this chapter, let us study about Theme Customization. There are several ways to customize your theme. Grav provides many features and a few functionalities to easily customize your theme.
Custom CSS
You can provide your own custom.css file to customize your theme. The Antimatter theme refers the css/custom.css file through the use of Asset Manager. If no reference to the CSS file is found, then the Asset Manager will not add the reference to HTML. Creating the CSS file in Antimatter's css/ folder will override the default CSS. For example −
custom.css
body a {
   color: #FFFF00;
}
The default link color is overriden and set to yellow.
Custom SCSS/LESS
Another way to provide custom CSS file is by using the custom.scss file. The SCSS( Syntactically Awesome Style Sheets ) is a CSS preprocessor which allows you to build CSS efficiently through the use of operators, variables, nested structures, imports, partials and mix-ins. The Antimatter is written using SCSS.
In order to use SCSS, you need the SCSS compiler. You can use the command-line tools and the GUI applications to install SCSS compilers on any platform. Antimatter uses the scss/ folder to place all your .scss files. The compiled files are stored in css-compiled/ folder.
The SCSS files should be watched for any updates which can be done by using the following command −
scss --watch scss:css-compiled
The above command tells the SCSS compiler to watch the directory called scss and whenever the css-compiled folder is updated the SCSS compiler should compile it.
You can keep your custom SCSS code in scss/template/_custom.scss file. There are many advantages of keeping your code in this file.
Any update from the SCSS files and other CSS files are compiled into css-compiled/template.css file
You can access any of the SCSS that are used in your theme and make use of all variables and mix-ins available to it.
For easier development, you are provided with access to all the features and functionalities of standard SCSS.
An example of _custom.scss file is shown below −
body {
   a {
      color: darken($core-accent, 20%);
   }
}
When you upgrade your theme, all the custom css will be overridden. This is the major drawback of choosing this way to customize a theme. This can be solved by using the theme inheritance.
Theme Inheritance
Theme Inheritance is the best way of modifying or customizing a theme and can be accomplished with a few setups. The basic idea is that a theme is defined as the base-theme that you are inheriting from, and only some bits can be modified and the rest of the things is handled by the base theme. The advantage of using theme inheritance is that the customized inherited theme will not be directly impacted whenever the base theme is updated. To accomplish this, you need to follow these steps.
To store your new theme, create new folder called mytheme/ inside /user/themes/ folder.
Next you need to create a new theme YAML file called mytheme.yaml under the newly created /user/themes/mytheme/ folder with the following content.
streams:
   schemes:
      theme:
         type: ReadOnlyStream
         prefixes:
            '':
               - user/themes/mytheme
               - user/themes/antimatter
Create a YAML file called blueprints.yaml under the /user/themes/mytheme/ folder with the following content.
name: MyTheme
version: 1.0.0
description: "Extending Antimatter"
icon: crosshairs
author:
   name: Team Grav
   email: devs@getgrav.org
   url: http://getgrav.org
We will now understand how to define a theme blueprints.yaml that consists of basic elements. More details can be provided for form definitions to control your form functionalities. The blueprints.yaml file can be examined for more details on this.
In your user/config/system.yaml file edit pages: theme: option to change your default theme to new theme as shown below.
pages:
   theme: mytheme
Now new theme is created and Antimatter will be the base theme for this new mytheme theme. If you want to modify specific SCSS we need to configure SCSS compiler so that it looks your mytheme theme first and secondly the Antimatter theme.
It uses the following settings −
First copy the template.scss file which is placed in the antimatter/scss/ folder and paste it in the mytheme/scss/ folder. This file will contain all the @import calls for various files like template/_custom.scss and sub files.
The load-path points to antimatter/scss/ folder which contains large number of SCSS files. To run the SCSS compiler, you need to provide load-path to it as shown below.
scss --load-path ../antimatter/scss --watch scss:css-compiled
Now, create a file called _custom.scss under mytheme/scss/template/. This file will contain all your modifications.
When the custom SCSS file is changed, automatically all the SCSS files will be compiled again into template.css which is located under the mytheme/css-compiled/ folder and then the Grav references this accurately.
Grav - Plugin Basics
In this chapter, we will understand how a plugin works as an additional functionality in Grav. Plugin is a piece of software that provides additional functionality which was not originally completed by Grav's core functionality.
Grav Plugin can be uploaded to expand the functionality of the site. Plugins are used to make your work easier. The Dependency Injection Container helps access the key objects in Grav. In the entire life cycle with the help of Grav's event hooks, we can manipulate Grav as per our need and can also access whatever the Grav knows. We will study in detail about the Grav event hooks in the Chapter Grav - Event Hooks.
Dependency Injection is a software design pattern in which components are given their dependencies instead of hard coding them within the component.
There are many free plugins available for Grav which are used for displaying blog archive, sitemap, search engine, form, light slider and many more. You can download the plugins from here. In the Plugin folder, you can store the plugins with a unique name; the name should be related to the function of the plugin and it should not contain any capital letter, underscore or space. We will study about how to use plugin in the Chapter Grav - Plugin Tutorials .
Powerful
Plugins are easy to write, flexible and powerful. There are 46 plugins, and have the features that include displaying a sitemap, provides breadcrumbs, display blog archives etc.
Essentials
When Grav is installed on your system, you can see there are two plugins inside the <your_folder_name>/user/plugins folder.
Error plugin
Problem plugin
Error Plugin − It is used to display the HTTP errors i.e. 404 Page Not Found when there is no request page available for the given URI.
Problem Plugin − It is used for detecting issues regarding the permissions, hosting setup and missing folders. It is useful when you install new Grav for identifying such issues.
Grav - Plugin Tutorials
In this chapter, we will delve into how a plugin can be set up and configured. In addition, we will also understand the structure of a plugin and how to display a random page. Plugin is a piece of software that provides additional functionality which was not originally completed by Grav's core functionality.
In this article, we are going to display random page using the random plugin. Before using this plugin, we will see some important points of the random plugin.
You can use this plugin to display the random page by using URI as /random.
Create the filter to make use of taxonomy specified in the pages. You can create as category : blog.
You can display a random page by using the filter option; this informs Grav to use the same content that is to be displayed in the random page.
Setup Plugin
Follow these steps to create a basic setup for plugin before using the actual plugin.
Create folder called random under the user/plugins folder.
Under the user/plugins/random folder, create two files namely −
random.php used for plugin code
random.yaml used for the configuration
Plugin Configuration
To use the random plugin, we need to have some configuration options. We will write the following lines under the random.yaml file.
enabled:true
route:/random
filters:
   category:blog
Random creates a route that you define. Based on taxonomy filters, it picks a random item. The default value of the filter is 'category: blog' which is used for random selection.
Plugin Structure
The following code can be used in the plugin structure.
<?php
   namespace Grav\Plugin;
   use Grav\Common\Page\Collection;
   use Grav\Common\Plugin;
   use Grav\Common\Uri;
   use Grav\Common\Taxonomy;

   class RandomPlugin extends Plugin {
   }
?>
We are using a bunch of classes in the plugin using the use statements which makes it more readable and saves on space too. The namespace Grav\Plugin must be written at the top of the PHP file. The plugin name should be written in titlecase and should be extended using Plugin.
You can subscribe the function getSubscribedEvents() to the onPluginsInitialized event; this determines which events the plugin is subscribed to. Like this, you can use the event to subscribe to other events.
public static function getSubscribedEvents() {
   return [
      'onPluginsInitialized' => ['onPluginsInitialized', 0],
   ];
}
Let us now use the onPluginInitialized event under the RandomPlugin class used for routing the page which is configured in the random.yaml file.
The method onPluginInitialized() contains the following code −
public function onPluginsInitialized() {
   $uri = $this->grav['uri'];
   $route = $this->config->get('plugins.random.route');

   if ($route && $route == $uri->path()) {
      $this->enable([
         'onPageInitialized' => ['onPageInitialized', 0]
      ]);
   }
}
The Uri object includes the current uri, information about route. The config object specifies the configuration value for routing the random plugin and store it in the route object.
We will now compare the configured route with the current URI path which informs the plugin to listen to the onPageInitialized event.
Displaying Random Page
You can display the random page by using the code with the following method −
public function onPageInitialized() {
   $taxonomy_map = $this->grav['taxonomy'];
   $filters = (array) $this->config->get('plugins.random.filters');
   $operator = $this->config->get('plugins.random.filter_combinator', 'and');

   if (count($filters)) {
      $collection = new Collection();
      $collection->append($taxonomy_map->findTaxonomy($filters, $operator)->toArray());

      if (count($collection)) {
         unset($this->grav['page']);
         $this->grav['page'] = $collection->random()->current();
      }
   }
}
As shown in the code,
Assign the taxonomy object to the variable $taxonomy_map.
Get the array of filter which uses configured taxonomy from the plugin configuration using config object. We are using the item as category : blog.
We are using collection to store the random page in the $collection. Append the page which matches the filter to $collection variable.
Unset the current page object and set the current page to display as random page in the collection.
Finally, we will see the complete code of plugin to display a random page as shown below −
<?php
namespace Grav\Plugin;
use Grav\Common\Page\Collection;
use Grav\Common\Plugin;
use Grav\Common\Uri;
use Grav\Common\Taxonomy;

class RandomPlugin extends Plugin {
   public static function getSubscribedEvents() {
      return [
         'onPluginsInitialized' => ['onPluginsInitialized', 0],
      ];
   }
   public function onPluginsInitialized() {
      $uri = $this->grav['uri'];
      $route = $this->config->get('plugins.random.route');
      if ($route && $route == $uri->path()) {
         $this->enable([
            'onPageInitialized' => ['onPageInitialized', 0]
         ]);
      }
   }
   public function onPageInitialized() {
      $taxonomy_map = $this->grav['taxonomy'];
      $filters = (array) $this->config->get('plugins.random.filters');
      $operator = $this->config->get('plugins.random.filter_combinator', 'and');

      if (count($filters)) {
         $collection = new Collection();
         $collection->append($taxonomy_map->findTaxonomy($filters, $operator)->toArray());

         if (count($collection)) {
            unset($this->grav['page']);
            $this->grav['page'] = $collection->random()->current();
         }
      }
   }
}
Open your browser and type localhost/folder_name/random to see the random page as shown in the following screenshot −
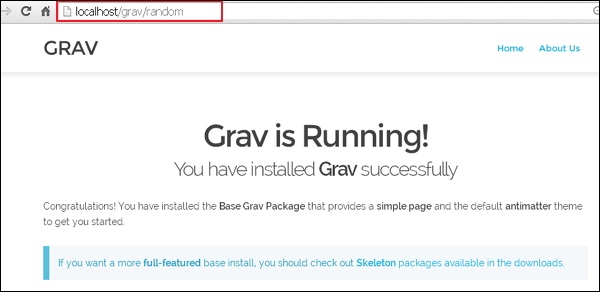
Grav - Event Hooks
In this chapter, we will study about Event Hooks in Grav. In Plugins chapter you will see, the logic of plugin was included in two methods. The methods are onPluginsInitialized and onPageInitialized; these methods are similar to event hooks. To know more and control the power of Grav plugins, you need to check the availability of event hooks. The event hooks have a direct relationship with Grav from beginning to end. You must be aware of the order in which the hooks are called and what is usable at the time of these calls.
The following table lists out the core Grav event hooks that are activated during the processing of a page.
| Sr.No. | Event & Description |
|---|---|
| 1 | onFatalException You can fire this event at any moment, if PHP gives a fatal exception. The Problem plugin uses this to manage displaying a list of full explanation, for why the Grav delivers the fatal error. |
| 2 | onPluginsInitialized This is the first plugin event that is usable in Grav. The following objects have been introduced as mentioned below −
|
| 3 | onAssetsInitialized This specifies that the assets manager is loaded and ready to use and manage. |
| 4 | onPageNotFound If you found an unexpected page, you can dismiss this event. Presently, the error plugin is used to specify a 404 error page. |
| 5 | onPageInitialized This specifies the requested page by a URL which is loaded into the Page object. |
| 6 | onOutputGenerated This specifies the output process by the Twig templating engine. Presently, it is just a string of HTML. |
| 7 | onOutputRendered This is an output process, which is sent to the display. |
| 8 | onShutdown This is a new and very powerful event that allows you to perform actions. This is done after Grav has completed processing and the connection to the client is closed. This individual action does not require any interaction with the user, in result can affect the performance. It includes the user tracking and jobs processing. |
| 9 | onBeforeDownload This is a new event which passes into the event object that contains a file. It allows the users to perform logging, grant and ignore permission to download the mentioned file. |
Twig Event Hooks
Twig has its own collection of event hooks to use as mentioned below.
| Sr.No. | Event & Description |
|---|---|
| 1 | onTwigTemplatePaths The template path's base location is set on the Twig object. This event is used to add other locations where Twig will search for template paths. |
| 2 | onTwiglnitialized It initialize the Twig templating engine. |
| 3 | onTwigExtensions It specifies the core twig extensions is ready to use. This event hook allows you to add your own Twig extension. |
| 4 | onTwigPageVariables This Twig process permits you a page directly, i.e. you can locate process:twig:tru in a page of YAML headers. Here you can add any variables to Twig and should accessible to twig during this process. |
| 5 | onTwigSiteVariables In this process, you will see the full site template in order wise by Twig methods. Further, you can add any variable to Twig during this process. |
Collection Event Hooks
The following table lists out a collection event hook.
| Sr.No. | Event & Description |
|---|---|
| 1 | onCollectionProcessed In this section, once the process is completed you can control a collection. |
Page Event Hooks
The following table lists out a collection of page event hooks.
| Sr.No. | Event & Description |
|---|---|
| 1 | onBuildPagesInitialized This event is useful for plugins to control the content and cache the results. Once this event is activated the pages will be recycled. This occurs, when the cache has expired or needs refreshing. |
| 2 | onBlueprintCreated This event helps in processing and managing forms. |
| 3 | onPageContentRaw In this process, when a page is found, headers are fixed, but content will not be fixed. You will see every page is fired in the Grav system. If you have cleared the cache or clearing the cache this event occurs. |
| 4 | onPageProcessed Once a page is tested and fixed, every page is dismissed in the Grav system. Performance doesn't matter in this case, since it will not play on a cached page. |
| 5 | onPageContentProcessed You can see this event is dismissed, once the page's content() technique has fixed the page content. This event is useful in case, you want to perform actions on the post-fixed content but make sure that the results are cached. |
| 6 | onFolderProcessed Once a folder is tested and fixed, every folder is dismissed in the Grav system. Performance doesn't matter in this case, since it will not play on a cached page. |
Grav - Admin Introduction
Grav Administration Panel plugin is a web graphical user interface (GUI) for Grav. It can easily create and modify pages. It is an optional plugin and to work effectively Grav does not depend on this totally. The Admin provides limited views for easy usage of Grav.
Features
Following are the features of administration panel −
Enable or disable the plugins present in the plugin manager list.
You can create, edit, copy and delete the pages easily.
List of latest page updates gets displayed on the Dashboard.
Latest available updates can be viewed easily by just one click.
Find the particular pages from the list by using search box.
It consists of functionality of the forget password.
Media files can be uploaded by drag-n-drop method.
Allows editing via yaml or forms in normal and expert modes.
Dashboard consists of site activity, latest page updates and maintenance status.
It consists of Ajax powered backup and clear-cache capabilities.
It consists of site and system configuration management.
New plugins and themes installation powered by GPM.
Automatic password encryption feature is provided during user login.
It provides code editor that highlights powerful syntax with instant Grav-powered preview.
Installed theme listing and configurations can be done by using Theme manager.
It also manages the logged-in users.
Installation
To access the admin plugin, we need to run the latest Grav. You can run the following command in the CLI (command line interface).
$ bin/gpm selfupgrade -f
The selfupgrade is used to update Grav to the latest version available. -f is used to refresh GPM(Grav Package Manager) index.
We need to install the admin, form, email and login plugins to make your admin plugin run properly. As all plugins have dependencies, you need to agree when it prompts you to install other plugins while installing the admin plugin; these plugins are available via GPM (Grav Package Manager). We'll study more about GPM in the chapter Grav - GPM.
Following command is used to install the admin plugin using the command prompt.
$ bin/gpm install admin
Manual Installation
We can install the administration panel manually by downloading the following plugins individually −
After downloading all the plugins, extract all the zip files and store in the <your_folder_name>/user/plugins folder. In the Plugin folder, you can store plugins with a unique name; the name should be related to the function of the plugin. The folder can be renamed as admin/, email/, form/ and login/. It is necessary to store all the four plugins in the Plugin folder together; otherwise the admin panel won't work properly.
Creating User
We can create the user account by using the command line interface. Use the following command to create a user account.
$bin/grav newuser
Otherwise, you can also create user account manually by writing the following lines of code −
email: admin@tutorials.com
access:
   admin:
      login: true
      super: true
   site:
      login: true
fullname: 'Tutorials Point'
title: tp
password: 'Password'
Save the above lines in the <your_folder_name>/user/account/admin.yaml file. The name which you have used to save your above code will be the username for your login, i.e., admin. You can edit the email, fullname, title and the password according to your requirements.
Usage
You can access the administration panel by pointing your browser to the localhost/<your_folder_name>/admin and you will get a screen as shown below. You can set the username and password in yaml file as specified in the creating user section.
Grav - Admin Dashboard
In this chapter, we will study about the Administrative Panel Dashboard in Grav. The Dashboard acts as a nerve center of information for the Grav Administration Panel plugin. You can inspect the traffic statistics, create new backups, Grav updates, maintenance information, view the latest page updates and you can clear the Grav's cache with the help of this single page.
Step 1 − You can specify the permissions to the user and alter the content of the Dashboard as per the demand. The screen of the dashboard will somewhat be like the following screenshot.
Step 2 − You will now see the features of Cache and Updates Checking in dashboard.
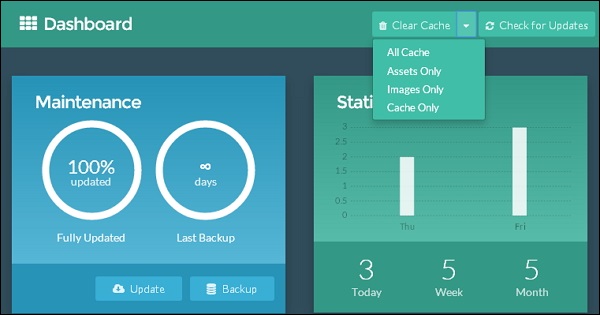
You will see two tabs on the top of the Dashboard menu.
- Clear cache
- Check for updates
Clear cache
It specifies to delete all the cache content, including the cache of images, and assets.
You can see more features in the dropdown menu as mentioned below.
All cache − It specifies to delete all cache
Assets only − It specifies to delete cache only of assets.
Images only − It specifies to delete cache only of images.
Cache only − It defines to delete only cache.
Check for updates
This tab specifies to check updates for your site. You will receive a notification on the Dashboard, if new updates are available. You will receive updates for supported plugins, themes and even for Grav.
Maintenance and Statistics
This portion allows you to know the important information about your site.
Maintenance
This section provides you a percentage graph for Grav features that are completely up-to-date. You will see the notification of a required update, above the Maintenance and Statistics section.
Update − An Update button will appear as soon as a new update is available. Next, you can click it and update your plugins and themes. You will see the Update Grav Now button in the notification bar, that updates your Grav's core section.
Backup − In this part, you can see the graph that shows you since how long you have not backed up your site. This can be executed by generating and downloading a zip file, save it as a backup for your site's data.
Statistics
It displays a simple and a quick look graph of the visitors traffic on your site, that was received in the past day, week and month. It shows the bar graph separated into days of the week.
Step 3 − Next, you will see the detail information of Latest Page Updates as shown below.
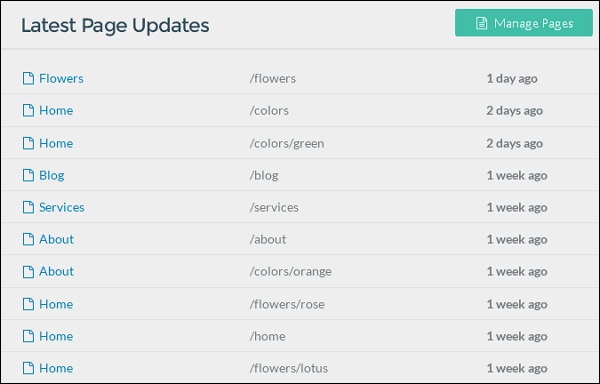
This section allows you to know more about the latest modified content of your pages in the Grav site. Next, each time you refresh the page, it will generate the recently updated list for you.
You can click on title of a page from the list; which will redirect you to the page editor in the admin section.
The Manage Pages button redirects you to the pages of the administrative panel.
Grav - Configuration System
In this chapter, we will study about the Configuration System in Grav's Administration Panel. You can directly configure the settings of your site's system with the help of the Configuration page. Furthermore, you will see a brief explanation of your server's properties including PHP, server environment, and other several components that regulate how your site performs.
The System tab allows you to modify the settings in the /user/config/system.yaml file. This affects many primary systems related features of Grav's operation. The settings can be divided into different sections that show you different features of Grav's performance.
Below is a detailed list of the configuration sections that are displayed in the systems tab −
Content
In this section, you can fix the basic properties of Content handling for your site as shown below.
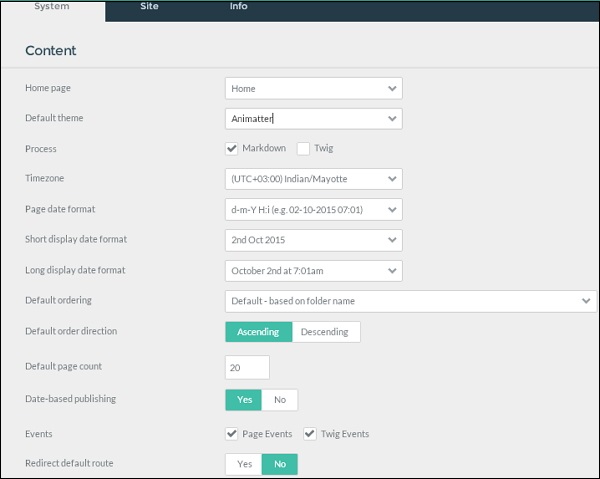
Home Page − Specifies the home page that you want to display for your site.
Default Theme − Displays the primary default theme for your site.
Process − Controls how pages are processed. Can be set per-page rather than globally.
TimeZone − Sets the default timezone in the server.
Short Date Format − Displays the short date format.
Long Date Format − Displays the long date format.
Default Ordering − Pages are displayed in a list using this order.
Default Order Direction − Specifies the direction of pages in a list.
Default Page Count − Defines the maximum default page count in a list.
Date Based Publishing − It automatically publishes posts as per the date.
Events − It specifies to enable or disable the events. Disabling will cause damage to the plugin.
Redirect Default Route − It defines a default route and automatically redirects to a page.
Languages
You can set the Multi language features in this area as shown below.
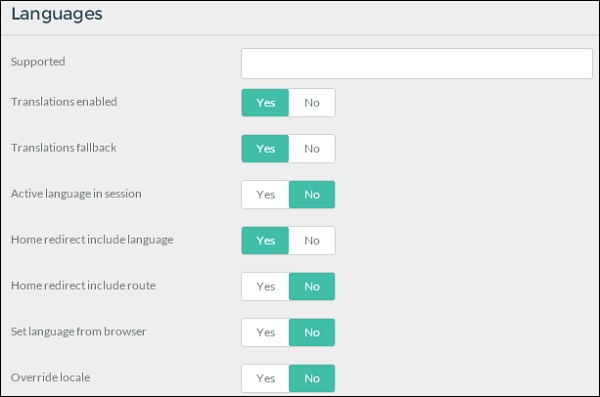
Supported − It specifies list of two letter language codes separated with comma, i.e., en, fr, de.
Translations Enabled − Enables the translations in Grav, plugins and extensions.
Translations Fallback − It specifies the substitute supported translations, if active language is not present.
Active Language in Section − You can store the active language in the area.
Home Redirect Include Language − It includes language in home redirect (/en) as per the demand.
Home redirect Include Route − It specifies redirecting admin home root.
Set language from browser − It specifies the language from browser.
Override locale − It specifies to override locale.
HTTP Headers
This section is used to set the HTTP Headers options. This setting helps in the browser based caching and optimization.
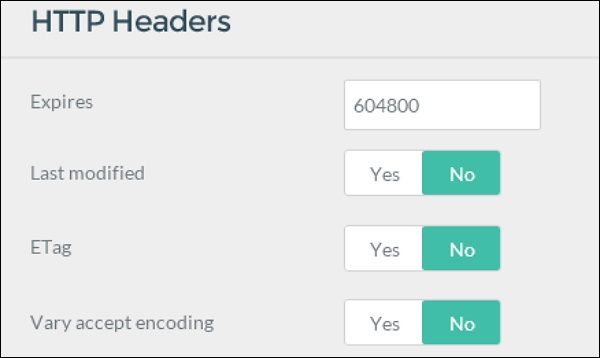
Expires − Defines the expiry time and sets the value in seconds.
Last Modified − Last modified header is set which helps to optimize proxy and browser caching.
ETag − Defines the e tag header to identify a modified page.
Vary Accept Encoding − You should arrange the Vary: HTTP header to Accept. This will benefit the cache on proxies.
Markdown
In this section, we will study about how Grav manages Markdown and its features to enable Markdown Extra. It helps the user and makes up the bulk of Grav's page content.
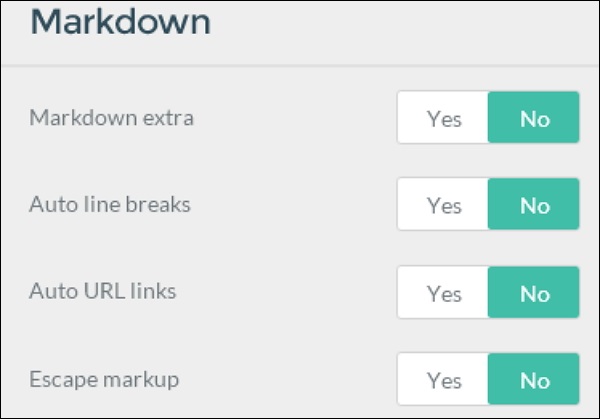
Markdown Extra − It specifies a default support for Markdown Extra.
Auto Line Breaks − It specifies line breaks in markdown.
Auto URL Links − It specifies conversion of URLs into HTML hyperlinks.
Escape Markup − It specifies the markup tabs into HTML objects.
Caching
In this section, you can configure your site's primary Caching functions. Grav has combined the caching feature that helps to build the fastest flat-file CMS options for the users.
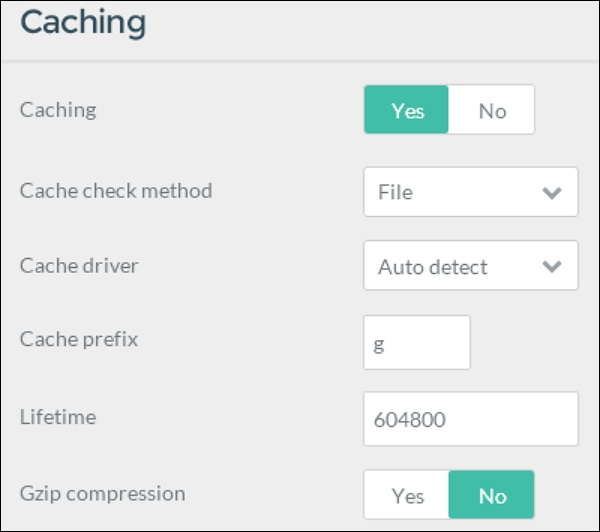
Caching − This specifies to switch ON/OFF globally to enable/disable Grav caching.
Cache Check Method − This defines the cache check methods for File, Folder, and None.
Cache Driver − This specifies to choose cache driver to the users. Auto Detect cache driver finds to be best.
Cache Prefix − This specifies an identifier for part of the Grav key. Change it only if needed or else don't change it.
Lifetime − This defines the cache lifetime in seconds, 0=infinite.
Gzip Compression − To increase the performance, enable Gzip compression of the Grav page.
Twig Templating
In this section, Grav highlights its Twig templating features. You can configure Twig caching, debug and modify tracking down setting here.
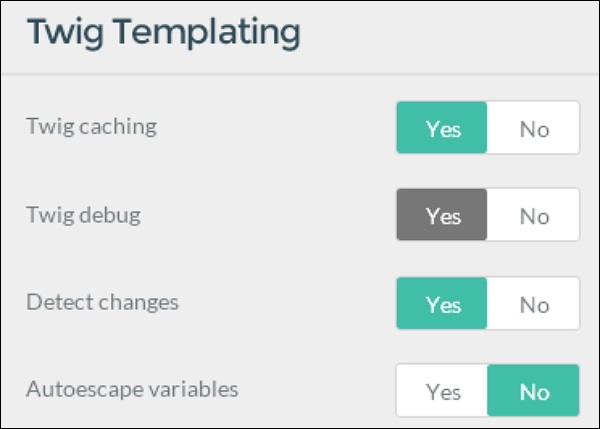
Twig Caching − This specifies to control the Twig caching system. It gives the best performance, when it is enabled.
Twig Debug − This defines the option not to load the Twig Debugger extension.
Detect Changes − Any changes done in Twig templates, this will automatically recompile the Twig cache.
Autoescape Variables − All variables are autoescapes; this can cause damage to your site.
Assets
This section is used to handle the assets, including CSS and JavaScript assets as shown below.
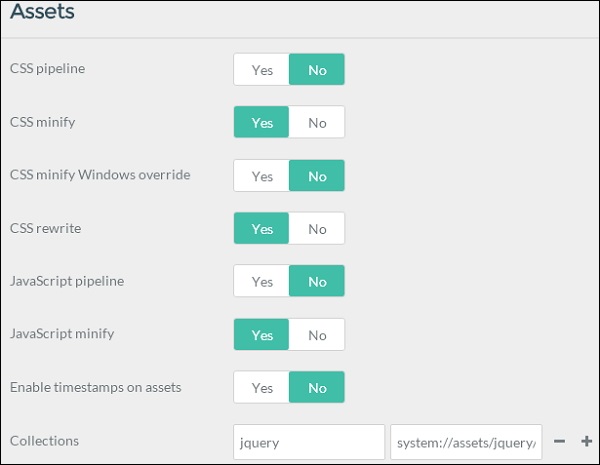
CSS Pipeline − Integration of multiple CSS resources into a single file.
CSS Minify − During the pipelining the CSS is minify.
CSS Minify Windows Override − It is set False by default and it defines Minify Override for Windows platforms.
CSS Rewrite − CSS relative URL's are rewritten during pipelining.
JavaScript Pipeline − Integration of multiple JavaScript resources into a single file.
JavaScript Minify − During the pipelining the JS is minify.
Enable Timestamps on Assets − Timestamps on assets are enable.
Collections − Assets collection is added individually.
Error Handler
During the time of site development, this section is very useful to manage the Grav error reporting.
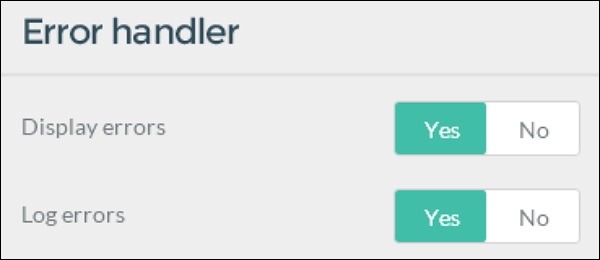
Display Error − Full backtrace-style error page is displayed.
Log Errors − Log errors are displayed into /logs folder.
Debugger
This is similar to error handling, the debugging tools are integrated in Grav to locate and troubleshoot errors.
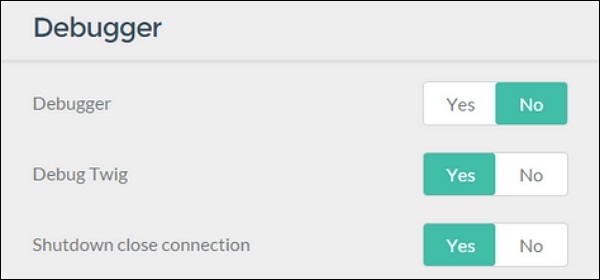
Debugger − Debugger and its settings are enabled.
Debug Twig − Twig templates debugger is enabled.
Shutdown Close Connection − Before calling onShutdown(), you need to close the connection.
Media
This section is used to manage the media content of Grav. You can configure the Image quality, file upload size and many media handling options here.
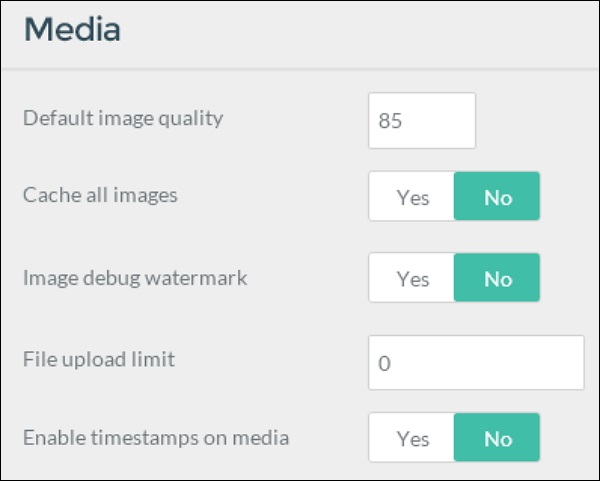
Default Image Quality − Use the default image quality while caching or resampling the images.
Cache all Images − All the images are run through Grav's cache system, even if it does not contain media manipulations.
Image Debug Watermark − You can indicate the pixel depth of the image, while showing an overlay over the images, i.e., working with retina.
File Upload Limit − It defines the maximum upload size in bytes (0 is infinite).
Enable Timestamps on Media − Add timestamp to each media item according to the last modified date.
Session
The features mentioned below help you enable session support.
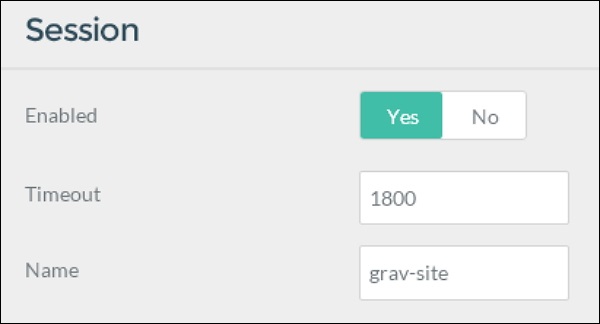
Enable − This specifies the session support within Grav.
Timeout − This specifies the session timeout in seconds.
Name − This specifies the name of the session cookie, developed and applied by an identifier.
Advanced
In this section, you will see the advanced system options.
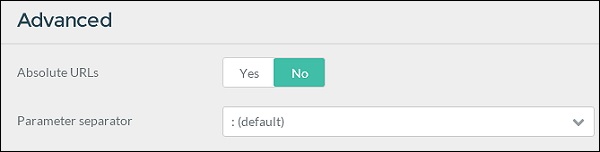
Absolute URLs − This specifies absolute or relative URLs for base_url.
Parameter Separate − You can change Apache on Windows with the help of parameter separator.
Grav - Configuration Site
In this chapter, we will study about how to Configure Site in Grav's Administration Panel. You can directly configure the settings of your site's System with the help of the Configuration page. TheSite tab allows you to modify the settings in the /user/config/system.yaml file. This tab allows you to modify the options and the fields that affect site related features such as the name, default author etc. used in your site.
Following are the different configuration settings that you can see in the Site tab.
Default
In this area, you can set the basic properties to manage the content for your site. Here, you can set several content display options such as the home page, default theme and many others.
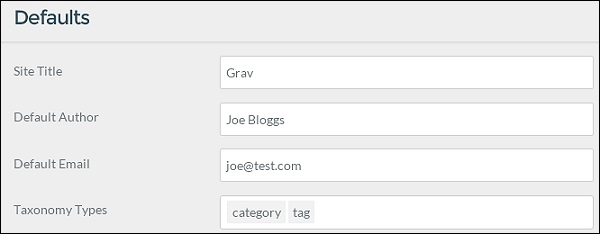
Site Title − This specifies the title for your site.
Default Author − This specifies a default author name that is used in themes or page content.
Default Email − This specifies a default email in themes or pages.
Taxonomy Types − This specifies the taxonomy types that you use in pages.
Page Summary
A page summary has the ability to present you a small preview of a page's content. You can define a "cut off" point in the page, between the summary content with the help of delimiter.
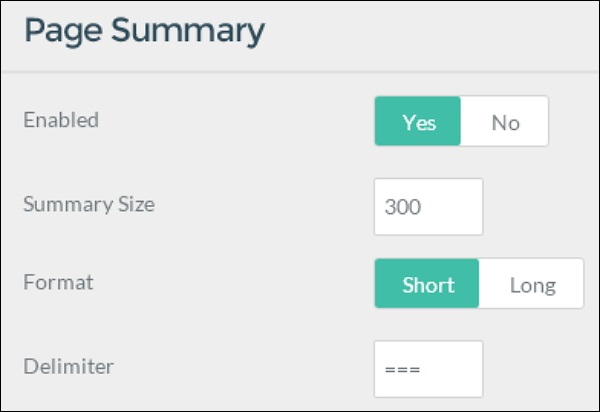
Enabled − This specifies if the page summary is enabled.
Summary Size − This defines the number of characters to be used as content summary in the page.
Format − Short uses the first occurrence of delimiter, Long ignores summary delimiter.
Delimiter − This specifies the summary delimiter. Default value is default '==='. You can use this in the page summary and post this after opening a paragraph.
Metadata
Metadata plays an important role in the pages and improves your SEO. You can set several metadata properties here, so that your links can appear in several search engines and social feeds as per the demand.

This specifies the default metadata value, later you can make the modifications.
Redirects and Routes
This allows you to set redirects and routes to other pages of your site.
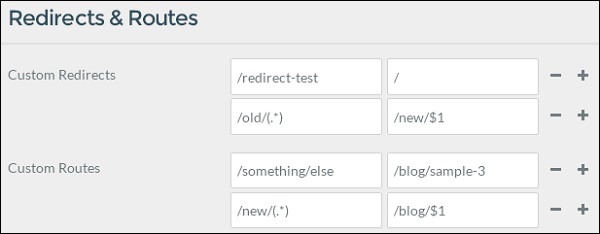
Custom Redirects − This defines routes to direct to other pages. The replacement of standard regex is valid.
Custom Routes − Routes to alias to other pages. The replacement of standard regex is valid.
Grav - Administration Panel Pages
In this chapter, we will understand how Administration Panel Pages work in Grav. Pages give an easy access to create, edit or delete the content to your site. In the administrative panel pages, you can view the list of pages created for your site and you can also create new modular or non-modular page for your site.
Adding New Pages
You can see that there are three buttons present at the top of the pages administrative panel as shown in the following screenshot.
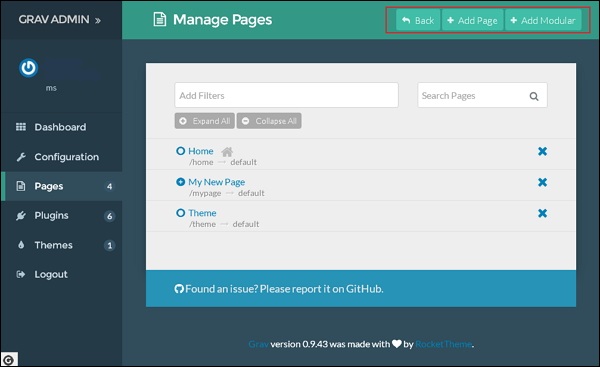
Back − This takes back to the dashboard of administrative page.
Add Page − This creates a new non-modular content.
Add Modular − This creates new modular content.
Add Page
It creates non modular page for your site which consists of various fields while adding page to your site such as Title, Folder Name, Parent root etc.
When you click on the Add Page button, a popup window appears as shown below −
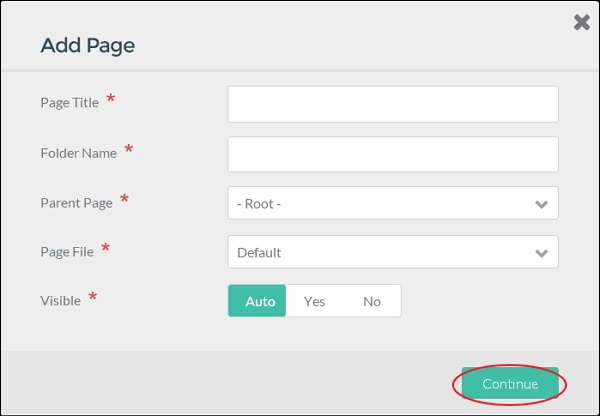
It contains the following fields −
Page Title − Here you enter the title of the page.
Folder Name − This is to enter the folder name for the page or the name will get generated automatically once you enter the title.
Parent Page − This sets the parent page for your newly created page.
Page File − This displays the selected theme template to the page.
Visible − This makes the page visible in the navigation bar by setting it to auto, yes or no.
After filling all the information in the fields, click on the Continue button. It will redirect you to the page editor.
Add Modular Page
Modular page enables to create a single page from its child pages. It has the ability to build complex one page layouts from modular content pages.
When you click on the Add Modular button, a popup window appears as shown below −
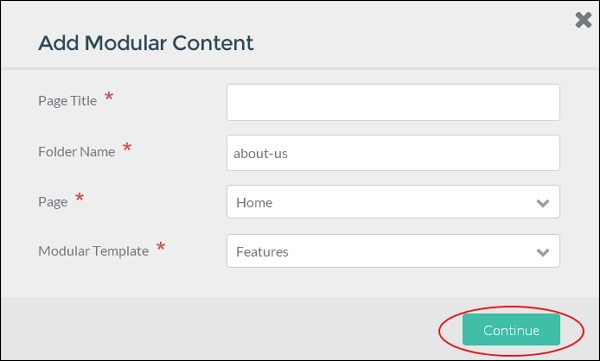
The window contains the following fields −
Page Title − Here we enter the title of the modular page.
Folder Name − This is to enter the folder name for page or the name gets generated automatically once you enter the title.
Page − This sets the parent page for your newly created modular subpage.
Modular Template − This selects the particular template to be displayed for your modular pages.
After filling all the information in the fields, click on the Continue button. It will redirect you to the page editor.
Pages List
This displays the list of the pages which are created for the site.
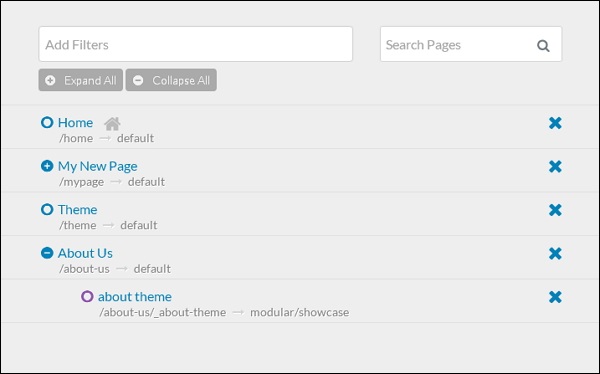
Here you can easily access your created pages and edit it.
Clicking on any title of the page, it will redirect you to the page editor for editing purpose.
The X icon at the right side of the page is used to delete the page.
The Filter box is used to find the page you are searching for. It filters the pages according to the types so that only pages like modular, visible and/or routable are displayed in the list.
The search box is used to find page when you know the exact name of that page.
When you directly hover on the icons on the left side of page, then it will show you the current status, i.e., Page . Routable . Visible . Published, it means that the page is visible via the URL and will be displayed in the navigation menus.
When you click on the page which is displayed in the list, you will see the following screen.
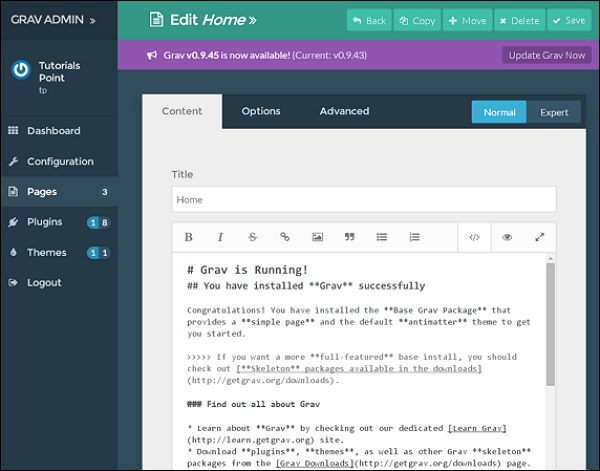
In the above screen, you have options to edit the page, add content or add images to your page. The Options tab consists of publishing, taxonomies and site map options which we study in Page Editor Options chapter. The Advanced tab contains the advanced options of the page like setting, ordering and overriding which will be covered in the Page Editor Advanced chapter.
Grav - Page Editor Options
In this chapter, we will study about the Page Editor options in Grav administration panel. This is a dynamic text editor that allows you to create the content of your page. In addition, you can add media files in the pages. You can see the features of the options tab as shown below.

The Options tab contains two sections −
- Publishing
- Taxonomies
Publishing
This section is used to set the dates and time to publish and unpublish the page. You will have full control over the content to publish or unpublish and you can create the metadata values for the particular page.
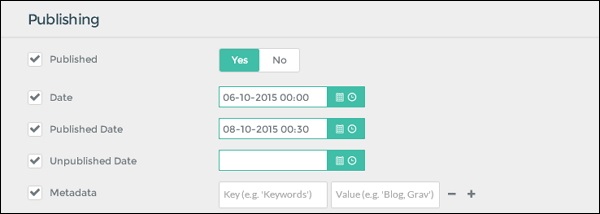
Following fields are present in the publishing section −
Published − By default, the page is set to Yes, i.e., published. By selecting No you can unpublish the page.
Date − Set the date and time for the page.
Published Date − Set the date and time to publish the page automatically.
Unpublished Date − Set the date and time to unpublish the page automatically.
Metadata − Set the metadata values that will get displayed on all pages.
Taxonomies
In this section, you can display categories on the page and configure your page and its structural properties.
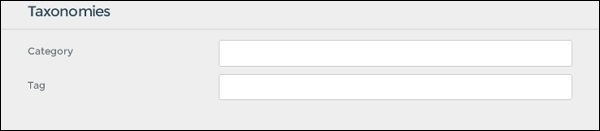
Following fields are present in the taxonomies section.
Category − It sets the categories for the page. It helps in sorting and filtering of the content.
Tag − It provides information of what your page is about. It helps in organization and filtering of the content.
Grav - Page Editor Advanced
The Page editor is a text editor and manages the pages also; this allows you to create content including the media files, publishing and taxonomy options, settings and theme specific options. The following screenshot shows the Advanced tab of the editor page.
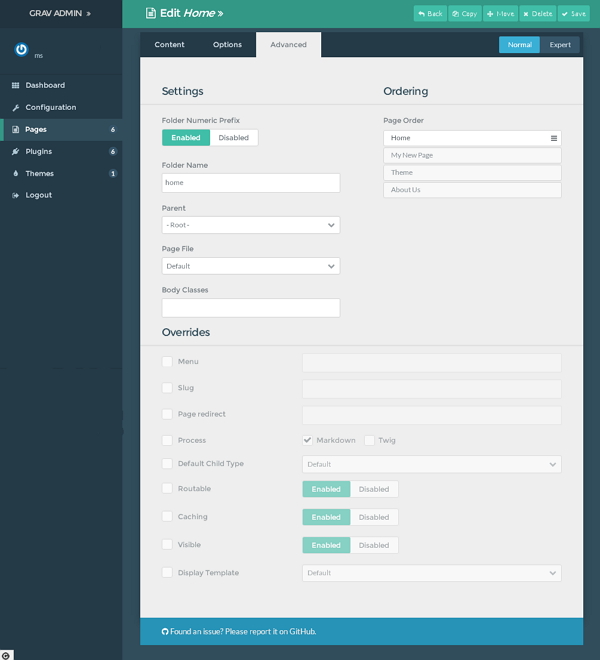
The Advanced tab contains three sections −
Settings
Ordering
Overrides
Settings
The Settings section deals with the various options of the page. Here you can set the template for the page, set page's parent, change the folder name where the page is placed in.
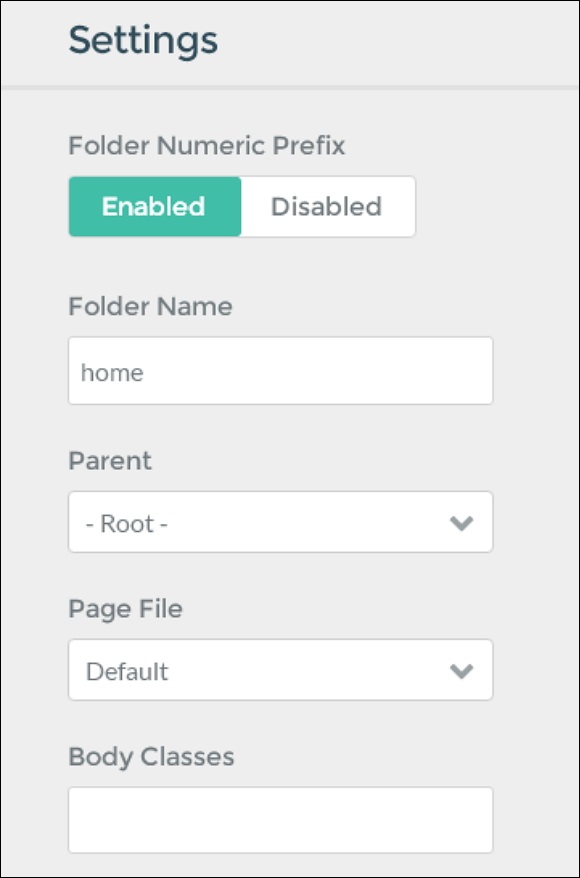
Following fields are present in the settings section −
Folder Numeric Prefix − Number is set to provide manual ordering.
Folder Name − Enter the folder name where your pages are located.
Parent − Set root for your pages or few pages appears as subpages.
Page File − Set the theme template to the page to be displayed.
Body Classes − Enter the class name that is applied on the body of the page.
Ordering
This section is to set the non-numbered folders in a particular order.
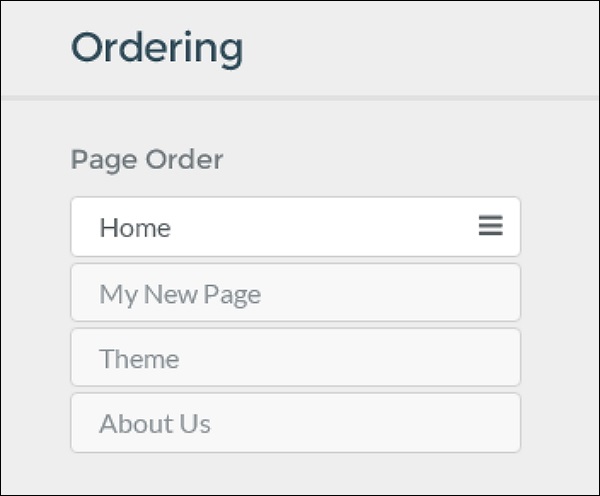
Press and hold on the four-pronged-arrow and move it to the position to rearrange your pages in a particular order.
Overrides
Overrides options give extra functionality to the page such as caching, navigations visibility, setting slug to something other than the default one which is set based on the folder name.
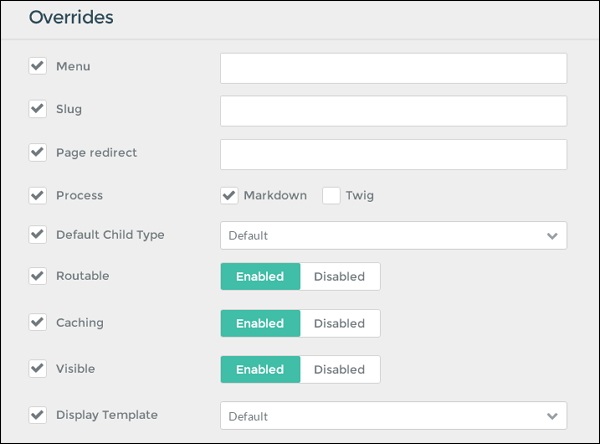
Following fields are present in the Overrides section.
Menu − Sets the name to be used as menu. If nothing is set than Title will be used.
Slug − Page's portion of the URL can be set by this slug variable.
Page redirect − Sets a page URL to redirect it to a different URL.
Process − Process that you wish to make available in the page content.
Default Child Type − For the child pages, the page type is set as default.
Routable − Sets the page accordingly to check whether it is reachable by the URL or not.
Caching − Sets the caching for the page.
Visible − Specifies whether the page is visible in the navigation.
Display Template − Sets the template to the page to be displayed.
Grav - Blueprints
Blueprints are metadata information about the resource (source of information). It serves two purposes −
- First is the resource identity itself.
- Second is regarding the forms.
This complete information is saved in the blueprints.yaml file present in each plugin or theme.
Resource Identity
In blueprints.yaml file identity is defined for each themes and plugins. Resource will not be added in Grav repository until blueprints are not formatted and compiled perfectly.
Blueprints Example
name: plugin name
version: 0.6.0
description: Adds an advanced plugin to manage your site
icon: empire
author:
   name: Team Grav
   email: devs@getGrav.org
   url: http://getGrav.org
homepage: https://github.com/getGrav/Grav-plugin-assets
keywords: assets, plugin, manager, panel
bugs: https://github.com/getGrav/Grav-plugin-assets/issues
readme: https://github.com/getGrav/Grav-plugin-assets/blob/develop/README.md
license: MIT

dependencies:
   - form
   - email
   - login

form:
   validation: loose
   fields:
      Basics:
         type: section
         title: Basics
         underline: false
      enabled:
         type: hidden
         label: Plugin status
         highlight: 1
         default: 0
         options:
            1: Enabled
            0: Disabled
         validate:
            type: bool
The following few properties are optional and some are used to give your identity and resource.
| Sr.No. | Properties & Description |
|---|---|
| 1 | name* Mention the name of the resource. |
| 2 | version* Specifies the version of the resource. |
| 3 | description* Gives brief description about the resource. It should not exceed more than 200 characters. |
| 4 | icon* Specifies an icons library for developing a new theme or plugin. |
| 5 | author.name* Specifies the name of the developer. |
| 6 | author.email (optional) Specifies the email address of the developer. |
| 7 | author.url (optional) Specifies the URL homepage of developer. |
| 8 | homepage (optional) Specifies the allocated Url for homepage for your resource. |
| 9 | docs (optional) Specifies the documentation link which you have written for your resource. |
| 10 | demo (optional) Specifies the link of demo resource. |
| 11 | guide (optional) Specifies the link of how to guide or tutorials for your resource. |
| 12 | keywords (optional) Specifies the list of keywords that are related to your resource. |
| 13 | bugs (optional) Specifies the Url where issues or bugs can be reported. |
| 14 | license (optional) Specifies your resource license i.e. MIT, GPL etc. |
| 15 | dependencies (optional) Specifies the name of the dependencies that are required for plugins or themes. |
The following is an example of the login plugin blueprint −
name: Login
version: 0.3.3
description: Enables user authentication and login screen.
icon: sign-in
author:
   name: Team Grav
   email: devs@getGrav.org
   url: http://getGrav.org
keywords: admin, plugin, login
homepage: https://github.com/getGrav/Grav-plugin-login
keywords: login, authentication, admin, security
bugs: https://github.com/Getgrav/Grav-plugin-login/issues
license: MIT
Forms
You can fill the blueprints.yaml file with forms if you want themes or plugins to have options directly configurable from the admin interface. The part of this resource can be configured via the Admin Plugin, which is defined by the Forms metadata.
The following is an example of the Archives Plugin archives.yaml file.
enabled: true
built_in_css: true
date_display_format: 'F Y'
show_count: true
limit: 12
order:
   by: date
   dir: desc
filter_combinator: and
filters:
   category: blog
These are the plugin's default settings. To configure them without the use of Admin plugin the user has to copy this file in the /user/config/plugins/archives.yaml folder and make the changes. You can provide the archives.yaml file correctly; you can choose to change the settings in the admin interface from the users.
After saving the changes, it will automatically get written to <your_folder_name>/user/config/plugins/archives.yaml.
The blueprint.yaml file of the Archives Plugin contains the structure as shown below −
name: Archives
version: 1.3.0
description: The **Archives** plugin creates links for pages grouped by month/year
icon: university
author:
   name: Team Grav
   email: devs@getGrav.org
   url: http://getGrav.org
homepage: https://github.com/getGrav/Grav-plugin-archives
demo: http://demo.getGrav.org/blog-skeleton
keywords: archives, plugin, blog, month, year, date, navigation, history
bugs: https://github.com/getGrav/Grav-plugin-archives/issues
license: MIT

form:
   validation: strict
   fields:
      enabled:
         type: toggle
         label: Plugin status
         highlight: 1
         default: 1
         options:
            1: Enabled
            0: Disabled
         validate:
            type: bool

      date_display_format:
         type: select
         size: medium
         classes: fancy
         label: Date Format
         default: 'jS M Y'
         options:
            'F jS Y': "January 1st 2014"
            'l jS of F': "Monday 1st of January"
            'D, m M Y': "Mon, 01 Jan 2014"
            'd-m-y': "01-01-14"
            'jS M Y': "10th Feb 2014"

      limit:
         type: text
         size: x-small
         label: Count Limit
         validate:
            type: number
            min: 1

      order.dir:
         type: toggle
         label: Order Direction
         highlight: asc
         default: desc
         options:
            asc: Ascending
            desc: Descending
Following are the form elements present in the archive.yaml.
Toggle
enabled:
   type: toggle
   label: Plugin status
   highlight: 1
   default: 1
   options:
      1: Enabled
      0: Disabled
   validate:
      type: bool
Select
date_display_format:
   type: select
   size: medium
   classes: fancy
   label: Date Format
   default: 'jS M Y'
   options:
      'F jS Y': "January 1st 2014"
      'l jS of F': "Monday 1st of January"
      'D, m M Y': "Mon, 01 Jan 2014"
      'd-m-y': "01-01-14"
      'jS M Y': "10th Feb 2014"
Text
limit:
   type: text
   size: x-small
   label: Count Limit
   validate:
      type: number
      min: 1
The root element Enabled, date_display_format and limit are the options. The field present in this root element determines the type, size, label, default and options. Depending upon the field type, the other fields can change; for example, the select field requires options list.
Order direction
order.dir:
   type: toggle
   label: Order Direction
   highlight: asc
   default: desc
   options:
      asc: Ascending
      desc: Descending
This field consists of the nested options. There are many field types that can be used in plugins/admin/themes/Grav/templates/forms/fields. As we can see in the archive.yaml file, the form validation is set to strict. When validation is set as strict, then for all the options you have to add the blueprints form, otherwise it will pop up an error while saving. The form.validation can be set as loose when you want to customize only the two fields to admin interface.
The following table gives a brief explanation of the fields relating to the above form elements.
| Sr.No. | Field & Description |
|---|---|
| 1 | Type Indicates the field type. |
| 2 | Size Specifies the size of the field. |
| 3 | Label Specifies label to the field. |
| 4 | Validate It validates the type of the field and the minimum length entered in the field. |
| 5 | Default Sets default fields. |
| 6 | Options Specifies the list of options. |
| 7 | Classes Specifies the class for the field. |
Form Fields available in the admin
There are many built-in-form fields available which are used by plugins and themes or can create their own form fields. The following table lists out the of available form fields −
Common form fields
| Sr.No. | Field & Description |
|---|---|
| 1 | Checkbox Displays single checkbox. |
| 2 | Checkboxes Displays a list of checkboxes. |
| 3 | Date Contains date field. |
| 4 | Datetime Contains date and time field. |
| 5 | Contains an email address field with validation. |
| 6 | Password Contains a password field which displays in dot format. |
| 7 | Hidden Contains hidden input field. |
| 8 | Radio Allows selecting only one option from the list. |
| 9 | Select This field contains few options. |
| 10 | Spacer Adds title, text or horizontal line to the form. |
| 11 | Text Contains normal text field. |
| 12 | Textarea Contains multiline text inputs. |
Special form fields
| Sr.No. | Field & Description |
|---|---|
| 1 | Array Adds multiple key value rows. |
| 2 | Ignore Unused fields are removed. |
| 3 | Columns Divides the form into multiple columns. |
| 4 | Column Displays a single column. |
| 5 | Dateformat Sets the date and time format. |
| 6 | Display Displays text value without any input value. |
| 7 | Frontmatter The page is displayed in raw format. |
| 8 | List Displays a list of items without a key. |
| 9 | Markdown Displays the markdown editor. |
| 10 | Pages Displays the list of pages. |
| 11 | Section The setting page is divided into sections and each section has a title. |
| 12 | Selectize It is used to select boxes. |
| 13 | Tabs Settings are divided into list of tabs. |
| 14 | Tab The tabs field uses to provide a tab. |
| 15 | Taxonomy It is a select preconfigured to select the taxonomy. |
| 16 | Toggle It represents the toggle effect that specifies on or off type of input. |
Grav - Performance & Caching
In this chapter, we will understand the concepts of performance and caching in Grav.
Performance
The term performance refers to the system performance in such a way that whether it can handle higher load on system and modify the system to handle a higher load.
Consider the following points relating to the performance of Grav −
To have better performance of Grav, you can use PHP opcache and usercache. The opcache works well with PHP 5.4 and usercache works faster with PHP 5.5, PHP 5.6 and Zend opcache.
The SSD (Solid State Drive) which uses flash memory and has no moving parts. Sometimes cache will be stored in user cache or stored as files. So SSD drives can give better performance.
Virtual machines are the best way of hosting providers under the cloud computing technology. You can specify the resources without interacting with physical equipment. Native hosting is faster than virtual machine. Grav runs better on virtual machines, but for optimal performance you can make use of the native hosting option.
Grav has faster memory in which its cache uses heavy memory that provides better performance on your server. Compared to other platforms, it uses less amount of memory.
Grav uses shared hosting on the shared server to share the things. Sharing hosting is available in a low cost and sometimes it may lead to slow the things on the server.
Multi core processors are used for handling multiple tasks faster. The advanced processors are better than these processors which helps the user to accomplish the task.
Caching
In general, cache is a stored data in a cache memory. Cache mechanism makes Grav faster in which browser can get files from cache rather than the original server, saving time and additional network traffic.
Grav uses Doctrine Cache library which supports the following −
Auto (Default) − It uses default option automatically.
File − It specifies cache files present in the cache/ folder.
APC
XCache
Memcache
Redis
WinCache
By default, Grav uses the auto setting. It will try for APC, then for WinCache, XCache and lastly it uses File.
Caching Types
There are 5 types of caching −
YAML configuration caching into PHP.
Core Grav caching for page objects.
Twig caching of template files as PHP classes.
Image caching for media resources.
Asset caching of CSS and jQuery with pipelining.
The caching of YAML configuration stored in the /cache folder. The image caching stores its images in the /images folder. The configuration option for core Grav caching is stored in user/config/system.yml file as shown below −
cache:
   enabled: true
   check:
      method: file
   driver: auto
   prefix: 'g'
The enabled option enables the caching by setting it to true.
The method option checks for the updates in pages such as files or folder.
The driver option specifies different types of caching options such as Auto, File, APC, XCache, Memcache, Redis or WinCache.
The prefix option defines cache prefix string.
Memcache Options
If you are using the memcached server, then you need to add some extra configuration options by using the memcache driver in the user/config/system.yml file. These options can be defined under the cache: group.
cache:
...
...
   memcache:
      server:localhost
      port: 8080
Redis Options
If you are using redis, then you need to add some extra configuration options by using redis driver in the user/config/system.yml file. These options can be defined under the cache: group.
cache:
...
...
   redis:
   	server:localhost
      port: 8080
The Twig template uses its own caching mechanism by using twig driver in the user/config/system.yml file.
twig:
   cache: true
   debug: true
   auto_reload: true
   autoescape: false
It has some options such as −
cache option enables the twig caching by setting it to true.
debug option enables the twig debug.
auto_reload option is used to reload the changes by setting it to true.
autoescape option is used to auto escape the twig variables.
Caching and Events
Events can be used when caching is enabled. This can be enabled for all events except for OnPageContentRaw, OnPageProcessed, OnPageContentProcessed, OnTwigPageVariables and OnFolderProcessed events. These events can be used on all pages and folders and can run only when the events are processing. These events cannot be run after the page has been cached.
Grav - Debugging & Logging
Debugging & logging information is very necessary while developing the themes and plugins. Grav uses the debugging information by using some features as described below.
PHP Debug Bar
Grav comes with a tool called the Debug Bar to display debugging information. By default, this feature is disabled. You can turn it on globally or use system.yaml for your development environment.
debugger:
   enabled: true
   twig: true
   shutdown:
      close_connection: true
After enabling the debugger true, you can view the following debug bar as shown below. Click on the G symbol which is present at the left side of the corner.

In the debug bar, you can view the overall memory usage and the time used for processing at the corner on the right side. It also consists several tabs that provide information in detail.
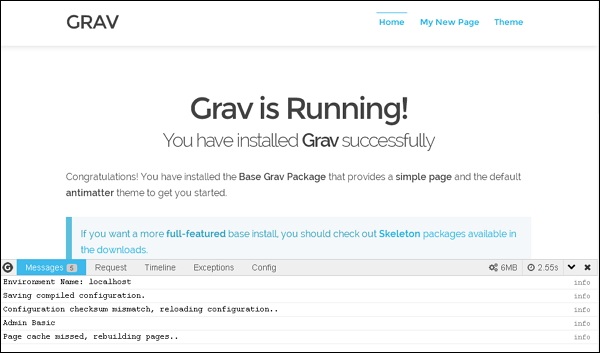
In the Messages tab, you can view the messages which will help you to debug your Grav development process and the information will get post to this tab from the code via $Grav['debugger']→addMessage($my_var).
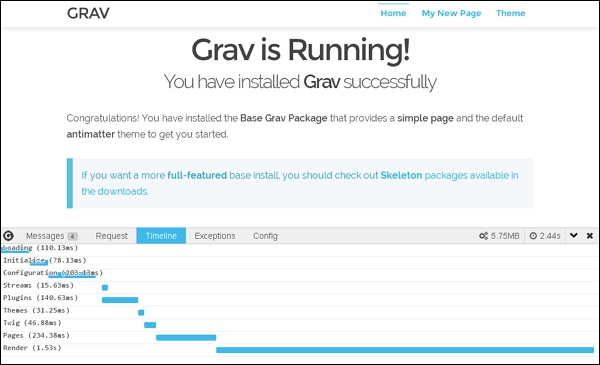
In Timeline tab, you can view the breakdown of Grav timing.
Error Display
It displays the error messages regarding the block or page at a runtime. In Grav, you can easily identify the error and resolve the errors very quickly. Following are the error messages that will get displayed on your screen as shown in the following screenshot.
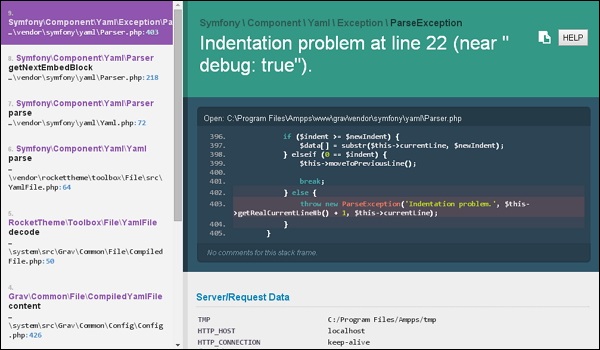
In the user/config/system.yaml file, you can disable the error page by setting it to false.
errors:
   display: false
   log: true
Logging
Logging is used for reporting errors and status information from libraries and application. In Grav, there are a few important logging features as specified below.
$Grav['log']->info('My informational message');
$Grav['log']->notice('My notice message');
$Grav['log']->debug('My debug message');
$Grav['log']->warning('My warning message');
$Grav['log']->error('My error message');
$Grav['log']->critical('My critical message');
$Grav['log']->alert('My alert message');
$Grav['log']->emergency('Emergency, emergency, there is an emergency here!');
All logging messages will get displayed in the Grav.log file which is present under the folder <your_folder_name>/logs/Grav.log
Grav - CLI
In this chapter, we will understand how the CLI works in Grav. CLI stands for command line interface stored in bin/Grav. It performs some tasks such as clearing cache, creating backup copy, etc.
Accessing CLI is different on different platforms. On Windows, you can access through cmd, on Mac you can access through Terminal and on Linux you can use shell. In windows, you can't use UNIX style commands. To use these just install the msysgit package which provides GIT and GIT BASH and provides UNIX style commands on Windows.
You can list out the available commands in the Grav by using below command −
$ bin/Grav list
You can see the available commands as shown in the following screenshot −
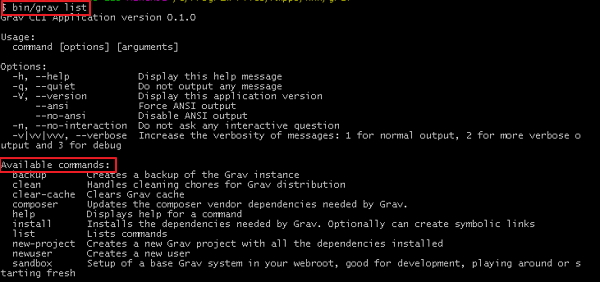
New Project Creation
Creating new project with Grav is very simple. You can create a new project with a Grav instance.
Open your terminal or console and navigate to your Grav folder.
$ cd ../ProjectFolder/grav
Your Grav will be installed in the root of your web server. If you want to create folder called contact inside the root folder of your Grav, then use the command as −
$ bin/Grav project-name ../webroot/ contact
It will download all the required dependencies and create a new Grav instance.
Installing Grav Dependencies
While installing dependencies, Grav automatically installs plugins namely error plugin, problems plugin and antimatter theme. You can install these by using the following command in your terminal or console −
$ cd ../webroot/myproject
$ bin/Grav install
You will now see the downloaded plugins in their respective folders as −
../webroot/ myproject/user/plugins/error
../webroot/ myproject/user/plugins/problems
../webroot/ myproject/user/themes/antimatter
Clearing Grav Cache
You can delete files and folders to clear the cache which are stored in the cache/ folder. To clear cache, you can use below command −
$ cd ../webroot/myproject
$ bin/Grav clear-cache
Create Backup
In Grav, you can back up your project stored under the root folder. As it won't use the database so there is no difficulty to take a backup. If you want to create the backup of your project called myproject (../webroot/myproject), then use the following command −
$ cd ../webroot/myproject
$ bin/Grav backup
You will see a zip file of the backup created under the backup/ folder.
Updating Composer
You can update the Grav composer which was installed via Github and installed manually using composer based vendor packages. The command is −
$ bin/Grav composer
Grav - GPM
GPM stands for Grav Package Manager which is used to install, update, un install and list the available plugins on the Grav repository. GPM executes the commands using command line interface such as terminal or cmd.
You can access CLI very easily. On Windows, you can access through cmd, on Mac you can access through Terminal and on Linux you can use shell. In windows, you can't use UNIX style commands. To use these just install the msysgit package which provides GIT and GIT BASH and provides UNIX style commands on Windows.
To list the available commands on the Grav repository type the command as −
$ bin/gpm list
You will receive the following −
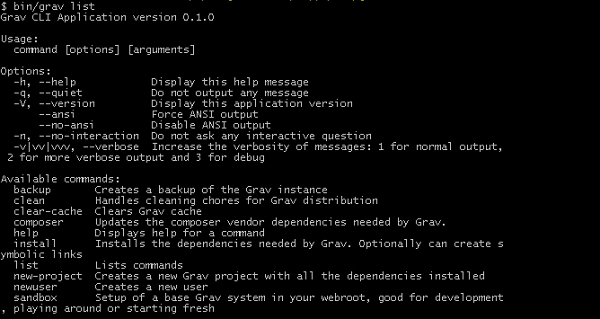
You can help the commands by adding help to the line as shown below −
$ bin/gpm help install
You can find the version of PHP on the command line interface by using the following command −
$ php -v

How Does it work?
When you run the commands on the command line interface, GPM automatically downloads the required data from the GetGrav.org site. It includes all the details of available packages and also determines the packages that need to be installed and which packages needs to be updated.
When you are downloading the packages from the repository, the Grav repository gets cached locally and no request will be able to contact the GetGrav.org server after the cache has been generated.
Some commands come with the --force (-f) option, which forces to re-fetch the repository. Using this option, there is no need to wait for 24 hours cycle before cache gets cleared.
Commands
You can download the available packages from the Grav repository using some commands. To make use of the command, open your terminal and navigate to your root of the Grav folder and type as bin/gpm <command>.
Index
The index command is used to list the available plugins, themes in the Grav repository. Use the below command in your terminal to list out the available resources.
$ bin/gpm index
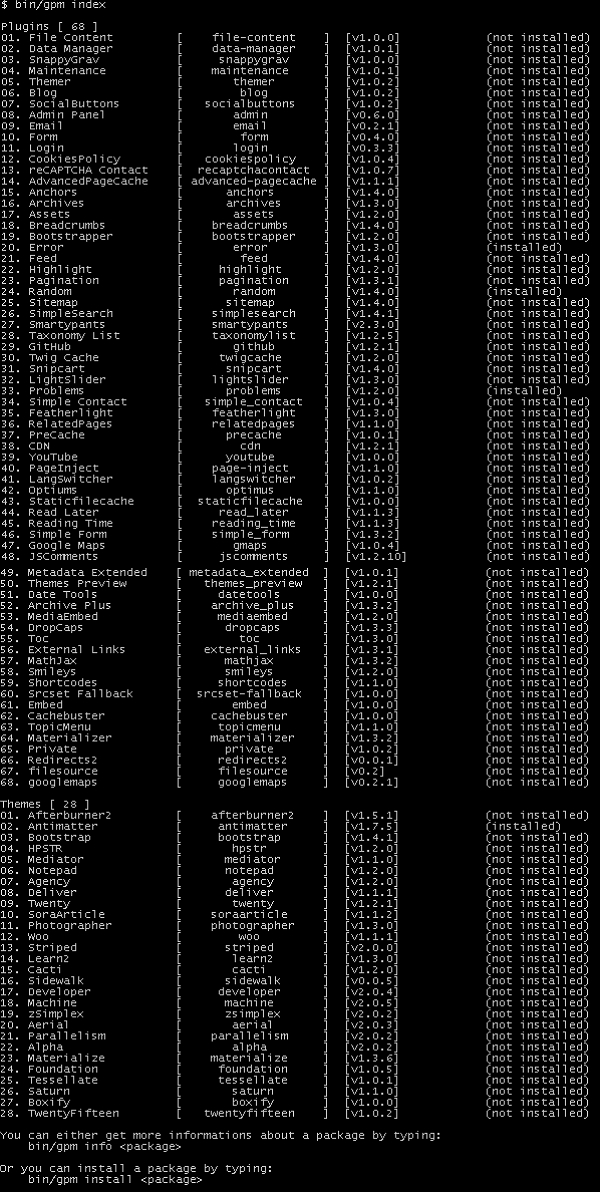
Each line defines the name of the plugin or theme, slug, version of plugin or theme and also displays whether it is installed or not.
Info
The info command is used to display the information about package such as author, version, date and time of last updated, repository of package, download link of package, license information etc.
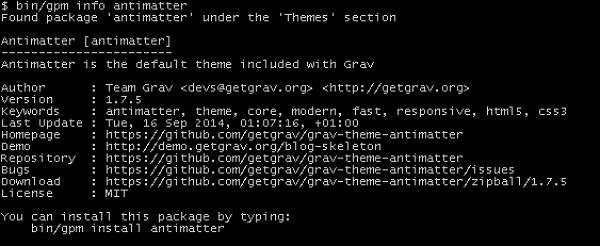
Install
As the name implies the install command installs the required resources for the package from the Grav repository.
You can use the following command to install the required package.
$ bin/gpm install package_name
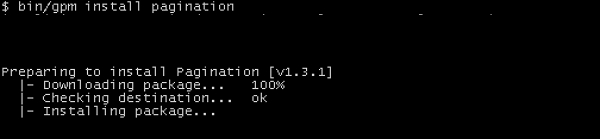
If you try to install an already installed package, then it informs what to do next.

If you type Y, it will overwrite on an already installed package and if you type N, it will abort the installation process.
Update
The update command informs about the package that need to be updated. Suppose if all packages are up to date, then it will say nothing to update.
$ bin/gpm update

Self-upgrade
The self-upgrade command is used to upgrade the Grav to the latest version. Use the following command to upgrade the Grav.
$ bin/gpm self-upgrade
If you are using the latest version of Grav, then it will display a message saying "You are already running the latest version of Grav" along with the date of release and the time as shown in the screen.

Grav - Development
You can build Grav with different types of Development such as Grav Core, Grav Plugins, Grav Skeleton and Grav Themes.
Grav Core
Grav is a modern CMS in which writing content is simple and building pages is more friendly and intuitive. The Grav core specially talks about the system folder which controls everything about Grav and represents the qualities of Grav workflow and life cycle. It focuses mainly on pages which can be written in good manner. It focuses on your content and turns your content into navigable site.
Grav Plugins
Plugin is a piece of software that provides enhanced functionality which was not originally completed by Grav's core functionality. There are many plugins available on the Grav repository which shows functionality on the site.
Consider the following points relating to Grav plugins −
Grav itself is super-lean which adds only needed plugins for your site.
There is no need to wait for adding extra functionality that you want. To achieve this, just create a plugin to extend Grav.
Plugins are so flexible and powerful which display site map, blog archives, search engine, provides breadcrumbs etc.
Grav Skeletons
The Grav skeleton describes a sample site which contains Grav Core, plugins, pages, theme all together. The initial idea behind Grav was to build site very easily. All that is needed to develop a site is placed in a user folder. The skeleton of Grav comes with various dependencies such as plugins, theme, etc. and stored in a package which can be unzipped.
Grav Themes
Grav supports different types of themes ehich form an integral part of a Grav site. When you install Grav on your system, it comes with Antimatter theme. Most of the themes come with skeleton package or with sample pages. You can see the sample pages under the user/pages folder which provides similar experience as the skeleton package.
The installed theme requires appropriate twig templates for your pages. A theme is combination of theme and content which is equal to the entire site design. You can create your own twig templating engine according to your design.
Theme/Plugin Release Process
You can notice some of the points for your created theme or plugin which is added in the Grav repository.
It is an open source which is licensed by MIT.
It has the README.md file which specifies installation process and configuration of the project.
It contains blueprints.yaml file which includes information about resource and can be found at the root of each plugin and theme.
Contains CHANGELOG.md file which includes version of the theme or plugin and displays the information whenever changes made to the file.
Creating releases are better ways to place your completed theme or plugin on the GitHub. If there is no release, then you won't find your plugin or theme.
Add the details about your plugin or theme and do a test to ensure its working functionality.
ChangeLog Format
The changelog format is written in the Markdown syntax which keeps the content and visual display separate. It uses simple CSS which is displayed in the following format.
# vX.Y.Z
## 01/01/2015
1. [](#new)
   * New features added
   * Another new feature
2. [](#improved)
   * Improvement made
   * Another improvement
3. [](#bugfix)
   * Bugfix implemented
   * Another bugfix
...repeat...
GitHub Setup
GitHub is a largest open community which shares your projects with the users, get feedback and contribute to the repositories hosted on GitHub.
Clone the URL of external repository into single project folder on your local system. You can clone the external Git repository to new repository as shown in the steps below.
Open the command line and create folder called "my_project".
$ mkdir my_project
$ cd my_project
$ mkdir Grav
$ cd Grav
$ git clone https://github.com/getGrav/Grav.git
$ git clone https://github.com/Grav_project/Grav-plugin-error.git
$ git clone https://github.com/ Grav_project /Grav-plugin-problems.git
$ git clone https://github.com/ Grav_project /Grav-theme-antimatter.git
Here Grav_project is a repository where you will get all the files and folders related to this repository will be saved in the /my_project/Grav folder. Grav includes dependencies such as error plugin, problems plugin and Antimatter theme.
You can setup the test site for Grav by using the bin/Grav new-project command. We need to develop the cloned code from the web root. So we have to symbolically link the related parts using -s flag to the bin/Grav new-project command.
Create one configuration file in a new folder called .Grav/ to find the repository by using the command and you need to create this under the root directory.
$ cd
$ mkdir .Grav
$ vi .Grav/config
Navigate to your Grav folder and setup the symbolically linked site using -s flag.
$ cd ~/Projects/Grav/Grav
$ bin/Grav my-project -s ~/www/Grav
Here, www is a root folder and Grav is the location where you're going to create the test site.
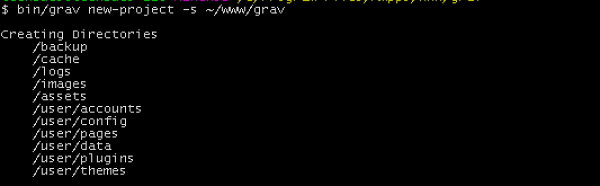
Grav - Lifecycle
In this chapter, we will understand the lifecycle of Grav. Grav Lifecycle determines how Grav processes in order to extend the Grav via Plugins. The following diagram shows the flow of Grav lifecycle process.
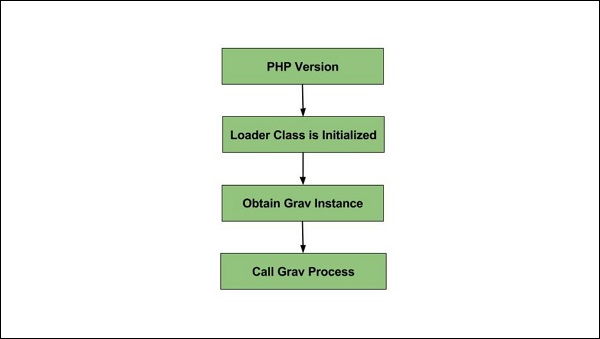
The following four steps from the Grav lifecycle −
PHP Version
Loader class is initialized
Obtain Grav Instance
Call Grav Process
PHP Version
It checks the version of PHP to make sure that we are running the PHP version above 5.4.0.
Loader class is initialized
In the second step, the class loader gets initialized.
Obtain Grav Instance
If no instance exists, then it calls the load() method and adds Grav.
It initializes the debugger value and adds to the debugger.
It registers the log and the error handler.
It adds the uri, task, events, cache, session, plugins, themes, twig, taxonomy, language, pages, assets and base url.
It registers the stream and the config handler.
Call Grav Process
It initializes the configuration, Uri object, error handler, debugger and session.
After initializing, it starts buffering the output.
It initializes the timezone and the plugins and fires the onPluginsInitialized event.
Next it initializes the theme and fires the onThemeInitialized and onTask[TASK] events.
It initializes the assets and fires the onAssetsInitialized event.
It initializes the twig with the following actions −
Based on the configuration, it sets the twig template paths.
Handles the available language templates.
Next it fires the onTwigTemplatePaths event.
Loader chain and twig configuration is loaded.
Fires onTwigInitialized event.
It loads the twig extensions and fires onTwigExtensions event.
It sets the standard twig variables.
Next it initializes the pages.
It calls the buildPages() method.
If cache is good, then it loads pages from cache. If cache is not good then the recurse() method is called.
onBuildPagesInitialized event is fired in the recurse() method.
If a file is found as .md, the following actions are performed −
To load the file details, the init() method is called.
It sets the filePath, modified and id.
The header() method is called to initialize header variables.
The slug() method is called to set the URL slug.
The visible() method is called to set the visible state.
Based on the folder that starts with _(underscore), modularTwig() is set.
It later fires the onPageProcessed event.
recurse() the children if a folder is found.
It fires the onFolderProcessed event.
calls the buildRoutes() method.
For all pages the taxonomy is initialized
The route table is built for fast lookup.
The events onPagesInitialized and onPageInitialized gets fired.
Debugger CSS/JS is added to the assets.
Using Twig's processSite() method, we get the output.
The event onTwigSiteVariables is fired.
Gets the output of the page.
When page is not found or not routable then the event onPageNotFound is fired.
All Twig variables are set on twig object.
Template name is set depending upon the file/header/extension information.
render() method is called.
Returns the file format in HTML
It fires the onOutputGenerated event.
Set the HTTP headers.
Displays the output
The output buffer is flushed to the page.
The event onOutputRendered will get fire.
Closes the connection to client.
Lastly, it fires the onShutDown event.
When the content() method is called on page, then the following lifecycle occurs.
The event onPageContentRaw will get fire.
According to the Markdown and Twig settings, it processes the page.
It fires the onPageContentProcessed event.
Grav - YAML Syntax
YAML stands for YAML Ain't Markup Language which includes human readable content and often used in configuration files, blueprints (metadata information about resource) and page settings.
Features
Following are the features of YAML −
Compared to XML or JSON, YAML is less complex and provides same features.
It provides configuration settings without the need to learn complex code types such as CSS, JavaScript or PHP.
YAML describes data and content of the YAML file which can be easily translated to multiple language types.
Basic Rules of YAML
There are some basic rules of YAML which are used to reduce the ambiguity in multiple languages and editable programs.
You must end the YAML files with .yaml extension.
YAML must be case-sensitive.
YAML doesn't support the use of tabs. Instead of tabs, it uses spaces which are not supported universally.
Basic Data Types of YAML
YAML supports some basic data types which can be used with programming languages such as −
Scalars − strings or numbers.
Sequences − arrays or lists.
Mappings − hashes or dictionaries.
Scalars
Scalars are the basic data types that use strings or numbers on the pages to work with the data. It may be a boolean property (either yes or no), integer value such as 2 or string of text such as word or sentence or title of the website.
For instance −
string: "Grav"
integer: 10
float: 10.5
boolean: true
Sometimes scalars come with unquoted values like integer, float or Boolean. The string value uses punctuation which comes with single or double quotation marks which uses escaping to specify ASCII and Unicode characters.
Sequences
YAML represent sequences in the form of arrays or lists. It defines each item with opening dash (-) placed in the list as shown below.
For instance −
- Apple
- Orange
- Grapes
Suppose if you want to define nested sequence with the sub items, and then place a single space before each dash in the sub items.
For instance −
-
   - Apple
   - Orange
   - Grapes
If you want nested sequence within the nested list, then add some levels as shown below −
For instance −
-
   -
      - Apple
      - Orange
      - Grapes
Mappings
It is a way of defining keys along with the values.
For example, you can assign some value to a specific element as −
Sports: cricket
Here the value is "cricket" that maps with the key called "Sports". You can use this mapping with the sequence to specify the list of items for cricket; for example, we will define some player names for the value "cricket" making names as child and Sports: cricket as parent.
Sports: cricket
- Sachin Tendulkar
- Rahul Dravid
- M S Dhoni
Grav - Forms
You can create a form using the form plugin available in this link. Search for the form plugin and install it in your Grav folder.
You can also install this plugin using the command $ bin/gpm install Form. Navigate to your root folder of Grav and type this command. It will automatically download the form plugin and install the necessary dependencies.
Creating a Simple Form
You can create a simple form which can be defined in the page YAML frontmatter. The following is an example of a form −
---
title: Contact Form

form:
   name: contact

   fields:
      - name: name
         label: Name
         placeholder: Enter your name
         autofocus: on
         autocomplete: on
         type: text
         validate:
            required: true

      - name: email
         label: Email
         placeholder: Enter your email address
         type: email
         validate:
            required: true

      - name: message
         label: Message
         placeholder: Enter your message
         type: textarea
         validate:
            required: true

      - name: g-recaptcha-response
         label: Captcha
         type: captcha
         recatpcha_site_key: 6LelOg4TAAAAALAt1CjjjVMxFLKY8rrnednYVbr8
         recaptcha_not_validated: 'Captcha not valid!'
         validate:
            required: true

   buttons:
      - type: submit
         value: Submit
      - type: reset
         value: Reset

   process:
      - email:
         subject: "[Site Contact Form] {{ form.value.name|e }}"
         body: "{% include 'forms/data.html.twig' %}"
      - save:
         fileprefix: contact-
         dateformat: Ymd-His-u
         extension: txt
         body: "{% include 'forms/data.txt.twig' %}"
      - message: Thank you for getting in touch!
      - display: thankyou
---
The above code shows simple form page with name, email, message and Captcha fields. When you submit the information after filling the form, the form will process by adding process field to the YAML frontmatter as shown in the code.
The process field uses the following information −
The email option uses two fields such as from field specify sender of the email and to field specify receiver of the mail.
The subject uses [feedback][entered mail] option in which email is sent to the entered email.
The body of the email is specified in the forms/data.html.twig file which is present in the theme folder.
The form input data is stored under the user/data folder. The template is defined in the forms/data.txt.twig file which is present in the theme folder.
Create a subpage under the thankyou/ sub folder which will be redirected to that page when a user submits the form.
You can use some fields with the form plugin as shown in the following table −
| Sr.No. | Field & Description |
|---|---|
| 1 | Captcha It is an antispam field which is used in computing to determine whether or not the user is human. |
| 2 | Checkbox It displays a simple checkbox. |
| 3 | Checkboxes It displays multiple checkboxes. |
| 4 | Date and Datetime Both fields are used to display date and date along with time respectively. |
| 5 | It is an email field with validation. |
| 6 | Hidden It specifies the hidden field. |
| 7 | Password It specifies the password field. |
| 8 | Radio It displays the simple radio buttons. |
| 9 | Select It provides select field. |
| 10 | Spacer It allows to add title, text or horizontal line to the form. |
| 11 | Text It displays simple text field. |
| 12 | Textarea It displays simple text area field. |
| 13 | Display It displays the text or instruction field, not the input field. |
Fields Parameter
Every field accepts the following parameters which can be used to customize the appearance in the form.
| Sr.No. | Parameter & Description |
|---|---|
| 1 | label It defines the label field. |
| 2 | validate.required It makes the element required. |
| 3 | validate.pattern It specifies validation pattern. |
| 4 | validate.message It display the message when validation fails. |
| 5 | type It defines the field type. |
| 6 | default It defines the default field type. |
| 7 | size It displays the field size such as large, x-small, medium, long, small. |
| 8 | name It defines the field name. |
| 9 | classes It uses string with css classes. |
| 10 | id It defines the field id. |
| 11 | style It specifies the style of the field. |
| 12 | title It defines the title of the field. |
| 13 | disabled It determines whether or not the field is in a disabled state. |
| 14 | placeholder It is a short hint which is displayed in the input field before the user enters a value. |
| 15 | autofocus It specifies that an input element should automatically get focus when the page loads. |
| 16 | novalidate It specifies that form data should not be validated when submitted. |
| 17 | readonly It determines field as read only state. |
| 18 | autocomplete It displays the options in the field when user starts typing in the field and displays the values based on earlier typed values. |
Some of the fields contains specific parameters such as −
| Sr.No. | Parameter & Description |
|---|---|
| 1 | date and datetime These fields use validate.min and validate.max to set minimum and maximum values. |
| 2 | spacer It uses underline to add <hr> tag, adds text values using text and uses title as <h3> tag. |
| 3 | select It uses multiple parameter to add multiple values. |
| 4 | select and checkboxes It uses options field to set the available options. |
| 5 | display It uses content parameter to display the content. It sets the markdown to true to show the content. |
| 6 | captcha It uses recatpcha_site_key and recaptcha_not_validated parameters. |
Note on Captcha
We have code on captcha information under field called g-recaptcha-response as shown below −
- name: g-recaptcha-response
   label: Captcha
   type: captcha
   recatpcha_site_key: 6LelOg4TAAAAALAt1CjjjVMxFLKY8rrnednYVbr8
   recaptcha_not_validated: 'Captcha not valid!'
   validate:
		required: true
The reCaptcha is used to protect your website from spam and abuse. It uses the recatpcha_site_key option and displays the widget on your site. To use reCaptcha, just refer the reCaptcha docs. If reCaptcha is incorrect, then it will display message using the recaptcha_not_validated option.
Form Actions
You can send an email with specific options under the process field as shown below −
- email:
	from: "{{ config.plugins.email.from }}"
	to: "{{ config.plugins.email.to }}"
	subject: "Contact by {{ form.value.name|e }}"
	body: "{% include 'forms/data.html.twig' %}"
It uses the email option which includes two fields; the from field specifies the sender of the email address and the to field specifies the recevier of the email address by using the Email plugin configuration. The email field also uses subject option in which an email is sent to the email entered with the subject [Contact by][name entered] and the body of the email is defined in the forms/data.html.twig file of the theme.
Redirecting to Other Page
You can redirect to another page by using message and display options defined under the process field.
process:
   - message: Thank you for getting in touch!
   - display: thankyou
The message option sets a message which should be displayed when a user click the submit button. When a user submits the form, it should be redirected to another page. Create one subpage under the thankyou subfolder where your form.md file is stored. After submitting the form, it will be redirected on the page and displays the above message.
The subpage called thankyou/formdata.md will have the following content.
---
title: Email sent
cache_enable: false
process:
   twig: true
---

## Your email has been sent!
When you submit the form, the plugin will send an email to the user and data is saved under the data/folder.
Save
It is used to save the data to a file which is saved under the user/data folder.
For instance −
process:
   - save:
      fileprefix: contact-
      dateformat: Ymd-His-u
      extension: txt
      body: "{% include 'forms/data.txt.twig' %}"
The data will be stored in text format with extension txt. The body is taken from the templates/forms/data.html.twig file of the theme.
The following screen shows a simple form −
Grav - Web Hosting
Hosting, also known as website hosting, is a process of maintaining and organizing a website and provides access to the websites via the World Wide Web. In simple words you can say, it is a service providing platform for web sites on the Internet.
Grav supports different types of hosting services −
Rochen Web Hosting
WireNine
Crucial Web Hosting
Arvixe
SiteGround
Dreamhost
Rochen Web Hosting
It can be used for both GetGrav.org and RocketTheme.com as long-term hosting provider. It uses SSD drives, Litespeed web servers along with Intel XEON processors to enhance Grav performance. It provides two types of options; one is Shared hosting and the other one is Burst hosting.

For more information on Rochen Web Hosting, click this link.
WireNine
WireNine provides reliable web hosting services for the customers in over 665 countries. It uses Intel Xeon E5 v3 CPUs, DDR4 ECC ram, and redundant RAID SSD storage for enhancing server's functionality. It provides maximum reliability and stability to ensure 100% uptime. It includes optimized software's such as CloudLinux, Litespeed, MariaDB, PHP, Ruby, Python, Perl etc.

Visit this link for information on WireNine hosting.
Crucial Web Hosting
It is another web hosting type that focuses more on speed and support. It uses SSD drives, Litespeed web servers along with Intel XEON processors to enhance Grav performance.
You can get more information on Crucial Web Hosting in this link.
Arvixe
Arvixe is a web hosting type, which provides web hosting with a combination of unmatched reliability, quality and affordability. It has won numerous web hosting awards for providing good functionalities in the web hosting field.

For more information on Arvixe Web Hosting, click this link.
SiteGround
It provides hosting solutions for Joomla, WordPress, Magento and other web applications. It has tagline as Web Hosting Crafted With Care which handles web hosting plans carefully and provides new techniques that make your website run faster.

Just visit this link for information on SiteGround hosting.
Dreamhost
It provides list of features by providing more functionalities to your personal or business related web hosting needs. It has ultra-fast SSDs and new dedicated servers with up to 64GB RAM.

For more information on Dreamhost Web Hosting, click this link.
Grav - Server Error
Server error occurs due to misconfiguration of Grav. When server has encountered an internal error or something happened unexpectedly, then Grav is unable to serve and recover the page.
If the server is running in production mode, to hide the information from the user, a server error message occurs. All the error messages are logged in Grav.log file present under the folder <your_folder_name>/logs/Grav.log.
Following are some of the reasons that may cause server error −
- Out-of-date configuration
- Incorrect file permission
- Invalid formatted configuration files
- Changes in file system not known to the Grav
Out-of-date configuration
You can flush the cache to check whether the configuration is up to-date or not. Use the following command to flush the cache.
bin/Grav clear-cache
Installation and configuration issues
The issues for installation and configuration are −
- Configuration Issues
- Installation Issues
- System Requirement
- File Permissions
Grav - Permission
In general, permission is a process of permitting to do something on your hosting environment. The permission includes read or write access to the files on the server or editing the files on the file system. Grav is a flat file based CMS which needs to write to the file system for creating cache and log files.
Grav comes under three main scenarios −
PHP/Webserver runs with same user that edits the files
This scenario works great with most shared hosting setup and also for local development. On the dedicated web host, we can't consider this approach as secure enough.
PHP/Webserver runs with different accounts but same group
With 775 and 664 permissions using shared group between the user and PHP/Webserver account, you can ensure that two different accounts will have the Read/Write access to the files. We can create new files by setting umask 0002 on the root with proper permissions.
Different accounts, fix permissions manually
This approach will have different accounts and update the ownership and permission of files which ensure that the PHP/Webserver user will have the Read/Write access on the files.
Following is the simple code of permissions-fixing shell script. You can edit this file as per the group which works for the setup.
#!/bin/sh
chown joeblow:staff .
chown -R joeblow:staff *
find . -type f ! -path "./bin/" | xargs chmod 664
find . -type f -path "./bin/" | xargs chmod 775
find . -type d | xargs chmod 775
find . -type d | xargs chmod +s
umask 0002
chown joeblow:staff is used to change the group and user of the directory to joeblow and staff.
chown -R joeblow:staff * line changes the ownership of the files and subfolder to joeblow and staff.
The line find . -type f ! -path "./bin/" | xargs chmod 664 sets 664 permissions for all files from the directory to Read for the others and Read/Write for group and user.
The line find . -type f -path "./bin/" | xargs chmod 775 sets 775 permissions for all files from the directory to RX for the others and RWX for group and user.
umask 0002 is used to create new files with 664 and 775 permissions.