- Gradle Tutorial
- Gradle – Home
- Gradle – Overview
- Gradle – Installation
- Gradle – Build Script
- Gradle – Tasks
- Gradle – Dependency Management
- Gradle – Plugins
- Gradle – Running a Build
- Gradle – Build a JAVA Project
- Gradle – Build a Groovy Project
- Gradle – Testing
- Gradle – Multi-Project Build
- Gradle – Deployment
- Gradle – Eclipse Integration
- Gradle Useful Resources
- Gradle - Quick Guide
- Gradle - Useful Resources
- Gradle - Discussion
Gradle - Build a JAVA Project
This chapter explains how to build a java project using Gradle build file.
First of all, we have to add java plugin to the build script, because, it provides the tasks to compile Java source code, to run the unit tests, to create a Javadoc and to create a JAR file.
Use the following line in build.gradle file.
apply plugin: 'java'
Java Default Project Layout
Whenever you add a plugin to your build, it assumes a certain setup of your Java project (similar to Maven). Take a look at the following directory structure.
- src/main/java contains the Java source code.
- src/test/java contains the Java tests.
If you follow this setup, the following build file is sufficient to compile, test, and bundle a Java project.
To start the build, type the following command on the command line.
C:\> gradle build
SourceSets can be used to specify a different project structure. For example, the sources are stored in a src folder rather than in src/main/java. Take a look at the following directory structure.
apply plugin: 'java'
sourceSets {
   main {
      java {
         srcDir 'src'
      }
   }

   test {
      java {
         srcDir 'test'
      }
   }
}
init Task Execution
Gradle does not yet support multiple project templates. But it offers an init task to create the structure of a new Gradle project. Without additional parameters, this task creates a Gradle project, which contains the gradle wrapper files, a build.gradle and settings.gradle file.
When adding the --type parameter with java-library as value, a java project structure is created and the build.gradle file contains a certain Java template with Junit. Take a look at the following code for build.gradle file.
apply plugin: 'java'

repositories {
   jcenter()
}

dependencies {
   compile 'org.slf4j:slf4j-api:1.7.12'
   testCompile 'junit:junit:4.12'
}
In the repositories section, it defines where to find the dependencies. Jcenter is for resolving your dependencies. Dependencies section is for providing information about external dependencies.
Specifying Java Version
Usually, a Java project has a version and a target JRE on which it is compiled. The version and sourceCompatibility property can be set in the build.gradle file.
version = 0.1.0
sourceCompatibility = 1.8
If the artifact is an executable Java application, the MANIFEST.MF file must be aware of the class with the main method.
apply plugin: 'java'

jar {
   manifest {
      attributes 'Main-Class': 'com.example.main.Application'
   }
}
Example
Create a directory structure as shown in the below screenshot.
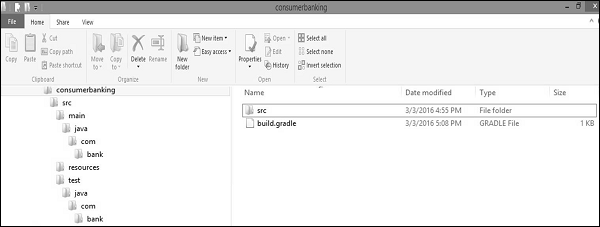
Copy the below given java code into App.java file and store into consumerbanking\src\main\java\com\bank directory.
package com.bank;

/**
* Hello world!
*
*/

public class App {
   public static void main( String[] args ){
      System.out.println( "Hello World!" );
   }
}
Copy the below given java code into AppTset.java file and store into consumerbanking\src\test\java\com\bank directory.
package com.bank;

/**
* Hello world!
*
*/

public class App{
   public static void main( String[] args ){
      System.out.println( "Hello World!" );
   }
}
Copy the below given code into build.gradle file and placed into consumerbanking\ directory.
apply plugin: 'java'

repositories {
   jcenter()
}

dependencies {
   compile 'org.slf4j:slf4j-api:1.7.12'
   testCompile 'junit:junit:4.12'
}

jar {
   manifest {
      attributes 'Main-Class': 'com.example.main.Application'
   }
}
To compile and execute the above script use the below given commands.
consumerbanking\> gradle tasks
consumerbanking\> gradle assemble
consumerbanking\> gradle build
Check all the class files in the respective directories and check consumerbanking\build\lib folder for consumerbanking.jar file.