- Excel Macros Tutorial
- Excel Macros - Home
- Excel Macros - Overview
- Excel Macros - Creation
- Macros in a Single Workbook
- Excel Macros - Security
- Excel Macros - Absolute References
- Excel Macros - Relative References
- Excel Macros - VBA
- Excel Macros - Understanding Codes
- Assigning Macros to Objects
- Excel Macros - Running a Macro
- Creating a Macro Using VBA Editor
- Excel Macros - Editing
- Excel Macros - UserForms
- Excel Macros - Debugging a Code
- Excel Macros - Configuring a Macro
- Excel Macros Useful Resources
- Excel Macros - Quick Guide
- Excel Macros - Useful Resources
- Excel Macros - Discussion
Excel Macros - Relative References
Relative reference macros record an offset from the active cell. Such macros will be useful if you have to repeat the steps at various places in the worksheet.
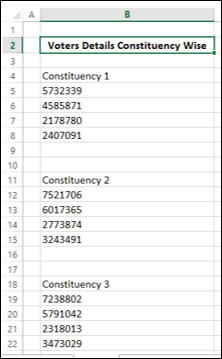
Suppose you are required to analyze the data of voters collected from 280 constituencies. For each constituency, the following details are collected −
- Constituency name.
- Total population in the constituency.
- Number of voters in the constituency.
- Number of male voters, and
- Number of female voters.
The data is provided to you in a worksheet as given below.
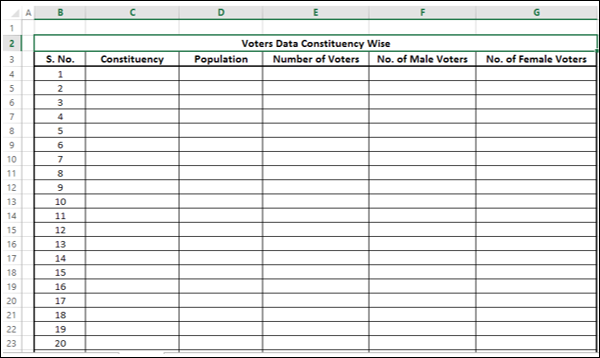
It is not possible to analyze the data in the above format. Therefore, arrange the data in a table as shown below.
If you attempt to arrange the given data in the above format −
It takes substantial amount of time to arrange the data from the 280 constituencies
It can be error prone
It becomes a mundane task not allowing you to focus on technical things
The solution is to record a macro so that you can complete the task in not more than a few seconds. The macro needs to use relative references, as you will move down the rows while arranging the data.
Using Relative References
In order to let the macro recorder know that it has to use relative references, do the following −
Click the VIEW tab on the Ribbon.
Click Macros.
Click Use Relative References.

Preparing the Data Format
The first step in arranging the above given data is to define the data format in a table with headers.
Create the row of headers as shown below.
Recording a Macro
Record the macro as follows −
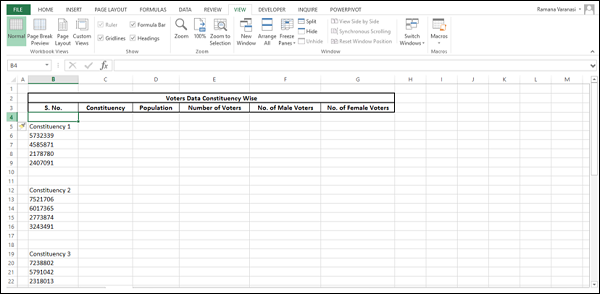
Click Record Macro.
Give a meaningful name, say, DataArrange to the macro.
Type = row ()- 3 in the cell B4. This is because the S. No. is the current row number – the 3 rows above it.
Cut the cells B5, B6, B7, B8 and B9 and paste it in the cells C4 to C8 respectively.
Now click in the cell B5. Your table looks as shown below.
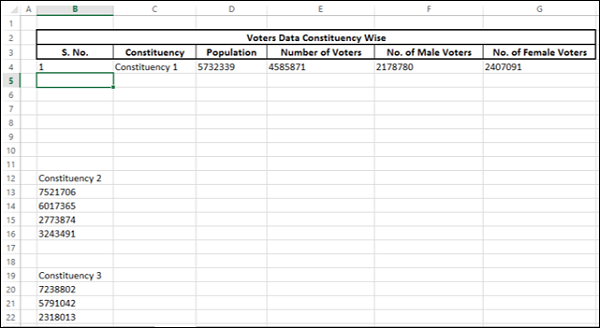
The first data set is arranged in the first row of the table. Delete the rows B6 – B11 and click in the cell B5.
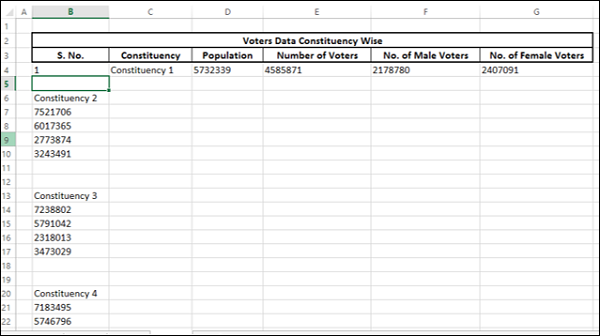
You can see that the active cell is B5 and the next data set will be placed here.
Stop recording the macro. Your macro for arranging the data is ready.
Running a Macro
You need to run the macro repeatedly to complete the data arrangement in the table as given below.
The active cell is B5. Run the macro. The second data set will be arranged in the second row of the table and the active cell will be B6.
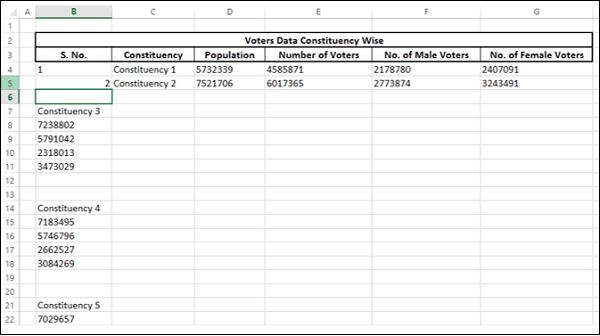
Run the macro again. The third data set will be arranged in the third row of the table and the active cell will become B7.
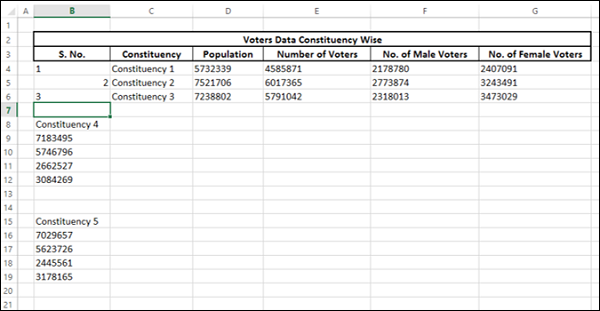
Each time you run the macro, the active cell advances to the next row, facilitating the repetition of recorded steps at the appropriate positions. This is possible because of the relative references in macro.
Run the macro until all the 280 data sets are arranged into 280 rows in the table. This process takes a few seconds and as the steps are automated, the entire exercise is error free.