- Excel Macros Tutorial
- Excel Macros - Home
- Excel Macros - Overview
- Excel Macros - Creation
- Macros in a Single Workbook
- Excel Macros - Security
- Excel Macros - Absolute References
- Excel Macros - Relative References
- Excel Macros - VBA
- Excel Macros - Understanding Codes
- Assigning Macros to Objects
- Excel Macros - Running a Macro
- Creating a Macro Using VBA Editor
- Excel Macros - Editing
- Excel Macros - UserForms
- Excel Macros - Debugging a Code
- Excel Macros - Configuring a Macro
- Excel Macros Useful Resources
- Excel Macros - Quick Guide
- Excel Macros - Useful Resources
- Excel Macros - Discussion
Excel Macros - Quick Guide
Excel Macros - Overview
An Excel macro is an action or a set of actions that you can record, give a name, save and run as many times as you want and whenever you want. When you create a macro, you are recording your mouse clicks and keystrokes. When you run a saved macro, the recorded mouse clicks and keystrokes will be executed in the same sequence as they are recorded.
Macros help you to save time on repetitive tasks involved in data manipulation and data reports that are required to be done frequently.
Macro and VBA
You can record and run macros with either Excel commands or from Excel VBA.
VBA stands for Visual Basic for Applications and is a simple programming language that is available through Excel Visual Basic Editor (VBE), which is available from the DEVELOPER tab on the Ribbon. When you record a macro, Excel generates VBA code. If you just want to record a macro and run it, there is no need to learn Excel VBA. However, if you want to modify a macro, then you can do it only by modifying the VBA code in the Excel VBA editor.
You will learn how to record a simple macro and run it with Excel commands in the chapter - Creating a Simple Macro. You will learn more about macros and about creating and / or modifying macros from Excel VBA editor in the later chapters.
Personal Macro Workbook
A macro can be saved in the same workbook from where you recorded it. In that case, you can run the macro from that workbook only and hence you should keep it open. Excel gives you an alternative way to store all your macros. It is the personal macro workbook, where you can save your macros, which enables you to run those macros from any workbook.
You will learn about Personal Macro Workbook in the chapter - Saving all your Macros in a Single Workbook.
Macro Security
Macros will be stored as VBA code in Excel. As with the case of any other code, macro code is also susceptible to malicious code that can run when you open a workbook. This is a threat to your computer. Microsoft provided with the Macro Security facility that helps you in protecting your computer from such macro viruses.
You will learn more about this in the chapter - Macro Security.
Absolute References and Relative References
While recording a macro, you can use either absolute references or relative references for the cells on which you are clicking. Absolute references make your macro run at the same cells where you recorded the macro. On the other hand, relative references make your macro run at the active cell.
You will learn about these in the chapters - Using Absolute References for a Macro and Using Relative References for a Macro.
Macro Code in VBA
You can record and run macros from Excel even if you do not know Excel VBA. However, if you have to modify a recorded macro or create a macro by writing VBA code, you should learn Excel VBA. You can refer to the Excel VBA tutorial in this tutorials library for this
However, you should know how to view the macro code. You can learn how to access VBA editor in Excel and about the different parts of the VBA editor in the chapter – Excel VBA.
You can learn how to view the macro code in Excel VBA editor and you can understand the macro code in the chapter - Understanding Macro Code.
Assigning Macros to Objects
You can assign a macro to an object such as a shape or a graphic or a control. Then, you can run the macro by clicking on that object. You will learn about this in the chapter - Assigning Macros to Objects.
Running Macros
Excel provides several ways to run a macro. You can choose the way you want to run a macro. You will learn about these different possible ways of running a macro in the chapter - Running a Macro.
Creating a Macro Using VBA Editor
If you decide to write the macro code, you can learn it in the chapter - Creating a Macro Using VBA Editor. However, the prerequisite is that you should have Excel VBA knowledge.
Editing a Macro
You can modify macro code in Excel VBA editor. If you want to make extensive changes, you should have Excel VBA knowledge. But, if you want to make only minor changes to the code or if you want to copy the VBA code from a recorded macro to another macro, you can refer to the chapter - Editing a Macro.
You can rename a macro and even delete it. You will learn about this also in the same chapter.
User Forms
A Form is normally used to collect required information. It will be self-explanatory making the task simple. Excel User Forms created from Excel VBA editor serve the same purpose, providing the familiar options such as text boxes, check boxes, radio buttons, list boxes, combo boxes, scroll bars, etc. as controls.
You will learn how to create a User Form and how to use the different controls in the chapter – User Forms.
Debugging Macro Code
At times, a macro may not run as expected. You might have created the macro or you might be using a macro supplied to you by someone. You can debug the macro code just as you debug any other code to uncover the defects and correct them. You will learn about this in the chapter - Debugging Macro Code.
Configuring a Macro to Run on Opening a Workbook
You can make your macro run automatically when you open a workbook. You can do this either by creating an Auto_Run macro or by writing VBA code for workbook open event. You will learn this in the chapter - Configuring a Macro to Run on Opening a Workbook.
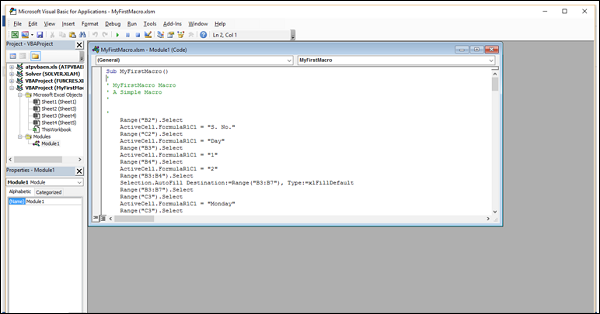
Excel Macros - Creation
You can create a macro with Excel commands by recording the key strokes and mouse clicks, giving the macro a name and specifying how to store the macro. A macro thus recorded can be run with an Excel command.
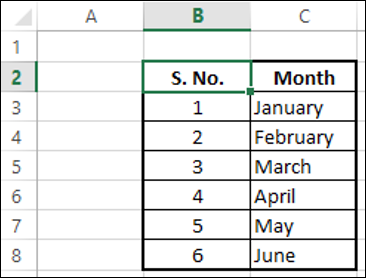
Suppose you have to collect certain results repeatedly in the following format −
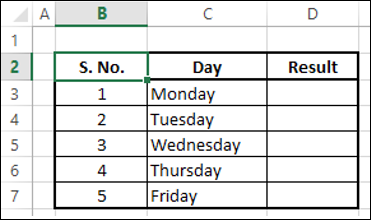
Instead of creating the table each time, you can have a macro to do it for you.
Recording a Macro
To record a macro do the following −
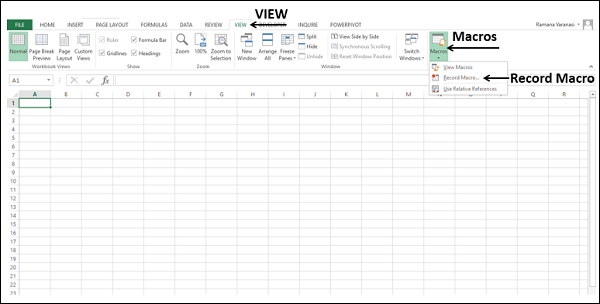
- Click the VIEW tab on the Ribbon.
- Click Macros in the Macros group.
- Select Record Macro from the dropdown list.
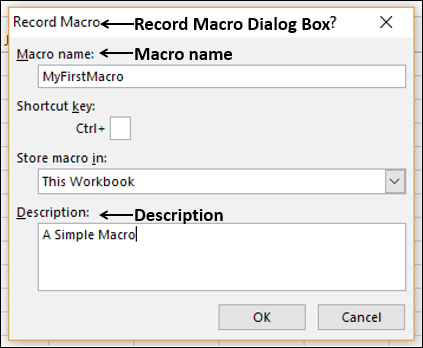
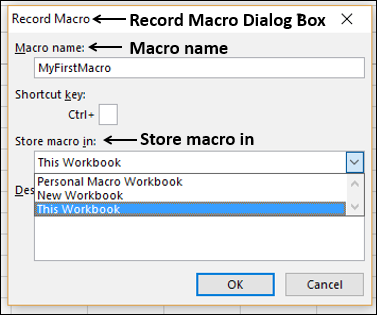
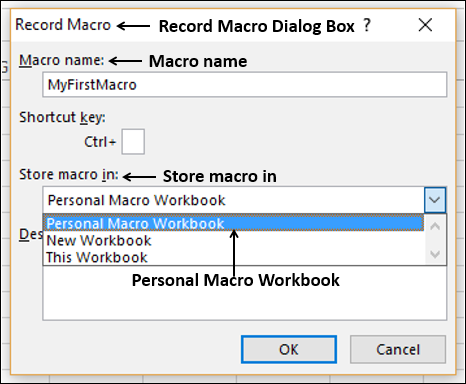
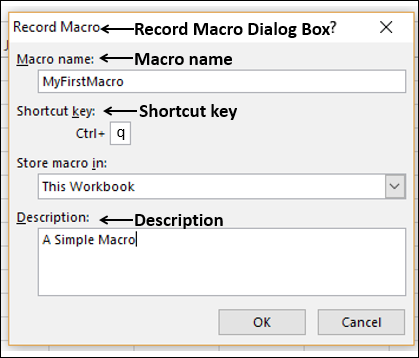
The Record Macro dialog box appears.
Type MyFirstMacro in the Macro name box.
Type A Simple Macro in the Description box and click OK.
Remember that whatever key strokes and mouse clicks you do, will be recorded now.
Click in the cell B2.
Create the table.
Click in a different cell in the worksheet.
Click the VIEW tab on the Ribbon.
Click Macros.
Select Stop Recording from the dropdown list.
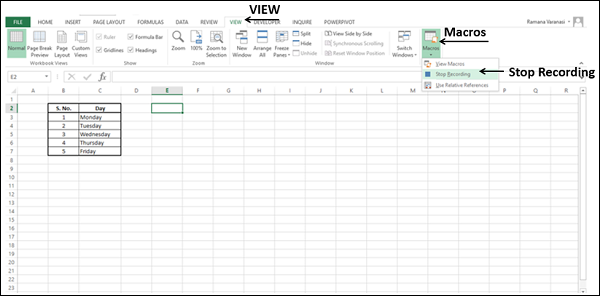
Your macro recording is completed.
The first step to click on a particular cell is important as it tells where exactly the macro has to start placing the recorded steps. Once you are done with the recording, you have to click Stop Recording to avoid recording of unnecessary steps.
Running a Macro
You can run the macro you have recorded any number of times you want. To run the macro, do the following −
- Click on a new worksheet.
Note the active cell. In our case, it is A1.
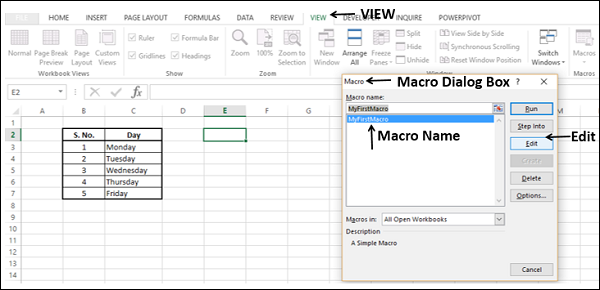
Click the VIEW tab on the Ribbon.
Click Macros.
Select View Macros from the dropdown list.

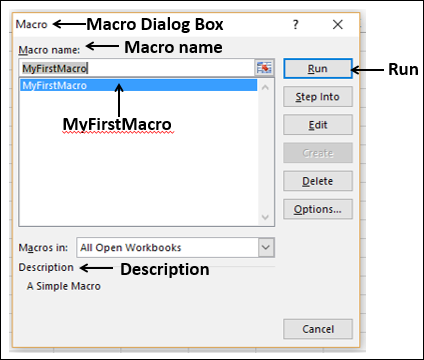
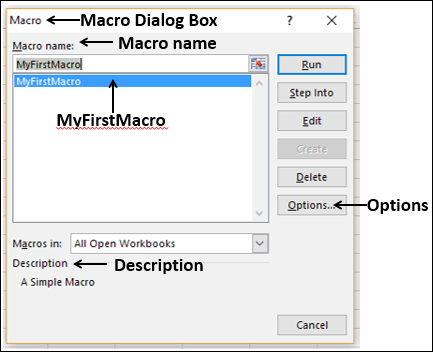
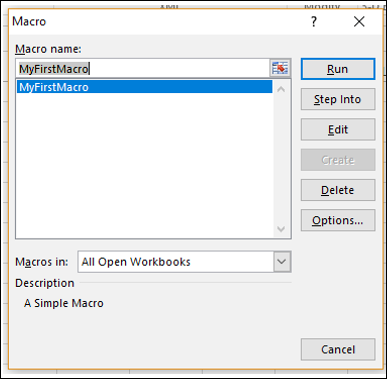
The Macro dialog box appears.
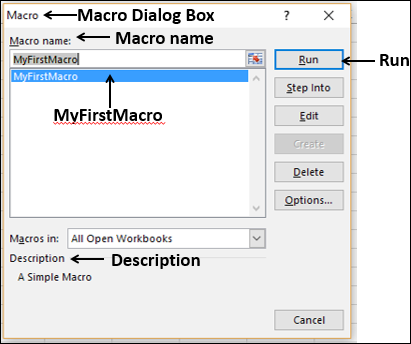
Only the macro that you recorded appears in the Macros list.
Click the macro name – MyFirstMacro in the Macro dialog box. The description you typed while recording the macro will get displayed. Macro description allows you to identify for what purpose you have recorded the macro.
Click the Run button. The same table that you have created while recording the macro will appear in just a split of a second.

You have discovered the magic wand that Excel provides you to save time on mundane tasks. You will observe the following −
Though the active cell before running the macro was A1, the table is placed in the cell B2 as you have recorded.
In addition, the active cell became E2, as you have clicked that cell before you stopped recording.
You can run the macro in multiple worksheets with different active cells before running the macro and observe the same conditions as given above. Just keep a note of this and you will understand later in this tutorial why it has occurred so.
You can also have a macro recording that places your recorded steps in the active cell. You will learn how to do this as you progress in the tutorial.
Storing a Macro
You might wonder how to save the macros that are created. In this context you need to know −
- Storing a macro
- Saving a macro enabled file
As and when you create a macro, you can choose where to store that particular macro. You can do this in the Record Macro dialog box.
Click the box - Store macro in. The following three options are available −
- This Workbook.
- New Workbook.
- Personal Macro Workbook
This Workbook
This is the default option. The macro will be stored in your current workbook from where you created the macro.
New Workbook
This option, though available, is not recommended. You will be asking Excel to store the macro in a different new workbook and mostly it is not necessary.
Personal Macro Workbook
If you create several macros that you use across your workbooks, Personal Macro Workbook provides you with the facility to store all the macros at one place. You will learn more about this option in the next chapter.
Saving a Macro Enabled File
If you had chosen This Workbook as the option for storing the macro, you would need to save your workbook along with the macro.
Try to save the workbook. By default, you would be asking Excel to save the workbook as an .xls file. Excel displays a message saying that an Excel feature VB project cannot be saved in a macro free workbook, as shown below.
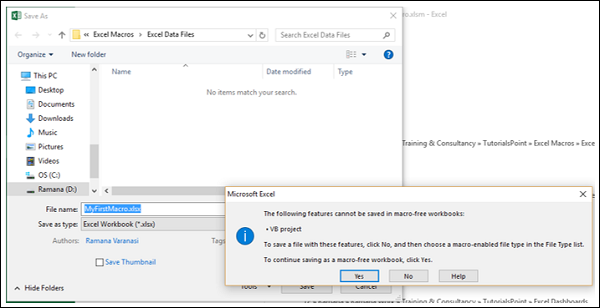
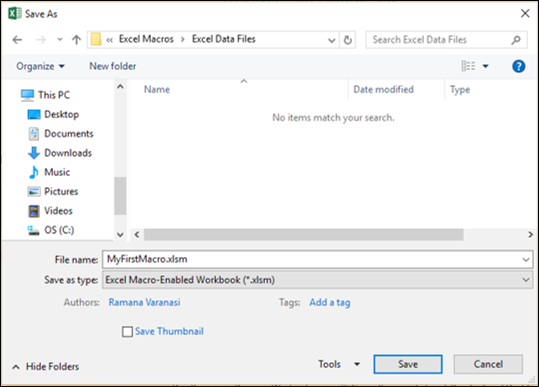
Note − If you click Yes, Excel will save your workbook as a macro free .xls file and your macro that you stored with This Workbook option will not get saved. To avoid this, Excel provides you an option to save your workbook as a macro-enabled workbook that will have .xlsm extension.
- Click No in the warning message box.
- Select Excel Macro-Enabled Workbook (*.xlsm) in the Save as type.
- Click Save.
You will learn more about these in later chapters in this tutorial.
Excel Macros - Macros in a Single Workbook
Excel provides you with a facility to store all your macros in a single workbook. The workbook is called Personal Macro Workbook - Personal.xlsb. It is a hidden workbook stored on your computer, which opens every time you open Excel. This enables you to run your macros from any workbook. There will be a single Personal Macro Workbook per computer and you cannot share it across computers. You can view and run the macros in your Personal Macro Workbook from any workbook on your computer.
Saving Macros in Personal Macro Workbook
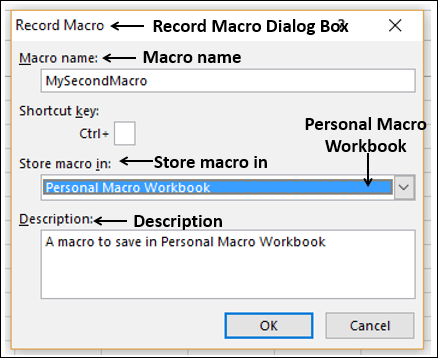
You can save macros in your Personal Macro Workbook by selecting it as the storing option while recording the macros.
Select Personal Macro Workbook from the drop down list under the category Store macro in.
- Record your second macro.
- Give macro details in the Record Macro dialog box as shown below.
- Click OK.
Your recording starts. Create a table as shown below.
Stop recording.
Click the VIEW tab on the Ribbon.
Click Macros.
Select View Macros from the dropdown list. The Macro dialog box appears.
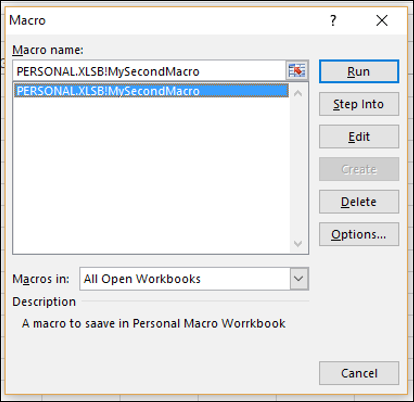
The macro name appears with a prefix PERSONAL.XLSB! indicating that the Macro is in the Personal Macro Workbook.
Save your workbook. It will get saved as an .xls file as the macro is not in your workbook and close Excel.
You will get the following message regarding saving the changes to the Personal Macro Workbook −
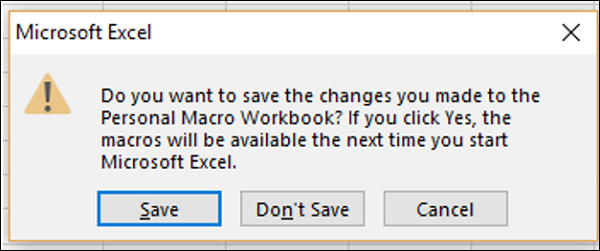
Click the Save button. Your macro is saved in the Personal.xlsb file on your computer.
Hiding / Unhiding Personal Macro Workbook
Personal Macro Workbook will be hidden, by default. When you start Excel, the personal macro workbook is loaded but you cannot see it because it is hidden. You can unhide it as follows −
Click the VIEW tab on the Ribbon.
Click Unhide in the Window group.
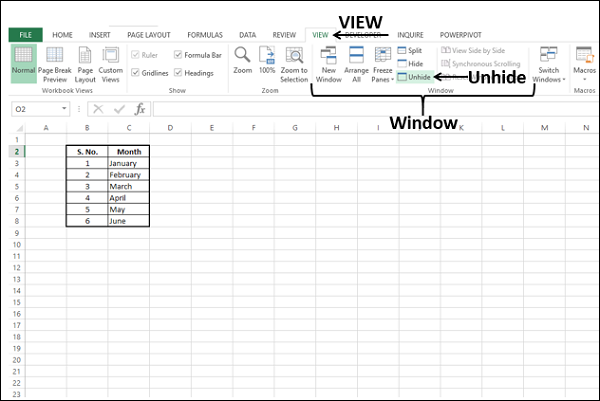
The Unhide dialog box appears.
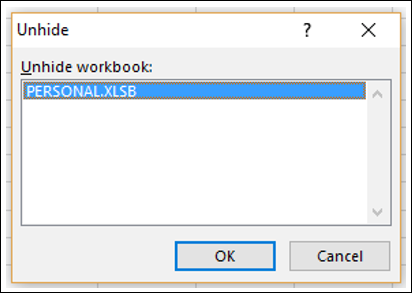
PERSONAL.XLSB appears in the Unhide workbook box and click OK.
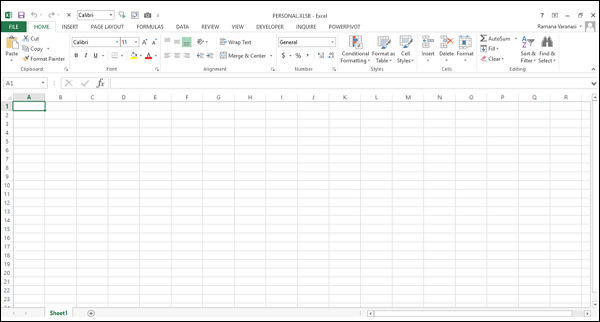
Now you can view the macros saved in the personal macro workbook.
To hide the personal macro workbook, do the following −
- Click on the personal macro workbook.
- Click the VIEW tab on the Ribbon.
- Click Hide on the Ribbon.
Running Macros Saved in Personal Macro Workbook
You can run the macros saved in personal macro workbook from any workbook. To run the macros, it does not make any difference whether the personal macro workbook is hidden or unhidden.
- Click View Macros.
- Select the macro name from the macros list.
- Click the Run button. The macro will run.
Adding / Deleting Macros in Personal Macro Workbook
You can add more macros in personal macro workbook by selecting it for Store macro in option while recording the macros, as you had seen earlier.
You can delete a macro in personal macro workbook as follows −
- Make sure that the personal macro workbook is unhidden.
- Click the macro name in the View Macros dialog box.
- Click the Delete button.
If the personal macro workbook is hidden, you will get a message saying “Cannot edit a macro on a hidden workbook”.
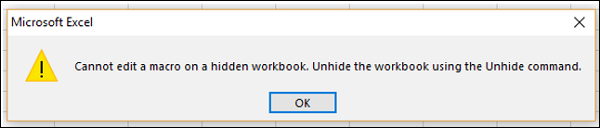
Unhide the personal macro workbook and delete the selected macro.
The macro will not appear in the macros list. However, when you create a new macro and save it in your personal workbook or delete any macros that it contains, you will be prompted to save the personal workbook just as in the case you saved it first time.
Excel Macros - Security
The macros that you create in Excel would be written in the programming language VBA (Visual Basic for Applications). You will learn about the Excel macro code in later chapters. As you are aware, when there is an executable code, there is a threat of viruses. Macros are also susceptible to viruses.
What are Macro Viruses?
Excel VBA in which the Macros are written has access to most Windows system calls and executes automatically when workbooks are opened. Hence, there is a potential threat of the existence of a virus written as a macro and is hidden within Excel that are executed on opening a workbook. Therefore, Excel macros can be very dangerous to your computer in many ways. However, Microsoft has taken appropriate measures to shield the workbooks from macro viruses.
Microsoft has introduced macro security so that you can identify which macros you can trust and which you cannot.
Macro Enabled Excel Workbooks
The most important Excel macro security feature is - file extensions.
Excel workbooks will be saved with .xlsx file extension by default. You can always trust workbooks with .xlsx file extension, as they are incapable of storing a macro and will not carry any threat.
Excel workbooks with macros are saved with .xlsm file extension. They are termed as Macro Enabled Excel Workbooks. Before you open such workbooks, you should make sure that the macros they contain are not malicious. For this, you must ensure that you can trust the origin of this type of workbooks.
Ways of Trusting Macro Enabled Workbook
Excel provides three ways to trust a macro enabled workbook.
Placing the macro enabled workbooks in a trusted folder
Checking if a macro is digitally signed
Enabling security alert messages before opening macro enabled workbooks
Placing the macro enabled workbooks in a trusted folder
This is the easiest and best way to manage macro security. Excel allows you to designate a folder as a trusted location. Place all your macro-enabled workbooks in that trusted folder. You can open macro-enabled workbooks that are saved to this location without warnings or restrictions.
Checking if a macro is digitally signed
Digital signatures confirm the identity of the author. You can configure Excel to run digitally signed macros from trusted persons without warnings or restrictions. Excel will also warn the recipient if it has been changed since the author signed it.
Enabling security alert messages before opening macro enabled workbooks
When you open a workbook, Excel warns you that the workbook contains macros and asks whether you wish to enable them. You can click the Enable Content button if the source of the workbook is reliable.

You can set any of these three options in the Trust Center in the Excel Options.
If you work in an organization, the system administrator might have changed the default settings to prevent anyone from changing the settings. Microsoft advises that you do not change security settings in the Trust Center as the consequences can be loss of data, data theft or security compromises on your computer or network.
However, you can learn the macro security settings in the following sections and check if they are to be changed. You have to use your own instinct to decide on any of these options based on the context and your knowledge of the file origin.
Macro Security Settings in Trust Center
The macro settings are located in the Trust Center in the Excel Options. To access the Trust Center, do the following −
Click the FILE tab on the Ribbon.
Click Options. The Excel Options dialog box appears.
Click Trust Center in the left pane.
Click the Trust Center Settings button under Microsoft Excel Trust Center.
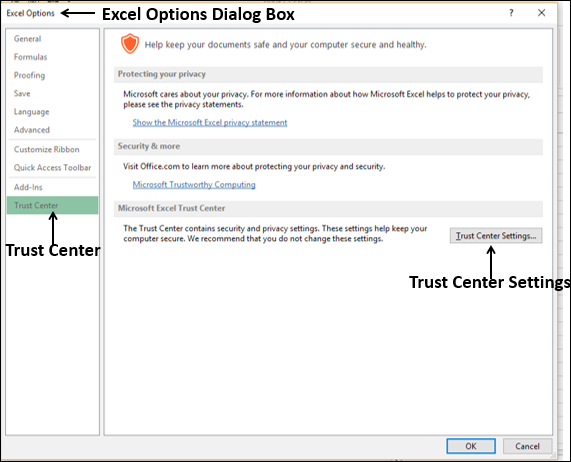
The Trust Center dialog box appears.
You will see various options available in the Excel Trust Center in the left pane. You will learn about the options related to Excel macros in the following sections.
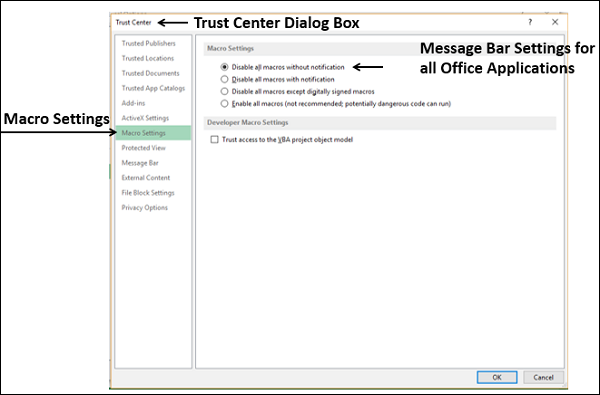
Macro Settings
Macro settings are located in the Trust Center.
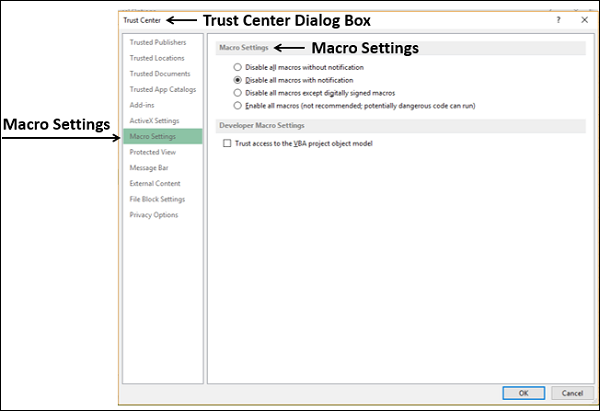
Under Macro Settings, four options are available.
Disable all macros without notification − If this option is chosen, Macros and security alerts about macros are disabled.
Disable all macros with notification − Macros are disabled, but security alerts appear if there are macros present. You can enable macros on a case-by-case basis.
Disable all macros except digitally signed macros − Macros are disabled but security alerts appear if there are macros present. However, if the macro is digitally signed by a trusted publisher, the macro runs if you trust the publisher. If you have do not trust the publisher, you will be notified to enable the signed macro and trust the publisher.
Enable all macros (not recommended, susceptible to macro viruses) − If this option is chosen, all macros run. This setting makes your computer vulnerable to potentially malicious code.
You have an additional security option under Developer Macro Settings with a Check box.
Trust access to the VBA project object model.
This option allows programmatic access to the Visual Basic for Applications (VBA) object model from an automation client.
This security option is for code written to automate an Office program and manipulate the VBA environment and object model.
It is a per-user and per-application setting, and denies access by default, hindering unauthorized programs from building harmful self-replicating code.
For automation clients to access the VBA object model, the user running the code must grant access. To turn on access, select the check box.
Defining a Trusted Location
If you think that a macro-enabled workbook is from a reliable source, it is better to move the file to the trusted location identified by Excel, instead of changing the default Trust Center settings to a less-safe macro security setting.
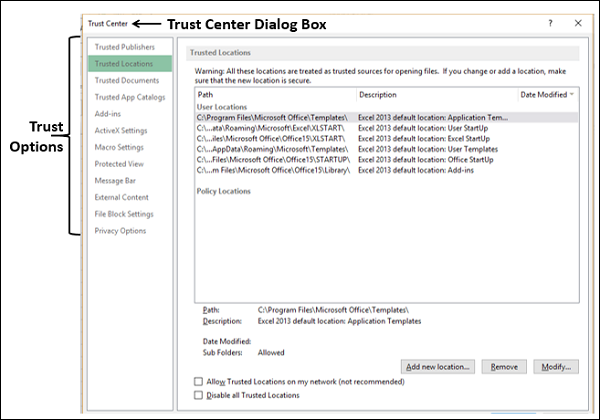
You can find the trusted folder settings in the Trust Center.
Click the Trusted Locations in the Trust Center dialog box. The Trusted Locations set by Microsoft Office appear on the right side.
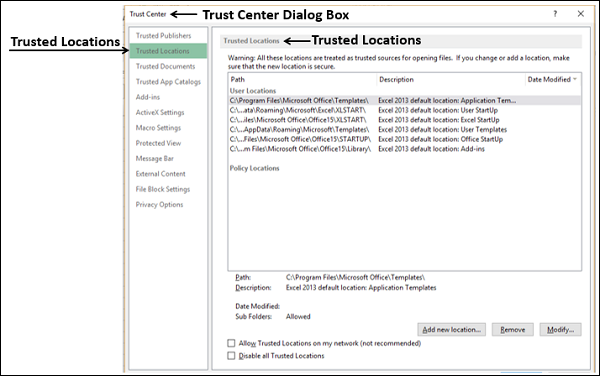
You can add new locations, remove the existing locations and modify the existing locations. The identified trusted locations will be treated by Microsoft office as reliable for opening files. However, if you add or modify a location, ensure that the location is secure.
You can also find the options that office does not recommend, such as locations on internet.
Digitally Signed Macros from Reliable Sources
Microsoft provides an option to accommodate digitally signed macros. However, even if a macro is digitally signed, you need to ensure that it is from a trusted publisher.
You will find the trusted publishers in in the Trust Center.
Click Trusted Publishers in the Trust Center dialog box. A list of certificates appear on the right side with the details – Issued To, Issued By and Expiration Date.
Select a certificate and click View.
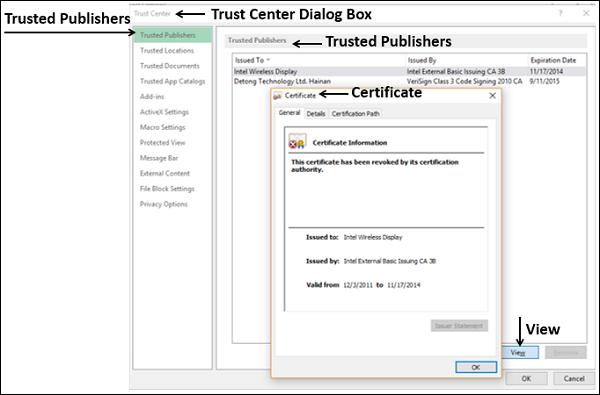
The certificate information is displayed.
As you have learnt earlier in this chapter, you can set an option to run a macro that is digitally signed only if you trust the publisher. If you do not trust the publisher, you will be notified to enable the signed macro and trust the publisher.
Using Warning Messages
The Message Bar displays security alert when there are macros in the file that you are opening. The yellow Message Bar with a shield icon alerts you that the macros are disabled.

If you know that the macro or macros are from a reliable source, you can click n the Enable Content button on the Message Bar, to enable the macros.
You can disable the Message Bar option if you do not want security alerts. On the other hand, you can enable the Message Bar option to increase security.
Enabling / Disabling Security Alerts on the Message Bar
You can enable / disable security alerts with Message Bars as follows −
- Click the FILE tab on the Ribbon.
- Click Options. The Excel Options dialog box appears.
- Click Trust Center.
- Click the Trust Center Settings button.
- Click Message Bar.
The Message Bar Settings for all Office Applications appear.
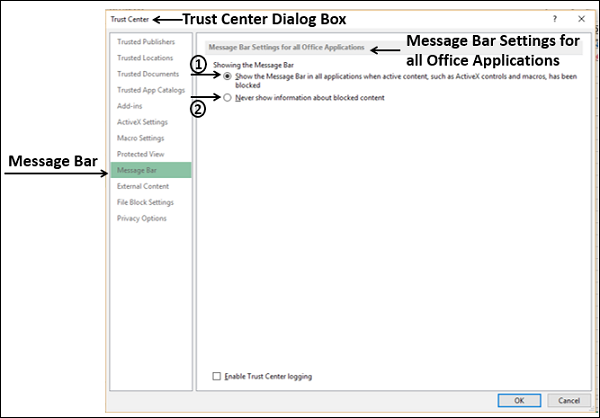
There are two options under - Showing the Message Bar.
Option 1 − Show the Message Bar in all applications when active content such as macros is blocked.
This is the default option. The Message Bar appears when potentially unsafe content has been disabled.
If you had selected - Disable all macros without notification in the Macro Settings of the Trust Center, this option is not selected and the Message Bar does not appear.
Option 2 − Never show information about blocked content.
If this option if selected, it disables the Message Bar and no alerts appear about security issues, regardless of any security settings in the Trust Center.

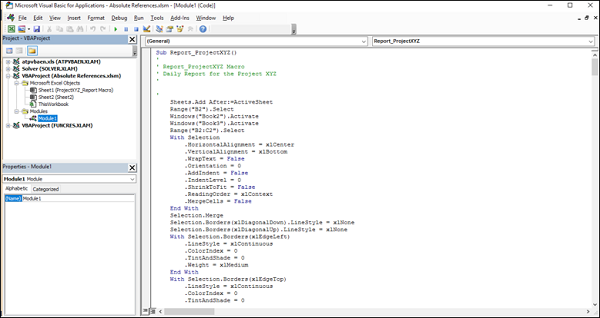
Excel Macros - Absolute References
Excel macros can be recorded either with absolute references or relative references. A macro recorded with absolute references places the recorded steps exactly in the cells where it was recorded, irrespective of the active cell. On the other hand, a macro recorded with relative references can perform the recorded tasks at different parts on the worksheet.
You will learn about absolute references for macro in this chapter. You will learn about relative references in the next chapter.
Suppose you have to submit a report about your team’s work at the end of every day in the following format −
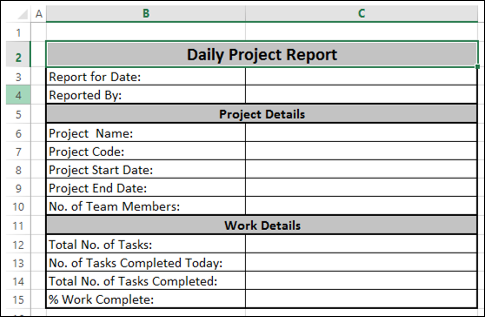
Now, the report should be placed in the cell B2 and should be in the given format.
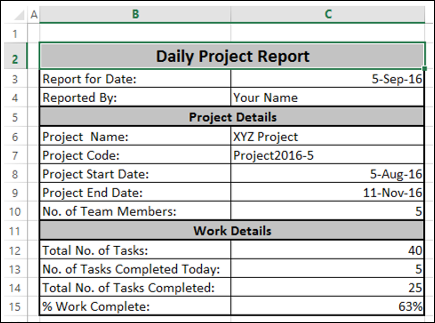
A sample filled in report will be as shown below −
Except for the data in the following cells, the information is constant for every report that you generate for the project.
- C3 – Report for Date.
- C13 – No. of Tasks Completed Today.
- C14 – Total No. of Tasks Completed.
- C15 – % Work Complete.
Of these also, in C3 (Report for Date) you can place the Excel function = TODAY () that places the date of your report without your intervention. Further, in cell C15, you can have the formula C14/C12 and format the cell C15 as percentage to have the % Work Complete calculated by Excel for you.
This leaves you with only two cells – C13 and C14 that need to be filled in by you every day. Hence, it would be ideal to have information for the rest of the cells, every time you have to create the report. This saves time for you and you can do the mundane activity of reporting in just few minutes.
Now, suppose you have to send such reports for three projects. You can imagine the time you can save and take up more challenging work for the day and of course get the accolades from your management.
You can achieve this by recording a macro per project and running them on a day-to-day basis to generate the required reports in a matter of just few minutes. However, every time you run the macro, the report should appear on the worksheet as given above, irrespective of the active cell. For this, you have to use absolute references.
Ensuring Absolute References
To record a macro with absolute references, you have to ensure that the macro is being recorded starting from the cell where the steps have to start. This means, in the case of the example given in the previous section, you need to do the following −
- Start recording the macro.
- Create a new worksheet.
- Click in any cell other than B2 in the new worksheet.
- Click in the cell B2.
- Continue recording the macro.
This will create a new worksheet for every new report and get the report format placed in the cell B2 every time you run the macro.
Note − The first three steps given above are essential.
If you do not create a new worksheet, when you run the macro, it places whatever you recorded on the same worksheet at the same place. This is not what you want. You need to have every report on a different worksheet.
If you do not click in a different cell at the beginning of the recording, even if the active cell is B2, Excel places the recorded steps in the active cell. When you run the macro, it will place the recorded report format at any part of the worksheet based on the active cell. By explicitly clicking in a cell other than B2 and then the the cell B2, you are telling the recorder to always place your macro steps in the cell B2.
Recording a Macro
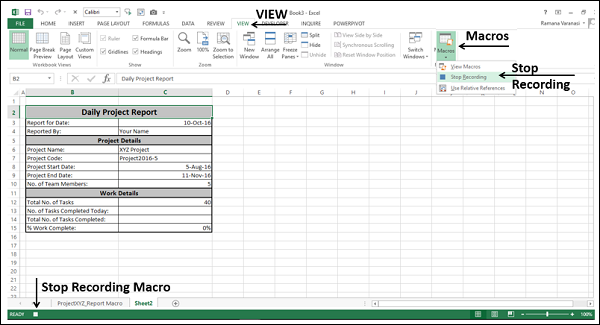
You can start recording the macro with the Record Macro command on the Ribbon under the VIEW tab → Macros. You can also click the Start Recording Macro button present on left side of the Excel task bar.
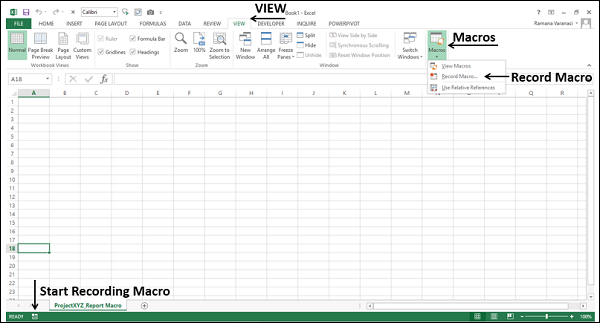
Start recording the macro. The Record Macro dialog box appears.
Give a meaningful name to identify the macro as a report of a particular project.
Select This Workbook under Store macro in, as you will produce reports from this specific workbook only.
Give a description to your macro and click OK.
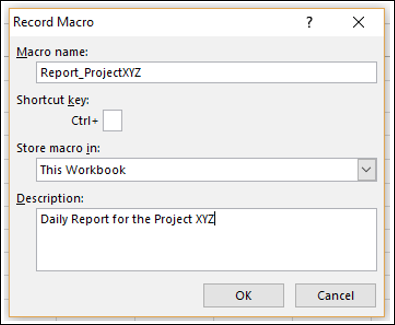
Your macro starts recording.
Create a new worksheet. This ensures your new report will be on a new worksheet.
Click in any cell other than B2 in the new worksheet.
Click in the cell B2. This ensures that the macro places your recorded steps in B2 always.
Create the format for the report.
Fill in the static information for the project report.
Place = TODAY () in C3 and = C14/C12 in the cell C15.
Format the cells with dates.
Stop recording the macro.

You can stop recording the macro either with the Stop Recording command on the Ribbon under VIEW tab → Macros or by clicking the Stop Recording Macro button present on left side of the Excel task bar.
Your Project Report macro is ready. Save the workbook as a macro-enabled workbook (with .xlsm extension).
Running a Macro
You can generate any number of reports in a few seconds just by running the macro.
- Click the VIEW button on the Ribbon.
- Click Macros.
- Select View Macros from the dropdown list. The Macro dialog box appears.
- Click the macro Report_ProjectXYZ.
- Click the Run button.
A new worksheet will be created in your workbook, with the report stencil created in it in the cell B2.
Excel Macros - Relative References
Relative reference macros record an offset from the active cell. Such macros will be useful if you have to repeat the steps at various places in the worksheet.
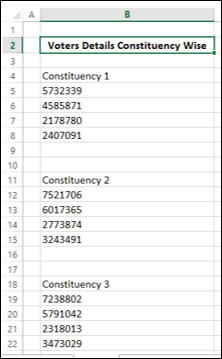
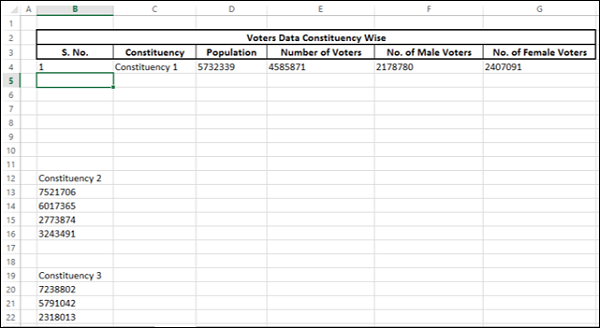
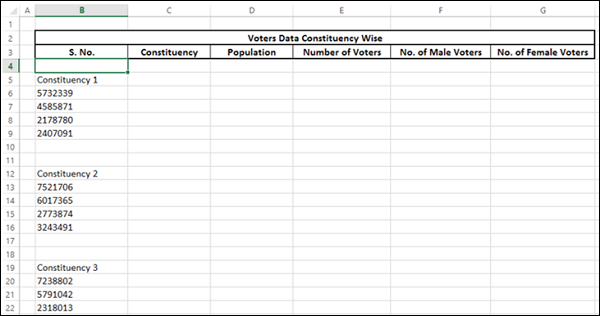
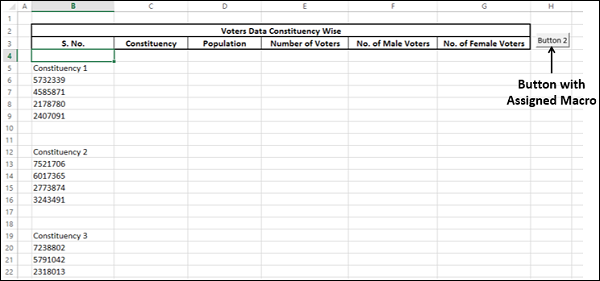
Suppose you are required to analyze the data of voters collected from 280 constituencies. For each constituency, the following details are collected −
- Constituency name.
- Total population in the constituency.
- Number of voters in the constituency.
- Number of male voters, and
- Number of female voters.
The data is provided to you in a worksheet as given below.
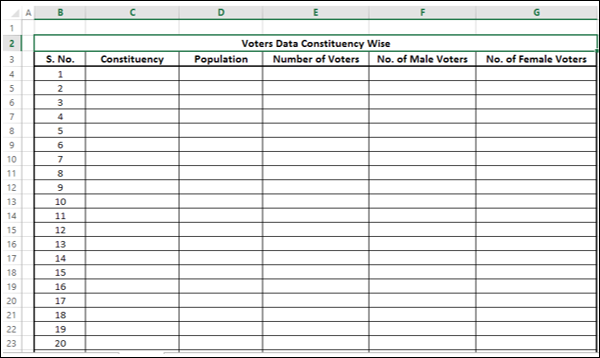
It is not possible to analyze the data in the above format. Therefore, arrange the data in a table as shown below.
If you attempt to arrange the given data in the above format −
It takes substantial amount of time to arrange the data from the 280 constituencies
It can be error prone
It becomes a mundane task not allowing you to focus on technical things
The solution is to record a macro so that you can complete the task in not more than a few seconds. The macro needs to use relative references, as you will move down the rows while arranging the data.
Using Relative References
In order to let the macro recorder know that it has to use relative references, do the following −
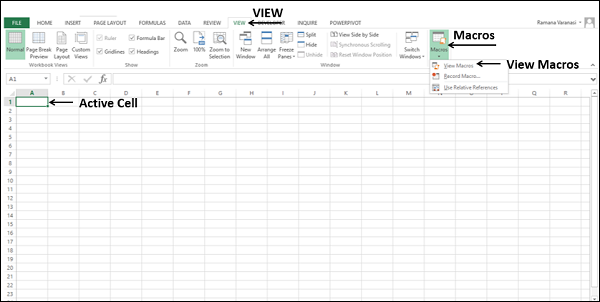
Click the VIEW tab on the Ribbon.
Click Macros.
Click Use Relative References.

Preparing the Data Format
The first step in arranging the above given data is to define the data format in a table with headers.
Create the row of headers as shown below.
Recording a Macro
Record the macro as follows −
Click Record Macro.
Give a meaningful name, say, DataArrange to the macro.
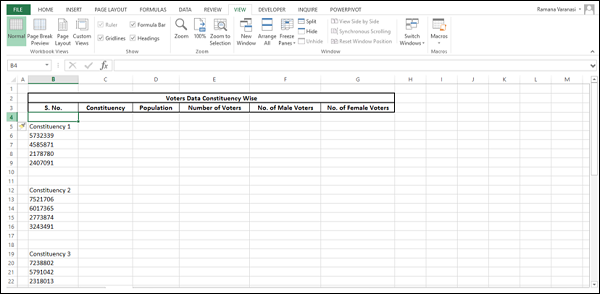
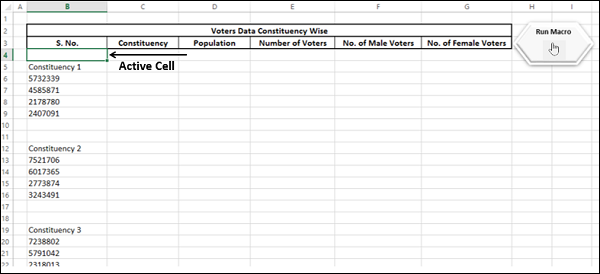
Type = row ()- 3 in the cell B4. This is because the S. No. is the current row number – the 3 rows above it.
Cut the cells B5, B6, B7, B8 and B9 and paste it in the cells C4 to C8 respectively.
Now click in the cell B5. Your table looks as shown below.
The first data set is arranged in the first row of the table. Delete the rows B6 – B11 and click in the cell B5.
You can see that the active cell is B5 and the next data set will be placed here.
Stop recording the macro. Your macro for arranging the data is ready.
Running a Macro
You need to run the macro repeatedly to complete the data arrangement in the table as given below.
The active cell is B5. Run the macro. The second data set will be arranged in the second row of the table and the active cell will be B6.
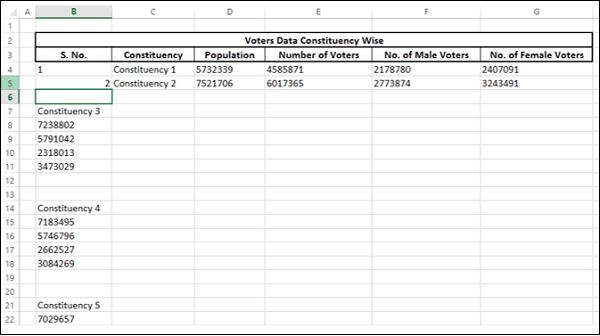
Run the macro again. The third data set will be arranged in the third row of the table and the active cell will become B7.
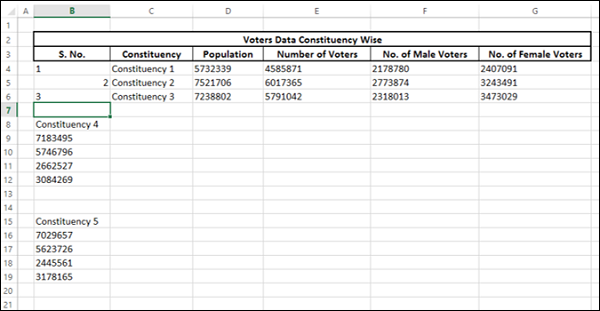
Each time you run the macro, the active cell advances to the next row, facilitating the repetition of recorded steps at the appropriate positions. This is possible because of the relative references in macro.
Run the macro until all the 280 data sets are arranged into 280 rows in the table. This process takes a few seconds and as the steps are automated, the entire exercise is error free.
Excel Macros - VBA
Excel stores the macros as Excel VBA (Visual Basic for Applications) code. After recording a macro, you can view the code that is generated, modify it, copy a part of it, etc. You can even write a macro code yourself if you are comfortable with programming in VBA.
You will learn how to create a macro, by writing a VBA code, in the chapter - Creating a Macro Using VBA Editor. You will learn how to modify a macro by editing VBA code in the chapter - Editing a Macro. You will learn the Excel VBA features in this chapter.
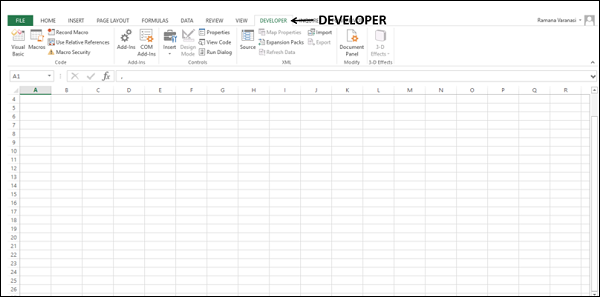
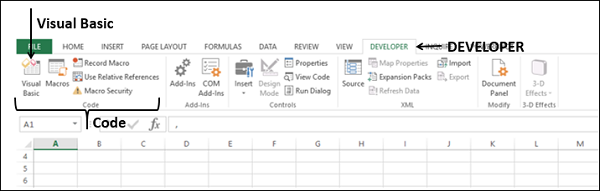
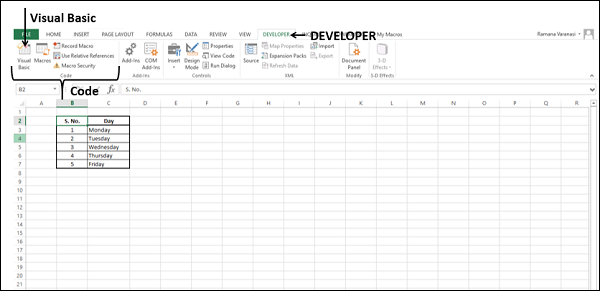
Developer Tab on the Ribbon
You can access macro code in VBA from the Developer tab on the Ribbon.
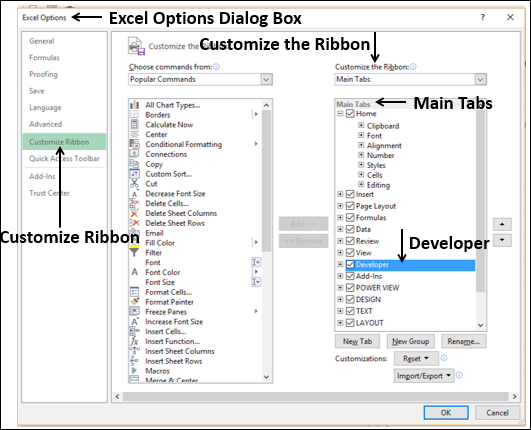
If you do not find the Developer tab on the Ribbon, you need to add it as follows −
Right click on the Ribbon.
Select Customize the Ribbon from the dropdown list.
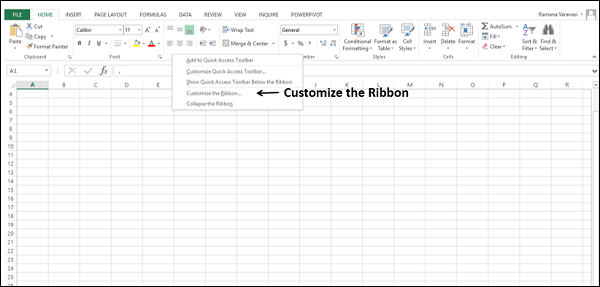
The Excel Options dialog box appears.
Select Main Tabs from Customize the Ribbon dropdown list.
Check the box – Developer in the Main Tabs list and click OK. The developer tab appears.
Developer Commands for Macros
You need to know the commands that are for macros under the developer tab.
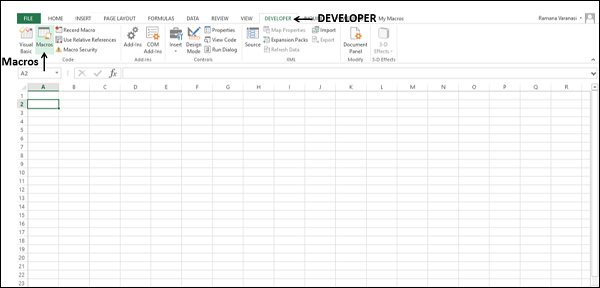
Click the DEVELOPER tab on the Ribbon. The following commands are available in the Code group −
- Visual Basic
- Macros
- Record Macro
- Use Relative References
- Macro Security
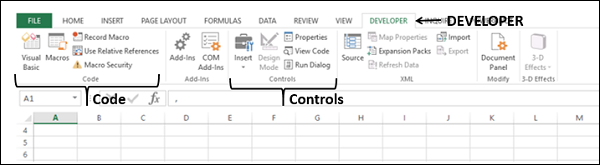
The Visual Basic command is used to open the VBA Editor in Excel and the Macros command is used to view, run and delete the macros.
You have already learnt the commands other than VBA Editor in the previous chapters.
VBA Editor
VBA Editor or VBE is the developer platform for VBA in Excel.
Open the workbook – MyFirstMacro.xlsm that you saved earlier in the chapter – Creating a Simple Macro, in this tutorial.
You can open the VBE in any of the two ways −
Option 1 − Click Visual Basic in the Code group under the Developer tab on the Ribbon.
Option 2 − Click Edit in the Macro dialog box that appears when you click VIEW tab → Macros → View Macros
VBE appears in a new window.
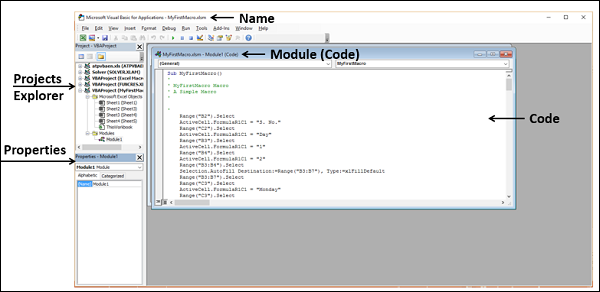
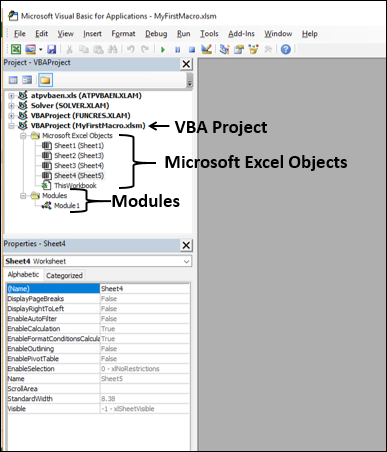
The name of your Excel macro enabled workbook name appears with the prefix – Microsoft Visual Basic for Applications.
You will find the following in the VBE −
- Projects Explorer.
- Properties.
- Module window with Code.
Projects Explorer
Project Explorer is where you find the VBA project names. Under a project, you will find Sheet names and Module names. When you click a module name, the corresponding code appears on the right side in a window.
Properties Window
The Properties are the parameters for VBA objects. When you have an object such as command button, its properties will appear in the Properties window.
Module Window with Code
The code of a macro will be stored in a module in VBA. When you select a macro and click Edit, the code of the macro appears in the corresponding module window.
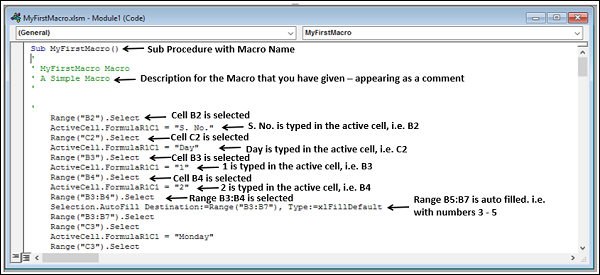
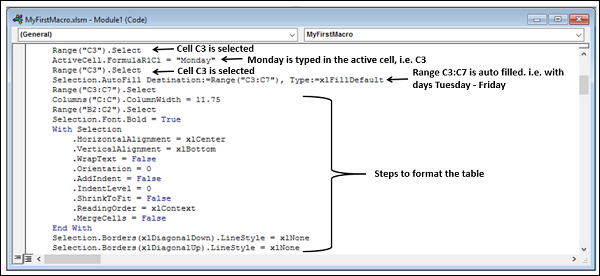
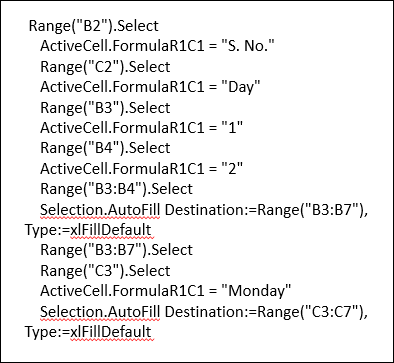
Excel Macros - Understanding Codes
When you record a macro, Excel stores it as a VBA code. You can view this code in the VBA editor. You can understand the code and modify it if you have substantial knowledge of Excel VBA. You can refer to the Excel VBA tutorial in this tutorials library to obtain a grasp on the language.
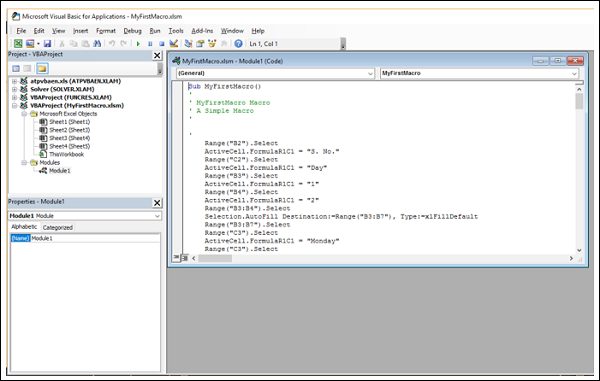
However, you can still view the macro code in Excel VBA editor and match it to the steps that you recorded in macro. You will learn how to view the code and understand it for the first macro that you created in this tutorial – MyFirstMacro.
Viewing a Macro Code in VBA Editor
To view a macro code, do the following −
- Open the workbook in which you stored the macro.
- Click VIEW tab on the Ribbon.
- Click Macros.
- Select View Macros from the dropdown list.

The Macro dialog box appears.
- Click MyFirstMacro in the macros list.
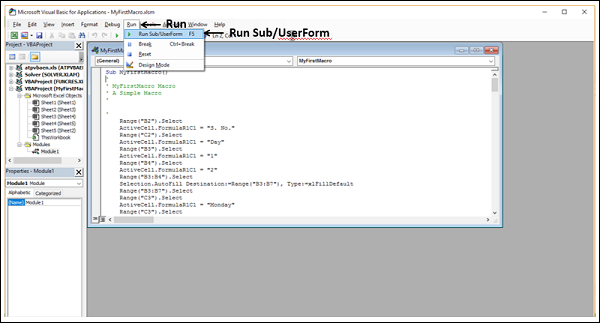
- Click the Edit button.
The VBA editor opens and the code of the macro MyFirstMacro appears.
Understanding the Recorded Actions as Parts of Code
You can browse through the macro code and map them to your recorded steps.
- Start reading the code.
- Map the code to the recorded steps.
Scroll down the code to view more code. Alternatively, you can enlarge the code window.
Observe that the code is simple. If you learn Excel VBA, you can create the macros by writing the code in the VBA editor.
You will learn how to write a VBA code to create a macro in the chapter - Creating a Macro Using VBA Editor.
Excel Macros - Assigning Macros to Objects
Suppose you have created a macro that you need to execute several times. For example, the macros that you have created for absolute references and relative references. Then, it would be easy for you if you can run the macro using a mouse click. You can accomplish this by assigning the macro to an object such as a shape or a graphic or a control.
In this chapter, you will learn how to include an object in your workbook and assign a macro to it.
Recall the macro that you created using relative references. The macro arranges the data given in one column into a table to facilitate data analysis.
Assigning a Macro to a Shape
You can insert a shape in your worksheet that is in a meaningful form with self-explanatory text, which when clicked runs the macro assigned to it.
Click the INSERT tab on the Ribbon.
Click Shapes in the Illustrations group.
Select any of the ready-made shapes that appear in the dropdown list. For example, the Flowchart shape – Preparation, as you are in the process of preparing the data.
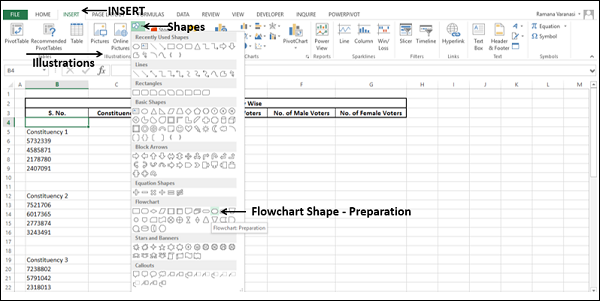
Draw the shape and format it.

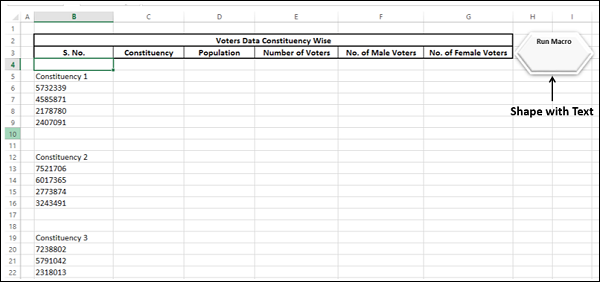
Right click on the shape and select Edit Text from the dropdown list.
Type text inside the shape - Run Macro.
Format the text.
- Right click on the shape.
- Select Assign Macro from the dropdown list.
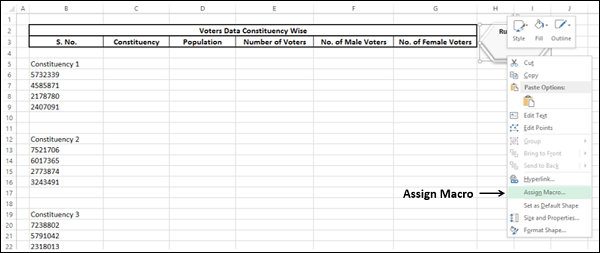
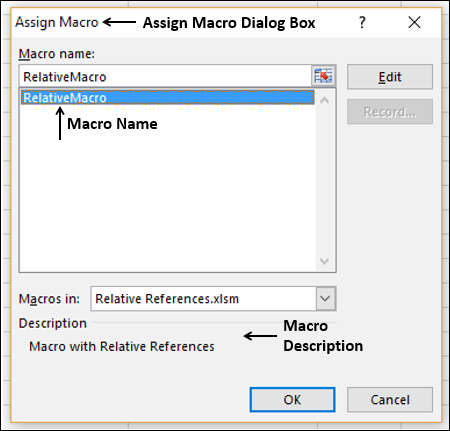
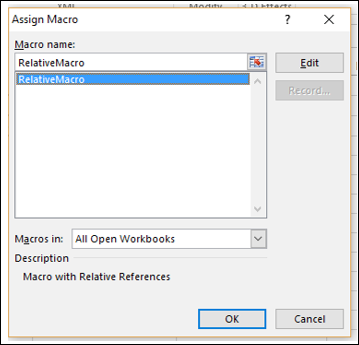
The Assign Macro dialog box appears. Click the macro name i.e. RelativeMacro and click OK.
The macro is assigned to the shape.
Click in the cell where you have to run the macro say B4.
Move the cursor (pointer) onto the shape. The cursor (pointer) changes to finger.
Now click the shape. The macro will run. Just repeat the mouse clicks to run the macro several times and you are done with the task of arranging the data into a table in a matter of a few seconds.
Assigning a Macro to a Graphic
You can insert a graphic in the worksheet and assign a macro to it. The graphic can be chosen to visualize your macro. For example, you can have a graphic of table representing that the macro will arrange the data into a table.
- Click the INSERT tab on the Ribbon.
- Click Pictures in the Illustrations group.
- Select a file that contains your graphic.

The rest of the steps are the same as those of shape given in the previous section.
Assigning a Macro to a Control
Inserting a VBA control and assigning a macro to it makes your work look professional. You can insert VBA controls from the Developer tab on the Ribbon.
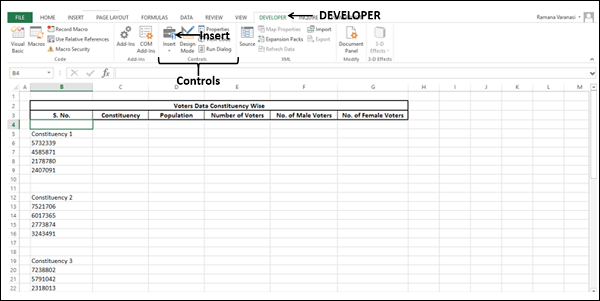
Click the DEVELOPER tab on the Ribbon.
Click Insert in the Controls group.
Select the Button icon under Form Controls from the dropdown list as shown in screenshot given below −
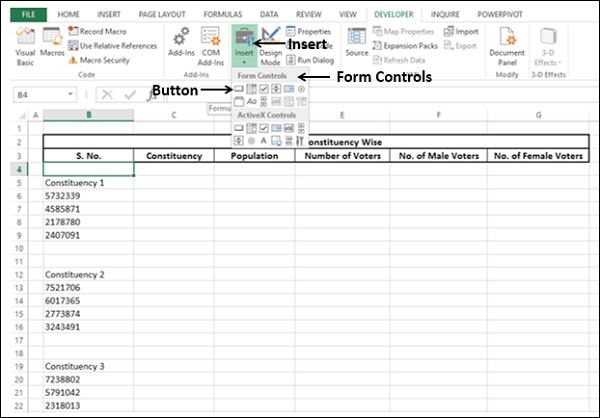
Click the cell on the worksheet where you want to insert the Button control. The Assign Macro dialog box appears.
Click the macro name and click OK.
The control button with the assigned macro will be inserted.
- Right click on the button.
- Click Edit Text.
- Type – Run Macro.
- Format Text and resize Button.
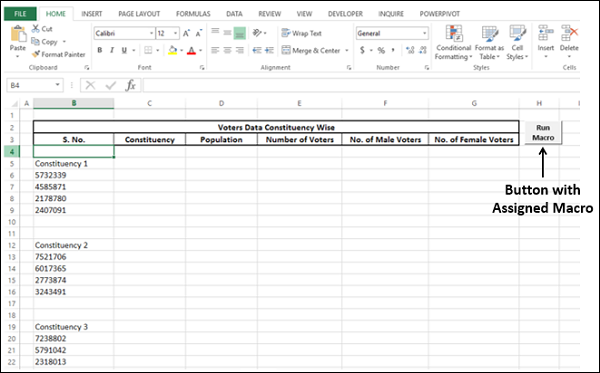
You can run the macro any number of times by just clicking the Button repeatedly.
Using Form Controls is an easy and effective way of interacting with the user. You will learn more about this in the chapter – Interacting with the User.
Excel Macros - Running a Macro
There are several ways of executing a macro in your workbook. The macro would have been saved in your macro enabled workbook or in your Personal macro workbook that you can access from any workbook as you had learnt earlier.
You can run a macro in the following ways −
- Running a Macro from the View Tab
- Running a Macro by pressing Ctrl plus a shortcut key
- Running a Macro by clicking a button on the Quick Access Toolbar
- Running a Macro by clicking a button in a Custom Group on the Ribbon
- Running a Macro by clicking on a Graphic Object
- Running a Macro from Developer Tab
- Running a Macro from VBA Editor
Running a Macro from View Tab
You have already learnt running a macro from the View tab on the Ribbon. A quick recap −
- Click the VIEW tab on the Ribbon.
- Click Macros.
- Select View Macros from the dropdown list.
The Macro dialog box appears.
- Click the macro name.
- Click the Run button.
Running a Macro with Shortcut Key
You can assign a shortcut key (Ctrl + key) for a macro. You can do this while recording the macro in the Create Macro dialog box. Otherwise, you can add this later in the Macro Options dialog box.
Adding a Shortcut Key While Recording a Macro
- Click the VIEW tab.
- Click Macros.
- Select Record Macro from the dropdown list.
The Create Macro dialog box appears.
- Type a macro name
- Type a letter, say q, in the box next to Ctrl + under Shortcut key.
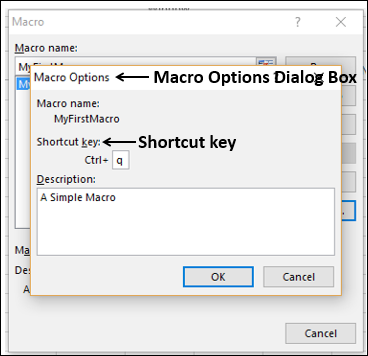
Adding a Shortcut Key in Macro Options
- Click the VIEW tab.
- Click Macros.
- Select View Macros from the dropdown list.
The Macro dialog box appears.
- Select the macro name.
- Click the Options button.
The Macro Options dialog box appears. Type a letter, say q, in the box next to Ctrl + under Shortcut key. Click OK.
To run the macro with the shortcut key, press the Ctrl key and the key q together. The macro will run.
Note − You can use any lowercase or uppercase letters for the shortcut key of a macro. If you use any Ctrl + letter combination that is an Excel shortcut key, you will override it. Examples include Ctrl+C, Ctrl+V, Ctrl+X, etc. Hence, use your jurisdiction while choosing the letters.
Running a Macro through Quick Access Toolbar
You can add a macro button to the Quick Access Toolbar and run the macro by clicking it. This option would be useful when you store your macros in personal macro workbook. The added button will appear on the Quick Access Toolbar in whatever workbook you open, thus making it easy for you to run the macro.
Suppose you have a macro with the name MyMacro in your personal macro workbook.
To add the macro button to the Quick Access Toolbar do the following −
Right click on the Quick Access Toolbar.
Select Customize Quick Access Toolbar from the dropdown list.
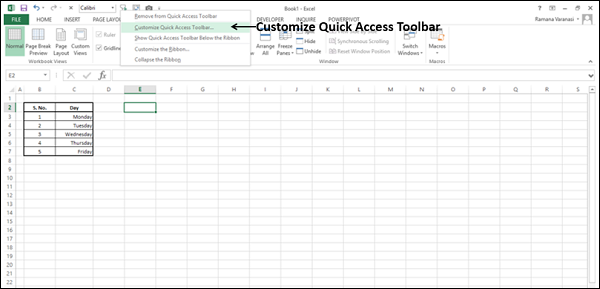
The Excel Options dialog box appears. Select Macros from the dropdown list under the category- Choose commands from.
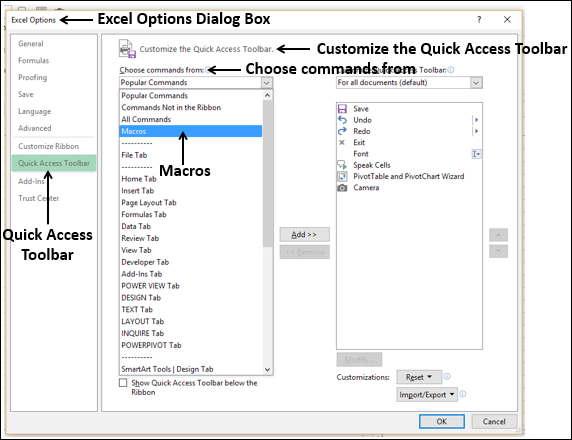
A list of macros appears under Macros.
- Click PERSONAL.XLSB!MyMacro.
- Click the Add button.

The macro name appears on the right side, with a macro button image.
To change the macro button image, proceed as follows −
- Click the macro name in the right box.
- Click the Modify button.
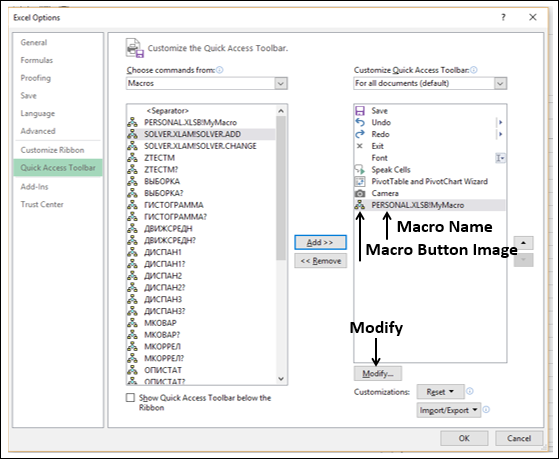
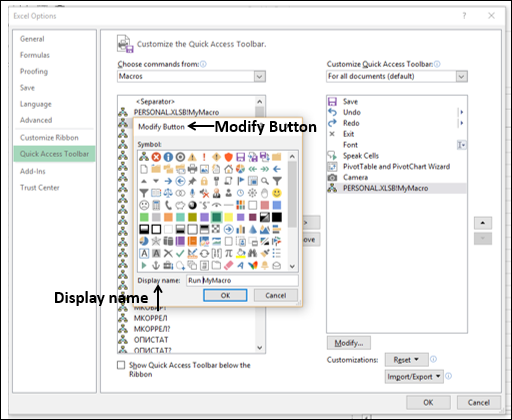
The Modify Button dialog box appears. Select one symbol to set it as the icon of the button.
Modify the Display name that appears when you place the pointer on the Button image on the Quick Access Toolbar to a meaningful name, say, Run MyMacro for this example. Click OK.
The Macro name and the icon symbol change in the right pane. Click OK.
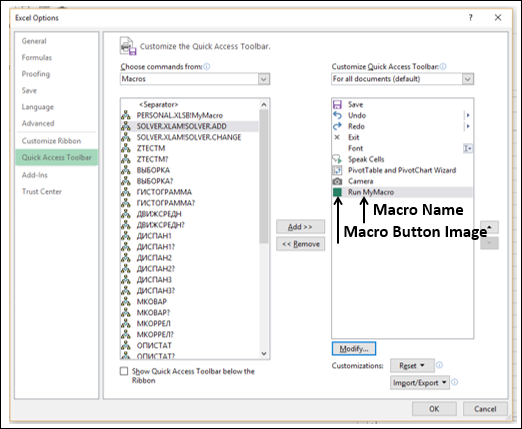
The macro button appears on the Quick Access Toolbar and the macro display name appears when you place the pointer on the button.
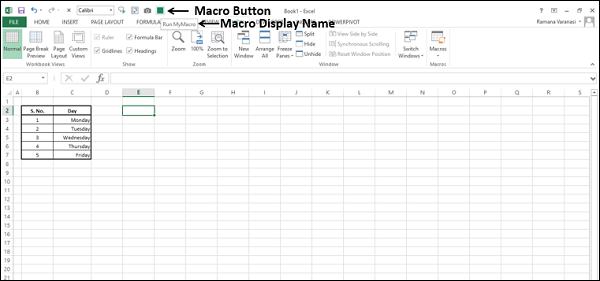
To run the macro, just click the macro button on the Quick Access Toolbar.
Running a Macro in Custom Group
You can add a custom group and a custom button on the Ribbon and assign your macro to the button.
- Right click on the Ribbon.
- Select Customize the Ribbon from the dropdown list.

The Excel Options dialog box appears.
- Select Main Tabs under Customize the Ribbon.
- Click New Tab.
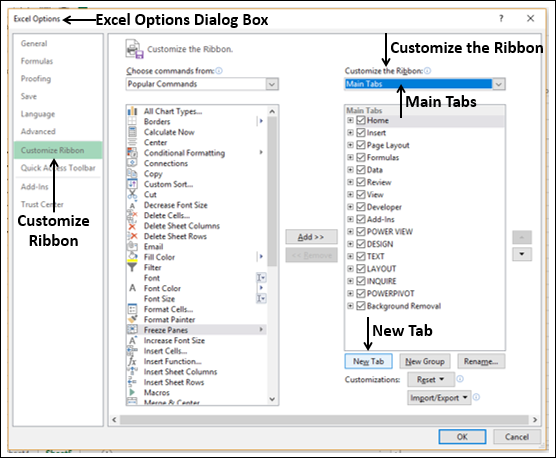
The New Tab (Custom) appears in Main Tabs list.
- Click New Tab (Custom).
- Click the New Group button.
The New Group (Custom) appears under New Tab (Custom).
- Click New Tab (Custom).
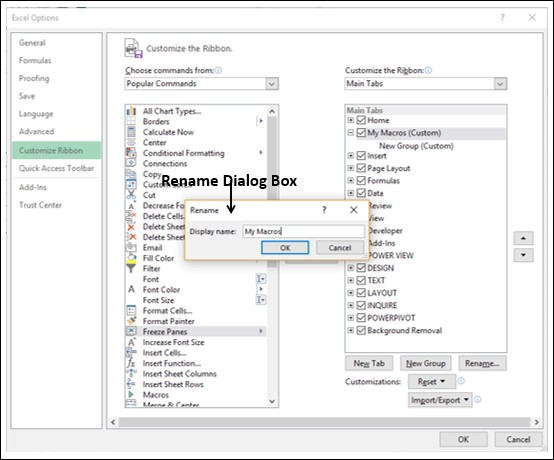
- Click the Rename button.
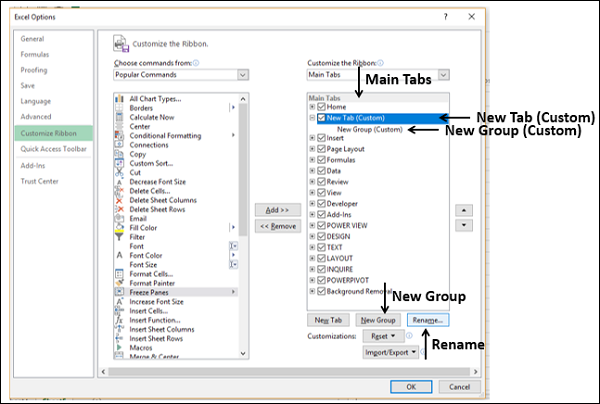
The Rename dialog box appears. Type the name for your custom tab that appears in Main tabs on the Ribbon, say - My Macros and click OK.
Note − All the Main tabs on the Ribbon are in uppercase letters. You can use your discretion to use uppercase or lowercase letters. I have chosen lowercase with capitalization of words so that it stands out in the standard tabs.
The new tab name changes to My Macros (Custom).
- Click New Group (Custom).
- Click the Rename button.
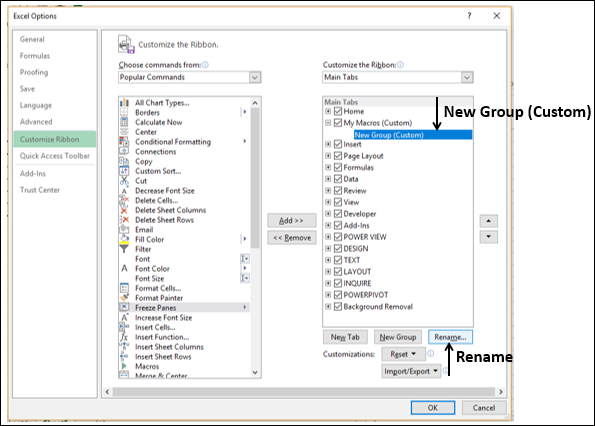
The Rename dialog box appears. Type the group name in the Display name dialog box and click OK.
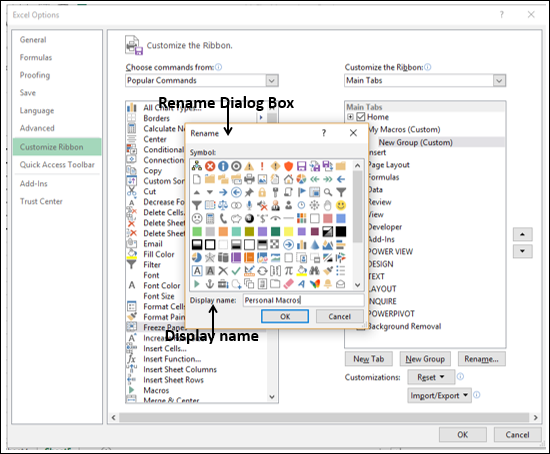
The new group name changes to Personal Macros (custom).
Click Macros in the left pane under Choose commands from.
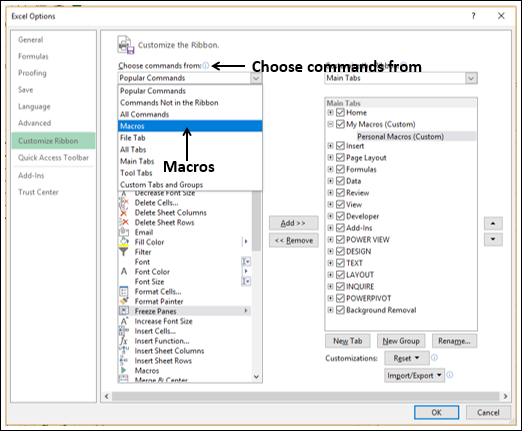
- Select your macro name, say – MyFirstMacro from the macros list.
- Click the Add button.
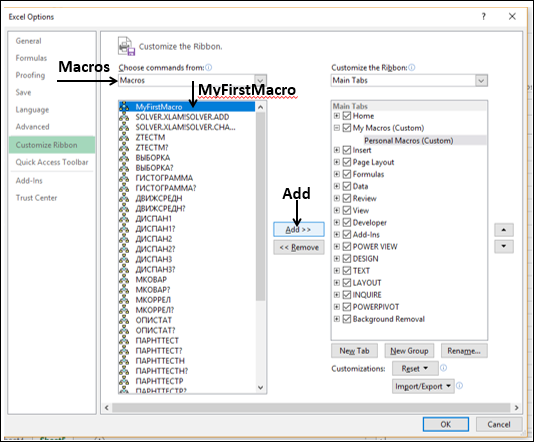
The macro will be added under the Personal Macros (Custom) group.
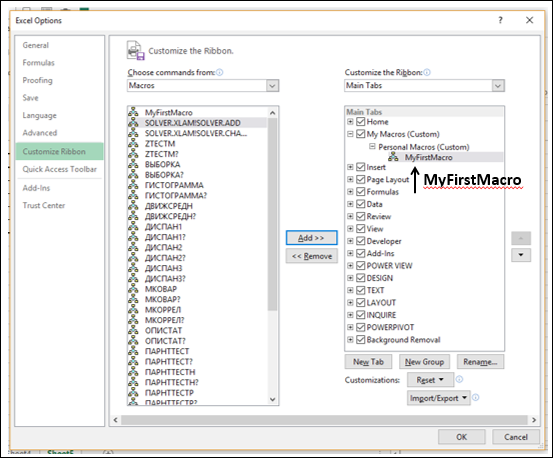
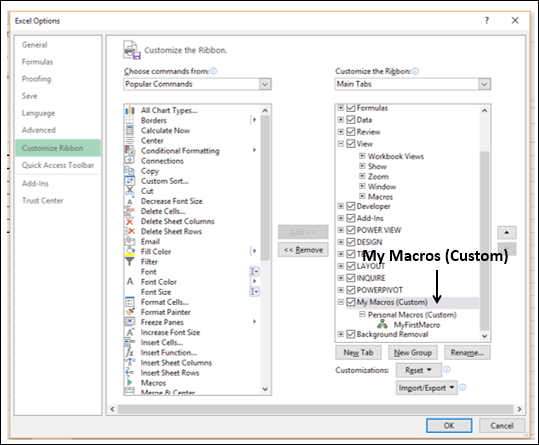
- Click My Macros (Custom) in the list.
- Click the arrows to move the tab up or down.
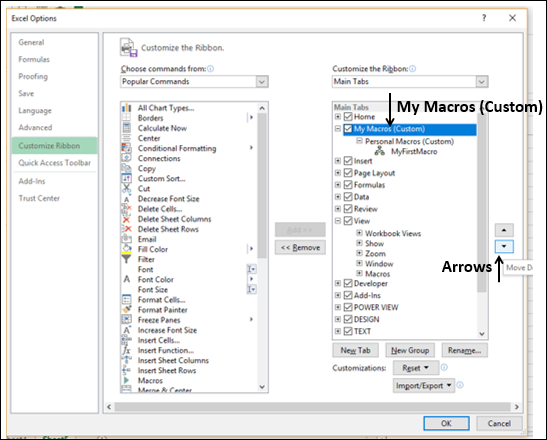
The position of the tab in the main tabs list determines where it will be placed on the Ribbon. Click OK.
Your custom tab – My Macros appears on the Ribbon.
Click the tab - My Macros. Personal Macros group appears on the Ribbon. MyFirstMacro appears in the Personal Macros group. To run the macro, just click on MyFirstMacro in the Personal Macros group.

Running a Macro by Clicking an Object
You can insert an object such as a shape, a graphic or a VBA control in your worksheet and assign a macro to it. To run the macro, just click the object.
For details on running a macro using objects, refer to chapter – Assigning Macros to Objects.
Running a Macro from the Developer Tab
You can run a macro from the Developer tab.
- Click the Developer tab on the Ribbon.
- Click Macros.
The Macro dialog box appears. Click the macro name and then click Run.
Running a Macro from VBA Editor
You can run a macro from the VBA editor as follows −
- Click the Run tab on the Ribbon.
- Select Run Sub/UserForm from the dropdown list.
Creating a Macro Using VBA Editor
You can create a macro by writing the code in the VBA editor. In this chapter, you will learn where and how to write the code for a macro.
VBA Objects and Modules
Before you start coding for a Macro, understand the VBA Objects and Modules.
- Open the macro-enabled workbook with your first macro.
- Click the DEVELOPER tab on the Ribbon.
- Click Visual Basic in the Code group.
The VBA editor window opens.
You will observe the following in the Projects Explorer window −
Your macro enabled workbook – MyFirstMacro.xlsm appears as a VBA Project.
All the worksheets and the workbook appear as Microsoft Excel Objects under the project.
Module1 appears under Modules. Your macro code is located here.
Click Module1.
Click the View tab on the Ribbon.
Select Code from the dropdown list.

The code of your macro appears.
Creating a Macro by Coding
Next, create a second macro in the same workbook – this time by writing VBA code.
You can do this in two steps −
Insert a command button.
Write the code stating the actions to take place when you click the command button.
Inserting a Command Button
Create a new worksheet.
Click in the new worksheet.
Click the DEVELOPER button on the Ribbon.
Click Insert in the Controls group.
Select the button icon from Form Controls.
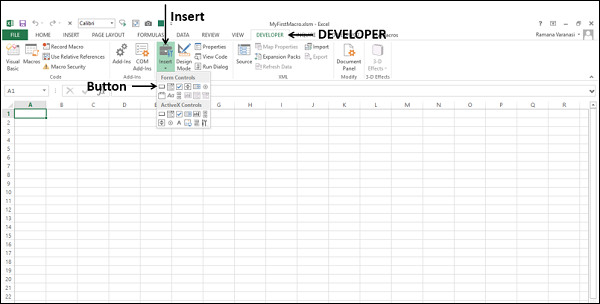
- Click in the worksheet where you want to place the command button.
- The Assign Macro dialog box appears.
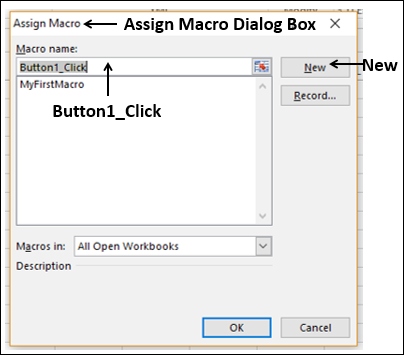
The Visual Basic editor appears.
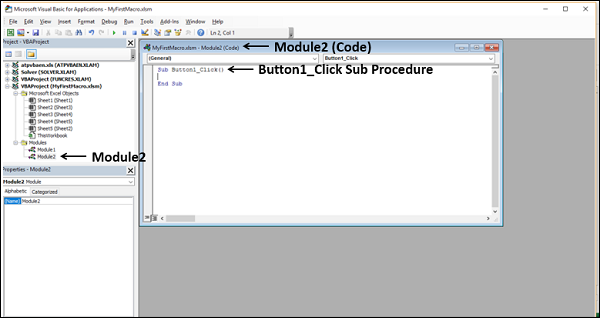
You will observe the following −
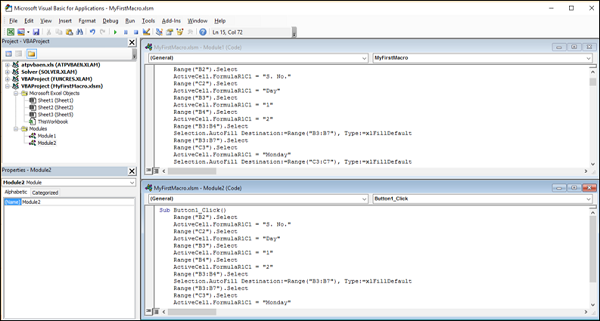
- A new module – Module2 is inserted in the Project Explorer.
- Code window with title Module2 (Code) appears.
- A sub procedure Button1_Click () is inserted in the Module2 code.
Coding the Macro
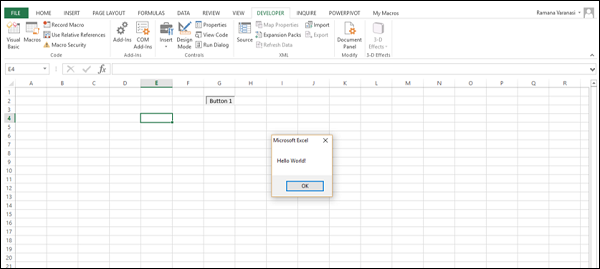
Your coding is half done by the VBA editor itself.
For example, type MsgBox “Best Wishes to You!” in the sub procedure Button1_Click (). A message box with the given string will be displayed when the command button is clicked.
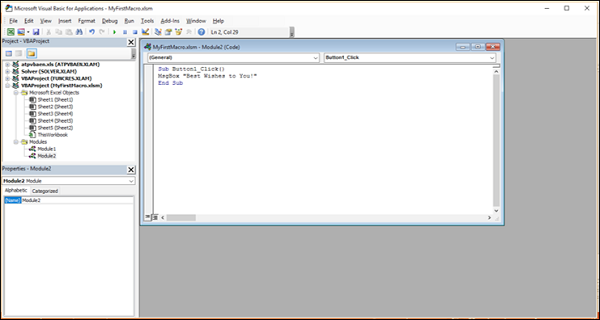
That’s it! Your macro code is ready to run. As you are aware, VBA code does not require compilation as it runs with an interpreter.
Running the Macro from VBA Editor
You can test your macro code from the VBA editor itself.
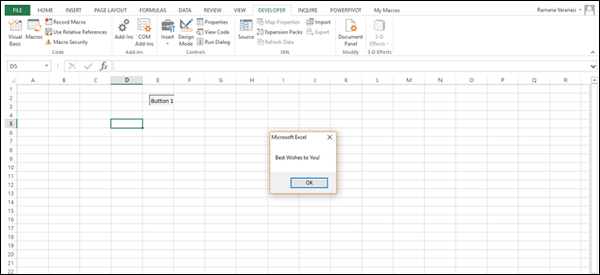
Click the Run tab on the Ribbon.
Select Run Sub/UserForm from the dropdown list. The message box with the string you typed appears in your worksheet.
You can see that the button is selected. Click OK in the message box. You will be taken back to the VBA editor.
Running the Macro from Worksheet
You can run the macro that you coded any number of times from the worksheet.
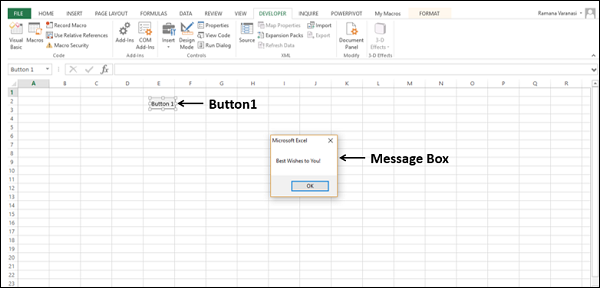
- Click somewhere on the worksheet.
- Click the Button. The Message box appears on the worksheet.
You have created a macro by writing VBA code. As you can observe, VBA coding is simple.
Excel Macros - Editing
You have learnt how to write macro code in VBA editor in the previous chapter. You can edit the macro code, rename a macro and delete a macro.
If you master Excel VBA, writing code or modifying code for a macro is a trivial task. You can edit the macro code however you want. If you want to make only few simple changes in the macro code, you can even copy macro code from one place to another.
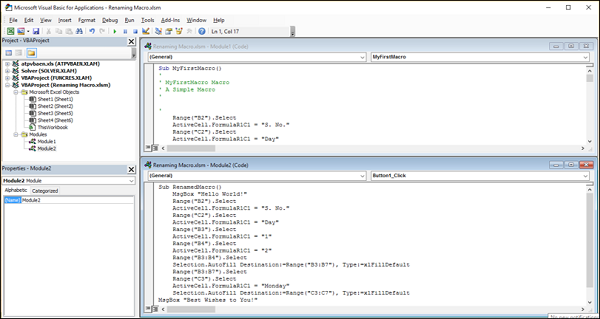
Copying a Macro Code
You have created two macros – MyFirstMacro and Button1_Click in the macro enabled workbook MyFirstMacro.xlsm. You have created the first macro by recording the steps and the second macro by writing code. You can copy code from the first macro into the second macro.
Open the workbook MyFirstMacro.xlsm.
Click the Developer tab on the Ribbon.
Click Visual Basic. The Visual Basic editor opens.
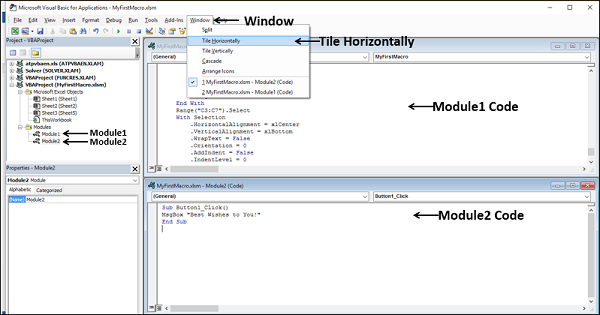
Open the code for Module1 (MyFirstMacro macro code) and Module2 (Button1_Click () macro code).
Click the Window tab on the Ribbon.
Select Tile Horizontally from the dropdown list.
You can view the code of the two macros in the tiled windows.
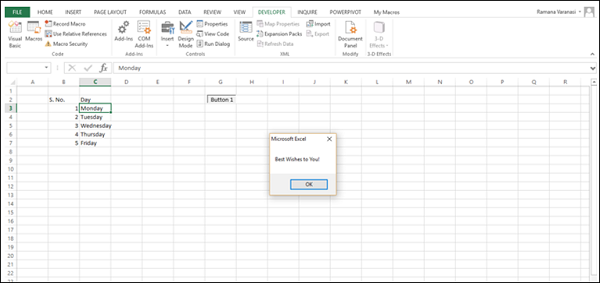
Copy the MsgBox line in the Module2 code.
Paste it above that line.
Modify the string as −
MsgBox “Hello World!”
Copy the following code from Module1.
Paste it in the Module2 code in between the two MsgBox lines of code.
Click the Save icon to save the code.
Click the Button in the Excel sheet. A Message box appears with the message - Hello World! Click OK.
The table data appears (according to the code that you copied) and message box appears with message - Best Wishes to You!
You can modify the code in just a few steps. This is the easiest task for a beginner.
Renaming a Macro
Suppose you want to run the edited macro from any worksheet other than the one that has the command button. You can do it irrespective of button click by renaming the macro.
- Click the VIEW tab on the Ribbon.
- Click Macros.
- Select View Macros from the dropdown list.
The Macro dialog box appears.
- Click the macro name – Button1_Click.
- Click the Edit button.
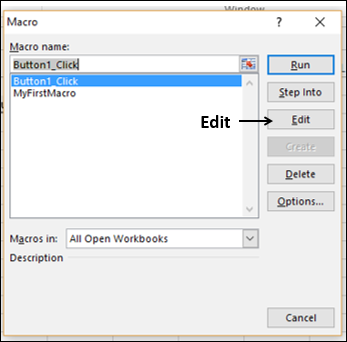
The macro code appears in the VBA editor.
Change the name that appears in the Sub line from Button1_Click to RenamedMacro. Leave Sub and parenthesis as they are.
Open the Macro dialog box. The macro name appears as you renamed.
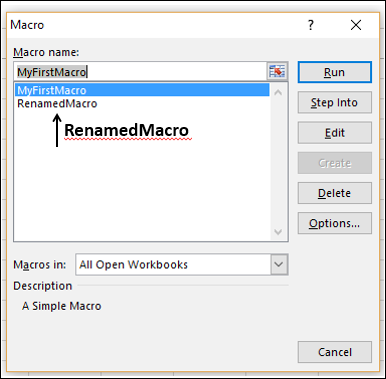
- Click RenamedMacro.
- Click the Run button. The macro runs. Now a button click is not necessary.
Deleting a Macro
You can delete a macro that you have recorded or coded.
- Open the Macros dialog box.
- Click the macro name.
- Click the Delete button.
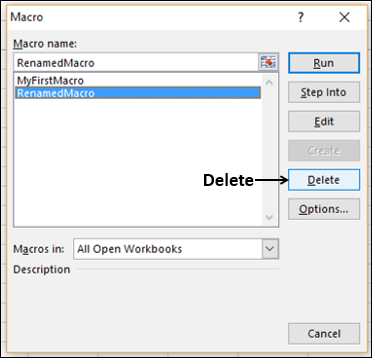
The Delete confirmation message appears.
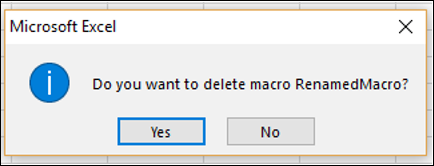
Click Yes if you are sure to delete the macro. Otherwise, click No.
Excel Macros - UserForms
At times, you might have to collect information repeatedly from others. Excel VBA provides you with an easy way of handling this task- UserForm. As any other form that you fill up, UserForm makes it simple to understand, what information is to be provided. UserForm is user friendly in the way that the controls provided are self-explanatory, accompanied by additional instructions where necessary.
Major advantage of UserForm is that you can save on time that you spend on what and how the information is to be filled.
Creating a UserForm
To create a UserForm, proceed as follows −
- Click the DEVELOPER tab on the Ribbon.
- Click Visual Basic. A Visual Basic window for the workbook opens.
- Click Insert,
- Select UserForm from the dropdown list.
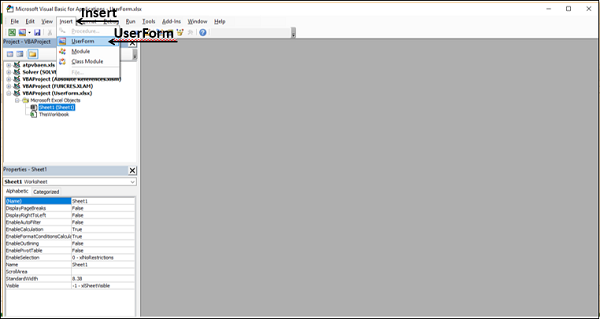
The UserForm appears on the right side of the window.
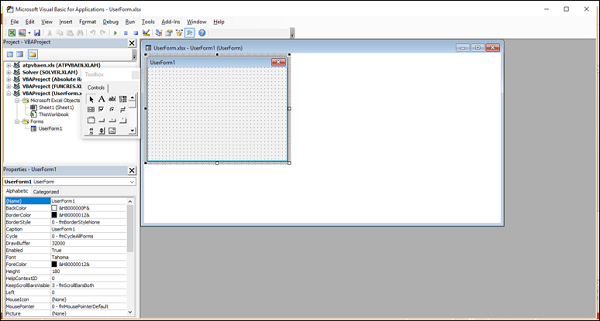
Understanding the UserForm
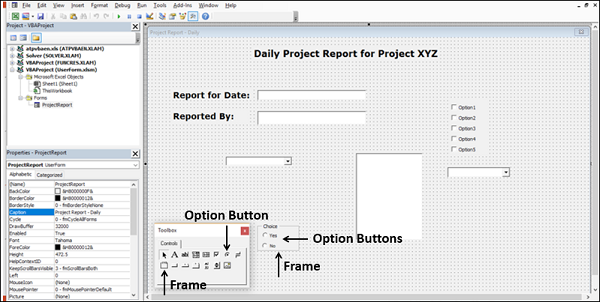
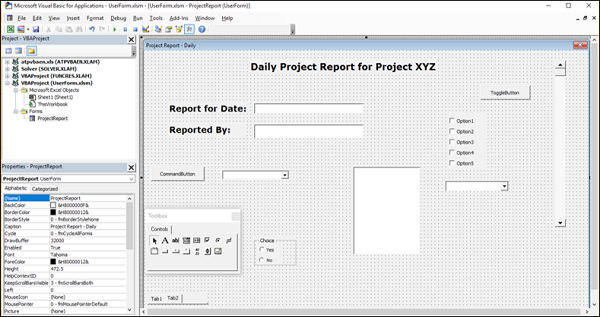
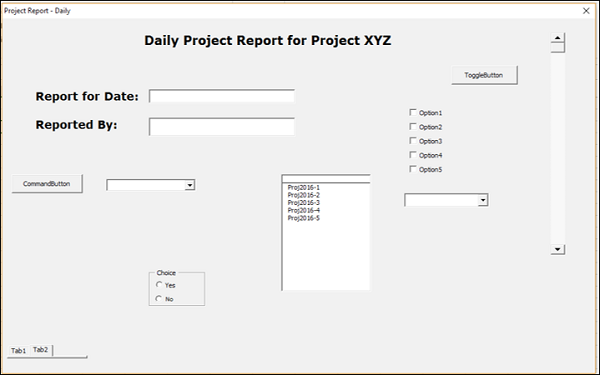
Maximize the UserForm.xlsx – UserForm1 window.
You are in the design mode now. You can insert controls on the UserForm and write code for the respective actions. The controls are available in the ToolBox. Properties of UserForm are in the Properties window. UserForm1 (caption of the UserForm) is given under Forms in the Projects Explorer.
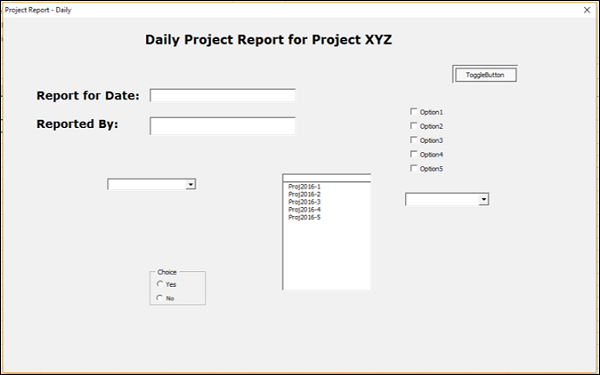
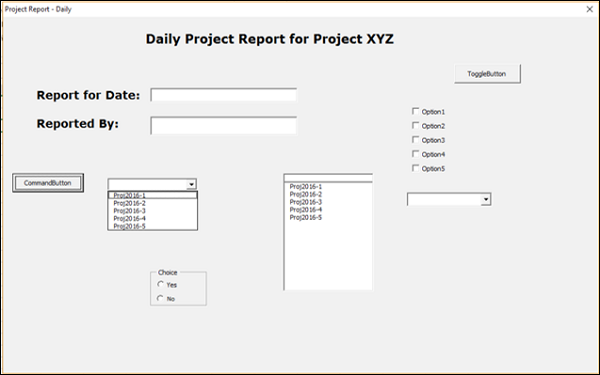
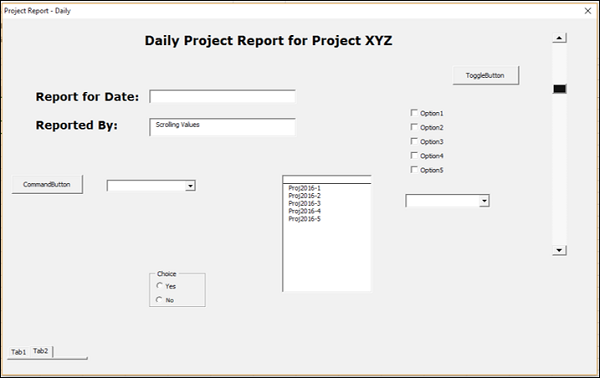
- Change the caption of the UserForm to Project Report – Daily in the properties window.
- Change the name of the UserForm to ProjectReport.
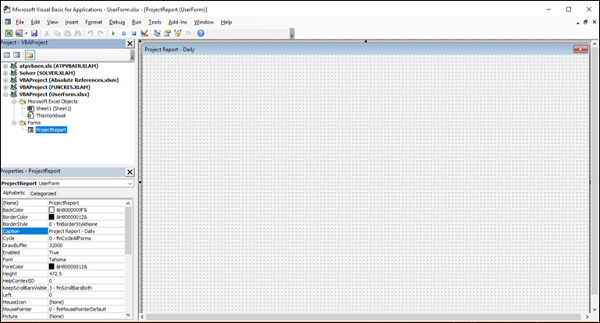
The changes are reflected in the UserForm, properties and project explorer.
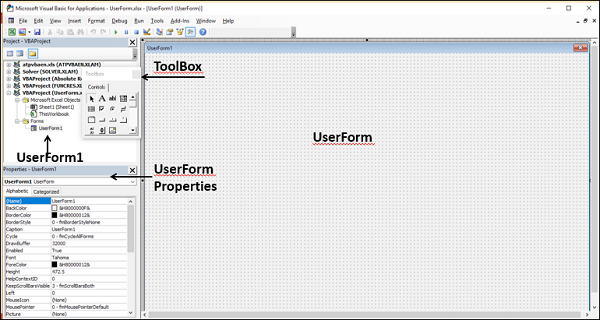
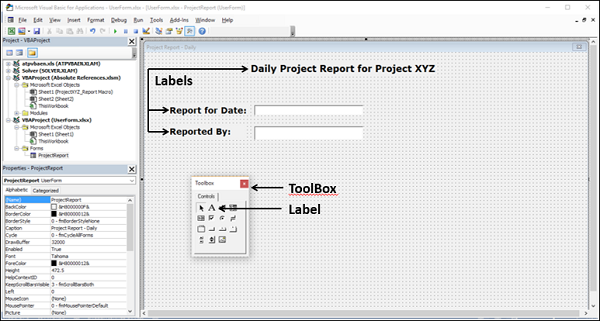
Controls in the ToolBox
A UserForm will have different components. As and when you click on any of the components, either you will be provided with instructions on what and how the information is to be provided or you will be provided with options (choices) to select from. All these are provided by means of ActiveX controls in the ToolBox of the UserForm.
Excel provides two types of controls – Form controls and ActiveX controls. You need to understand the difference between these two types of controls.
Form controls
Form controls are the Excel original controls that are compatible with earlier versions of Excel, starting with Excel version 5.0. Form controls are also designed for use on XLM macro sheets.
You can run macros by using Form controls. You can assign an existing macro to a control, or write or record a new macro. When the control is clicked, the macro. You have already learnt how to insert a command button from Form controls in the worksheet to run a macro. However, these controls cannot be added to a UserForm.
ActiveX controls
ActiveX controls can be used on VBA UserForms. ActiveX controls have extensive properties that you can use to customize their appearance, behavior, fonts and other characteristics.
You have the following ActiveX controls in the UserForm ToolBox −
- Pointer
- Label
- TextBox
- ComboBox
- ListBox
- CheckBox
- OptionButton
- Frame
- ToggleButton
- CommandButton
- TabStrip
- MultiPage
- ScrollBar
- SpinButton
- Image
In addition to these controls, Visual Basic provides you with MsgBox function that can be used to display messages and/or prompt the user for an action.
In the next few sections, you will understand these controls and MsgBox. Then, you will be in a position to choose which of these controls are required to design your UserForm.
Label
You can use Labels for identification purpose by displaying descriptive text, such as titles, captions and / or brief instructions.
Example
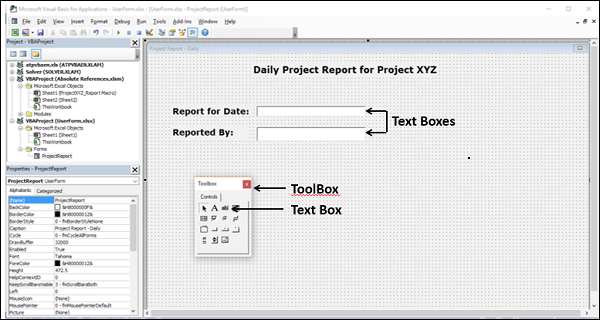
TextBox
You can use a TextBox that is a rectangular box, to type, view or edit text. You can also use a TextBox as a static text field that presents read-only information.
Example
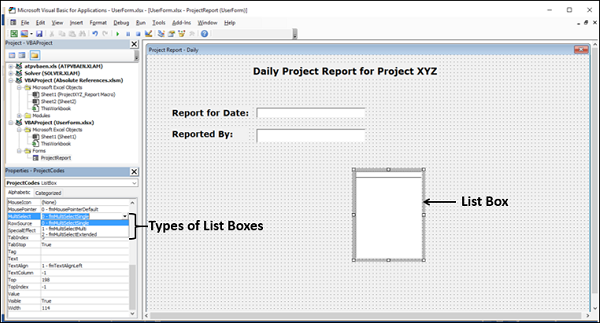
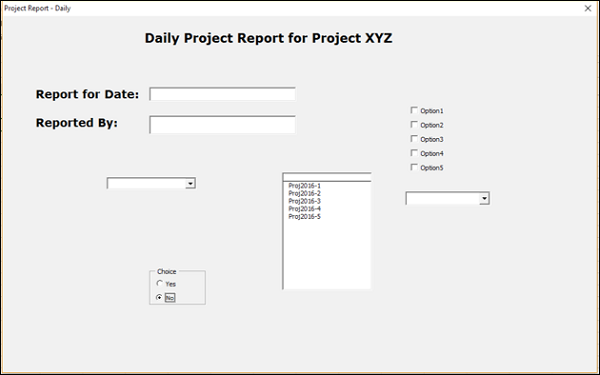
List Box
You can use a List Box to display a list of one or more items of text from which a user can choose. Use a list box for displaying large numbers of choices that vary in number or content.
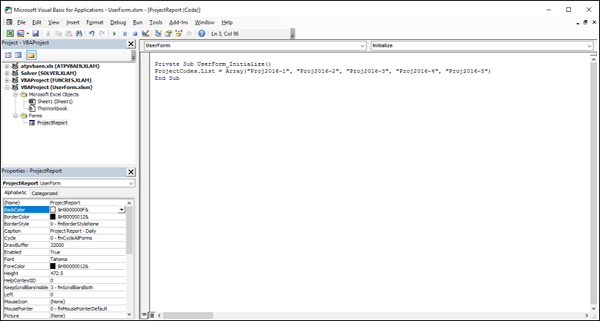
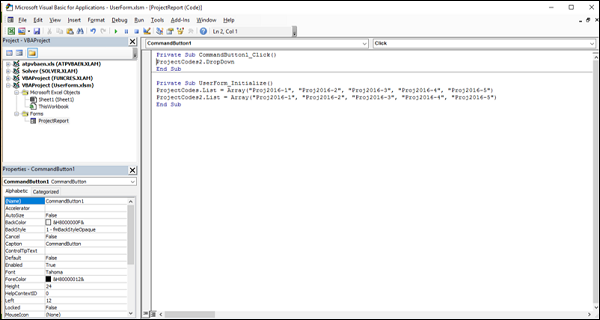
- Insert a ListBox on the UserForm.
- Click on the ListBox.
- Type ProjectCodes for Name in the Properties window of the ListBox.
There are three types of List Boxes −
Single-selection List box − A single-selection List Box enables only one choice. In this case, a list box resembles a group of option buttons, except that a list box can handle a large number of items more efficiently.
Multiple selection List Box − A multiple selection List Box enables either one choice or contiguous (adjacent) choices.
Extended-selection List Box − An extended-selection List Box enables one choice, contiguous choices and noncontiguous (or disjointed) choices.
You can select one of these types of List Boxes, from the Properties window.
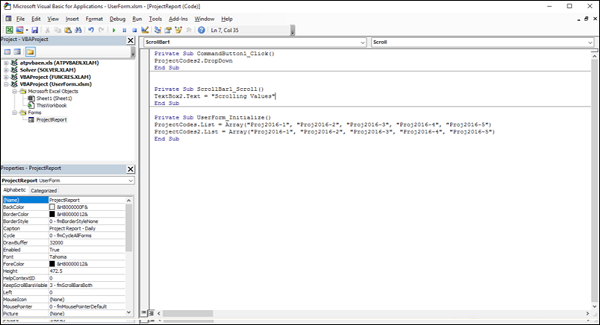
- Right click on the UserForm.
- Select View Code from the dropdown list. The code window of UserForm opens.
- Click Initialize in the top right box of the code window.
- Type the following under Private Sub UserForm_Initialize().
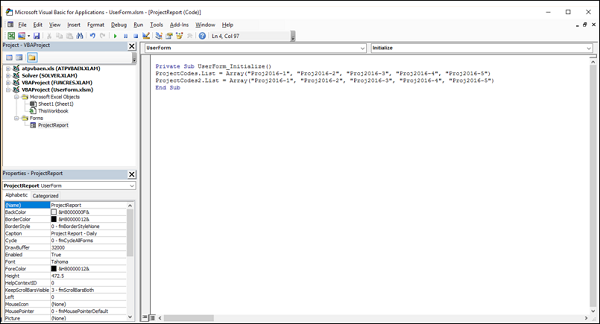
ProjectCodes.List = Array ("Proj2016-1", "Proj2016-2", "Proj2016-3", "Proj20164", "Proj2016-5")
- Click the Run tab on the Ribbon.
- Select Run Sub/UserForm from the dropdown list.
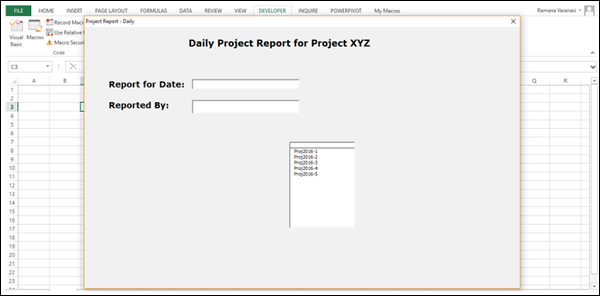
Next, you can write code for actions on selecting an item in the list. Otherwise, you can just display the text that is selected, which is the case for filling the Project Code in the Report.
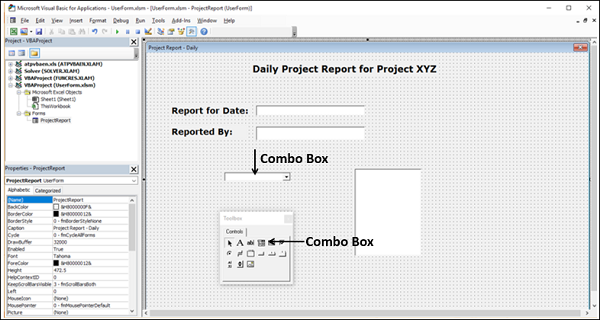
ComboBox
You can use ComboBox that combines a text box with a list box to create a dropdown list box. A combo box is more compact than a list box but requires the user to click the down arrow to display the list of items. Use a combo box to choose only one item from the list.
- Insert a ComboBox on the UserForm.
- Click the ComboBox.
- Type ProjectCodes2 for Name in the Properties window of the ComboBox.
- Right click on the UserForm.
- Select View Code from the dropdown list.
- The code window of UserForm opens.
Type the following as shown below.
ProjectCodes2.List = Array ("Proj2016-1", "Proj2016-2", "Proj2016-3", "Proj20164", "Proj2016-5")
- Click the Run tab on the Ribbon.
- Select Run Sub/UserForm from the dropdown list.
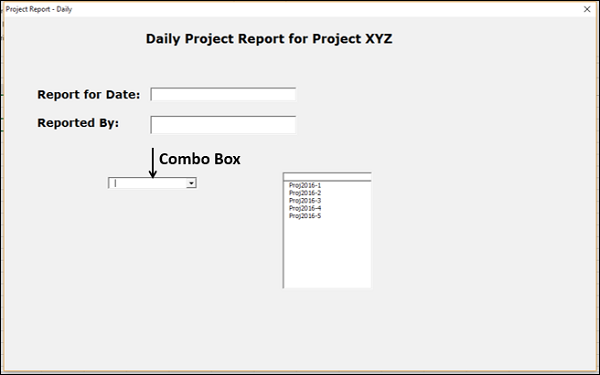
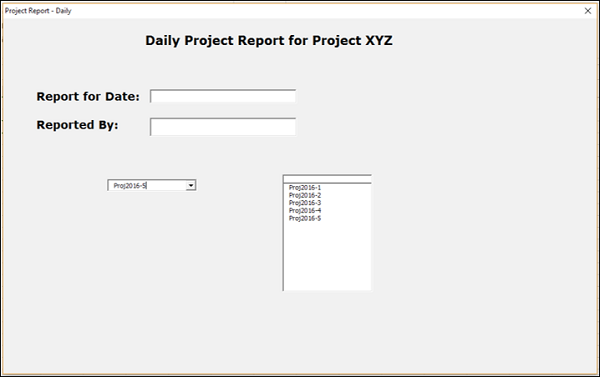
Click the down arrow to display the list of items.
Click on the required item, say, Project2016-5. The selected option will be displayed in the combo box.
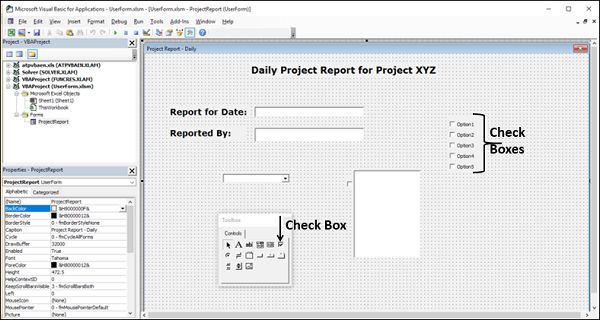
CheckBox
You can use check boxes to select one or more options that are displayed by clicking in the boxes. The options will have labels and you can clearly visualize what options are selected.
A check box can have two states −
- Selected (turned on), denoted by a tick mark in the box
- Cleared (turned off), denoted by a clear box
You can use check boxes for selection of options in a combo box to save space. In such a case, the check box can have a third state also −
Mixed, meaning a combination of on and off states, denoted by a black dot in the box. This will be displayed to indicate multiple selections in the combo box with check boxes.
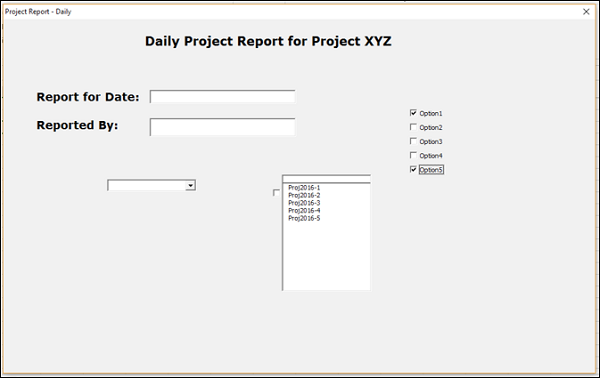
Insert check boxes in the UserForm as shown below.
- Click the Run tab on the Ribbon.
- Select Run Sub/UserForm from the dropdown list.
- Click in the boxes for your selected options.
OptionButton
You can use an option button, also known as the radio button to make a single choice within a limited set of mutually exclusive choices. An option button is usually contained in a group box or a frame.
An option button is represented by a small circle. An option button can have one of the following two states −
- Selected (turned on), denoted by a dot in the circle
- Cleared (turned off), denoted by a blank
Frame
You can use a frame control, also referred to as a group box to group related controls into one visual unit. Typically, option buttons, check boxes or closely related contents are grouped in a frame control.
A frame control is represented by a rectangular object with an optional label.
Insert a frame with caption “Choice”.
Insert two option buttons with captions “Yes” and “No” in the frame control. The options Yes and No are mutually exclusive.
- Click the Run tab on the Ribbon.
- Select Run Sub/UserForm from the dropdown list.
- Click on your selected option.
ToggleButton
You can use a toggle button to indicate a state, such as Yes or No, or a mode, such as on or off. The button alternates between an enabled and a disabled state when it is clicked.
Insert a toggle button on UserForm as shown below −
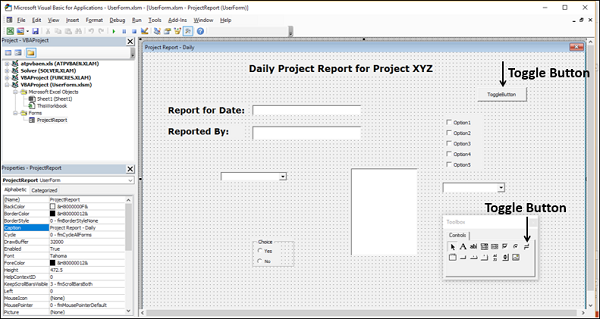
Click the Run tab on the Ribbon.
Select Run Sub/UserForm from the dropdown list. The toggle button will be in enabled state by default.
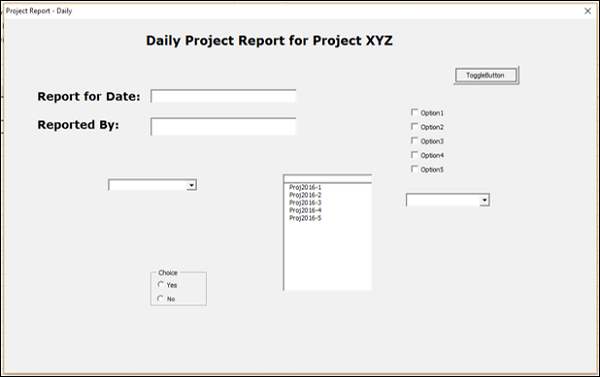
Click the toggle button. The toggle button will be disabled.
If you click the toggle button again, it will be enabled.
CommandButton
You can use a command button to run a macro that performs some actions when the user clicks on it. You have already learnt how to use a command button on a worksheet to run a macro.
Command button is also referred to as a push button. Insert a command button on the UserForm as shown below −
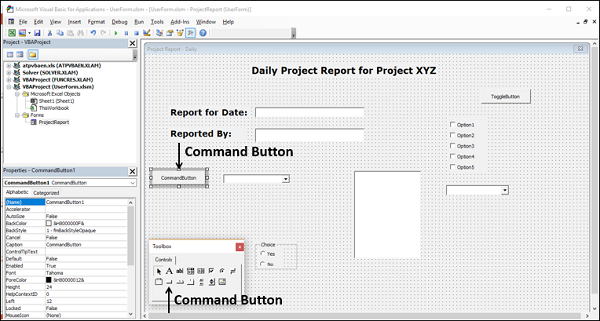
- Right click on the command button.
- Type the following code in the sub Commandbutton1_click ().
ProjectCodes2.DropDown
- Click the Run tab on the Ribbon.
- Select Run Sub/UserForm from the dropdown list.
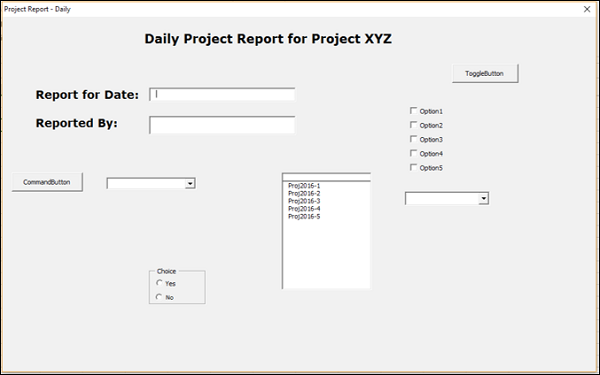
Click the command button. The dropdown list of combo box opens, as it is the action that you have written in the code.
TabStrip
You can insert a tab strip that resembles Excel tabs on the UserForm.
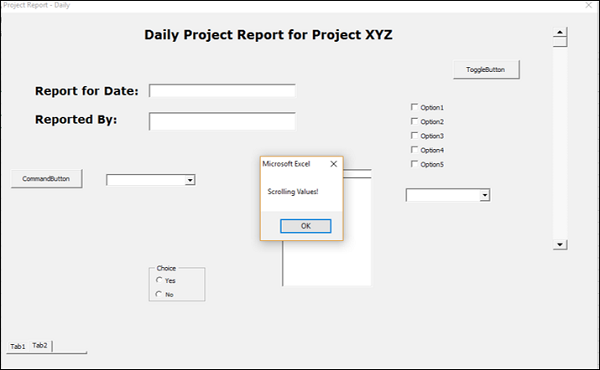
ScrollBar
You can use a scroll bar to scroll through a range of values by clicking on the scroll arrows or by dragging the scroll box.
Insert a scroll bar on the UserForm by drawing it at the required position and adjust the length of the scroll bar.
- Right click on the scroll bar.
- Select View Code from the dropdown list. The Code window opens.
- Add the following line under sub ScrollBar1_Scroll().
TextBox2.Text = "Scrolling Values"
- Click the Run tab on the Ribbon.
- Select Run Sub/UserForm from the dropdown list.
Drag the scroll box. The Text – Scrolling Values will be displayed in the text box as you specified it as the action for scroll bar scroll.
MsgBox ()
You can use the MsgBox () function to display a message when you click on something. It can be a guideline or some information or a warning or an error alert.
For example, you can display a message that values are being scrolled when you start scrolling the scroll box.
Message Box Icon Displays
You can use message-box icon displays that portray the specific message. You have the multiple message box icons to suit your purpose −
- Type the following code under ScrollBar1_scroll.
MsgBox "Select Ok or Cancel", vbOKCancel, "OK  - Cancel Message"
MsgBox "It's an Error!", vbCritical, "Run time result"
MsgBox "Why this value", vbQuestion, "Run time result"
MsgBox "Value Been for a Long Time", vbInformation, "Run time result"
MsgBox "Oh Is it so", vbExclamation, "Run time result"
- Click the Run tab on the Ribbon.
- Select Run Sub/UserForm from the dropdown list.
- Drag the scroll box.
You will get the following message boxes successively.

Designing UserForm
Now, you have an understanding of the different controls that you can use on a UserForm. Select the controls, group them if required and arrange them on the UserForm as per some meaningful sequence. Write the required actions as code corresponding to the respective controls.
Refer to the VBA tutorial in this tutorials library for an example of UserForm.
Excel Macros - Debugging a Code
You have learnt that the macro is stored as VBA code in Excel. You have also learnt that you can directly write code to create a macro in VBA editor. However, as with the case with any code, even the macro code can have defects and the macro may not run as you expected.
This requires examining the code to find the defects and correct them. The term that is used for this activity in software development is debugging.
VBA Debugging
VBA editor allows you to pause the execution of the code and perform any required debug task. Following are some of the debugging tasks that you can do.
- Stepping Through Code
- Using Breakpoints
- Backing Up or Moving Forward in Code
- Not Stepping Through Each Line of Code
- Querying Anything While Stepping Through Code
- Halting the Execution
These are just some of the tasks that you might perform in VBA's debugging environment.
Stepping Through the Code
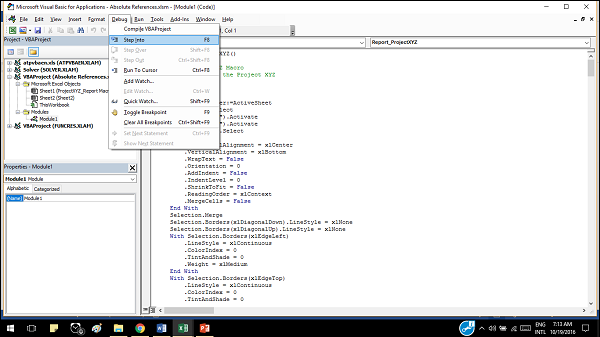
The first thing that you have to do for debugging is to step through the code while executing it. If you have an idea of which part of the code is probably producing the defect, you can jump to that line of the code. Otherwise, you can execute the code line by line, backing up or moving forward in the code.
You can step into the code either from Macro dialog box in your workbook or from the VBA editor itself.
Stepping into the code from the workbook
To step into the code from the workbook, do the following −
- Click the VIEW tab on the Ribbon.
- Click Macros.
- Select View Macros from the dropdown list.
The Macro dialog box appears.
- Click the macro name.
- Click the Step into button.
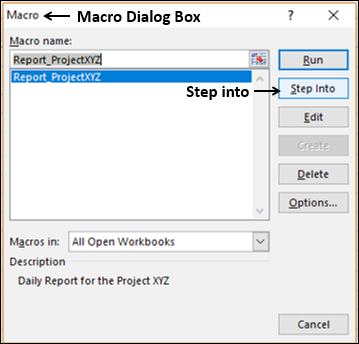
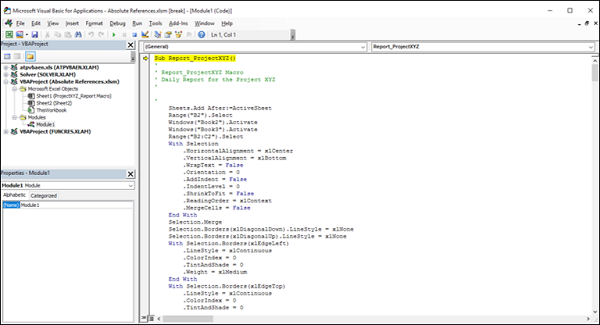
VBA editor opens and the macro code appears in the code window. The first line in the macro code will be highlighted in yellow color.
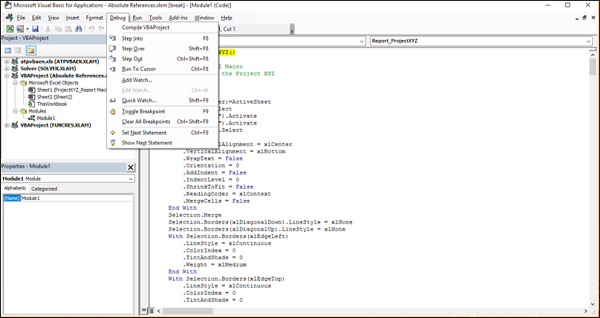
Stepping into the code from the VBA editor
To step into the code from the VBA editor, do the following −
- Click the DEVELOPER tab on the Ribbon.
- Click Visual Basic. The VBA editor opens.
- Click the module that contains the macro code.
The macro code appears in the code window.
Click the Debug tab on the Ribbon.
Select Step into from the dropdown list.
The first line in the macro code will be highlighted. The code is in the debugging mode and the options in the Debug dropdown list will become active.
Backing Up or Moving Forward in the Code
You can move forward or backward in the code by selecting Step Over or Step Out.
Not Stepping Through Each Line of Code
You can avoid stepping through each line code, if you identify a potential part of the code that needs to be discussed, by selecting Run to Cursor.
Using Breakpoints
Alternatively, you can set breakpoints at specific lines of code and execute the code, observing the results at each breakpoint. You can toggle a breakpoint and clear all breakpoints if and when required.
Using Watch
You can add a watch while debugging, to evaluate an expression and stop the execution when a variable attains a specific value. This means that you configure a watch expression, which will be monitored until it is true and then the macro will halt and leave you in break mode. VBA provides you with several watch types to select from, in order to accomplish what you are looking for.
Halting the Execution
During debugging, at any point of time, if you have found a clue on what is going wrong, you can halt the execution to decipher further.
If you are an experienced developer, the debugging terminology is familiar to you and VBA editor debugging options make your life simple. Even otherwise, it will not take much time to master this skill if you have learnt VBA and understand the code.
Excel Macros - Configuring a Macro
You can record a macro and save it with the name Auto_Open to run it whenever you open the workbook that contains this macro.
You can also write VBA code for the same purpose with the Open event of the workbook. The Open event runs the code in the sub procedure Workbook_Open () every time you open the workbook.
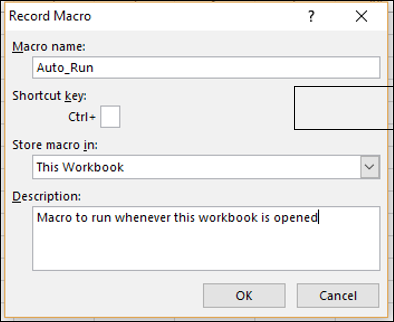
Recording an Auto_Open Macro
You can record an Auto_Run macro as follows −
- Click the VIEW tab on the Ribbon.
- Click Macros.
- Click Record Macro. The Record Macro dialog box appears.
- Type Auto_Run for the macro name.
- Type a description and click OK.
- Start recording the macro.
- Stop Recording.
- Save the workbook as macro enabled workbook.
- Close the workbook.
- Open the workbook. The macro Auto_Run will run automatically.
If you want Excel to start without running an Auto_Open macro, hold the SHIFT key when you start Excel.
Limitations of Auto_Open Macro
The following are the limitations of Auto_Open macro −
If the workbook in which you saved the Auto_Open macro contains code for workbook Open event, the code for the Open event will override the actions in the Auto_Open macro.
An Auto_Open macro is ignored when the workbook is opened by running code that uses the Open method.
An Auto_Open macro runs before any other workbooks open. Hence, if you record actions that you want Excel to perform on the default Book1 workbook or on a workbook that is loaded from the XLStart folder, the Auto_Open macro will fail when you restart Excel, because the macro runs before the default and startup workbooks open.
If you encounter any of these limitations, instead of recording an Auto_Open macro, you must write a code for the Open event as described in the next section.
VBA Code for Open Event of a Workbook
You can write code that will get executed when you open a workbook. VBA provides you with an event called open that incorporates a VBA procedure for the actions to be done on opening a workbook.
Open the workbook in which you stored the macro that you have written for the absolute references – Report_ProjectXYZ. When this macro is run, a new worksheet will be added in the workbook and the project report structure appears on the new worksheet.
You can write a macro code that will perform these actions when you open the workbook. That means when you open the Project Report workbook, a new worksheet with the report structure will be ready for you to enter the details.
Follow the below given procedure in VBA editor−
Double click on ThisWorkbook in Projects Explorer.
In the code window, select Workbook in the left dropdown list and Open in the right dropdown list. Sub Workbook_Open () appears.
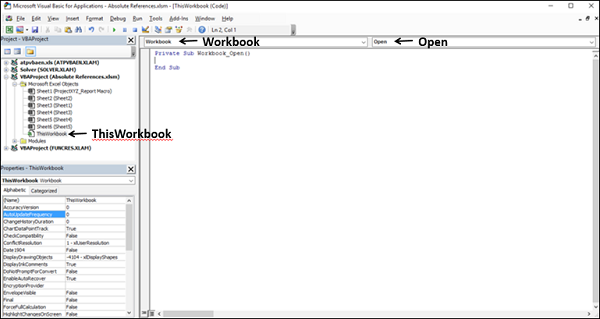
Click Modules in the Projects Explorer.
Double click on the module name that contains the macro code.
Copy the macro code from the module and paste it in the Sub WorkBook_Open ().
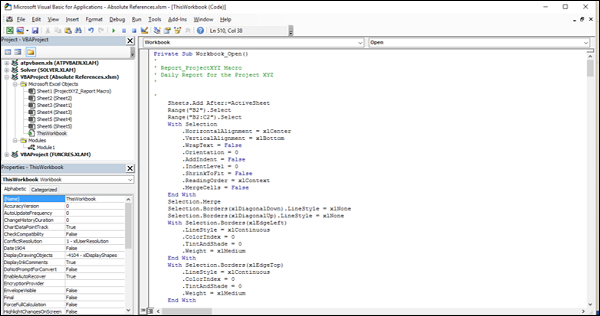
Save the macro-enabled workbook. Open it again. The macro runs and a new worksheet with the report structure is inserted.