- Excel DAX Tutorial
- DAX - Home
- DAX - Overview
- DAX - Calculated Columns
- DAX - Calculated Fields / Measures
- DAX - Editing a Calculated Field
- DAX - Deleting a Calculated Field
- DAX - Syntax
- DAX - Operators
- DAX - Standard Parameters
- DAX - Functions
- DAX - Understanding DAX Functions
- DAX - Evaluation Context
- DAX - Formulas
- Updating Results of DAX Formulas
- Updating Data in the Data Model
- DAX - Recalculating DAX Formulas
- Troubleshooting DAX Formula Recalculation
- DAX - Formula Errors
- DAX - Time Intelligence
- DAX - Filter Functions
- DAX - Scenarios
- Performing Complex Calculations
- DAX - Working with Text and Dates
- Conditional Values & Testing for Errors
- DAX - Using Time Intelligence
- DAX - Ranking & Comparing Values
- Excel DAX Useful Resources
- DAX - Quick Guide
- DAX - Useful Resources
- DAX - Discussion
Excel DAX - Formulas
DAX is a formula language for creating custom calculations in Power PivotTables. You can use the DAX functions that are designed to work with relational data and perform dynamic aggregation in DAX formulas.
DAX formulas are very similar to Excel formulas. To create a DAX formula, you type an equal sign, followed by a function name or expression and any required values or arguments.
DAX Functions vs. DAX Formulas
DAX formulas can include DAX functions and leverage their usage. This is where DAX formulas tend to differ from DAX functions in important ways.
A DAX function always reference a complete column or a table. If you want to use only particular values from a table or column, you can add filters to the formula.
If you want to customize calculations on a row by row basis, Power Pivot provides functions that let you use the current row value or a related value to perform calculations that vary by context.
DAX includes a type of function that returns a table as its result, rather than a single value. These functions can be used to provide input to other functions, thus calculating values for entire tables or columns.
Some DAX functions provide time intelligence, which lets you create calculations using meaningful ranges of dates and compare the results across parallel periods.
Understanding DAX Formula Syntax
Every DAX formula has the following syntax −
Each formula must begin with an equal sign.
To the right of the equal sign, you can either type or select a function name, or type an expression. The expression can contain table names and column names connected by DAX operators.
Following are some valid DAX formulas −
- [column_Cost] + [column_Tax]
- = Today ()
Understanding IntelliSense Feature
DAX provides the IntelliSense feature that will enable you to write DAX formulas promptly and correctly. With this feature, you need not type the table, column, and function names completely, but select the relevant names from the dropdown list while writing a DAX formula.
Begin to type the first few letters of the function name. AutoComplete displays a list of available functions with the names beginning with those letters.
Place the pointer on any of the function names. IntelliSense tooltip will be displayed giving you the use of the function.
Click the function name. The function name appears in the formula bar and the syntax is displayed, which will guide you as you select the arguments.
Type the first letter of the table name that you want. AutoComplete displays a list of available tables and columns with the names beginning with that letter.
Press TAB or click the name to add an item from the AutoComplete list to the formula.
Click the Fx button to display a list of available functions. To select a function from the dropdown list, use the arrow keys to highlight the item and click OK to add the function to the formula.
Supply the arguments to the function by selecting them from a dropdown list of possible tables and columns or by typing in required values.
Usage of this handy IntelliSense feature is highly recommended.
Where to Use DAX Formulas?
You can use DAX formulas in creating calculated columns and calculated fields.
You can use DAX formulas in calculated columns, by adding a column and then typing an expression in the formula bar. You create these formulas in the PowerPivot window.
You can use DAX formulas in calculated fields. You create these formulas −
In the Excel window in the Calculated Field dialog box, or
In the Power Pivot window in the calculation area of a table.
The same formula can behave differently depending on whether the formula is used in a calculated column or a calculated field.
In a calculated column, the formula is always applied to every row in the column, throughout the table. Depending on the row context, the value might change.
In a calculated field, however, the calculation of results is strongly dependent on the context. That is, the design of the PivotTable and the choice of row and column headings affects the values that are used in calculations.
It is important to understand the concept of context in DAX to write DAX formulas. This can be a bit difficult in the beginning of your DAX journey, but once you get a grasp on it, you can write effective DAX formulas that are required for complex and dynamic data analysis. For details, refer to the chapter – DAX Context.
Creating a DAX Formula
You have already learnt about the IntelliSense feature in a previous section. Remember to use it while creating any DAX formula.
To create a DAX formula, use the following steps −
Type an equal sign.
To the right of the equal sign, type the following −
Type the first letter of a function or table name and select the complete name from the dropdown list.
If you have chosen a function name, type parenthesis ‘(‘.
If you have chosen the table name, type bracket ‘[‘. Type the first letter of the column name and select the complete name from the dropdown list.
Close the column names with ‘]’ and function names with ‘)’.
Type a DAX operator between expressions or type ‘,’ to separate function arguments.
Repeat steps 1 - 5 till the DAX formula is complete.
For example, you want to find the total sales amount in the East region. You can write a DAX formula as shown below. East_Sales is the name of the table. Amount is a column in the table.
SUM ([East_Sales[Amount])
As already discussed in the chapter – DAX Syntax, it is a recommended practice to use the table name along with the column name in every reference to any column name. This is termed as – “the fully qualified name”.
The DAX formula can vary based on whether it is for a calculated field or calculated column. Refer to the sections below for details.
Creating a DAX Formula for a Calculated Column
You can create a DAX formula for a calculated column in the Power Pivot window.
- Click the tab of the table in which you want to add the calculated column.
- Click the Design tab on the Ribbon.
- Click Add.
- Type the DAX formula for the calculated column in the formula bar.
= DIVIDE (East_Sales[Amount], East_Sales[Units])
This DAX formula does the following for every row in the table East_Sales −
Divides the value in Amount column of a row by the value in Units column in the same row.
Places the result in the new added column in the same row.
Repeats steps 1 and 2 iteratively till it completes all the rows in the table.
You have added a column for Unit Price at which those units are sold with the above formula.
As you can observe, calculated columns require computation and storage space as well. Hence, use calculated columns only if necessary. Use calculated fields where possible and sufficient.
Refer to the chapter - Calculated Columns for details.
Creating a DAX Formula for a Calculated Field
You can create a DAX formula for a calculated field either in the Excel window or in the Power Pivot window. In the case of calculated field, you need to provide the name beforehand.
To create a DAX formula for a calculated field in the Excel window, use the Calculated Field dialog box.
To create a DAX formula for a calculated field in the Power Pivot window, click a cell in the calculation area in the relevant table. Start the DAX formula with CalculatedFieldName:=.
For example, Total East Sales Amount:=SUM ([East_Sales[Amount])
If you use Calculated Field dialog box in the Excel window, you can check the formula before you save it and make it as a mandatory habit to ensure the use of correct formulas.
For more details on these options, refer to the chapter – Calculated Fields.
Creating DAX Formulas Using the Formula Bar
Power Pivot window also has a formula bar that is like Excel window formula bar. Formula bar makes it easier to create and edit formulas, using the AutoComplete functionality so as to minimize syntax errors.
To enter the name of a table, begin typing the name of the table. Formula AutoComplete provides a dropdown list containing valid table names that begin with those letters. You can start with one letter and type more letters to narrow down the list if required.
To enter the name of a column, you can select it from the list of column names in the selected table. Type a bracket ‘[‘, to the right of the table name, and then choose the column from the list of columns in the selected table.
Tips for Using AutoComplete
Following are some tips for using AutoComplete −
You can nest functions and formulas in a DAX formula. In such a case, you can use Formula AutoComplete in the middle of an existing formula with nested functions. The text immediately before the insertion point is used to display values in the dropdown list and all of the text after the insertion point remains unchanged.
Defined names that you create for constants do not get displayed in the AutoComplete dropdown list, but you can still type them.
The closing parenthesis of functions is not automatically added. You need to do it by yourself.
You must make sure that each function is syntactically correct.
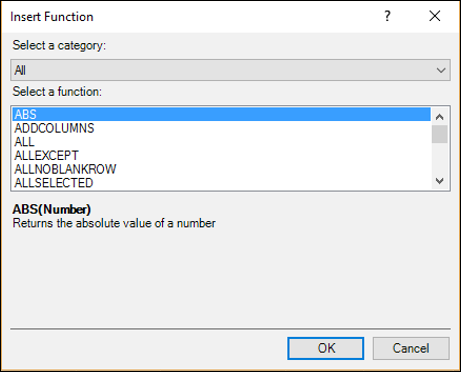
Understanding Insert Function Feature
You can find the Insert Function button labelled as fx, both in the Power Pivot window and Excel window.
The Insert Function button in the Power Pivot window is to the left of formula bar.
The Insert Function button in the Excel window is in the Calculated Field dialog box to the right of Formula.
When you click on the fx button, Insert Function dialog box appears. The Insert Function dialog box is the easiest way to find a DAX function that is relevant to your DAX formula.
The Insert Function dialog box helps you select functions by category and provides short descriptions for each function.
Using Insert Function in a DAX Formula
Suppose you want to create the following calculated field −
Medal Count: = COUNTA (]Medal])
You can use Insert Function dialog box using the following steps −
- Click the calculation area of the Results table.
- Type the following in the formula bar −
Medal Count: =
- Click the Insert Function button (fx).
Insert Function dialog box appears.
Select Statistical in the Select a category box as shown in the following screenshot.
Select COUNTA in the Select a function box as shown in the following screenshot.
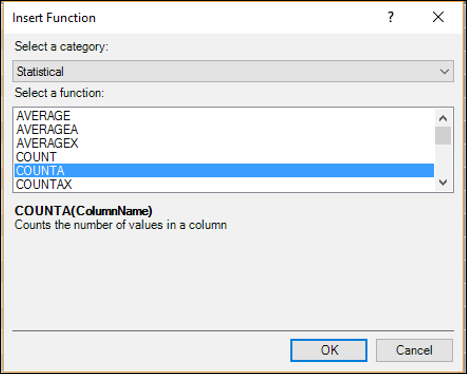
As you can observe, the selected DAX function syntax and the function description are displayed. This enables you to make sure that it is the function that you want to insert.
Click OK. Medal Count:=COUNTA( appears in the formula bar and a tooltip displaying the function syntax also appears.
Type [. This means you are about to type a column name. The names of all the columns and the calculated fields in the current table will be displayed in the dropdown list. You can use IntelliSense to complete the formula.
Type M. The displayed names in the dropdown list will be limited to those starting with ‘M’.
Click Medal.
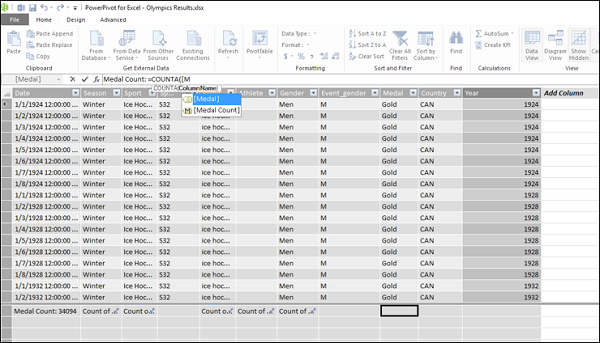
Double-click Medal. Medal Count: = COUNTA([Medal] will be displayed in the formula bar. Close the parenthesis.
Press Enter. You are done. You can use the same procedure to create a calculated column also. You can also follow the same steps to insert a function in the Calculated Field dialog box in the Excel window using the Insert Function feature.
Click the Insert Function (fx) button to the right of Formula.
Insert Function dialog box appears. The rest of the steps are the same as above.
Using Multiple Functions in a DAX Formula
DAX formulas can contain up to 64 nested functions. But, it is unlikely that a DAX formula contains so many nested functions.
If a DAX formula has many nested functions, it has the following disadvantages −
- The formula would be very difficult to create.
- If the formula has errors, it would be very difficult to debug.
- The formula evaluation would not be very fast.
In such cases, you can split the formula into smaller manageable formulas and build the large formula incrementally.
Creating a DAX Formula Using Standard Aggregations
When you perform data analysis, you will perform calculations on aggregated data. There are several DAX aggregation functions, such as SUM, COUNT, MIN, MAX, DISTINCTCOUNT, etc. that you can use in DAX formulas.
You can automatically create formulas using standard aggregations by using the AutoSum feature in the Power Pivot window.
- Click the Results tab in the Power Pivot window. Results table will be displayed.
- Click the Medal column. The entire column – Medal will be selected.
- Click the Home tab on the Ribbon.
- Click the down arrow next to AutoSum in the Calculations group.
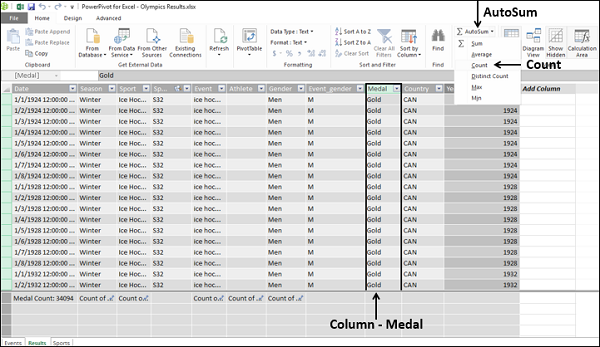
- Click COUNT in the dropdown list.

As you can observe, the calculated field Count of Medal appears in the calculation area below the column – Medal. The DAX formula also appears in the formula bar −
Count of Medal: = COUNTA([Medal])
The AutoSum feature has done the work for you – created the calculated field for data aggregation. Further, AutoSum has taken the appropriate variant of the DAX function COUNT, i.e. COUNTA (DAX has COUNT, COUNTA, COUNTAX functions).
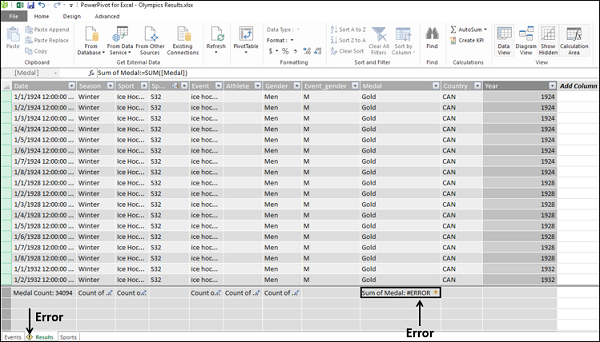
A word of caution – To use AutoSum feature, you need to click the down arrow next to AutoSum on the Ribbon. If you click on the AutoSum itself instead, you will get −
Sum of Medal: = SUM([Medal])
And an error is flagged as Medal is not a numeric data column and the text in the column cannot be converted to numbers.
You can refer to the chapter - DAX Error Reference for details on DAX errors.
DAX Formulas and the Relational Model
As you are aware, in the Data Model of Power Pivot, you can work with multiple tables of data and connect the tables by defining relationships. This will enable you to create interesting DAX formulas that use the correlations of the columns among the related tables for calculations.
When you create a relationship between two tables, you are expected to make sure that the two columns used as keys have values that match, at least for most of the rows, if not completely. In the Power Pivot Data Model, it is possible to have non-matching values in a key column and still create a relationship, because Power Pivot does not enforce referential integrity (look at the next section for details). However, the presence of blank or non-matching values in a key column might affect the results of the DAX formulas and the appearance of PivotTables.
Referential Integrity
Establishing referential integrity involves building a set of rules to preserve the defined relationships between tables when you enter or delete data. If you do not exclusively ensure this, as Power Pivot does not enforce it, you might not get correct results with the DAX formulas created before data changes are made.
If you enforce referential integrity, you can prevent the following pitfalls −
Adding rows to a related table when there is no associated row in the primary table (i.e. with matching values in the key columns).
Changing data in a primary table that would result in orphan rows in a related table (i.e. rows with a data value in the key column that does not have a matching value in the primary table key column).
Deleting rows from a primary table when there are matching data values in the rows of the related table.