- Excel Data Analysis Tutorial
- Excel Data Analysis - Home
- Data Analysis - Overview
- Data Analysis - Process
- Excel Data Analysis - Overview
- Working with Range Names
- Tables
- Cleaning Data with Text Functions
- Cleaning Data Contains Date Values
- Working with Time Values
- Conditional Formatting
- Sorting
- Filtering
- Subtotals with Ranges
- Quick Analysis
- Lookup Functions
- PivotTables
- Data Visualization
- Data Validation
- Financial Analysis
- Working with Multiple Sheets
- Formula Auditing
- Inquire
- Advanced Data Analysis
- Advanced Data Analysis - Overview
- Data Consolidation
- What-If Analysis
- What-If Analysis with Data Tables
- What-If Analysis Scenario Manager
- What-If Analysis with Goal Seek
- Optimization with Excel Solver
- Importing Data into Excel
- Data Model
- Exploring Data with PivotTables
- Exploring Data with Powerpivot
- Exploring Data with Power View
- Exploring Data Power View Charts
- Exploring Data Power View Maps
- Exploring Data PowerView Multiples
- Exploring Data Power View Tiles
- Exploring Data with Hierarchies
- Aesthetic Power View Reports
- Key Performance Indicators
- Excel Data Analysis Resources
- Excel Data Analysis - Quick Guide
- Excel Data Analysis - Resources
- Excel Data Analysis - Discussion
Working with Range Names
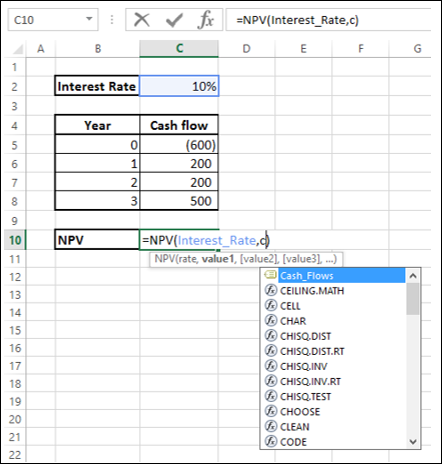
While doing Data Analysis, referring to various data will be more meaningful and easy if the reference is by Names rather than cell references – either a single cell or a range of cells. For example, if you are calculating Net Present Value based on a Discount Rate and a series of Cash Flows, the formula
Net_Present_Value = NPV (Discount_Rate, Cash_Flows)
is more meaningful than
C10 = NPV (C2, C6:C8)
With Excel, you can create and use meaningful names to various parts of your data. The advantages of using range names include −
A meaningful Range name (such as Cash_Flows) is much easier to remember than a Range address (such as C6:C8).
Entering a name is less error prone than entering a cell or range address.
If you type a name incorrectly in a formula, Excel will display a #NAME? error.
You can quickly move to areas of your worksheet by using the defined names.
With Names, your formulas will be more understandable and easier to use. For example, a formula Net_Income = Gross_Income – Deductions is more intuitive than C40 = C20 – B18.
Creating formulas with range names is easier than with cell or range addresses. You can copy a cell or range name into a formula by using formula Autocomplete.
In this chapter, you will learn −
- Syntax rules for names.
- Creating names for cell references.
- Creating names for constants.
- Managing the names.
- Scope of your defined names.
- Editing names.
- Filtering names.
- Deleting names.
- Applying names.
- Using names in a formula.
- Viewing names in a workbook.
- Using paste names and paste list.
- Using names for range intersections.
- Copying formulas with names.
Copying Name using Formula Autocomplete
Type the first letter of the name in the formula. A drop-down box appears with function names and range names. Select the required name. It is copied into your formula.
Range Name Syntax Rules
Excel has the following syntax rules for names −
You can use any combination of letters, numbers and the symbols - underscores, backslashes, and periods. Other symbols are not allowed.
A name can begin with a character, underscore or backslash.
A name cannot begin with a number (example - 1stQuarter) or resemble a cell address (example - QTR1).
If you prefer to use such names, precede the name with an underscore or a backslash (example - \1stQuarter, _QTR1).
Names cannot contain spaces. If you want to distinguish two words in a name, you can use underscore (example- Cash_Flows instead of Cash Flows)
Your defined names should not clash with Excel’s internally defined names, such as Print_Area, Print_Titles, Consolidate_Area, and Sheet_Title. If you define the same names, they will override the Excel’s internal names and you will not get any error message. However, it is advised not to do so.
Keep the names short but understandable, though you can use up to 255 characters
Creating Range Names
You can create Range Names in two ways −
Using the Name box.
Using the New Name dialog box.
Using the Selection dialog box.
Create a Range Name using the Name Box
To create a Range name, using the Name box that is to the left of formula bar is the fastest way. Follow the steps given below −
Step 1 − Select the range for which you want to define a Name.
Step 2 − Click on the Name box.
Step 3 − Type the name and press Enter to create the Name.
Create a Range Name using the New Name dialog box
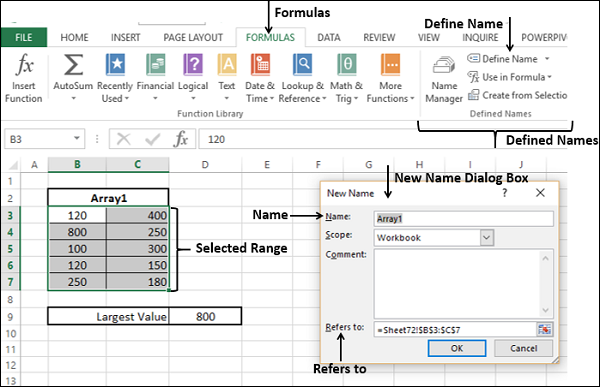
You can also create Range Names using the New Name dialog box from Formulas tab.
Step 1 − Select the range for which you want to define a name.
Step 2 − Click the Formulas tab.
Step 3 − Click Define Name in the Defined Names group. The New Name dialog box appears.
Step 4 − Type the name in the box next to Name
Step 5 − Check that the range that is selected and displayed in the Refers box is correct. Click OK.
Create a Range Name using the Create Names from Selection dialog box
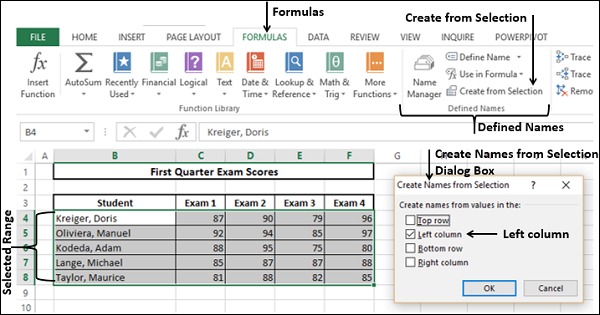
You can also create Range names using the Create Names from the Selection dialog box from Formulas tab, when you have Text values that are adjacent to your range.
Step 1 − Select the range for which you want to define a name along with the row / column that contains the name.
Step 2 − Click the Formulas tab.
Step 3 − Click Create from Selection in the Defined Names group. The Create Names from Selection dialog box appears.
Step 4 − Select top row as the Text appears in the top row of the selection.
Step 5 − Check the range that got selected and displayed in the box next to Refers to be correct. Click OK.

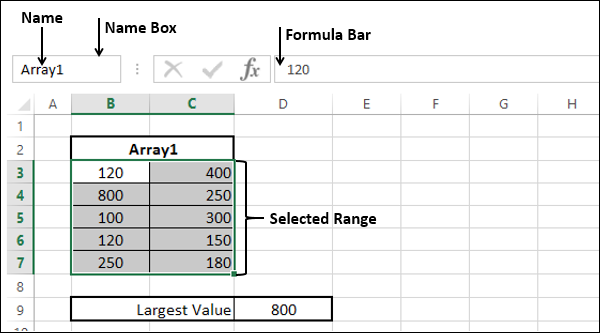
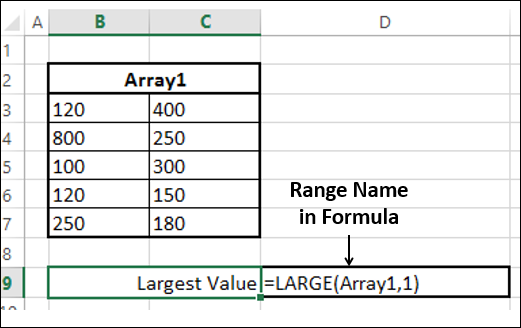
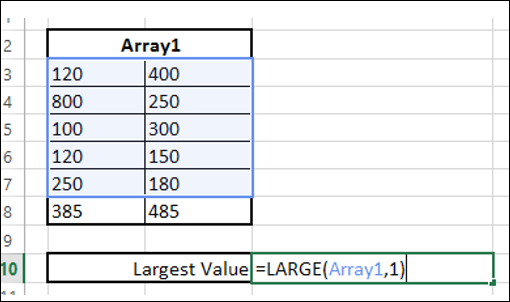
Now, you can find the largest value in the range with =Sum(Student Name), as shown below −
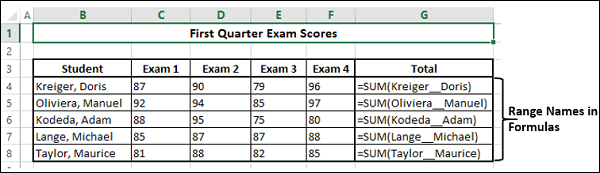
You can create names with multiple selection also. In the example given below, you can name the row of marks of each student with the student’s name.
Now, you can find the total marks for each student with =Sum (student name), as shown below.
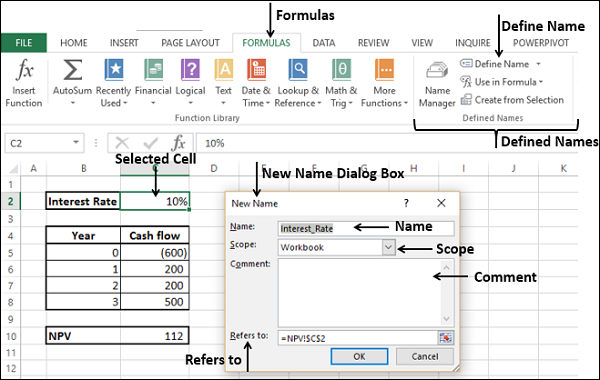
Creating Names for Constants
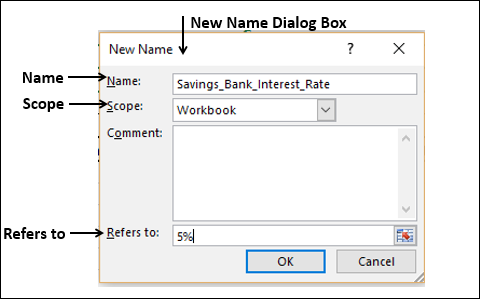
Suppose you have a constant that will be used throughout your workbook. You can assign a name to it directly, without placing it in a cell.
In the example below, Savings Bank Interest Rate is set to 5%.
- Click Define Name.
- In the New Name dialog box, type Savings_Bank_Interest_Rate in the Name box.
- In Scope, select Workbook.
- In Refers to box, clear the contents and type 5%.
- Click OK.
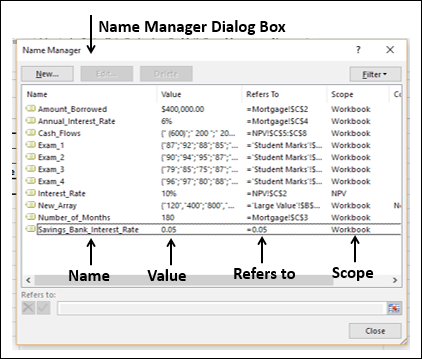
The Name Savings_Bank_Interest_Rate is set to a constant 5%. You can verify this in Name Manager. You can see that the value is set to 0.05 and in the Refers to =0.05 is placed.
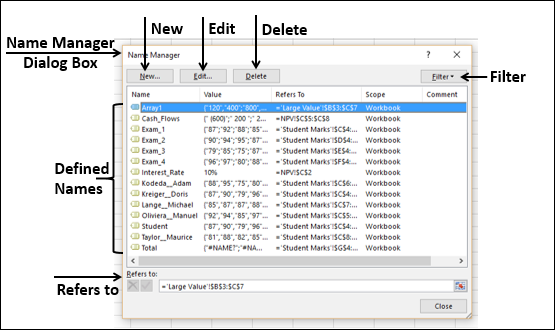
Managing Names
An Excel Workbook can have any number of named cells and ranges. You can manage these names with the Name Manager.
Click the Formulas tab.
Click Name Manager in the Defined Names group. The Name Manager dialog box appears. All the names defined in the current workbook are displayed.
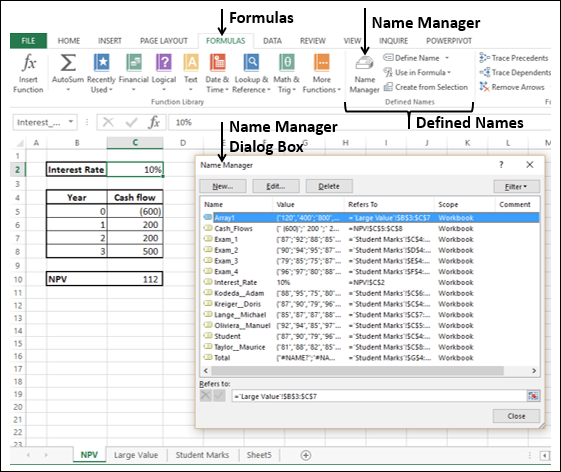
The List of Names are displayed with the defined Values, Cell Reference (including Sheet Name), Scope and Comment.
The Name Manager has the options to −
Define a New Name with the New Button.
Edit a Defined Name.
Delete a Defined Name.
Filter the Defined Names by Category.
Modify the Range of a Defined Name that it Refers to.
Scope of a Name
The Scope of a name by default is the workbook. You can find the Scope of a defined names from the list of names under the Scope column in the Name Manager.
You can define the Scope of a New Name when you define the name using New Name dialog box. For example, you are defining the name Interest_Rate. Then you can see that the Scope of the New Name Interest_Rate is the Workbook.
Suppose you want the Scope of this interest rate restricted to this Worksheet only.
Step 1 − Click the down-arrow in the Scope Box. The available Scope options appear in the drop-down list.
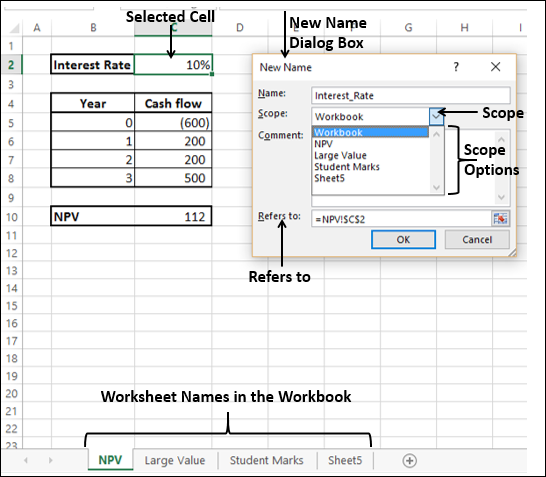
The Scope options include Workbook, and the sheet names in the workbook.
Step 2 − Click the current worksheet name, in this case NPV and click OK. You can define / find the sheet name in the worksheet tab.
Step 3 − To verify that Scope is worksheet, click Name Manager. In the Scope column, you will find NPV for Interest_Rate. This means you can use the Name Interest_Rate only in the Worksheet NPV, but not in the other Worksheets.
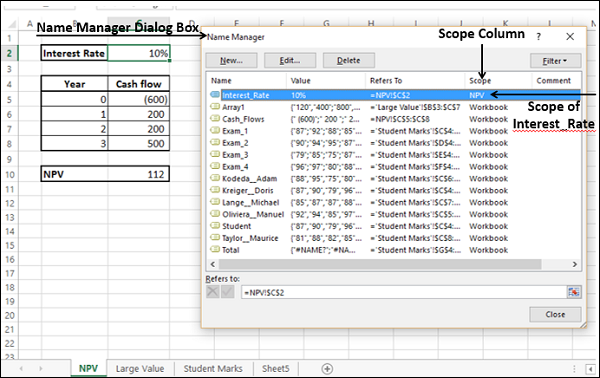
Note − Once you define the Scope of a Name, it cannot be modified later.
Deleting Names with Error Values
Sometimes, it may so happen that Name definition may have errors for various reasons. You can delete such names as follows −
Step 1 − Click Filter in the Name Manager dialog box.
The following filtering options appear −
- Clear Filter
- Names Scoped to Worksheet
- Names Scoped to Workbook
- Names with Errors
- Names without Errors
- Defined Names
- Table Names
You can apply Filter to the defined Names by selecting one or more of these options.
Step 2 − Select Names with Errors. Names that contain error values will be displayed.
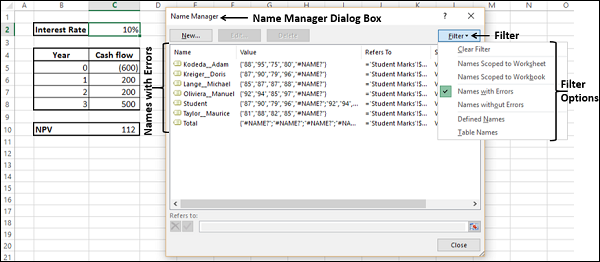
Step 3 − From the obtained list of Names, select the ones you want to delete and click Delete.
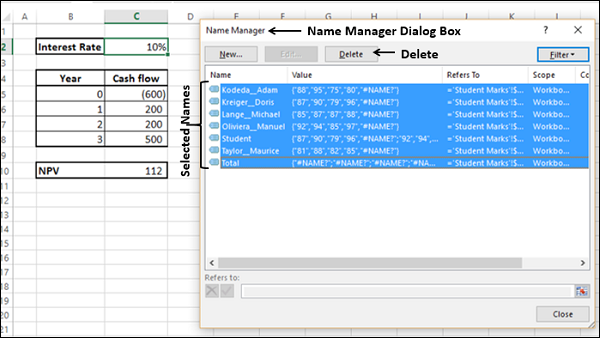
You will get a message, confirming delete. Click OK.
Editing Names
You can use the Edit option in the Name Manager dialog box to −
Change the Name.
Modify the Refers to range
Edit the Comment in a Name.
Change the Name
Step 1 − Click the cell containing the function Large.
You can see, two more values are added in the array, but are not included in the function as they are not part of Array1.
Step 2 − Click the Name you want to edit in the Name Manager dialog box. In this case, Array1.
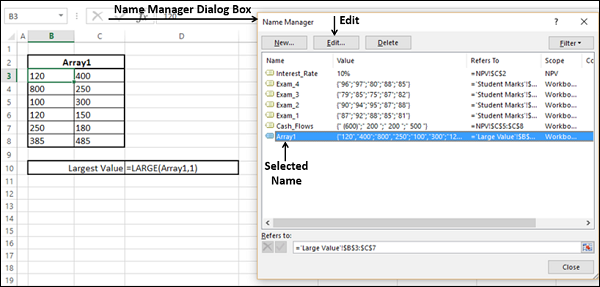
Step 3 − Click Edit. The Edit Name dialog box appears.
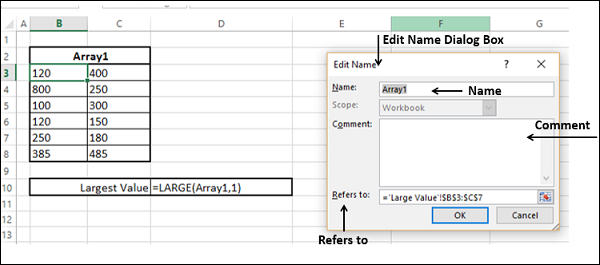
Step 4 − Change the Name by typing the new name that you want in the Name Box.
Step 5 − Click the Range button to the right of Refers to Box and include the new cell references.
Step 6 − Add a Comment (Optional)
Notice that Scope is deactive and hence cannot be changed.
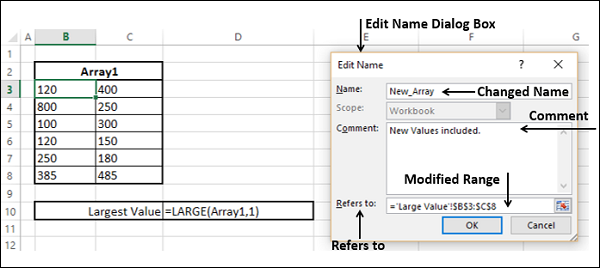
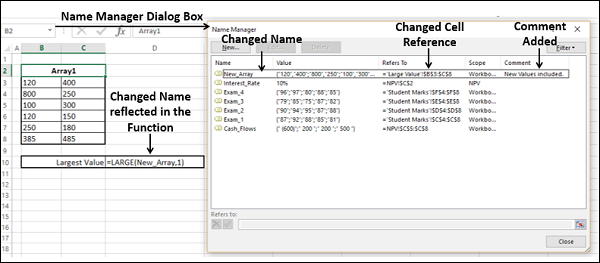
Click OK. You will observe the changes made.
Applying Names
Consider the following example −
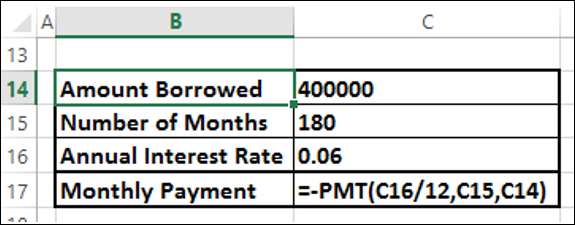
As you observe, names are not defined and used in PMT function. If you place this function somewhere else in the worksheet, you also need to remember where exactly the parameter values are. You know that using names is a better option.
In this case, the function is already defined with cell references that do not have names. You can still define names and apply them.
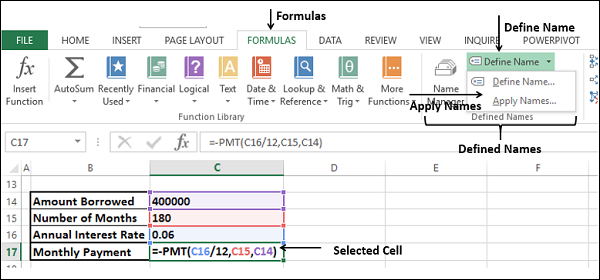
Step 1 − Using Create from Selection, define the names.
Step 2 − Select the cell containing the formula. Click  next to Define Name in the Defined Names group on the Formulas tab. From the drop-down list, click Apply Names.
Step 3 − The Apply Names dialog box appears. Select the Names that you want to Apply and click OK.
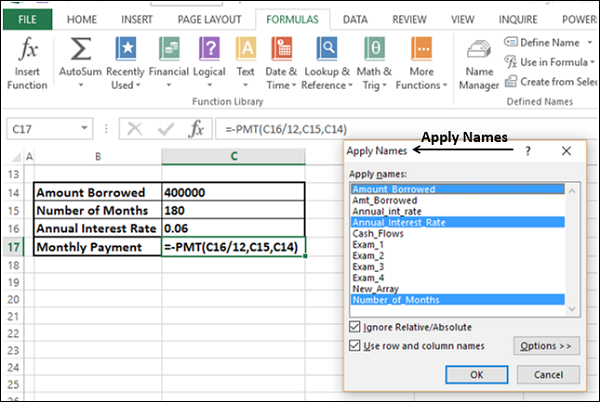
The selected names will be applied to the selected cells.
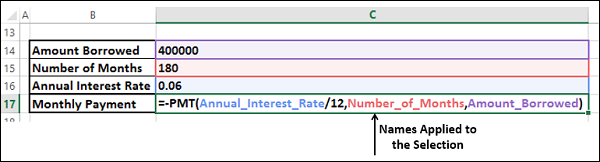
You can also Apply Names to an entire worksheet, by selecting the worksheet and repeating the above steps.
Using Names in a Formula
You can use a Name in a Formula in the following ways −
Typing the Name if you remember it, or
Typing first one or two letters and using the Excel Formula Autocomplete feature.
Clicking Use in Formula in the Defined Names group on the Formulas tab.
Select the required Name from the drop-down list of defined names.
Double-click on that name.
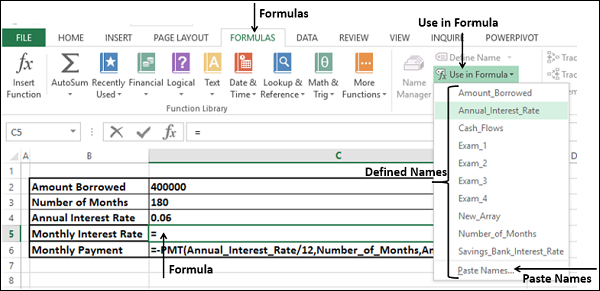
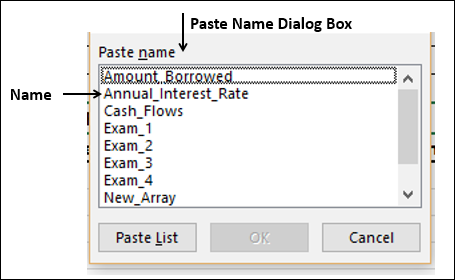
Using the Paste Name dialog box.
Select the Paste Names option from the drop-down list of defined names. The Paste Name dialog box appears.
Select the Name in the Paste Names dialog box and double-click it.
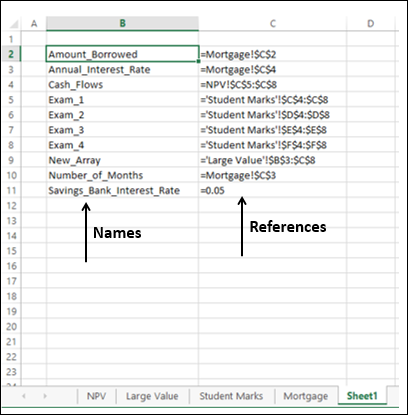
Viewing Names in a Workbook
You can get all the Names in your workbook along with their References and Save them or Print them.
Click an empty Cell where you want to copy the Names in your workbook.
Click Use in Formula in the Defined Names group.
Click Paste Names from the drop-down list.
Click Paste List in the Paste Name dialog box that appears.
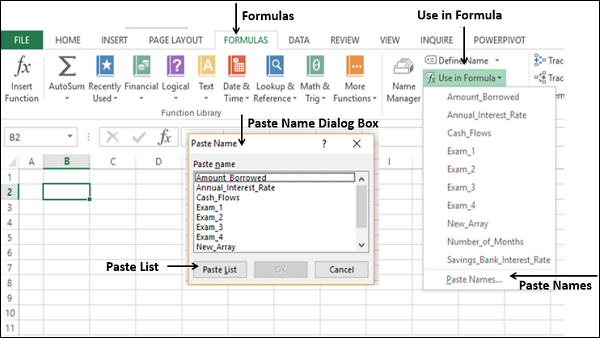
The list of names and their corresponding references are copied at the specified location on your worksheet as shown in the screen shot given below −
Using Names for Range Intersections
Range Intersections are those individual cells that have two Ranges in common.
For example, in the data given below, the Range B6:F6 and the Range C3:C8 have Cell C6 in common, which actually represents the marks scored by the student Kodeda, Adam in Exam 1.
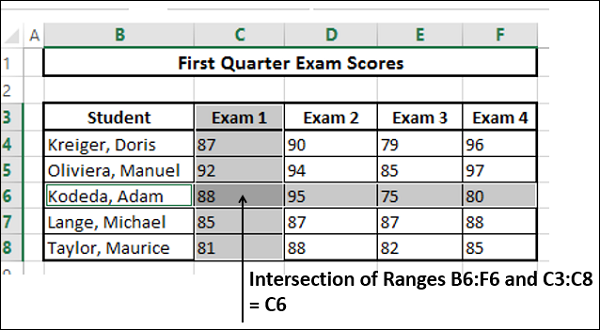
You can make this more meaningful with the Range Names.
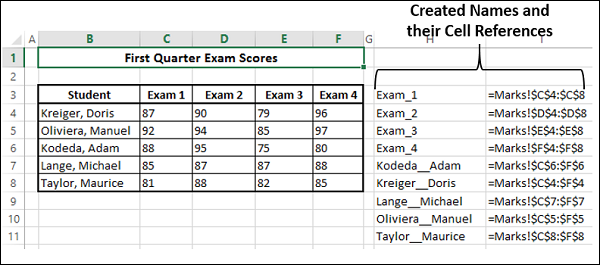
Create Names with Create from Selection for both Students and Exams.
Your Names will look as follows −
Type =Kodeda_Adam Exam_1 in B11.
Here, you are using the Range Intersection operation, space between the two ranges.
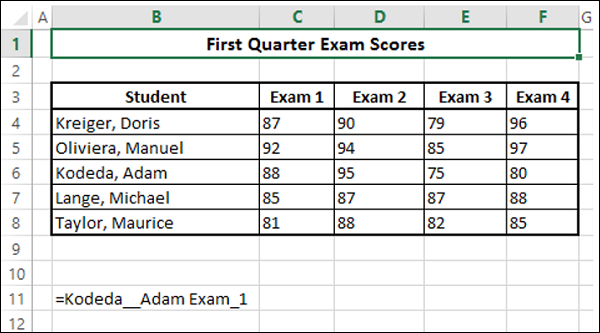
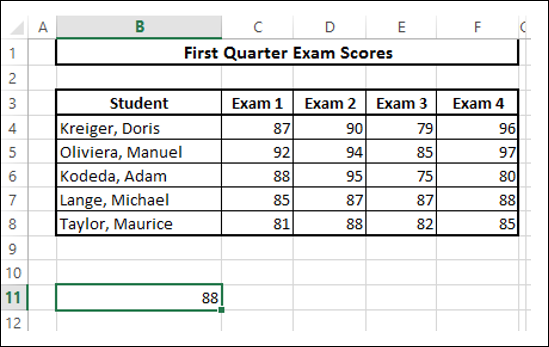
This will display marks of Kodeda, Adam in Exam 1, that are given in Cell C6.
Copying Formulas with Names
You can copy a formula with names by Copyand Paste within the same worksheet.
You can also copy a formula with names to a different worksheet by copy and paste, provided all the names in the formula have workbook as Scope. Otherwise, you will get a #VALUE error.