- MS Excel Basics
- Excel - Home
- Excel - Getting Started
- Excel - Explore Window
- Excel - Backstage
- Excel - Entering Values
- Excel - Move Around
- Excel - Save Workbook
- Excel - Create Worksheet
- Excel - Copy Worksheet
- Excel - Hiding Worksheet
- Excel - Delete Worksheet
- Excel - Close Workbook
- Excel - Open Workbook
- Excel - Context Help
- Editing Worksheet
- Excel - Insert Data
- Excel - Select Data
- Excel - Delete Data
- Excel - Move Data
- Excel - Rows & Columns
- Excel - Copy & Paste
- Excel - Find & Replace
- Excel - Spell Check
- Excel - Zoom In-Out
- Excel - Special Symbols
- Excel - Insert Comments
- Excel - Add Text Box
- Excel - Undo Changes
- Formatting Cells
- Excel - Setting Cell Type
- Excel - Setting Fonts
- Excel - Text Decoration
- Excel - Rotate Cells
- Excel - Setting Colors
- Excel - Text Alignments
- Excel - Merge & Wrap
- Excel - Borders and Shades
- Excel - Apply Formatting
- Formatting Worksheets
- Excel - Sheet Options
- Excel - Adjust Margins
- Excel - Page Orientation
- Excel - Header and Footer
- Excel - Insert Page Breaks
- Excel - Set Background
- Excel - Freeze Panes
- Excel - Conditional Format
- Working with Formula
- Excel - Creating Formulas
- Excel - Copying Formulas
- Excel - Formula Reference
- Excel - Using Functions
- Excel - Builtin Functions
- Advanced Operations
- Excel - Data Filtering
- Excel - Data Sorting
- Excel - Using Ranges
- Excel - Data Validation
- Excel - Using Styles
- Excel - Using Themes
- Excel - Using Templates
- Excel - Using Macros
- Excel - Adding Graphics
- Excel - Cross Referencing
- Excel - Printing Worksheets
- Excel - Email Workbooks
- Excel- Translate Worksheet
- Excel - Workbook Security
- Excel - Data Tables
- Excel - Pivot Tables
- Excel - Simple Charts
- Excel - Pivot Charts
- Excel - Keyboard Shortcuts
- MS Excel Resources
- Excel - Quick Guide
- Excel - Useful Resources
- Excel - Discussion
Using Styles in Excel 2010
Using Styles in MS Excel
With MS Excel 2010 Named styles make it very easy to apply a set of predefined formatting options to a cell or range. It saves time as well as make sure that look of the cells are consistent.
A Style can consist of settings for up to six different attributes −
- Number format
- Font (type, size, and color)
- Alignment (vertical and horizontal)
- Borders
- Pattern
- Protection (locked and hidden)
Now, let us see how styles are helpful. Suppose that you apply a particular style to some twenty cells scattered throughout your worksheet. Later, you realize that these cells should have a font size of 12 pt. rather than 14 pt. Rather than changing each cell, simply edit the style. All cells with that particular style change automatically.
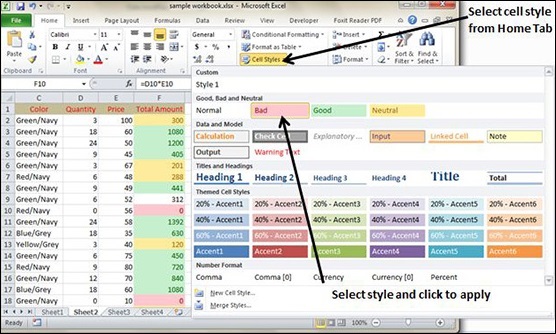
Applying Styles
Choose Home » Styles » Cell Styles. Note that this display is a live preview, that is, as you move your mouse over the style choices, the selected cell or range temporarily displays the style. When you see a style you like, click it to apply the style to the selection.
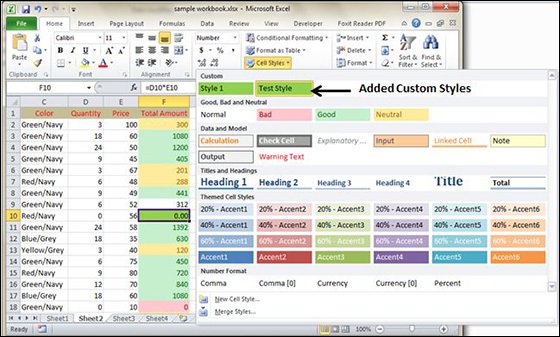
Creating Custom Style in MS Excel
We can create new custom style in Excel 2010. To create a new style, follow these steps −
- Select a cell and click on Cell styles from Home Tab.
- Click on New Cell Style and give style name.
- Click on Format to apply formatting to the cell.
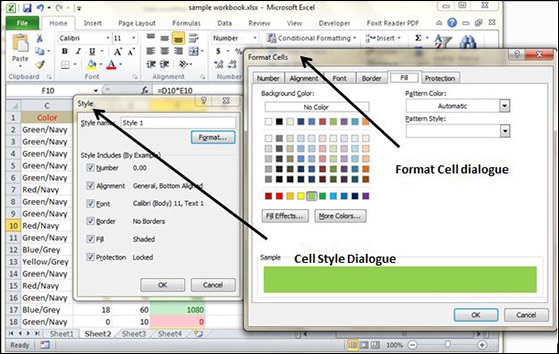
After applying formatting click on OK. This will add new style in the styles. You can view it on Home »; Styles.