- ESP32 for IoT Tutorial
- Home
- Brief Overview of IoT
- Introduction to ESP32
- Installing the ESP32 Board in Arduino IDE
- Setting up RTOS for dual-core and multi-threaded operation
- Interfacing ESP32 with MPU6050
- Interfacing ESP32 with Analog sensors
- ESP32 Preferences
- ESP32 SPIFFS storage (A mini-SD Card in the chip itself)
- Interfacing OLED Display with ESP32
- WiFi on ESP32
- Transmitting data over WiFi using HTTP
- Transmitting data over WiFi using HTTPS
- Transmitting data over WiFi using MQTT
- Transmitting data over Bluetooth
- Getting current time using NTP Client
- Performing the (OTA) update of ESP32 firmware
- Applications of ESP32
- Next steps for you as a developer
- ESP32 for IoT Useful Resources
- Quick Guide
- Useful Resources
- Discussion
Performing Over-The-Air Update of ESP32 firmware
Say you have a thousand IoT devices out in the field. Now, if one fine day, you find a bug in the production code, and wish to fix it, will you recall all the thousand devices and flash the new firmware in them? Probably not! What you'll prefer to have is a way to update all the devices remotely, over-the-air. OTA updates are very common these days. Every now and then, you keep receiving software updates to your Android or iOS smartphones. Just like software updates can happen remotely, so can firmware updates. In this chapter, we will look at how to update the firmware of ESP32 remotely.
OTA Update Process
The process is quite simple. The device first downloads the new firmware in chunks and stores it in a separate area of the memory. Let's call this area the 'OTA space'. Let's call the area of the memory where the current code or the application code is stored as the 'Application space'. Once the entire firmware has been downloaded and verified, the device bootloader swings into action. Consider the bootloader as a code written in a separate area of the memory (let's call it the 'Bootloader space'), whose sole purpose is to load the correct code in the Application space every time the device restarts.
Thus, every time the device restarts, the code in the Bootloader space gets executed first. Most of the time, it simply passes control to the code in the Application space. However, after downloading the newer firmware, when the device restarts, the bootloader will notice that a newer application code is available. So it will flash that newer code from the OTA space into the Application space and then give control to the code in the Application space. The result will be that the device firmware will be upgraded.
Now, digressing a bit, the bootloader can also flash the factory reset code from the 'Factory Reset space' to the Application space, if the Application code is corrupted, or a factory reset command is sent. Also, often, the OTA code and the factory reset codes are stored on external storage devices like an SD Card or an external EEPROM or FLASH chip, if the microcontroller doesn't have enough space. However, in the case of ESP32, the OTA code can be stored in the microcontroller's memory itself.
Code Walkthrough
We will be using an example code for this chapter. You can find it in File −> Examples −> Update −> AWS_S3_OTA_Update. It can also be found on GitHub.
This is one of the very detailed examples available for ESP32 on Arduino. The author of this sketch has even provided the expected Serial Monitor output of the sketch in comments. So while much of the code will be self−explanatory through the comments, we'll walk over the broad idea and also cover the important details. This code makes use of the Update library which, like many other libraries, makes working with ESP32 very easy, while keeping the rigorous work under−the−hood.
In this specific example, the author has kept the binary file of the new firmware in an AWS S3 bucket. Providing a detailed overview of AWS S3 is beyond the scope of this chapter, but very broadly, S3 (Simple Storage Service) is a cloud storage service provided by Amazon Web Services (AWS). Think of it like Google Drive. You upload files to your drive and share a link with people to share it. Similarly, you can upload a file to S3 and access it via a link. S3 is much more popular because a lot of other AWS services can interface seamlessly with it. Getting started with AWS S3 will be easy. You can get help from several resources available through a quick Google search. In the comments at the beginning of the sketch as well, a few steps to get started are mentioned.
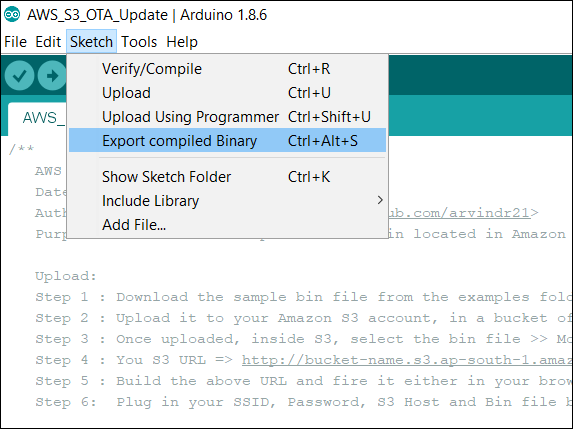
An important recommendation to note is that you should use your own binary file for this code. The comments at the top of the sketch suggest that you can use the same binary file that the author has used. However, downloading a binary compiled on another machine/ another version of Arduino IDE has been known to cause errors sometimes in the OTA process. Also, using your own binary will make your learning more 'complete'. You can export the binary of any ESP32 sketch by going to Sketch −> Export Compiled Binary. The binary (.bin) file gets saved in the same folder in which your Arduino (.ino) file is saved.
Once your binary is saved, you just need to upload it to S3 and add the link to the bucket and address of the binary file in your code. The binary you save should have some print statement to indicate that it is different from the code you flash in the ESP32. A statement like "Hello from S3" maybe. Also, don't keep the S3 bucket link and bin address in the code as it is.
Alright! Enough talk! Let's begin the walkthrough now. We will begin by including the WiFi and Update libraries.
#include <WiFi.h>
#include <Update.h>
Next, we define a few variables, constants, and also the WiFiClient object. Remember to add your own WiFi credentials and S3 credentials.
WiFiClient client;

// Variables to validate
// response from S3
long contentLength = 0;
bool isValidContentType = false;

// Your SSID and PSWD that the chip needs
// to connect to
const char* SSID = "YOUR−SSID";
const char* PSWD = "YOUR−SSID−PSWD";

// S3 Bucket Config
String host = "bucket−name.s3.ap−south−1.amazonaws.com"; // Host => bucket−name.s3.region.amazonaws.com
int port = 80; // Non https. For HTTPS 443. As of today, HTTPS doesn't work.
String bin = "/sketch−name.ino.bin"; // bin file name with a slash in front.
Next, a helper function getHeaderValue() has been defined, which basically is used to check the value of a particular header. For example, if we get the header "Content-Length: 40" and it is stored in a String called headers, getHeaderValue(headers,"Content−Length: ") will return 40.
// Utility to extract header value from headers
String getHeaderValue(String header, String headerName) {
   return header.substring(strlen(headerName.c_str()));
}
Next, the main function execOTA(), which performs the OTA. This function has the entire logic related to the OTA. If you look at the Setup, we simply connect to the WiFi and call the execOTA() function.
void setup() {
   //Begin Serial
   Serial.begin(115200);
   delay(10);

   Serial.println("Connecting to " + String(SSID));

   // Connect to provided SSID and PSWD
   WiFi.begin(SSID, PSWD);

   // Wait for connection to establish
   while (WiFi.status() != WL_CONNECTED) {
      Serial.print("."); // Keep the serial monitor lit!
      delay(500);
   }

   // Connection Succeed
   Serial.println("");
   Serial.println("Connected to " + String(SSID));

   // Execute OTA Update
   execOTA();
}
So you would have understood that understanding the execOTA function means understanding this entire code. Therefore, let's begin the walkthrough of that function.
We begin by connecting to our host, which is the S3 bucket in this case. Once connected, we fetch the bin file from the bucket, using a GET request (refer to the HTTP tutorial for more information on GET requests)
void execOTA() {
   Serial.println("Connecting to: " + String(host));
   // Connect to S3
   if (client.connect(host.c_str(), port)) {
   // Connection Succeed.
   // Fecthing the bin
   Serial.println("Fetching Bin: " + String(bin));

   // Get the contents of the bin file
   client.print(String("GET ") + bin + " HTTP/1.1\r\n" +
      "Host: " + host + "\r\n" +
      "Cache-Control: no-cache\r\n" +
      "Connection: close\r\n\r\n");
Next, we wait for the client to get connected. We give a maximum of 5 seconds for the connection to get established, otherwise we say that the connection has timed out and return.
unsigned long timeout = millis();
while (client.available() == 0) {
   if (millis() - timeout > 5000) {
      Serial.println("Client Timeout !");
      client.stop();
      return;
   }
}
Assuming that the code has not returned in the previous step, we have a successful connection established. The expected response from the server is provided in the comments. We begin by parsing that response. The response is read line by line, and each new line is stored in a variable called line. We specifically check for the following 3 things −
If the response status code is 200 (OK)
What is the Content-Length
Whether the content type is application/octet-stream (this is the type expected for a binary file)
The first and third are required, and the second is just for information.
while (client.available()) {
   // read line till /n
   String line = client.readStringUntil('\n');
   // remove space, to check if the line is end of headers
   line.trim();

   // if the the line is empty,
   // this is end of headers
   // break the while and feed the
   // remaining `client` to the
   // Update.writeStream();
   if (!line.length()) {
   //headers ended
   break; // and get the OTA started
   }

   // Check if the HTTP Response is 200
   // else break and Exit Update
   if (line.startsWith("HTTP/1.1")) {
      if (line.indexOf("200") < 0) {
         Serial.println("Got a non 200 status code from server. Exiting OTA Update.");
         break;
      }
   }

   // extract headers here
   // Start with content length
   if (line.startsWith("Content-Length: ")) {
      contentLength = atol((getHeaderValue(line, "Content-Length: ")).c_str());
      Serial.println("Got " + String(contentLength) + " bytes from server");
   }

   // Next, the content type
   if (line.startsWith("Content-Type: ")) {
      String contentType = getHeaderValue(line, "Content-Type: ");
      Serial.println("Got " + contentType + " payload.");
      if (contentType == "application/octet-stream") {
         isValidContentType = true;
      }
   }
}
With this, the if block that checks if the connection with the server was successful ends. It is followed by the else block, which just prints that we were unable to establish connection to the server.
} else {
   // Connect to S3 failed
   // May be try?
   // Probably a choppy network?
   Serial.println("Connection to " + String(host) + " failed. Please check your setup");
   // retry??
   // execOTA();
}
Next, if we have hopefully received the correct response from the server, we will have a positive contentLength (remember, we had initialized it with 0 at the top and so it will still be 0 if we somehow did not reach that line where we parse the Content−Length header). Also, we will have isValidContentType as true (remember, we had initialized it with false). So we check if both of these conditions are true and if yes, proceed with the actual OTA. Note that so far, we have only made use of the WiFi library, for interacting with the server. Now if the server interaction turns out to be alright, we will begin use of the Update library, otherwise, we simply print that there was no content in the server response and flush the client. If the response was indeed correct, we first check if there is enough space in the memory to store the OTA file. By default, about 1.2 MB of space is reserved for the OTA file. So if the contentLength exceeds that, Update.begin() will return false. This 1.2MB number can change depending on the partitions of your ESP32.
// check contentLength and content type
if (contentLength && isValidContentType) {
   // Check if there is enough to OTA Update
   bool canBegin = Update.begin(contentLength);
Now, if we indeed have space to store the OTA file in memory, we begin writing the bytes to the memory area reserved for OTA (the OTA space), using the Update.writeStream() function. If we don't, we simply print that message and flush the client, and exit the OTA process. The Update.writeStream() function returns the number of bytes that were written to the OTA space. We then check if the number of bytes written is equal to the contentLength. If the Update is completed, in which case the Update.end() function will return true, we check if it has finished properly, i.e. all bytes are written, using the Update.isFinished() function. If it returns true, meaning that all bytes have been written, we restart the ESP32, so that the bootloader can flash the new code from the OTA space to the Application space, and our firmware gets upgraded. If it returns false, we print the error received.
   // If yes, begin
   if (canBegin) {
      Serial.println("Begin OTA. This may take 2 − 5 mins to complete. Things might be quite for a while.. Patience!");
      // No activity would appear on the Serial monitor
      // So be patient. This may take 2 - 5mins to complete
      size_t written = Update.writeStream(client);

      if (written == contentLength) {
         Serial.println("Written : " + String(written) + " successfully");
      } else {
         Serial.println("Written only : " + String(written) + "/" + String(contentLength) + ". Retry?" );
         // retry??
         // execOTA();
      }

      if (Update.end()) {
         Serial.println("OTA done!");
         if (Update.isFinished()) {
            Serial.println("Update successfully completed. Rebooting.");
            ESP.restart();
         } else {
            Serial.println("Update not finished? Something went wrong!");
         }
      } else {
         Serial.println("Error Occurred. Error #: " + String(Update.getError()));
      }
   } else {
      // not enough space to begin OTA
      // Understand the partitions and
      // space availability
      Serial.println("Not enough space to begin OTA");
      client.flush();
   }
}
Of course, you would have realized by now that we need not do anything in the loop here.
That's it. You've successfully upgraded the firmware of your ESP32 chip remotely. If you are more curious about what each function of the Update library does, you can refer to the comments in the Update.h file.