- ESP32 for IoT Tutorial
- Home
- Brief Overview of IoT
- Introduction to ESP32
- Installing the ESP32 Board in Arduino IDE
- Setting up RTOS for dual-core and multi-threaded operation
- Interfacing ESP32 with MPU6050
- Interfacing ESP32 with Analog sensors
- ESP32 Preferences
- ESP32 SPIFFS storage (A mini-SD Card in the chip itself)
- Interfacing OLED Display with ESP32
- WiFi on ESP32
- Transmitting data over WiFi using HTTP
- Transmitting data over WiFi using HTTPS
- Transmitting data over WiFi using MQTT
- Transmitting data over Bluetooth
- Getting current time using NTP Client
- Performing the (OTA) update of ESP32 firmware
- Applications of ESP32
- Next steps for you as a developer
- ESP32 for IoT Useful Resources
- Quick Guide
- Useful Resources
- Discussion
Installing ESP32 Board in Arduino IDE
One very big advantage with ESP32, which has aided its quick adoption and massive popularity, is the provision for programming the ESP32 within the Arduino IDE.
Now, I should point out here that Arduino is not the only IDE that helps you compile code for ESP32 and flash it into the microcontroller. There is ESP−IDF which is the official development framework for ESP32, which provides much more flexibility in terms of configuration options. However, it is hardly as intuitive and user−friendly as the Arduino IDE, and if you are starting out with ESP32, Arduino IDE is ideal to get your hands dirty. Also, with the number of supporting libraries built for ESP32 in Arduino, courtesy of the huge developer community, there's hardly any functionality of ESP32 which can't be realized with the Arduino IDE. ESP-IDF is more suitable for the more advanced and experienced programmers, who need to stretch ESP32 to its limits. If you are one of those, you are looking for the ESP−IDF Getting Started Guide. Others can follow along.
Installation Steps
Now, to install the ESP32 board in the Arduino IDE, you need to follow the below steps −
Make sure you have Arduino IDE (preferably the latest version) installed on your machine
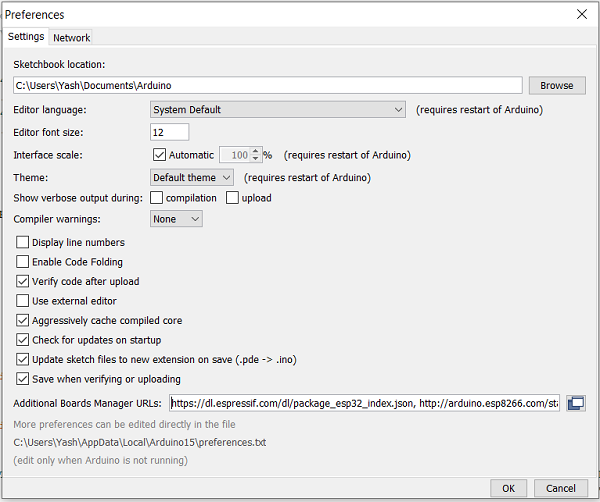
Open Arduino and go to File −> Preferences
In the Additional Boards Manager URL, enter
https://dl.espressif.com/dl/package_esp32_index.json
In case you have an existing JSON file's URL in the preferences (this is likely if you've installed ESP8266, stm32duino, or any such additional board in the IDE), you can just append the above path to the existing path, using a comma. An example is shown below, for ESP8266 and ESP32 boards −
http://arduino.esp8266.com/stable/package_esp8266com_index.json, https://dl.espressif.com/dl/package_esp32_index.json
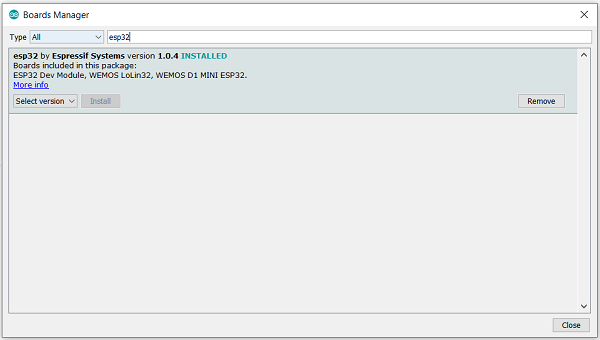
Go to Tools −> Board−> Boards Manager. A pop−up would open up. Search for ESP32 and install the esp32 by Espressif Systems board. The image below shows the board already installed because I had installed the board before preparing this tutorial.
Verifying the Installation
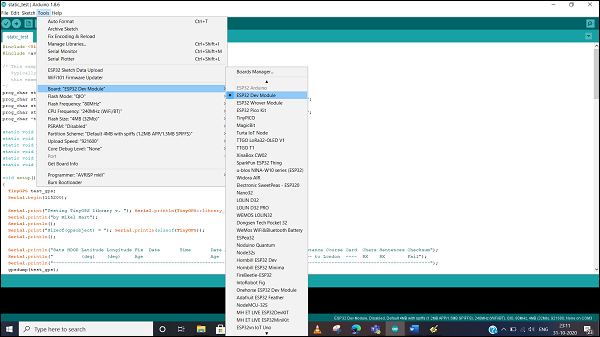
Once your ESP32 board has been installed, you can verify the installation by going to Tools −> Boards. You can see a whole bunch of boards under the ESP32 Arduino section. Choose the board of your choice. If you are not sure which board best represents the one you have, you can choose ESP32 Dev Module.
Next, connect your board to your machine using the USB Cable. You should see an additional COM Port under Tools−> Port. Select that additional port. In case you see multiple ports, you can disconnect the USB and see which port disappeared. That port corresponds to ESP32.
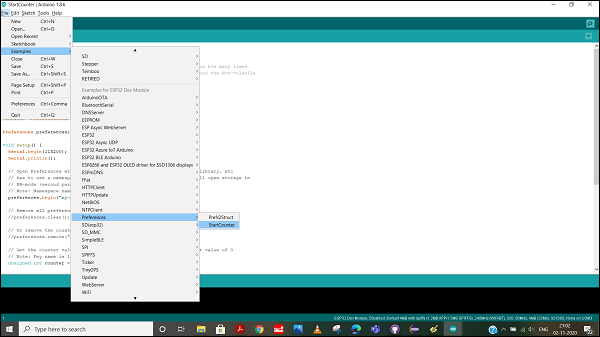
Once the port is identified, pick any one example sketch from File −> Examples. We will choose the StartCounter example from File −> Examples −> Preferences −> StartCounter.
Open that sketch, compile it and flash it into the ESP32 by clicking on the Upload button (the right arrow button, besides the Compile button).
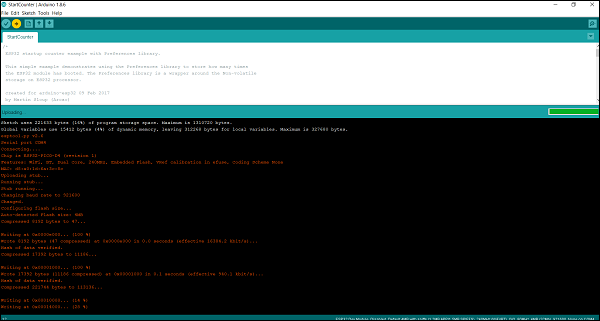
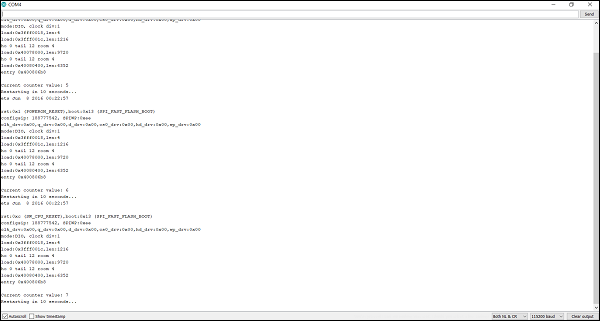
Then open the Serial Monitor using Tools −> Serial Monitor, or simply by pressing Ctrl + Shift + M on your keyboard. You should see the counter value getting incremented after every ESP32 restart.
Congratulations!! You've set up the environment for working with ESP32.