- ESP32 for IoT Tutorial
- Home
- Brief Overview of IoT
- Introduction to ESP32
- Installing the ESP32 Board in Arduino IDE
- Setting up RTOS for dual-core and multi-threaded operation
- Interfacing ESP32 with MPU6050
- Interfacing ESP32 with Analog sensors
- ESP32 Preferences
- ESP32 SPIFFS storage (A mini-SD Card in the chip itself)
- Interfacing OLED Display with ESP32
- WiFi on ESP32
- Transmitting data over WiFi using HTTP
- Transmitting data over WiFi using HTTPS
- Transmitting data over WiFi using MQTT
- Transmitting data over Bluetooth
- Getting current time using NTP Client
- Performing the (OTA) update of ESP32 firmware
- Applications of ESP32
- Next steps for you as a developer
- ESP32 for IoT Useful Resources
- Quick Guide
- Useful Resources
- Discussion
Transmitting data over WiFi using HTTP
HTTP (HyperText Transfer Protocol) is one of the most common forms of communications and with ESP32 we can interact with any web server using HTTP requests. Let's understand how in this chapter.
A brief about HTTP requests
The HTTP request happens between a client and a server. A server, as the name suggests, 'serves' information to the client on request. A web server serves web pages generally. For instance, when you type https://www.linkedin.com/login in your internet browser, your PC or laptop acts as a client and requests for the page corresponding to the /login address, from the server hosting linkedin.com. You get an HTML page in return, which is then displayed by your browser.
HTTP follows the request-response model, meaning that communication is always initiated by the client. The server cannot talk to any client out−of−the−blue, or can't start communication with any client. The communication always has to be initiated by the client in the form of a request and the server can only respond to that request. The response of the server contains the status code (remember 404? That's a status code) and, if applicable, the content requested. The list of all status codes can be found here.
Now, how does a server identify an HTTP request? Through the structure of the request. An HTTP request follows a fixed structure which consists of 3 parts:
The request line followed by carriage return line feed (CRLF = \r\n)
Zero or more header lines followed by CRLF and an empty line, again followed by CRLF
Optional body
This is how a typical HTTP request looks like:
POST / HTTP/1.1         //Request line, containing request method (POST in this case)
Host: www.example.com   //Headers
                        //Empty line between headers
key1=value1&key2=value2   //Body
This is how a server response looks like −
HTTP/1.1 200 OK                     //Response line; 200 is the status code
Date: Mon, 23 May 2005 22:38:34 GMT //Headers
Content-Type: text/html; charset=UTF-8
Content-Length: 155
Last-Modified: Wed, 08 Jan 2003 23:11:55 GMT
Server: Apache/1.3.3.7 (Unix) (Red-Hat/Linux)
ETag: "3f80f−1b6−3e1cb03b"
Accept-Ranges: bytes
Connection: close
                                    //Empty line between headers and body
<html>
  <head>
    <title>An Example Page</title>
  </head>
  <body>
    <p>Hello World, this is a very simple HTML document.</p>
  </body>
</html>
In fact, there is a very good tutorial on HTTP request structure on TutorialsPoint itself. It also introduces you to the various request methods (GET, POST, PUT, etc.). For this chapter, we will be concerned with the GET and POST methods.
The GET request contains all parameters in the form of a key value pair in the request URL itself. For example, if instead of POST, the same example request above was to be sent using GET, it would look like:
GET /test/demo_form.php?key1=value1&key2=value2 HTTP/1.1   //Request line
Host: www.example.com                                     //Headers
                                                          //No need for a body
The POST request, as you would have guessed by now, contains the parameters in the body instead of the URL. There are several more differences between GET and POST, which you can read here. But the crux is that you will use POST for sharing sensitive information, like passwords, with the server.
Code Walkthrough
For this chapter, we will write our HTTP request from scratch. There are libraries like httpClient available specifically for handling the ESP32 HTTP requests which take care of constructing the HTTP requests, but we will construct our request ourselves. That gives us much more flexibility. We will be restricting to the ESP32 Client mode for this tutorial. The HTTP server mode is also possible with ESP32, but that is for you to explore.
We will be using httpbin.org as our server. It is basically built for you to test your HTTP requests. You can test GET, POST, and a variety of other methods using this server. See this.
The code can be found on GitHub
We begin with the inclusion of the WiFi library.
#include <WiFi.h>
Next, we will define some constants. For HTTP, the port that is used is 80. That is the standard. Similarly, we use 443 for HTTPS, 21 for FTP, 53 for DNS, and so on. These are reserved port numbers.
const char* ssid = "YOUR_SSID";
const char* password = "YOUR_PASSWORD";

const char* server = "httpbin.org";
const int port = 80;
Finally, we create our WiFiClient object.
WiFiClient client
In the setup, we simply connect to the WiFi in the station mode using the credentials provided.
void setup() {
   Serial.begin(115200);
   WiFi.mode(WIFI_STA);          //The WiFi is in station mode. The other is the softAP mode
   WiFi.begin(ssid, password);
   while (WiFi.status() != WL_CONNECTED) {
      delay(500);
      Serial.print(".");
   }
   Serial.println("");  Serial.print("WiFi connected to: "); Serial.println(ssid);  Serial.println("IP address: ");  Serial.println(WiFi.localIP());
   delay(2000);
}
The loop becomes important here. That's where the HTTP request gets executed. We first begin by reading the Chip ID of our ESP32. We will be sending that as a parameter to the server along with our name. We will construct the body of our HTTP request using these parameters.
void loop() {
   int  conn;
   int chip_id = ESP.getEfuseMac();;
   Serial.printf("  Flash Chip id = %08X\t", chip_id);
   Serial.println();
   Serial.println();
   String body = "ChipId=" + String(chip_id) + "&SentBy=" + "your_name";
   int body_len = body.length();
Notice the & before the SentBy field. & is used as a separator between different key-value pairs in the HTTP requests. Next, we connect to the server.
Serial.println(".....");
Serial.println(); Serial.print("For sending parameters, connecting to ");      Serial.println(server);
conn = client.connect(server, port);
POST Request
If our connection is successful, client.connect() will return 1. We check that before making the request.
if (conn == 1)  {
   Serial.println(); Serial.print("Sending Parameters...");
   //Request
   client.println("POST /post HTTP/1.1");
   //Headers
   client.print("Host: "); client.println(server);
   client.println("Content-Type: application/x−www−form−urlencoded");
   client.print("Content-Length: "); client.println(body_len);
   client.println("Connection: Close");
   client.println();
   //Body
   client.println(body);
   client.println();

   //Wait for server response
   while (client.available() == 0);

   //Print Server Response
   while (client.available()) {
      char c = client.read();
      Serial.write(c);
   }
} else {
   client.stop();
   Serial.println("Connection Failed");
}
As you can see, we use the client.print() or client.println() for sending our request lines. The request, headers, and body are clearly indicated via comments. In the Request line, POST /post HTTP/1.1 is equivalent to POST http://httpbin.org/post HTTP/1.1. Since we have already mentioned the server in the client.connect(server,port), it is understood that /post refers to the server/post URL.
For POST requests especially, the Content-Length header is very important. Without it, several servers assume that the content-length is 0, meaning there is no body. The Content-Type has been kept as application/x−www−form−urlencoded because our body represents a form data. In a typical form submission, you will have keys like Name, Address, etc., and corresponding values. You can have several other content types. For the full list, see this.
The Connection: Close header tells the server to close the connection after the request has been processed. You could have alternatively send Connection: Keep-Alive if you wanted the connection to be kept alive after the request was processed.
These are just some of the headers that we could have included. The full list of HTTP headers can be found here.
Now, the httpbin.org/post URL typically just echoes back our body. A sample response is the following −
HTTP/1.1 200 OK
Date: Sat, 21 Nov 2020 16:25:47 GMT
Content−Type: application/json
Content−Length: 402
Connection: close
Server: gunicorn/19.9.0
Access−Control−Allow−Origin: *
Access−Control−Allow−Credentials: true
{
   "args": {},
   "data": "",
   "files": {},
   "form": {
      "ChipId": "1780326616",
      "SentBy": "Yash"
   },
   "headers": {
      "Content−Length": "34",
      "Content−Type": "application/x−www−form−urlencoded",
      "Host": "httpbin.org",
      "X-Amzn−Trace−Id": "Root=1−5fb93f8b−574bfb57002c108a1d7958bb"
   },
   "json": null,
   "origin": "183.87.63.113",
   "url": "http://httpbin.org/post"
}
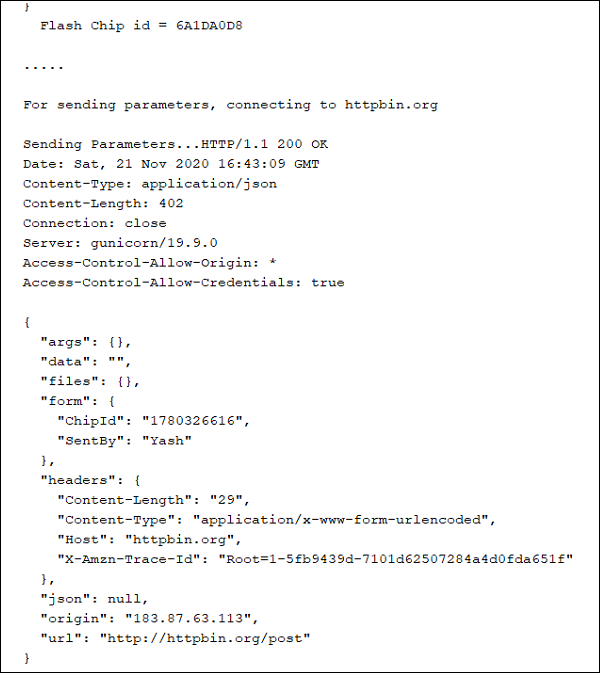
As you can see, the content of the POST body has been echoed back in the "form" field. You should see something similar to the above printed on your serial monitor. Also note the URL field. It clearly shows that the /post address in the request line was interpreted as http://httpbin.org/post.
Finally, we will wait for 5 seconds, before ending the loop, and thus, making the request again.
  delay(5000);
}
GET Request
At this point, you would be wondering, what changes would you need to make to convert this POST request to GET request. It is quite simple actually. You would, first of all, invoke the /get address instead of /post. Then you'll append the content of the body to the URL after a ? sign. Finally, you will replace the method to GET. Also, the Content-Length and Content−Type headers are no longer required, since your body is empty. Thus, your request block would look like −
if (conn == 1) {
   String path = String("/get") + String("?") +body;
   Serial.println(); Serial.print("Sending Parameters...");
   //Request
   client.println("GET "+path+" HTTP/1.1");
   //Headers
   client.print("Host: "); client.println(server);
   client.println("Connection: Close");
   client.println();
   //No Body

   //Wait for server response
   while (client.available() == 0);

   //Print Server Response
   while (client.available()) {
      char c = client.read();
      Serial.write(c);
   }
} else {
   client.stop();
   Serial.println("Connection Failed");
}
The corresponding response would look like −
HTTP/1.1 200 OK
Date: Tue, 17 Nov 2020 18:05:34 GMT
Content-Type: application/json
Content-Length: 497
Connection: close
Server: gunicorn/19.9.0
Access-Control−Allow−Origin: *
Access-Control-Allow-Credentials: true

{
   "args": {
      "ChipID": "3F:A0:A1:77:0D:84",
      "SentBy": "Yash"
   },
   "headers": {
      "Accept": "*/*",
      "Accept-Encoding": "deflate, gzip",
      "Host": "httpbin.org",
      "User-Agent": "Mozilla/5.0 (Windows NT 10.0; Win64; x64) AppleWebKit/537.36 (KHTML, like Gecko) Chrome/86.0.4240.198 Safari/537.36",
      "X−Amzn−Trace−Id": "Root=1−5fb410ee−3630963b0b7980c959c34038"
   },
   "origin": "206.189.180.4",
   "url": "https://httpbin.org/get?ChipID=3F:A0:A1:77:0D:84&SentBy=Yash"
}
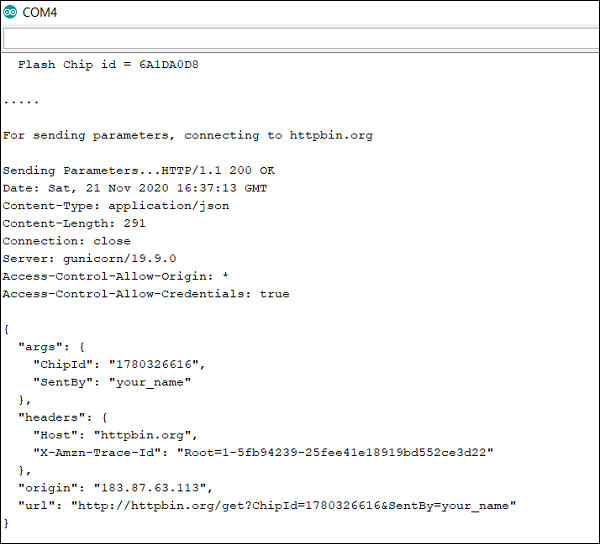
As you can see, the parameters send to the server are now returned in the args field, because they were sent as arguments in the URL itself.
Congratulations!! You've successfully sent your HTTP requests using ESP32.