- Erlang Tutorial
- Erlang - Home
- Erlang - Overview
- Erlang - Environment
- Erlang - Basic Syntax
- Erlang - Shell
- Erlang - Data Types
- Erlang - Variables
- Erlang - Operators
- Erlang - Loops
- Erlang - Decision Making
- Erlang - Functions
- Erlang - Modules
- Erlang - Recursion
- Erlang - Numbers
- Erlang - Strings
- Erlang - Lists
- Erlang - File I/O
- Erlang - Atoms
- Erlang - Maps
- Erlang - Tuples
- Erlang - Records
- Erlang - Exceptions
- Erlang - Macros
- Erlang - Header Files
- Erlang - Preprocessors
- Erlang - Pattern Matching
- Erlang - Guards
- Erlang - BIFS
- Erlang - Binaries
- Erlang - Funs
- Erlang - Processes
- Erlang - Emails
- Erlang - Databases
- Erlang - Ports
- Erlang - Distributed Programming
- Erlang - OTP
- Erlang - Concurrency
- Erlang - Performance
- Erlang - Drivers
- Erlang - Web Programming
- Erlang Useful Resources
- Erlang - Quick Guide
- Erlang - Useful Resources
- Erlang - Discussion
Erlang - Quick Guide
Erlang - Overview
Erlang is a functional programming language which also has a runtime environment. It was built in such a way that it had integrated support for concurrency, distribution and fault tolerance. Erlang was originally developed to be used in several large telecommunication systems from Ericsson.
The first version of Erlang was developed by Joe Armstrong, Robert Virding and Mike Williams in 1986. It was originally a proprietary language within Ericsson. It was later released as an open source language in year 1998. Erlang, along with OTP, a collection of middleware and libraries in Erlang, are now supported and maintained by the OTP product unit at Ericsson and widely referred to as Erlang/OTP.
Why Erlang?
Erlang should be used to develop your application, if you have the following requirements −
The application needs to handle a large number of concurrent activities.
It should be easily distributable over a network of computers.
There should be a facility to make the application fault-tolerant to both software and hardware errors.
The application should be scalable. This means that it should have the ability to span across multiple servers with little or no change.
It should be easily upgradable and reconfigurable without having to stop and restart the application itself.
The application should be responsive to users within certain strict timeframes.
The official website for Erlang is https://www.erlang.org/.

Erlang - Environment
Now before you can start working on Erlang, you need to ensure that you have a fully functional version of Erlang running on your system. This section will look into the installation of Erlang and its subsequent configuration on a windows machine to get started with Erlang.
Ensure that the following system requirements are met before proceeding with the installation.
System Requirements
| Memory | 2 GB RAM (recommended) |
|---|---|
| Disk Space | No minimum requirement. Preferably to have enough storage to store the applications which will be created using Erlang. |
| Operating System Version | Erlang can be installed on Windows, Ubuntu/Debian, Mac OS X. |
Downloading Erlang
To download Erlang, one must go to the following url − www.erlang.org/downloads.
This page has a variety of downloads and also the steps required to download and install the language on Linux and Mac platforms.
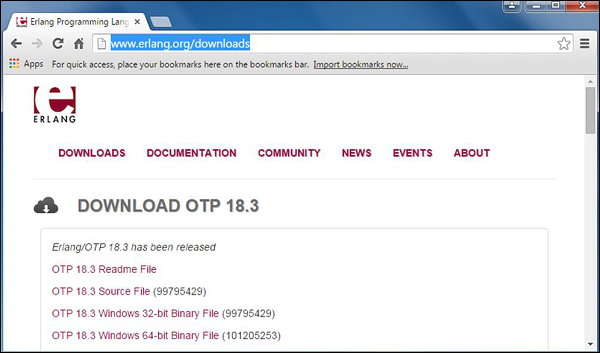
Click on the ‘OTP 18.3 Windows 32-bit Binary File’ to begin the download of the Erlang Windows Installation file.
Erlang Installation
The following steps detail how Erlang can be installed on Windows −
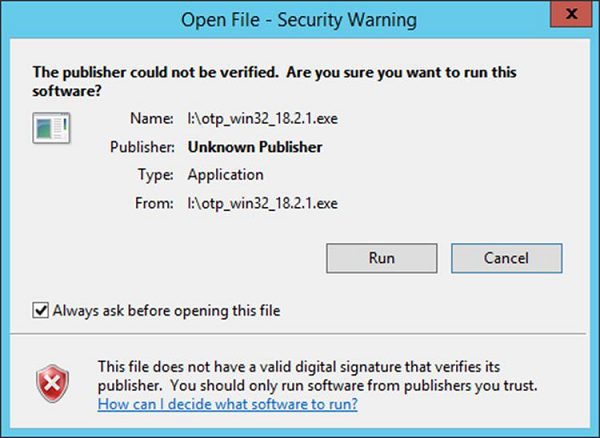
Step 1 − Launch the Installer downloaded in the earlier section. After the installer starts, click Run.
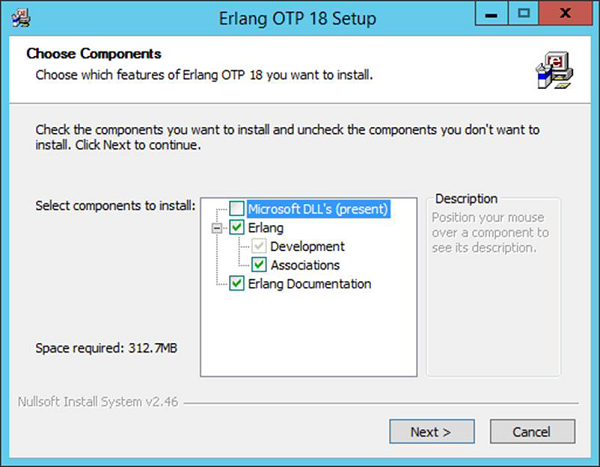
Step 2 − Click Next on the following screen to accept the default components, which will be installed.
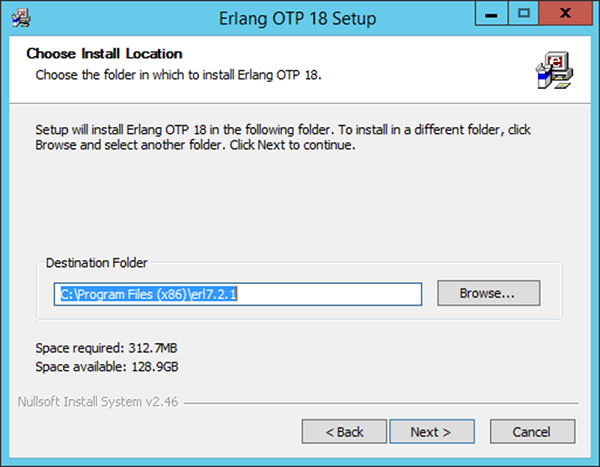
Step 3 − Accept the default installation path and click Next.
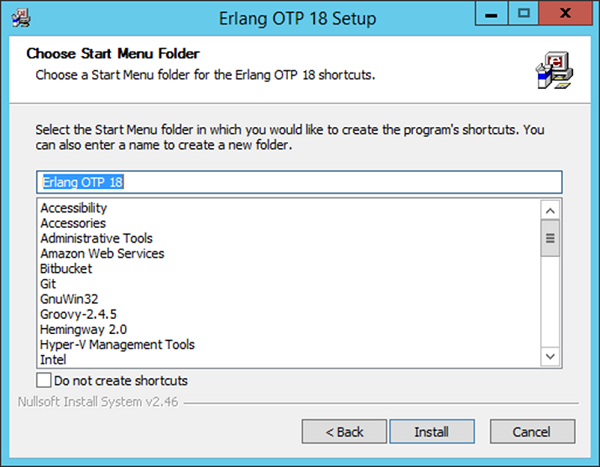
Step 4 − Accept the default Start Menu item, which will be created and click Next.
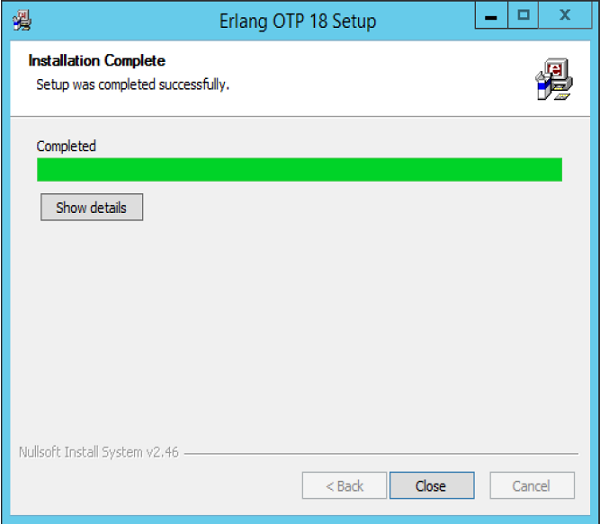
Step 5 − After the installation is complete, click Close to complete the installation.
Erlang Configuration
After the installation is complete the following configuration needs to be carried out to ensure that Erlang starts working on the system.
| OS | Output |
|---|---|
| Windows | Append the String; C:\Program Files(x86)\erl7.2.1\bin OR C:\Program Files\erl7.2.1\bin to the end of the system variable PATH. |
If you now open the command prompt and type erl, you should be able to get the erl command prompt.
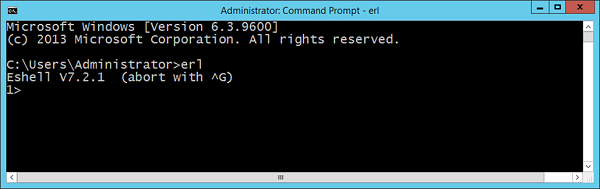
Congratulations, you now have erl successfully configured on your laptop.
Installation of Plugin-ins on Popular IDE’s
Erlang as a programming language is also available in popular IDE’s such as Eclipse and IntelliJ. Let’s look at how we can get the required plugin’s in these IDE’s so that you have more choices in working with Erlang.
Installation in Eclipse
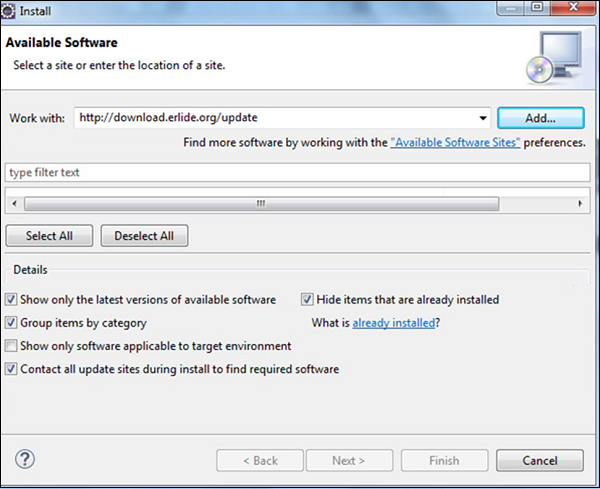
Step 1 − Open Eclipse and click the Menu item, Help → Install New Software.

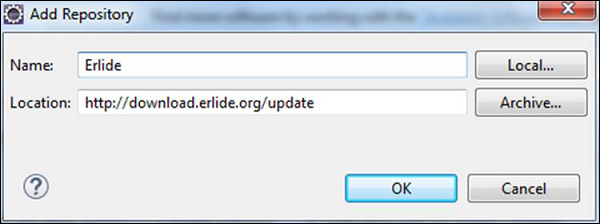
Step 2 − Enter the Work with link as https://download.erlide.org/update
Then click Add.
Step 3 − You will then be prompted to enter a Name for the plugin, enter the name as Erlide. Click Ok.
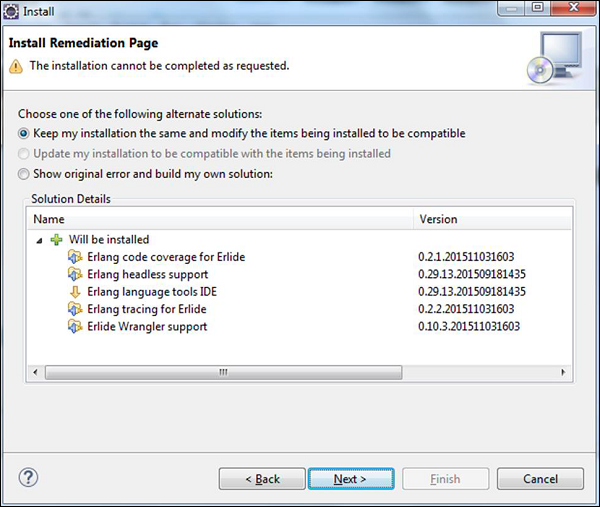
Step 4 − Eclipse will then scan the link provided and get the required plugins. Check the plugins and click Next.

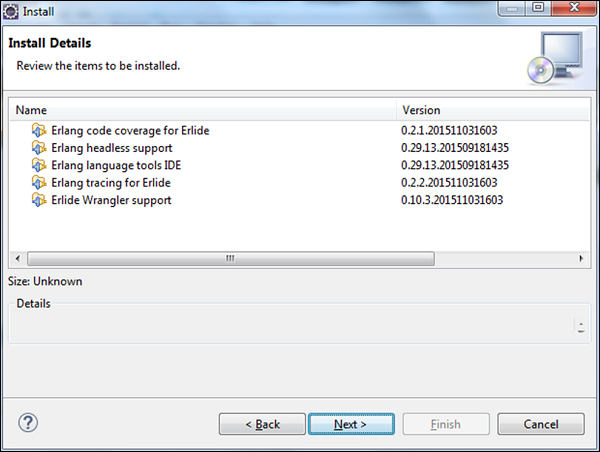
Step 5 − In the next dialog box, Eclipse will show all the components which will be installed. Click Next.
Step 6 − In the next dialog box, Eclipse will just ask to review the components being installed. Click Next.
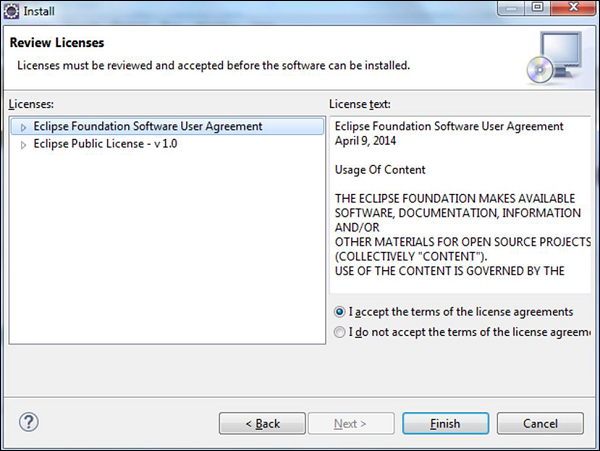
Step 7 − In the next dialog box, you just need to accept the license agreement. Finally, click the Finish button.
The installation will then begin, and once completed, it will prompt you to restart Eclipse.
Once Eclipse is restarted, when you create a project, you will be able to see Erlang as an option as well.

Installation in IntelliJ
Please follow the subsequent steps to install IntelliJ in your computer.
Step 1 − Open IntelliJ and click Configure → Plugins.

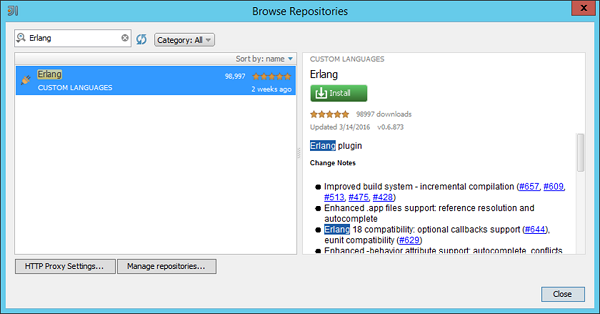
Step 2 − Type Erlang in the search box. You will get Erlang plugin on the right hand side of the screen. Click the Install button.
Step 3 − After the Erlang plugin is installed, you will be prompted to restart the IDE.
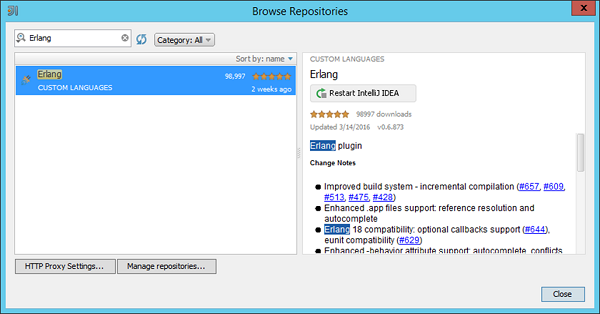
When you restart the IDE and try to create a new project, you will see the option to create an Erlang project.

Erlang - Basic Syntax
In order to understand the basic syntax of Erlang, let’s first look at a simple Hello World program.
Example
% hello world program
-module(helloworld).
-export([start/0]).

start() ->
   io:fwrite("Hello, world!\n").
The following things need to be noted about the above program −
The % sign is used to add comments to the program.
The module statement is like adding a namespace as in any programming language. So over here, we are mentioning that this code will part of a module called helloworld.
The export function is used so that any function defined within the program can be used. We are defining a function called start and in order to use the start function, we have to use the export statement. The /0 means that our function ‘start’ accepts 0 parameters.
We finally define our start function. Here we use another module called io which has all the required Input Output functions in Erlang. We used the fwrite function to output “Hello World” to the console.
The output of the above program will be −
Output
Hello, world!
General Form of a Statement
In Erlang, you have seen that there are different symbols used in Erlang language. Let’s go through what we have seen from a simple Hello World program −
The hyphen symbol (–) is generally used along with the module, import and export statement. The hyphen symbol is used to give meaning to each statement accordingly. So examples from the Hello world program are shown in the following program −
-module(helloworld).
-export([start/0]).
Each statement is delimited with the dot (.) symbol. Each statement in Erlang needs to end with this delimiter. An example from the Hello world program is as shown in the following program −
io:fwrite("Hello, world!\n").
The slash (/) symbol is used along with the function to define the number of parameters which is accepted by the function.
-export([start/0]).
Modules
In Erlang, all the code is divided into modules. A module consists of a sequence of attributes and function declarations. It is just like a concept of a namespace in other programming languages which is used to logically separate different units of code.
Defining a module
A module is defined with the module identifier. The general syntax and example is as follows.
Syntax
-module(ModuleName)
The ModuleName needs to be same as the file name minus the extension .erl. Otherwise code loading will not work as intended.
Example
-module(helloworld)
These Modules will be covered in detail in the ensuing chapters, this was just to get you at a basic understanding of how a module should be defined.
Import Statement in Erlang
In Erlang, if one wants to use the functionality of an existing Erlang module, one can use the import statement. The general form of the import statement is depicted in the following program −
Example
-import (modulename, [functionname/parameter]).
Where,
Modulename − This is the name of the module which needs to be imported.
functionname/parameter − The function in the module which needs to be imported.
Let’s change the way we write our hello world program to use an import statement. The example would be as shown in the following program.
Example
% hello world program
-module(helloworld).
-import(io,[fwrite/1]).
-export([start/0]).

start() ->
   fwrite("Hello, world!\n").
In the above code, we are using the import keyword to import the library ‘io’ and specifically the fwrite function. So now whenever we invoke the fwrite function, we don’t have to mention the io module name everywhere.
Keywords in Erlang
A Keyword is a reserved word in Erlang which should not be used for any different purposes other than the purpose which it has been intended for. Following are the list of keywords in Erlang.
| after | and | andalso | band |
| begin | bnot | bor | bsl |
| bsr | bxor | case | catch |
| cond | div | end | fun |
| if | let | not | of |
| or | orelse | receive | rem |
| try | when | xor |
Comments in Erlang
Comments are used to document your code. Single line comments are identified by using the % symbol at any position in the line. Following is an example for the same −
Example
% hello world program
-module(helloworld).
% import function used to import the io module
-import(io,[fwrite/1]).
% export function used to ensure the start function can be accessed.
-export([start/0]).

start() ->
   fwrite("Hello, world!\n").
Erlang - Shell
The Erlang shell is used for testing of expressions. Hence, testing can be carried out in the shell very easily before it actually gets tested in the application itself.
The following example showcases how the addition expression can be used in the shell. What needs to be noted here is that the expression needs to end with the dot (.) delimiter.
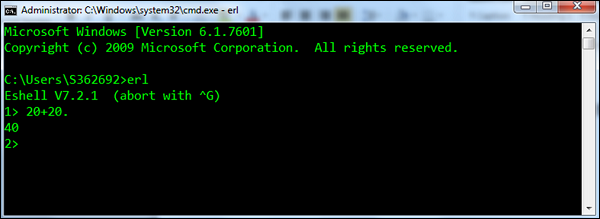
After the command is executed, the shell prints out another prompt, this time for Command Number 2 (because the command number increases each time a new command is entered).
The following functions are the most common one’s used in the Erlang shell.
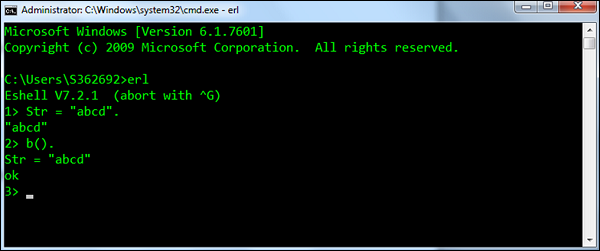
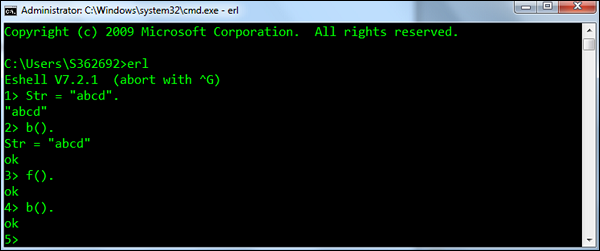
b() − Prints the current variable bindings.
Syntax − b().
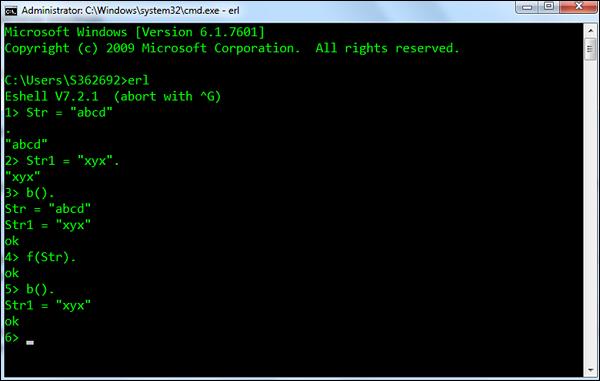
For example − Following is an example of how the function is used. First a variable called Str is defined, which has the value abcd. Then b() is used to display all the binded variables.
f() − Removes all current variable bindings.
Syntax − f().
For example − Following is an example of how the function is used. First a variable called Str is defined which has the value abcd. The f() is then used to remove the Str variable binding. The b() is then called to ensure the binding has been successfully removed.
f(x) − Removes the binding for a particular variable.
Syntax − f(x). Where, x – is the variable for which the binding needs to be removed.
For example − Following is an example of how the function is used. First a variable called Str and Str1 are defined. The f(Str) is then used to remove the Str variable binding. The b() is then called to ensure the binding has been successfully removed.
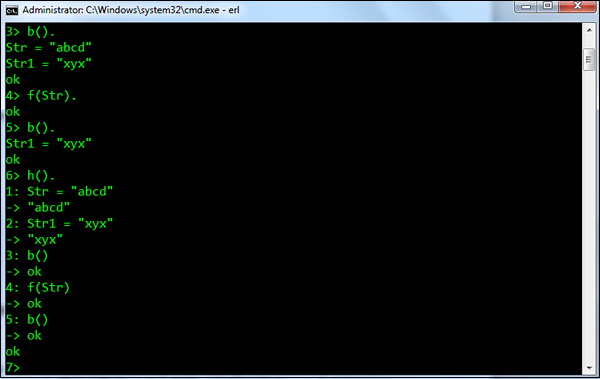
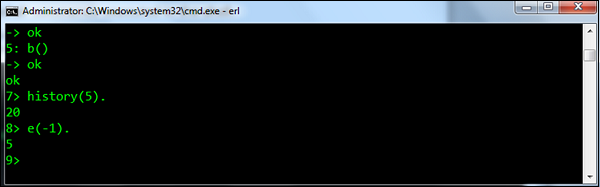
h() − Prints the history list of all the commands executed in the shell.
Syntax − h().
For example − An example of the h() command, which prints the history of commands executed in the shell is shown in the following screenshot.
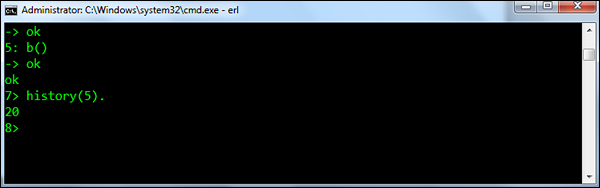
history(N) − Sets the number of previous commands to keep in the history list to N. The previous number is returned. The default number is 20.
Syntax − history(N). Where, N – is the number to which the command history list needs to be limited to.
For example − An example of the history(N) command is shown in the following screenshot.
e(N) − Repeats the command N, if N is positive. If it is negative, the Nth previous command is repeated (i.e., e(-1) repeats the previous command).
Syntax − e(N). Where, N – is the command at the Nth position in the list.
For example − An example of the e(N) command is shown below. Since we have executed the e(-1) command, it will execute the previous command which was history(5).
Erlang - Data Types
In any programming language, you need to use several variables to store various types of information. Variables are nothing but reserved memory locations to store values. This means that when you create a variable you reserve some space in the memory to store the value associated with that variable.
You may like to store information of various data types like string, character, wide character, integer, floating point, Boolean, etc. Based on the data type of a variable, the operating system allocates memory and decides what can be stored in the reserved memory.
Built-in Data Types
Erlang offers a wide variety of built-in data types. Following is a list of data types which are defined in Erlang −
Number − In Erlang, there are 2 types of numeric literals which are integers and floats.
Atom − An atom is a literal, a constant with name. An atom is to be enclosed in single quotes (') if it does not begin with a lower-case letter or if it contains other characters than alphanumeric characters, underscore (_), or @.
Boolean − Boolean data types in Erlang are the two reserved atoms: true and false.
Bit String − A bit string is used to store an area of un-typed memory.
Tuple − A tuple is a compound data type with a fixed number of terms. Each Term in the tuple is called as an element. The number of elements is said to be the size of the tuple.
Map − A map is a compound data type with a variable number of key-value associations. Each key-value association in the map is called an association pair. The key and value parts of the pair are called elements. The number of association pairs is said to be the size of the map.
List − A list is a compound data type with a variable number of terms. Each term in the list is called an element. The number of elements is said to be the length of the list.
Note − You will be surprised to see that you cannot see the String type anywhere in the list above. That’s because there is no string data type exclusively defined in Erlang. But we will see how we can work with strings in a subsequent chapter.
Following are the examples of how each data type can be used. Again each data type will be discussed in detail in the ensuing chapters. This is just to get you acquainted with a brief description of the above-mentioned data types.
Number
An example of how the number data type can be used is shown in the following program. This program shows the addition of 2 Integers.
Example
-module(helloworld).
-export([start/0]).

start() ->
   io:fwrite("~w",[1+1]).
The output of the above program will be −
Output
2
Atom
Atoms should begin with a lowercase letter and can contain lowercase and uppercase characters, digits, underscore (_) and the “at” sign (@). We can also enclose an atom in single quotes.
An example of how the atom data type can be used is shown in the following program. In this program, we are creating an atom which is called atom1.
Example
-module(helloworld).
-export([start/0]).

start() ->
   io:fwrite(atom1).
The output of the above program will be −
Output
atom1
Boolean
An example of how the Boolean data type can be used is shown in the following program. This example does a comparison between 2 integers and prints the resultant Boolean to the console.
Example
-module(helloworld).
-export([start/0]).

start() ->
   io:fwrite(2 =< 3).
The output of the above program will be −
Output
true
Bit String
An example of how the Bit String data type can be used is shown in the following program. This program defines a Bit String consisting of 2 bits. The binary_to_list is an inbuilt function defined in Erlang which can be used to convert a Bit String to a list.
Example
-module(helloworld).
-export([start/0]).

start() ->
   Bin1 = <<10,20>>,
   X = binary_to_list(Bin1),
   io:fwrite("~w",[X]).
The output of the above program will be −
Output
[10,20]
Tuple
An example of how the Tuple data type can be used is shown in the following program.
Here we are defining a Tuple P which has 3 terms. The tuple_size is an inbuilt function defined in Erlang, which can be used to determine the size of the tuple.
Example
-module(helloworld).
-export([start/0]).

start() ->
   P = {john,24,{june,25}} ,
   io:fwrite("~w",[tuple_size(P)]).
The output of the above program will be −
Output
3
Map
An example of how the Map data type can be used is shown in the following program.
Here we are defining a Map M1 which has 2 mappings. The map_size is an inbuilt function defined in Erlang, which can be used to determine the size of the map.
Example
-module(helloworld).
-export([start/0]).

start() ->
   M1 = #{name=>john,age=>25},
   io:fwrite("~w",[map_size(M1)]).
The output of the above program will be −
Output
2
List
An example of how the List data type can be used is shown in the following program.
Here we are defining a List L which has 3 items. The length is an inbuilt function defined in Erlang, which can be used to determine the size of the list.
Example
-module(helloworld).
-export([start/0]).

start() ->
   L = [10,20,30] ,
   io:fwrite("~w",[length(L)]).
The output of the above program will be −
Output
3
Erlang - Variables
In Erlang, all the variables are bound with the ‘=’ statement. All variables need to start with the upper case character. In other programming languages, the ‘=’ sign is used for the assignment, but not in the case of Erlang. As stated, variables are defined with the use of the ‘=’ statement.
One key thing to note in Erlang is that variables are immutable, which means that in order for the value of the variable to change, it needs to be destroyed and recreated again.
The following basic variables in Erlang are explained in the last chapter −
Numbers − This is used to represent an integer or a float. An example is 10.
Boolean − This represents a Boolean value which can either be true or false.
Bit String − A bit string is used to store an area of un-typed memory. An example is <<40,50>>.
Tuple − A tuple is a compound data type with a fixed number of terms. An example is {40,50}.
Map − A map is a compound data type with a variable number of key-value associations. Each key-value association in the map is called an association pair. An example is {type=>person,age=>25}.
List − A list is a compound data type with a variable number of terms. An example is [40,40].
Variable Declarations
The general syntax of defining a variable is as follows −
Syntax
var-name = var-value
Where,
var-name − This is the name of the variable.
var-value − This is the value bound to the variable.
Following is an example of variable declaration −
Example
-module(helloworld).
-export([start/0]).

start() ->
   X = 40,
   Y = 50,
   Result = X + Y,
   io:fwrite("~w",[Result]).
In the above example, we have 2 variables, one is X which is bound to the value 40 and the next is Y which is bound to the value of 50. Another variable called Result is bound to the addition of X and Y.
The output of the above program will be −
Output
90
Naming Variables
As discussed, variable names have to start with uppercase. Let’s take an example of a variable declared in lower case.
Example
-module(helloworld).
-export([start/0]).

start() ->
   X = 40,
   Y = 50,
   result = X + Y,
   io:fwrite("~w",[Result]).
If you try to compile the above program, you will get the following compile time error.
Output
helloworld.erl:8: variable 'Result' is unbound
Secondly, all variables can only be assigned once. Let’s take an example of assigning a variable more than once.
Example
-module(helloworld).
-export([start/0]).

start() ->
   X = 40,
   Y = 50,
   X = 60,
   io:fwrite("~w",[X]).
If you try to compile the above program, you will receive the following compile time error.
Output
helloworld.erl:6: Warning: variable 'Y' is unused
helloworld.erl:7: Warning: no clause will ever match
helloworld.erl:7: Warning: the guard for this clause evaluates to 'false'
Printing Variables
In this section we will discuss how to use the various functions of printing variables.
Using the io:fwrite function
You would have seen this (io:fwrite) used in all of the above programs. The fwrite function is part of the ‘io’ module or Erlang, which can be used to output the value of variables in the program.
The following example shows a few more parameters which can be used with the fwrite statement.
Example
-module(helloworld).
-export([start/0]).

start() ->
   X = 40.00,
   Y = 50.00,
   io:fwrite("~f~n",[X]),
   io:fwrite("~e",[Y]).
The output of the above program will be −
Output
40.000000
5.00000e+1
The following pointers should be noted about the above program.
~ − This character symbolizes that some formatting needs to be carried out for the output.
~f − The argument is a float which is written as [-]ddd.ddd, where the precision is the number of digits after the decimal point. The default precision is 6 and it cannot be less than 1.
~n − This is to println to a new line.
~e − The argument is a float which is written as [-]d.ddde+-ddd, where the precision is the number of digits written. The default precision is 6 and it cannot be less than 2.
Erlang - Operators
An operator is a symbol that tells the compiler to perform specific mathematical or logical manipulations.
Erlang has the following type of operators −
- Arithmetic operators
- Relational operators
- Logical operators
- Bitwise operators
Arithmetic Operators
Erlang language supports the normal Arithmetic operators as any the language. Following are the Arithmetic operators available in Erlang.
| Operator | Description | Example |
|---|---|---|
| + | Addition of two operands | 1 + 2 will give 3 |
| − | Subtracts second operand from the first | 1 - 2 will give -1 |
| * | Multiplication of both operands | 2 * 2 will give 4 |
| / | Division of numerator by denominator | 2 / 2 will give 1 |
| rem | Remainder of dividing the first number by the second | 3 rem 2 will give 1 |
| div | The div component will perform the division and return the integer component. | 3 div 2 will give 1 |
Relational Operators
The Relational Operators allow the comparison of objects. Following are the relational operators available in Erlang.
| Operator | Description | Example |
|---|---|---|
| == | Tests the equality between two objects | 2 = 2 will give true |
| /= | Tests the difference between two objects | 3 /= 2 will give true |
| < | Checks to see if the left object is less than the right operand. | 2 < 3 will give true |
| =< | Checks to see if the left object is less than or equal to the right operand. | 2 =<3 will give true |
| > | Checks to see if the left object is greater than the right operand. | 3 > 2 will give true |
| >= | Checks to see if the left object is greater than or equal to the right operand. | 3 >= 2 will give true |
Logical Operators
These Logical Operators are used to evaluate Boolean expressions. Following are the logical operators available in Erlang.
| Operator | Description | Example |
|---|---|---|
| or | This is the logical “or” operator | true or true will give true |
| and | This is the logical “and” operator | True and false will give false |
| not | This is the logical “not” operator | not false will give true |
| xor | This is the logical exclusive “xor” operator | True xor false will give true |
Bitwise Operators
Erlang provides four bitwise operators. Following are the bitwise operators available in Erlang.
| Sr.No. | Operator & Description |
|---|---|
| 1 |
band This is the bitwise “and” operator |
| 2 |
bor This is the bitwise “or” operator |
| 3 |
bxor This is the bitwise “xor” or Exclusive or operator |
| 4 |
bnot This is the bitwise negation operator |
Following is the truth table showcasing these operators −
| p | q | p & q | p | q | p ^ q |
|---|---|---|---|---|
| 0 | 0 | 0 | 0 | 0 |
| 0 | 1 | 0 | 1 | 1 |
| 1 | 1 | 1 | 1 | 0 |
| 1 | 0 | 0 | 1 | 1 |
Operator Precedence
The following table shows the Operator Precedence for the Erlang operators in order of descending priority together with their associativity. Operator precedence and associativity are used to determine the evaluation order in un-parenthesized expressions.
| Operators | Associativity |
|---|---|
| : | |
| # | |
| bnot,not | |
| /,*,div,rem,band,and | Left associative |
| +,-,bor,bxor,or,xor | Left associative |
| ==,/=,=<,<,>=,> |
Erlang - Loops
Erlang is a functional programming language and what needs to be remembered about all functional programming languages is that they don’t offer any constructs for loops. Instead, functional programming depends on a concept called recursion.
while Statement Implementation
Since there is no direct while statement available in Erlang, one has to use the recursion techniques available in Erlang to carry out a while statement implementation.
We will try to follow the same implementation of the while loop as is followed in other programming languages. Following is the general flow which will be followed.
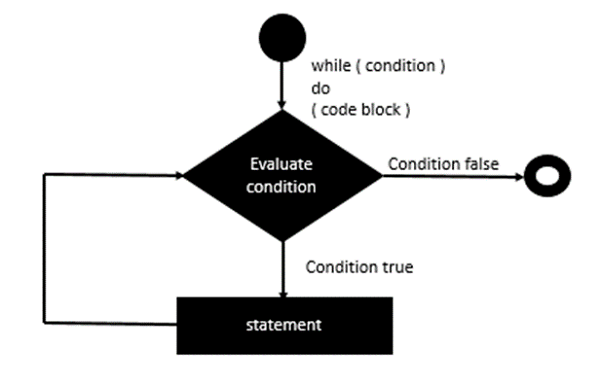
Let’s look at an example of how we can use recursion to implement the while loop in Erlang.
Example
-module(helloworld).
-export([while/1,while/2, start/0]).

while(L) -> while(L,0).
while([], Acc) -> Acc;

while([_|T], Acc) ->
   io:fwrite("~w~n",[Acc]),
   while(T,Acc+1).

   start() ->
   X = [1,2,3,4],
   while(X).
The following key points need to be noted about the above program −
Define a recursive function called while which would simulate the implementation of our while loop.
Input a list of values defined in the variable X to our while function as an example.
The while function takes each list value and stores the intermediate value in the variable ‘Acc’.
The while loop is then called recursively for each value in the list.
The output of the above code will be −
Output
0
1
2
3
for Statement
Since there is no direct for statement available in Erlang, one has to use the recursion techniques available in Erlang to carry out a for statement implementation.
We will try to follow the same implementation of the for loop as is followed in other programming languages. Following is the general flow which should be adhered to.
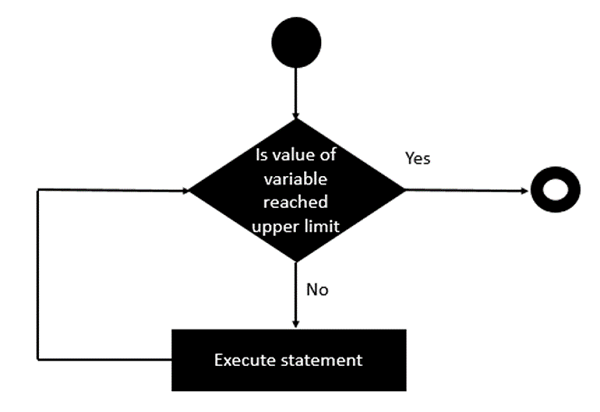
Let’s look at an example of how we can use recursion to implement the for loop in Erlang.
Example
-module(helloworld).
-export([for/2,start/0]).

for(0,_) ->
   [];

   for(N,Term) when N > 0 ->
   io:fwrite("Hello~n"),
   [Term|for(N-1,Term)].

start() ->
   for(5,1).
The following key points need to be noted about the above program −
We are defining a recursive function which would simulate the implementation of our for loop.
We are using a guard within the ‘for’ function to ensure that the value of N or the limit is a positive value.
We recursively call the for function, by reducing the value of N at each recursion.
The output of the above code will be −
Output
Hello
Hello
Hello
Hello
Hello
Erlang - Decision Making
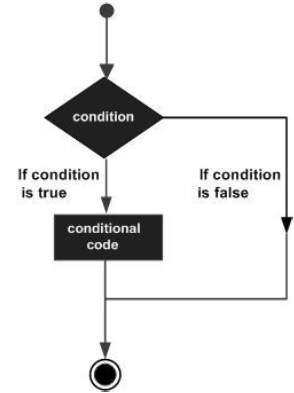
Decision making structures requires that the programmer should specify one or more conditions to be evaluated or tested by the program, along with a statement or statements to be executed if the condition is determined to be true, and optionally, other statements to be executed if the condition is determined to be false.
Following is the general form of a typical decision making structure found in most of the programming languages −
Erlang programming language provides the following types of decision making statements.
| Sr.No. | Statement & Description |
|---|---|
| 1 |
An if statement consists of a Boolean expression followed by one or more statements. |
| 2 |
The if expression also allows for multiple expressions to be evaluated at once. |
| 3 |
You can use one if or else if statement inside another if or else if statement(s). |
| 4 |
It can be used to execute expressions based on the output of the case statement. |
Erlang - Functions
Erlang is known as a functional programming language, hence you would expect to see a lot of emphasis on how functions work in Erlang. This chapter covers what all can be done with the functions in Erlang.
Defining a Function
The syntax of a function declaration is as follows −
Syntax
FunctionName(Pattern1… PatternN) ->
Body;
Where,
FunctionName − The function name is an atom.
Pattern1… PatternN − Each argument is a pattern. The number of arguments N is the arity of the function. A function is uniquely defined by the module name, function name, and arity. That is, two functions with the same name and in the same module, but with different arities are two different functions.
Body − A clause body consists of a sequence of expressions separated by comma (,):
The following program is a simple example of the use of functions −
Example
-module(helloworld).
-export([add/2,start/0]).

add(X,Y) ->
   Z = X+Y,
   io:fwrite("~w~n",[Z]).

start() ->
   add(5,6).
The following pointers should be noted about the above program −
We are defining two functions, one is called add which takes 2 parameters and the other is the start function.
Both functions are defined with the export function. If we don’t do this, we will not be able to use the function.
One function can be called inside another. Here we are calling the add function from the start function.
The output of the above program will be −
Output
11
Anonymous Functions
An anonymous function is a function, which has no name associated with it. Erlang has the facility to define anonymous functions. The following program is an example of an anonymous function.
Example
-module(helloworld).
-export([start/0]).

start() ->
   Fn = fun() ->
      io:fwrite("Anonymous Function") end,
   Fn().
The following points need to be noted about the above example −
The anonymous function is defined with the fun() keyword.
The Function is assigned to a variable called Fn.
The Function is called via the variable name.
The output of the above program will be −
Output
Anonymous Function
Functions with Multiple Arguments
Erlang functions can be defined with zero or more parameters. Function overloading is also possible, wherein you can define a function with the same name multiple times, as long as they have different number of parameters.
In the following example, the function demo is defined with multiple arguments for each function definition.
Example
-module(helloworld).
-export([add/2,add/3,start/0]).

add(X,Y) ->
   Z = X+Y,
   io:fwrite("~w~n",[Z]).

add(X,Y,Z) ->
   A = X+Y+Z,
   io:fwrite("~w~n",[A]).

start() ->
   add(5,6),
   add(5,6,6).
In the above program, we are defining the add function twice. But the definition of the first add function takes in two parameters and the second one takes in three parameters.
The output of the above program will be −
Output
11
17
Functions with Guard Sequences
Functions in Erlang also have the capability of having guard sequences. These are nothing but expressions which only when evaluated to true will cause the function to run.
The syntax of a function with a guard sequence is shown in the following program.
Syntax
FunctionName(Pattern1… PatternN) [when GuardSeq1]->
Body;
Where,
FunctionName − The function name is an atom.
Pattern1… PatternN − Each argument is a pattern. The number of arguments N is the arity of the function. A function is uniquely defined by the module name, function name, and arity. That is, two functions with the same name and in the same module, but with different arities are two different functions.
Body − A clause body consists of a sequence of expressions which are separated by a comma (,).
GuardSeq1 − This is the expression which gets evaluated when the function is called.
The following program is a simple example of the use of a function with a guard sequence.
Example
-module(helloworld).
-export([add/1,start/0]).

add(X) when X>3 ->
   io:fwrite("~w~n",[X]).

start() ->
   add(4).
The output of the above program is −
Output
4
If the add function was called as add(3), the program will result in an error.
Erlang - Modules
Modules are a bunch of functions regrouped in a single file, under a single name. Additionally, all functions in Erlang must be defined in modules.
Most of the basic functionality like arithmetic, logic and Boolean operators are already available because the default modules are loaded when a program is run. Every other function defined in a module you will ever use needs to be called with the form Module:Function (Arguments).
Defining a Module
With a module, you can declare two kinds of things: functions and attributes. Attributes are metadata describing the module itself such as its name, the functions that should be visible to the outside world, the author of the code, and so on. This kind of metadata is useful because it gives hints to the compiler on how it should do its job, and also because it lets people retrieve useful information from compiled code without having to consult the source.
The syntax of a function declaration is as follows −
Syntax
-module(modulename)
Where, modulename is the name of the module. This has to be the first line of the code in the module.
The following program shows an example of a module called helloworld.
Example
-module(helloworld).
-export([start/0]).

start() ->
   io:fwrite("Hello World").
The output of the above program is −
Output
Hello World
Module Attributes
A module attribute defines a certain property of a module. A module attribute consists of a tag and a value.
The general syntax of an attribute is −
Syntax
-Tag(Value)
An example of how the attribute can be used is shown in the following program −
Example
-module(helloworld).
-author("TutorialPoint").
-version("1.0").
-export([start/0]).

start() ->
   io:fwrite("Hello World").
The above program defines 2 custom attributes called author and version which contains the program author and program version number respectively.
The output of the above program is −
Output
Hello World
Pre-built Attributes
Erlang has some pre-built attributes which can be attached to modules. Let’s take a look at them.
Export
The exports attribute will take a list of functions and arity to export for consumption by other modules. It will define the module interface. We have already seen this in all of our previous examples.
Syntax
export([FunctionName1/FunctionArity1,.,FunctionNameN/FunctionArityN])
Where,
FunctionName − This is the name of the function in the program.
FunctionArity − This is the number of parameters associated with the function.
Example
-module(helloworld).
-author("TutorialPoint").
-version("1.0").
-export([start/0]).

start() ->
   io:fwrite("Hello World").
The output of the above program will be −
Output
Hello World
Import
The import attribute is used to import functions from another module to use it as local.
Syntax
-import (modulename , [functionname/parameter]).
Where,
Modulename − This is the name of the module which needs to be imported.
functionname/parameter − the function in the module which needs to be imported.
Example
-module(helloworld).
-import(io,[fwrite/1]).
-export([start/0]).

start() ->
   fwrite("Hello, world!\n").
In the above code, we are using the import keyword to import the library ‘io’ and specifically the fwrite function. So, now whenever we invoke the fwrite function, we don’t have to mention the io module name everywhere.
The output of the above program will be −
Output
Hello, world!
Erlang - Recursion
Recursion is an important part of Erlang. First let’s see how we can implement simple recursion by implementing the factorial program.
Example
-module(helloworld).
-export([fac/1,start/0]).

fac(N) when N == 0 -> 1;
fac(N) when N > 0 -> N*fac(N-1).

start() ->
   X = fac(4),
   io:fwrite("~w",[X]).
The following things need to be noted about the above program −
We are first defining a function called fac(N).
We are able to define the recursive function by calling fac(N) recursively.
The output of the above program is −
Output
24
Practical Approach to Recursion
In this section, we will understand in detail the different types of recursions and its usage in Erlang.
Length Recursion
A more practical approach to recursion can be seen with a simple example which is used to determine the length of a list. A list can have multiple values such as [1,2,3,4]. Let’s use recursion to see how we can get the length of a list.
Example
-module(helloworld).
-export([len/1,start/0]).

len([]) -> 0;
len([_|T]) -> 1 + len(T).

start() ->
   X = [1,2,3,4],
   Y = len(X),
   io:fwrite("~w",[Y]).
The following things need to be noted about the above program −
The first function len([]) is used for the special case condition if the list is empty.
The [H|T] pattern to match against lists of one or more elements, as a list of length one will be defined as [X|[]] and a list of length two will be defined as [X|[Y|[]]]. Note that the second element is a list itself. This means we only need to count the first one and the function can call itself on the second element. Given each value in a list counts as a length of 1.
The output of the above program will be −
Output
4
Tail Recursion
To understand how the tail recursion works, let’s understand how the following code in the previous section works.
Syntax
len([]) -> 0;
len([_|T]) -> 1 + len(T).
The answer to 1 + len(Rest) needs the answer of len(Rest) to be found. The function len(Rest) itself then needed the result of another function call to be found. The additions would get stacked until the last one is found, and only then would the final result be calculated.
Tail recursion aims to eliminate this stacking of operation by reducing them as they happen.
In order to achieve this, we will need to hold an extra temporary variable as a parameter in our function. The aforementioned temporary variable is sometimes called accumulator and acts as a place to store the results of our computations as they happen in order to limit the growth of our calls.
Let’s look at an example of tail recursion −
Example
-module(helloworld).
-export([tail_len/1,tail_len/2,start/0]).

tail_len(L) -> tail_len(L,0).
tail_len([], Acc) -> Acc;
tail_len([_|T], Acc) -> tail_len(T,Acc+1).

start() ->
   X = [1,2,3,4],
   Y = tail_len(X),
   io:fwrite("~w",[Y]).
The output of the above program is −
Output
4
Duplicate
Let’s look at an example of recursion. This time around let’s write a function which takes an integer as its first parameter and then any other term as its second parameter. It will then create a list of as many copies of the term as specified by the integer.
Let’s look at how an example of this would look like −
-module(helloworld).
-export([duplicate/2,start/0]).

duplicate(0,_) ->
   [];
duplicate(N,Term) when N > 0 ->
   io:fwrite("~w,~n",[Term]),
   [Term|duplicate(N-1,Term)].
start() ->
   duplicate(5,1).
The output of the above program will be −
Output
1,
1,
1,
1,
1,
List Reversal
There are no bounds to which you can use recursion in Erlang. Let’s quickly now look at how we can reverse the elements of a list using recursion. The following program can be used to accomplish this.
Example
-module(helloworld).
-export([tail_reverse/2,start/0]).

tail_reverse(L) -> tail_reverse(L,[]).

tail_reverse([],Acc) -> Acc;
tail_reverse([H|T],Acc) -> tail_reverse(T, [H|Acc]).

start() ->
   X = [1,2,3,4],
   Y = tail_reverse(X),
   io:fwrite("~w",[Y]).
The output of the above program will be −
Output
[4,3,2,1]
The following things need to be noted about the above program −
We are again using the concept of temporary variables to store each element of the List in a variable called Acc.
We then call tail_reverse recursively, but this time around, we ensure that the last element is put in the new list first.
We then recursively call tail_reverse for each element in the list.
Erlang - Numbers
In Erlang there are 2 types of numeric literals which are integers and floats. Following are some examples which show how integers and floats can be used in Erlang.
Integer − An example of how the number data type can be used as an integer is shown in the following program. This program shows the addition of 2 Integers.
Example
-module(helloworld).
-export([start/0]).

start() ->
   io:fwrite("~w",[1+1]).
The output of the above program will be as follows −
Output
2
Float − An example of how the number data type can be used as a float is shown in the following program. This program shows the addition of 2 Integers.
Example
-module(helloworld).
-export([start/0]).

start() ->
   io:fwrite("~w",[1.1+1.2]).
The output of the above program will be as follows −
Output
2.3
Displaying Float and Exponential Numbers
When using the fwrite method to output values to the console, there are formatting parameters available which can be used to output numbers as float or exponential numbers. Let’s look at how we can achieve this.
Example
-module(helloworld).
-export([start/0]).

start() ->
   io:fwrite("~f~n",[1.1+1.2]),
   io:fwrite("~e~n",[1.1+1.2]).
The output of the above program will be as follows −
Output
2.300000
2.30000e+0
The following key things need to be noted about the above program −
When the ~f option is specified it means that the argument is a float which is written as [-]ddd.ddd, where the precision is the number of digits after the decimal point. The default precision is 6.
When the ~e option is specified it means that the argument is a float which is written as [-]d.ddde+-ddd, where the precision is the number of digits written. The default precision is 6.
Mathematical Functions for Numbers
The following mathematical functions are available in Erlang for numbers. Note that all the mathematical functions for Erlang are present in the math library. So all of the below examples will use the import statement to import all the methods in the math library.
| Sr.No. | Mathematical Functions & Description |
|---|---|
| 1 |
This method returns the sine of the specified value. |
| 2 |
This method returns the cosine of the specified value. |
| 3 |
This method returns the tangent of the specified value. |
| 4 |
The method returns the arcsine of the specified value. |
| 5 |
The method returns the arccosine of the specified value. |
| 6 |
The method returns the arctangent of the specified value. |
| 7 |
exp
The method returns the exponential of the specified value. |
| 8 |
The method returns the logarithmic of the specified value. |
| 9 |
The method returns the absolute value of the specified number. |
| 10 |
The method converts a number to a float value. |
| 11 |
The method checks if a number is a float value. |
| 12 |
The method checks if a number is a Integer value. |
Erlang - Strings
A String literal is constructed in Erlang by enclosing the string text in quotations. Strings in Erlang need to be constructed using the double quotation marks such as “Hello World”.
Following is an example of the usage of strings in Erlang −
Example
-module(helloworld).
-export([start/0]).

start() ->
   Str1 = "This is a string",
   io:fwrite("~p~n",[Str1]).
The above example creates a string variable called Str1. The string “This is a string” is assigned to the variable and displayed accordingly.
The output of the above program will be −
Output
“This is a string”
Next, we will discuss the various operations available for Strings. Note that for string operations, you need to include the string library as well.
| Sr.No | String Methods & Description |
|---|---|
| 1 |
The method returns the length of a particular string. |
| 2 |
The method returns a Boolean value on whether one string is equal to another. |
| 3 |
The method concats 2 strings and returns the concatenated string. |
| 4 |
The method returns the index position of a character in a string. |
| 5 |
The method returns the index position of a sub string in a string. |
| 6 |
The method returns the sub string from the original string based on the starting position and number of characters from the starting position. |
| 7 |
The method returns the sub string from the original string based on the starting position and number of characters from the starting position. |
left with trailing character
The method returns the sub string from the left of the string based on the number of characters. But with the option to include a trailing character if the number is greater than the length of the string.
Syntax
left(str1,number,$character)
Parameters
str1 − This is the string from which the sub string needs to be extracted.
Number − This is the number of characters which need to be present in the substring.
$Character − The character to include as the trailing character.
Return Value
Returns the sub string from the original string based on the left hand side of the string and the number.
For example
-module(helloworld).
-import(string,[left/3]).
-export([start/0]).

start() ->
   Str1 = "hello",
   Str2 = left(Str1,10,$.),
   io:fwrite("~p~n",[Str2]).
Output
When we run the above program, we will get the following result.
"hello....."
right
The method returns the sub string from the right of the string based on the number of characters.
Syntax
right(str1,number)
Parameters
str1 − This is the string from which the sub string needs to be extracted.
Number − This is the number of characters which need to be present in the substring.
Return Value
Returns the substring from the original string based on the right hand side of the string and the number.
For example
-module(helloworld).
-import(string,[right/2]).
-export([start/0]).

start() ->
   Str1 = "hello World",
   Str2 = right(Str1,2),
   io:fwrite("~p~n",[Str2]).
Output
When we run the above program, we will get the following result.
“ld”
right with trailing character
The method returns the substring from the right of the string based on the number of characters. But with the option to include a trailing character if the number is greater than the length of the string.
Syntax
right(str1,number,$character)
Parameters
str1 − This is the string from which the sub string needs to be extracted.
Number − This is the number of characters which need to be present in the substring.
$Character − The character to include as the trailing character.
Return Value
Returns the sub string from the original string based on the right hand side of the string and the number.
For example
-module(helloworld).
-import(string,[right/3]).
-export([start/0]).

start() ->
   Str1 = "hello",
   Str2 = right(Str1,10,$.),
   io:fwrite("~p~n",[Str2]).
Output
When we run the above program, we will get the following result.
".....hello"
to_lower
The method returns the string in lower case.
Syntax
to_lower(str1)
Parameters
str1 − This is the string from which needs to be converted to lower case.
Return Value
Returns the string in lower case.
For example
-module(helloworld).
-import(string,[to_lower/1]).
-export([start/0]).

start() ->
   Str1 = "HELLO WORLD",
   Str2 = to_lower(Str1),
   io:fwrite("~p~n",[Str2]).
Output
When we run the above program, we will get the following result.
"hello world"
to_upper
The method returns the string in upper case.
Syntax
to_upper(str1)
Parameters
str1 − This is the string from which needs to be converted to upper case.
Return Value − Returns the string in upper case.
For example
-module(helloworld).
-import(string,[to_upper/1]).
-export([start/0]).

start() ->
   Str1 = "hello world",
   Str2 = to_upper(Str1),
   io:fwrite("~p~n",[Str2]).
Output
When we run the above program, we will get the following result.
"HELLO WORLD"
sub_string
Returns a substring of String, starting at the position Start to the end of the string, or to and including the Stop position.
Syntax
sub_string(str1,start,stop)
Parameters
str1 − This is the string from which the sub string needs to be returned.
start − This is the start position of the sub string
stop − This is the stop position of the sub string
Return Value
Returns a substring of String, starting at the position Start to the end of the string, or to and including the Stop position.
For example
-module(helloworld).
-import(string,[sub_string/3]).
-export([start/0]).

start() ->
   Str1 = "hello world",
   Str2 = sub_string(Str1,1,5),
   io:fwrite("~p~n",[Str2]).
Output
When we run the above program, we will get the following result.
"hello"
Erlang - Lists
The List is a structure used to store a collection of data items. In Erlang, Lists are created by enclosing the values in square brackets.
Following is a simple example of creating a list of numbers in Erlang.
Example
-module(helloworld).
-export([start/0]).

start() ->
   Lst1 = [1,2,3],
   io:fwrite("~w~n",[Lst1]).
The output of the above example will be −
Output
[1 2 3]
Let us now discuss the various methods available for Lists. Note that the lists library needs to be imported for these methods to work.
| Sr.No | Method and Description |
|---|---|
| 1 |
Returns true if Pred(Elem) returns true for all elements Elem in List, otherwise false. |
| 2 |
Returns true if Pred(Elem) returns true for at least one element Elem in List. |
| 3 |
Returns a new list List3 which is made from the elements of List1 followed by the elements of List2. |
| 4 |
Deletes an element from the list and returns a new list. |
| 5 |
Drops the last element of a List. |
| 6 |
Returns a list which contains N copies of the term Elem |
| 7 |
Returns the last element of the list |
| 8 |
Returns the element of the list which has the maximum value. |
| 9 |
Checks if an element is present in the list or not. |
| 10 |
Returns the element of the list which has the minimum value. |
| 11 |
Returns the sorted list formed by merging all the sub-lists of ListOfLists. |
| 12 |
Returns the Nth element of List. |
| 13 |
Returns the Nth tail of the List. |
| 14 |
Reverses a list of elements. |
| 15 |
Sorts a list of elements. |
| 16 |
Returns a sublist of elements. |
| 17 |
Returns the sum of elements in the list. |
Erlang - File I/O
Erlang provides a number of methods when working with I/O. It has easier classes to provide the following functionalities for files −
- Reading files
- Writing to files
- Seeing whether a file is a file or directory
File Operation Methods in Erlang
Let’s explore some of the file operations Erlang has to offer. For the purposes of these examples, we are going to assume that there is a file called NewFile.txt which contains the following lines of text
Example1
Example2
Example3
This file will be used for the read and write operations in the following examples.
Reading the Contents of a File One Line at a Time
The general operations on files are carried out by using the methods available in the file library. For the reading of files, we would need to first use the open operation and then use the read operation which is available as a part of the file library. Following is the syntax for both of these methods.
Syntax
- Opening a file – Open(File,Mode)
- Reading a file – read(FileHandler,NumberofBytes)
Parameters
File − This is the location of the file which needs to be opened.
Mode − This is the mode in which the file needs to be opened in.
Following are some of the available modes −
Read − The file, which must exist, is opened for reading.
Write − The file is opened for writing. It is created if it does not exist. If the file exists, and if write is not combined with read, the file will be truncated.
Append − The file will be opened for writing, and it will be created if it does not exist. Every write operation to a file opened with append will take place at the end of the file.
Exclusive − The file, when opened for writing, is created if it does not exist. If the file exists, open will return {error, exist}.
FileHandler − This is the handle to a file. This handle is the one that would be returned when the file:open operation is used.
NumberofByte − This is the number of bytes of information that needs to be read from the file.
Return Value
Open(File,Mode) − Returns a handle to the file, if the operation is successful.
read(FileHandler,NumberofBytes) − Returns the requested read information from the file.
For example
-module(helloworld).
-export([start/0]).

start() ->
   {ok, File} = file:open("Newfile.txt",[read]),
   Txt = file:read(File,1024 * 1024),
   io:fwrite("~p~n",[Txt]).
Output − When we run the above program, we will get the following result.
Example1
Let us now discuss some other methods available for file operations −
| Sr.No. | Method & Description |
|---|---|
| 1 |
Available to allow the reading of all the contents of a file at one time. |
| 2 |
Used to write the contents to a file. |
| 3 |
used to make a copy of an existing file. |
| 4 |
This method is used to delete an existing file. |
| 5 |
This method is used to list down the contents of a particular directory. |
| 6 |
This method is used to create a new directory. |
| 7 |
This method is used to rename an existing file. |
| 8 |
This method is used to determine the size of the file. |
| 9 |
This method is used to determine if a file is indeed a file. |
| 10 |
This method is used to determine if a directory is indeed a directory. |
Erlang - Atoms
An atom is a literal, a constant with name. An atom is to be enclosed in single quotes (') if it does not begin with a lower-case letter or if it contains other characters than alphanumeric characters, underscore (_), or @.
The following program is an example of how atoms can be used in Erlang. This program declares 3 atoms, atom1, atom_1 and ‘atom 1’ respectively. So you can see the different ways an atom can be declared.
Example
-module(helloworld).
-export([start/0]).

start() ->
   io:fwrite(atom1),
   io:fwrite("~n"),
   io:fwrite(atom_1),
   io:fwrite("~n"),
   io:fwrite('atom 1'),
   io:fwrite("~n").
The output of the above program would be follows −
Output
atom1

atom_1

atom 1
Let’s see some of the methods available in Erlang to work with atoms.
| Sr.No. | Methods and Description |
|---|---|
| 1 |
This method is used to determine if a term is indeed an atom. |
| 2 |
This method is used to convert an atom to a list. |
| 3 |
This method is used to convert a list item to an atom. |
| 4 |
This method is used to convert an atom to a binary value. |
| 5 |
This method is used to convert a binary value to an atom value. |
Erlang - Maps
A map is a compound data type with a variable number of key-value associations. Each key-value association in the map is called an association pair. The key and value parts of the pair are called elements. The number of association pairs is said to be the size of the map.
An example of how the Map data type can be used is shown in the following program.
Here we are defining a Map M1 which has 2 mappings. The map_size is an inbuilt function defined in Erlang which can be used to determine the size of the map.
Example
-module(helloworld).
-export([start/0]).

start() ->
   M1 = #{name=>john,age=>25},
   io:fwrite("~w",[map_size(M1)]).
The output of the above program will be as follows.
Output
2
Some of the other methods available for maps are as follows.
| Sr.No. | Methods & Description |
|---|---|
| 1 |
This method is used to generate a map from a list. |
| 2 |
This method is used to find if a particular key exists in the map. |
| 3 |
This method is used to get the value of a particular key in the map. |
| 4 |
This method is used to determine if a particular key is defined as a key in the map. |
| 5 |
This method is used to return all the keys from a map. |
| 6 |
This method is used to merge 2 maps. |
| 7 |
This method is used to add a key value pair to the map. |
| 8 |
This method is used to return all the values from a map. |
| 9 |
This method is used to remove a key value from the map. |
Erlang - Tuples
A tuple is a compound data type with a fixed number of terms. Each term in the Tuple is called an element. The number of elements is said to be the size of the Tuple.
An example of how the Tuple data type can be used is shown in the following program.
Here we are defining a Tuple P which has 3 terms. The tuple_size is an inbuilt function defined in Erlang which can be used to determine the size of the Tuple.
Example
-module(helloworld).
-export([start/0]).

start() ->
   P = {john,24,{june,25}} ,
   io:fwrite("~w",[tuple_size(P)]).
The output of the above program will be as follows.
Output
3
Let’s look at some more operations which are available for tuples.
| Sr.No. | Methods & Description |
|---|---|
| 1 |
This method is used to determine is the term provided is indeed a tuple. |
| 2 |
This method is to convert a list to a tuple. |
| 3 |
This method is convert a tuple to a list. |
Erlang - Records
Erlang has the extra facility to create records. These records consist of fields. For example, you can define a personal record which has 2 fields, one is the id and the other is the name field. In Erlang, you can then create various instances of this record to define multiple people with various names and id’s.
Let’s explore how we can work with records.
Creating a Record
A record is created using the Record Identifier. In this record identifier, you specify the various fields which constitute the record. The general syntax and example are given below.
Syntax
record(recordname , {Field1,Field2 ..Fieldn})
Parameters
recordname − This is the name given to the record.
Field1,Field2 ..Fieldn − These are the list of various fields which constitute the record.
Return Value
None
For example
-module(helloworld).
-export([start/0]).
-record(person, {name = "", id}).

start() ->
   P = #person{name="John",id = 1}.
The above example shows the definition of a record with 2 fields, one is the id and the other is the name. Also, a record is constructed in the following way −
Syntax
#recordname {fieldName1 = value1, fieldName2 = value2 .. fieldNameN = valueN}
Where in you assign values to the respective fields when an instance of the record is defined.
Accessing a Value of the Record
To access the fields and values of a particular record, the following syntax should be used.
Syntax
#recordname.Fieldname
Parameters
recordname − This is the name given to the record.
Fieldname − This is the name of the field which needs to be accessed.
Return Value
The value assigned to the field.
For example
-module(helloworld).
-export([start/0]).
-record(person, {name = "", id}).

start() ->
   P = #person{name = "John",id = 1},
   io:fwrite("~p~n",[P#person.id]),
   io:fwrite("~p~n",[P#person.name]).
Output
The output of the above program is as follows.
1
“John”
Updating a Value of the Record
The updation of a record value is done by changing the value to a particular field and then assigning the record to a new variable name. The general syntax and example is given below.
Syntax
#recordname.Fieldname = newvalue
Parameters
recordname − This is the name given to the record.
Fieldname − This is the name of the field which needs to be accessed.
newvalue − This is the new value which needs to be assigned to the field.
Return Value
The new record with the new values assigned to the fields.
For example
-module(helloworld).
-export([start/0]).
-record(person, {name = "", id}).

start() ->
   P = #person{name = "John",id = 1},
   P1 = P#person{name = "Dan"},

   io:fwrite("~p~n",[P1#person.id]),
   io:fwrite("~p~n",[P1#person.name]).
Output
The output of the above program is as follows −
1
“Dan”
Nested Records
Erlang also has the facility to have nested records. The following example shows how these nested records can be created.
For example
-module(helloworld).
-export([start/0]).
-record(person, {name = "", address}).
-record(employee, {person, id}).

start() ->
   P = #employee{person = #person{name = "John",address = "A"},id = 1},
   io:fwrite("~p~n",[P#employee.id]).
In the above example the following things need to be noted −
We are first creating a person’s record which has the field values of name and address.
We then define an employee record which has the person as a field and an additional field called id.
Output
The output of the above program is as follows.
1
Erlang - Exceptions
Exception handling is required in any programming language to handle the runtime errors so that normal flow of the application can be maintained. Exception normally disrupts the normal flow of the application, which is the reason why we need to use Exception handling in our application.
Normally when an exception or error occurs in Erlang, the following message will be displayed.
{"init terminating in do_boot", {undef,[{helloworld,start,[],[]},
{init,start_it,1,[]},{init,start_em,1,[]}]}}
Crash dump will be written to −
erl_crash.dump
init terminating in do_boot ()
In Erlang, there are 3 types of exceptions −
Error − Calling erlang:error(Reason) will end the execution in the current process and include a stack trace of the last functions called with their arguments when you catch it. These are the kind of exceptions that provoke the runtime errors above.
Exists − There are two kinds of exits: 'internal' exits and 'external' exits. The internal exits are triggered by calling the function exit/1 and make the current process stop its execution. The external exits are called with exit/2 and have to do with multiple processes in the concurrent aspect of Erlang.
Throw − A throw is a class of exception used for cases that the programmer can be expected to handle. In comparison with exits and errors, they don't really carry any 'crash that process!' intent behind them, but rather they control the flow. As you use throws while expecting the programmer to handle them, it's usually a good idea to document their use within a module using them.
A try ... catch is a way to evaluate an expression while letting you handle the successful case as well as the errors encountered.
The general syntax of a try catch expression is as follows.
Syntax
try Expression of
SuccessfulPattern1 [Guards] ->
Expression1;
SuccessfulPattern2 [Guards] ->
Expression2

catch
TypeOfError:ExceptionPattern1 ->
Expression3;
TypeOfError:ExceptionPattern2 ->
Expression4
end
The Expression in between try and of is said to be protected. This means that any kind of exception happening within that call will be caught. The patterns and expressions in between the try ... of and catch behave in exactly the same manner as a case ... of.
Finally, the catch part – here, you can replace TypeOfError by either error, throw or exit, for each respective type we've seen in this chapter. If no type is provided, a throw is assumed.
Following are some of the errors and the error reasons in Erlang −
| Error | Type of Error |
|---|---|
| badarg | Bad argument. The argument is of wrong data type, or is otherwise badly formed. |
| badarith | Bad argument in an arithmetic expression. |
| {badmatch,V} | Evaluation of a match expression failed. The value V did not match. |
| function_clause | No matching function clause is found when evaluating a function call. |
| {case_clause,V} | No matching branch is found when evaluating a case expression. The value V did not match. |
| if_clause | No true branch is found when evaluating an if expression. |
| {try_clause,V} | No matching branch is found when evaluating the of-section of a try expression. The value V did not match. |
| undef | The function cannot be found when evaluating a function call.. |
| {badfun,F} | Something is wrong with a fun F |
| {badarity,F} | A fun is applied to the wrong number of arguments. F describes the fun and the arguments. |
| timeout_value | The timeout value in a receive..after expression is evaluated to something else than an integer or infinity. |
| noproc | Trying to link to a non-existing process. |
Following is an example of how these exceptions can be used and how things are done.
The first function generates all possible types of an exception.
Then we write a wrapper function to call generate_exception in a try...catch expression.
Example
-module(helloworld).
-compile(export_all).

generate_exception(1) -> a;
generate_exception(2) -> throw(a);
generate_exception(3) -> exit(a);
generate_exception(4) -> {'EXIT', a};
generate_exception(5) -> erlang:error(a).

demo1() ->
   [catcher(I) || I <- [1,2,3,4,5]].
catcher(N) ->
   try generate_exception(N) of
      Val -> {N, normal, Val}
   catch
      throw:X -> {N, caught, thrown, X};
      exit:X -> {N, caught, exited, X};
      error:X -> {N, caught, error, X}
   end.

demo2() ->
   [{I, (catch generate_exception(I))} || I <- [1,2,3,4,5]].
demo3() ->
   try generate_exception(5)
   catch
      error:X ->
         {X, erlang:get_stacktrace()}
   end.

lookup(N) ->
   case(N) of
      1 -> {'EXIT', a};
      2 -> exit(a)
   end.
If we run the program as helloworld:demo(). , we will get the following output −
Output
[{1,normal,a},
{2,caught,thrown,a},
{3,caught,exited,a},
{4,normal,{'EXIT',a}},
{5,caught,error,a}]
Erlang - Macros
Macros are generally used for inline code replacements. In Erlang, macros are defined via the following statements.
- -define(Constant, Replacement).
- -define(Func(Var1, Var2,.., Var), Replacement).
Following is an example of macros using the first syntax −
Example
-module(helloworld).
-export([start/0]).
-define(a,1).

start() ->
   io:fwrite("~w",[?a]).
From the above program you can see that the macro gets expanded by using the ‘?’ symbol. The constant gets replaced in place by the value defined in the macro.
The output of the above program will be −
Output
1
An example of a macro using the function class is as follows −
Example
-module(helloworld).
-export([start/0]).
-define(macro1(X,Y),{X+Y}).

start() ->
   io:fwrite("~w",[?macro1(1,2)]).
The output of the above program will be −
Output
{3}
The following additional statements are available for macros −
undef(Macro) − Undefines the macro; after this you cannot call the macro.
ifdef(Macro) − Evaluates the following lines only if the Macro has been defined.
ifndef(Macro) − Evaluates the following lines only if Macro is undefined.
else − Allowed after an ifdef or ifndef statement. If the condition was false, the statements following else are evaluated.
endif − Marks the end of an ifdef or ifndef statement.
When using the above statements, it should be used in the proper way as shown in the following program.
-ifdef(<FlagName>).

-define(...).
-else.
-define(...).
-endif.
Erlang - Header Files
Header files are like include files in any other programming language. It is useful for splitting modules into different files and then accessing these header files into separate programs. To see header files in action, let’s look at one of our earlier examples of records.
Let’s first create a file called user.hrl and add the following code −
-record(person, {name = "", id}).
Now in our main program file, let’s add the following code −
Example
-module(helloworld).
-export([start/0]).
-include("user.hrl").

start() ->
   P = #person{name = "John",id = 1},
   io:fwrite("~p~n",[P#person.id]),
   io:fwrite("~p~n",[P#person.name]).
As you can see from the above program, we are actually just including the user.hrl file which automatically inserts the –record code in it.
If you execute the above program, you will get the following output.
Output
1
“John”
You can also do the same thing with macros, you can define the macro inside the header file and reference it in the main file. Let’ see an example of this −
Let’s first create a file called user.hrl and add the following code −
-define(macro1(X,Y),{X+Y}).
Now in our main program file, let’s add the following code −
Example
-module(helloworld).
-export([start/0]).
-include("user.hrl").

start() ->
   io:fwrite("~w",[?macro1(1,2)]).
If you execute the above program, you will get the following output −
Output
{3}
Erlang - Preprocessors
Before an Erlang module is compiled, it is automatically processed by the Erlang Preprocessor. The preprocessor expands any macros that might be in the source file and inserts any necessary include files.
Ordinarily, you won’t need to look at the output of the preprocessor, but in exceptional circumstances (for example, when debugging a faulty macro), you might want to save the output of the preprocessor. To see the result of preprocessing the module some_module.erl give the OS shell command.
erlc -P some_module.erl
For example, suppose if we had the following code file −
Example
-module(helloworld).
-export([start/0]).
-include("user.hrl").

start() ->
   io:fwrite("~w",[?macro1(1,2)]).
And if we executed the following command from the command line −
erlc –P helloworld.erl
A file called helloworld.P would be generated. If you open this file, you would find the following contents which is what the preprocessor would compile.
-file("helloworld.erl", 1). -module(helloworld).

-export([start/0]).
-file("user.hrl", 1).
-file("helloworld.erl", 3).

start() ->
   io:fwrite("~w", [{1 + 2}]).
Erlang - Pattern Matching
Patterns look the same as terms – they can be simple literals like atoms and numbers, compound like tuples and lists, or a mixture of both. They can also contain variables, which are alphanumeric strings that begin with a capital letter or underscore. A special "anonymous variable", _ (the underscore) is used when you don't care about the value to be matched, and won't be using it.
A pattern matches if it has the same "shape" as the term being matched, and atoms encountered are the same. For example, the following matches succeed −
- B = 1.
- 2 = 2.
- {ok, C} = {ok, 40}.
- [H|T] = [1, 2, 3,4].
Note that in the fourth example, the pipe (|) signifying the head and tail of the list as described in Terms. Also note that the left hand side should match the right hand side which is the normal case for patterns.
The following examples of pattern matching will fail.
- 1 = 2.
- {ok, A} = {failure, "Don't know the question"}.
- [H|T] = [].
In the case of the pattern-matching operator, a failure generates an error and the process exits. How this can be trapped and handled is covered in Errors. Patterns are used to select which clause of a function will be executed.
Erlang - Guards
Guards are constructs that we can use to increase the power of pattern matching. Using guards, we can perform simple tests and comparisons on the variables in a pattern.
The general syntax of the guard statement is as follows −
function(parameter) when condition ->
Where,
Function(parameter) − This is the function declaration that is used in the guard condition.
Parameter − Generally the guard condition is based on the parameter.
Condition − The condition which should be evaluated to see if the function should be executed or not.
The when statement must be used when a guard condition is specified.
Let’s look at a quick example of how guards can be used −
Example
-module(helloworld).
-export([display/1,start/0]).

display(N) when N > 10 ->
   io:fwrite("greater then 10");
display(N) when N < 10 -> io:fwrite("Less
   than 10").

start() ->
   display(11).
The following things need to be noted about the above example −
The display function is defined along with a guard. The first display declaration has a guard of when the parameter N is greater than 10. So if the parameter is greater than 10, that function will be called.
The display function is defined again, but this time with the guard of less than 10. In this way, you can define the same function multiple times, each with a separate guard condition.
The output of the above program will be as follows −
Output
greater than 10
The guard conditions can also be used for if else and case statements. Let’s see how we can carry out the guard operations on these statements.
Guards for ‘if’ Statements
Guards can also be used for if statements so that the series of statements executed is based on the guard condition. Let’s see how we can achieve this.
Example
-module(helloworld).
-export([start/0]).

start() ->
   N = 9,
   if
      N > 10 ->
         io:fwrite("N is greater than 10");
      true ->
         io:fwrite("N is less than 10")
   end.
The following things need to be noted about the above example −
The guard function is used along with the if statement. If the guard function evaluates to true, then the statement “N is greater than 10” is displayed.
If the guard function evaluates to false, then the statement “N is less than 10” is displayed.
The output of the above program will be as follows −
Output
N is less than 10
Guards for ‘case’ Statements
Guards can also be used for case statements so that the series of statements executed is based on the guard condition. Let’s see how we can achieve this.
Example
-module(helloworld).
-export([start/0]).

start() ->
   A = 9,
   case A of {A} when A>10 ->
      io:fwrite("The value of A is greater than 10"); _ ->
      io:fwrite("The value of A is less than 10")
   end.
The following things need to be noted about the above example −
The guard function is used along with the case statement. If the guard function evaluates to true, then the statement “The value of A is greater than 10” is displayed.
If the guard function evaluates to anything else, then the statement “The value of A is less than 10” is displayed.
The output of the above program will be as follows −
Output
The value of A is less than 10
Multiple Guard Conditions
Multiple guard conditions can also be specified for a function. The general syntax of the guard statement with multiple guard conditions is given below −
function(parameter) when condition1 , condition1 , .. conditionN ->
Where,
Function(parameter) − This is the function declaration that used the guard condition.
Parameter − Generally the guard condition is based on the parameter.
condition1, condition1, .. conditionN − These are the multiple guard conditions which are applied to functions.
The when statement must be used when a guard condition is specified.
Let’s look at a quick example of how multiple guards can be used −
Example
-module(helloworld).
-export([display/1,start/0]).

display(N) when N > 10 , is_integer(N) ->
   io:fwrite("greater then 10");
display(N) when N < 10 ->
   io:fwrite("Less than 10").

start() ->
   display(11).
The following point needs to be noted about the above example −
You will notice that for the first display function declaration, in addition to the condition for N>10, the condition for is_integer is also specified. So only if the value of N is an integer and greater than 10, this function will be executed.
The output of the above program will be as follows −
Output
Greater than 10
Erlang - BIFS
BIFs are functions that are built into Erlang. They usually do tasks that are impossible to program in Erlang. For example, it’s impossible to turn a list into a tuple or to find the current time and date. To perform such an operation, we call a BIF.
Let’s take an example of how BIF’s are used −
Example
-module(helloworld).
-export([start/0]).

start() ->
   io:fwrite("~p~n",[tuple_to_list({1,2,3})]),
   io:fwrite("~p~n",[time()]).
The following things need to be noted about the above example −
In the first example, we are using the BIF called tuple_to_list to convert a tuple to a list.
In the second BIF function, we are using the time function to output the system time.
The output of the above program will be as follows −
Output
[1,2,3]
{10,54,56}
Let’s look at some of the more BIF functions available in Erlang.
| Sr.No. | BIF Functions & Description |
|---|---|
| 1 |
This method returns the current system date. |
| 2 |
This method returns the number of bytes contained in a Bitstring. |
| 3 |
The method returns the Nth element in the tuple. |
| 4 |
This method returns the float value of a particular number. |
| 5 |
The method returns the process dictionary as a list. |
| 6 |
This method is used to put a key,value pair in the process dictionary. |
| 7 |
The method is used to give the local date and time in the system. |
| 8 |
Returns a list containing information about memory dynamically allocated by the Erlang emulator. |
| 9 |
This method returns the tuple {MegaSecs, Secs, MicroSecs} which is the elapsed time since 00:00 GMT, January 1, 1970. |
| 10 |
Returns a list of all ports on the local node |
| 11 |
Returns a list of process identifiers corresponding to all the processes currently existing on the local node. |
| 12 |
Returns the current date and time according to Universal Time Coordinated (UTC). |
Erlang - Binaries
Use a data structure called a binary to store large quantities of raw data. Binaries store data in a much more space efficient manner than in lists or tuples, and the runtime system is optimized for the efficient input and output of binaries.
Binaries are written and printed as sequences of integers or strings, enclosed in double less than and greater than brackets.
Following is an example of binaries in Erlang −
Example
-module(helloworld).
-export([start/0]).

start() ->
   io:fwrite("~p~n",[<<5,10,20>>]),
   io:fwrite("~p~n",[<<"hello">>]).
When we run the above program, we will get the following result.
Output
<<5,10,20>>
<<"hello">>
Let’s look at the Erlang functions which are available to work with Binaries −
| Sr.No. | Methods & Description |
|---|---|
| 1 |
This method is used to convert an existing list to a list of binaries. |
| 2 |
This method is used to split the binary list based on the index position specified. |
| 3 |
This method is used to convert a term to binary. |
| 4 |
This method is used to check if a bitstring is indeed a binary value. |
| 5 |
This method is used to extract a part of the binary string |
| 6 |
This method is used to convert a binary value to a float value. |
| 7 |
This method is used to convert a binary value to a integer value. |
| 8 |
This method is used to convert a binary value to a list. |
| 9 |
This method is used to convert a binary value to an atom. |
Erlang - Funs
Funs are used to define anonymous functions in Erlang. The general syntax of an anonymous function is given below −
Syntax
F = fun (Arg1, Arg2, ... ArgN) ->
   ...
End
Where
F − This is the variable name assigned to the anonymous function.
Arg1, Arg2, ... ArgN − These are the arguments which are passed to the anonymous function.
The following example showcases how the anonymous function can be used.
Example
-module(helloworld).
-export([start/0]).

start() ->
   A = fun() -> io:fwrite("Hello") end,
   A().
The following things need to be noted about the above program.
The anonymous function is assigned to the variable A.
The anonymous function via the variable A().
When we run the above program we will get the following result.
“Hello”
Another example of anonymous function is as follows, but this is with the use of parameters.
-module(helloworld).
-export([start/0]).

start() ->
   A = fun(X) ->
      io:fwrite("~p~n",[X])
      end,
   A(5).
When we run the above program we will get the following result.
Output
5
Using Variables
The Anonymous function have the ability to access the variables which are outside of the scope of the anonymous function. Let’s look at an example of this −
Example
-module(helloworld).
-export([start/0]).

start() ->
   B = 6,
   A = fun(X) ->
      io:fwrite("~p~n",[X]),
      io:fwrite("~p~n",[B])
      end,
   A(5).
The following things need to be noted about the above program.
The variable B is outside of the scope of the anonymous function.
The anonymous function can still access the variable defined in the global scope.
When we run the above program we will get the following result.
Output
5

6
Functions within Functions
One of the other most powerful aspects of higher order functions, is that you can define a function within a function. Let’s see an example of how we can achieve this.
Example
-module(helloworld).
-export([start/0]).

start() ->
   Adder = fun(X) -> fun(Y) -> io:fwrite("~p~n",[X + Y]) end end,
   A = Adder(6),
   A(10).
The following things need to be noted about the above program.
Adder is a higher order function defined as fun(X).
The Adder function fun(X) has a reference to another function fun(Y).
When we run the above program we will get the following result.
Output
16
Erlang - Processes
The granularity of concurrency in Erlang is a process. A process is an activity/task that runs concurrently with and is independent from the other processes. These processes in Erlang are different than the processes and threads most people are familiar with. Erlang processes are lightweight, operate in (memory) isolation from other processes, and are scheduled by Erlang’s Virtual Machine (VM). The creation time of process is very low, the memory footprint of a just spawned process is very small, and a single Erlang VM can have millions of processes running.
A process is created with the help of the spawn method. The general syntax of the method is given below.
Syntax
spawn(Module, Name, Args)
Parameters
Module − This is a predefined atom value which must be ?MODULE.
Name − This is the name of the function to be called when the process is defined.
Args − These are the arguments which need to be sent to the function.
Return Value
Returns the process id of the new process created.
For example
An example of the spawn method is shown in the following program.
-module(helloworld).
-export([start/0, call/2]).

call(Arg1, Arg2) ->
   io:format("~p ~p~n", [Arg1, Arg2]).
start() ->
   Pid = spawn(?MODULE, call, ["hello", "process"]),
   io:fwrite("~p",[Pid]).
The following things need to be noted about the above program.
A function called call is defined and will be used to create the process.
The spawn method calls the call function with the parameters hello and process.
Output
When we run the above program we will get the following result.
<0.29.0>"hello" "process"
Now let’s look at the other functions which are available with processes.
| Sr.No. | Methods & Description |
|---|---|
| 1 |
This method is used to determine if a process id exists. |
| 2 |
This is called as is_process_alive(Pid). A Pid must refer to a process at the local node. |
| 3 |
It converts a process id to a list. |
| 4 |
Returns a list with the names of all registered processes. |
| 5 |
One of the most commonly used BIF, returns the pid of the calling processes. |
| 6 |
This is used to register a process in the system. |
| 7 |
It is called as whereis(Name). Returns the pid of the process that is registered with the name. |
| 8 |
This is used to unregister a process in the system. |
Erlang - Email
To send an email using Erlang, you need to use a package available from github for the same. The github link is − https://github.com/Vagabond/gen_smtp
This link contains an smtp utility which can be used for sending email from an Erlang application. Follow the steps to have the ability to send an email from Erlang
Step 1 − Download the erl files from the github site. The files should be downloaded to the directory where your helloworld.erl application resides.
Step 2 − Compile all the smtp related files shown in the following list using the erlc command. The following files need to be compiled.
- smtp_util
- gen_smtp_client
- gen_smtp_server
- gen_smtp_server_session
- binstr
- gen_smtp_application
- socket
Step 3 − The following code can be written to send an email using smtp.
Example
-module(helloworld).
-export([start/0]).

start() ->
   gen_smtp_client:send({"sender@gmail.com", ["receiver@gmail.com"], "Subject: testing"},

   [{relay, "smtp.gmail.com"}, {ssl, true}, {username, "sender@gmail.com"},
      {password, "senderpassword"}]).
The following things need to be noted about the above program
The above smtp function is being used along with the smtp server available from google.
Since we wanted to send using a secure smtp, we specify the ssl parameter as true.
You need to specify the relay as smtp.gmail.com.
You need to mention a user name and password which has access to send the email.
Once you configure all the above settings and execute the program, the receiver will successfully receive an email.
Erlang - Databases
Erlang has the ability to connect to the traditional databases such as SQL Server and Oracle. Erlang has an inbuilt odbc library that can be used to work with databases.
Database Connection
In our example, we are going to make use of the Microsoft SQL Server. Before connecting to a Microsoft SQL Server database, make sure that the following pointers are checked.
You have created a database TESTDB.
You have created a table EMPLOYEE in TESTDB.
This table has fields FIRST_NAME, LAST_NAME, AGE, SEX and INCOME.
User ID "testuser" and password "test123" are set to access TESTDB.
Ensure that you have created an ODBC DSN called usersqlserver which creates an ODBC connection to the database
Establishing a Connection
To establish a connection to the database, the following code example can be used.
Example
-module(helloworld).
-export([start/0]).

start() ->
   odbc:start(),
   {ok, Ref} = odbc:connect("DSN = usersqlserver;UID = testuser;PWD = test123", []),
   io:fwrite("~p",[Ref]).
The output of the above program is as follows −
Output
<0.33.0>
The following things need to be noted about the above program.
The start method of the odbc library is used to indicate the beginning of the database operation.
The connect method requires a DSN, user name and password to connect.
Creating a Database Table
The next step after connecting to the database is to create the tables in our database. The following example shows how to create a table in the database using Erlang.
Example
-module(helloworld).
-export([start/0]).

start() ->
   odbc:start(),
   {ok, Ref} = odbc:connect("DSN = usersqlserver; UID = testuser;PWD = test123, []),
   odbc:sql_query(Ref, "CREATE TABLE EMPLOYEE (FIRSTNAME char varying(20),
   LASTNAME char varying(20), AGE integer, SEX char(1), INCOME integer)")
If you now check the database, you will see that a table called EMPLOYEE will be created.
Inserting a Record into the Database
It is required when you want to create your records into a database table.
The following example will insert a record in the employee table. If the table is successfully updated, the record and the statement will return the value of the updated record and the number of records that were updated.
Example
-module(helloworld).
-export([start/0]).

start() ->
   odbc:start(),
   {ok, Ref} = odbc:connect("DSN = usersqlserver; UID = testuser;PWD = test123", []),
   io:fwrite("~p",[odbc:sql_query(Ref,
   "INSERT INTO EMPLOYEE VALUES('Mac', 'Mohan', 20, 'M', 2000)")]).
The output of the above program will be −
Output
{updated,1}
Fetching Records from the Database
Erlang also has the capability to fetch records from the database. This is done via the sql_query method.
An example is shown in the following program −
Example
-module(helloworld).
-export([start/0]).

start() ->
   odbc:start(),
   {ok, Ref} = odbc:connect("DSN = usersqlserver; UID = testuser;PWD = test123", []),
   io:fwrite("~p",[odbc:sql_query(Ref, "SELECT * FROM EMPLOYEE") ]).
The output of the above program will be as follows −
Output
{selected,["FIRSTNAME","LASTNAME","AGE","SEX","INCOME"],
[{"Mac","Mohan",20,"M",2000}]}
So you can see that the insert command in the last section worked and the select command returned the right data.
Fetching Records from the Database Based on Parameters
Erlang also has the capability to fetch records from the database based on certain filter criteria.
An example is as follows −
Example
-module(helloworld).
-export([start/0]).

start() ->
   odbc:start(),
   {ok, Ref} = odbc:connect("DSN=usersqlserver; UID=testuser;PWD=test123", []),
   io:fwrite("~p",[ odbc:param_query(Ref, "SELECT * FROM EMPLOYEE WHERE SEX=?",
   [{{sql_char, 1}, ["M"]}])]).
The output of the above program will be −
Output
{selected,["FIRSTNAME","LASTNAME","AGE","SEX","INCOME"],
         [{"Mac","Mohan",20,"M",2000}]}
Updating Records from the Database
Erlang also has the capability to update records from the database.
An example for the same is as follows −
Example
-module(helloworld).
-export([start/0]).

start() ->
   odbc:start(),
   {ok, Ref} = odbc:connect("DSN = usersqlserver; UID = testuser;PWD = test123", []),

   io:fwrite("~p",[ odbc:sql_query(Ref, "
      UPDATE EMPLOYEE SET AGE = 5 WHERE INCOME= 2000")]).
The output of the above program will be −
Output
{updated,1}
Deleting Records from the Database
Erlang also has the capability to delete records from the database.
An example for the same is as follows −
Example
-module(helloworld).
-export([start/0]).

start() ->
   odbc:start(),
   {ok, Ref} = odbc:connect("DSN = usersqlserver; UID = testuser;PWD = test123", []),
   io:fwrite("~p",[ odbc:sql_query(Ref, "DELETE EMPLOYEE WHERE INCOME= 2000")]).
The output of the above program will be as follows −
Output
{updated,1}
Table Structure
Erlang also has the capability to describe a table structure.
An example is as follows −
Example
-module(helloworld).
-export([start/0]).

start() ->
   odbc:start(),
   {ok, Ref} = odbc:connect("DSN = usersqlserver; UID = testuser;PWD = test123", []),
   io:fwrite("~p",[odbc:describe_table(Ref, "EMPLOYEE")]).
The output of the above program will be as follows −
Output
{ok,[{"FIRSTNAME",{sql_varchar,20}},
   {"LASTNAME",{sql_varchar,20}},
   {"AGE",sql_integer},
   {"SEX",{sql_char,1}},
   {"INCOME",sql_integer}]}
Record Count
Erlang also has the capability to fetch the total count of the records in a table.
An example for the same is shown in the following program.
Example
-module(helloworld).
-export([start/0]).

start() ->
   odbc:start(),
   {ok, Ref} = odbc:connect("DSN = usersqlserver; UID = sa;PWD = demo123", []),
   io:fwrite("~p",[odbc:select_count(Ref, "SELECT * FROM EMPLOYEE")]).
The output of the above program will be −
{ok,1}
Erlang - Ports
In Erlang, ports are used for communication between different programs. A socket is a communication endpoint that allows machines to communicate over the Internet by using the Internet Protocol (IP).
Types of Protocols Used in Ports
There are 2 types of protocols available for communication. One is UDP and the other is TCP. UDP lets applications send short messages (called datagrams) to each other, but there is no guarantee of delivery for these messages. They can also arrive out of order. TCP, on the other hand, provides a reliable stream of bytes that are delivered in order as long as the connection is established.
Let’s look at a simple example of opening a port using UDP.
Example
-module(helloworld).
-export([start/0]).

start() ->
   {ok, Socket} = gen_udp:open(8789),
   io:fwrite("~p",[Socket]).
The following things need to be noted about the above program
The gen_udp contains the modules in Erlang used for UDP communication.
Here 8789 is the port number which is being opened in Erlang. You need to make sure this port number is available and can be used.
The output of the above program is −
#Port<0.376>
Sending a Message on the Port
Once the port has been opened a message can be sent on the port. This is done via the send method. Let’s look at the syntax and the following example.
Syntax
send(Socket, Address, Port, Packet)
Parameters
Socket − This is the socket created with the gen_udp:open command.
Address − This is machine address to where the message has to be sent to.
port − This is the port no on which the message needs to be sent.
Packet − This is the packet or message details which needs to be sent.
Return Values
An ok message is returned if the message was sent properly.
For example
-module(helloworld).
-export([start/0]).

start() ->
   {ok, Socket} = gen_udp:open(8789),
   io:fwrite("~p",[Socket]),
   io:fwrite("~p",[gen_udp:send
   (Socket,"localhost",8789,"Hello")]).
Output
The output of the above program will be as follows.
#Port<0.376>ok
Receiving a Message on the Port
Once the port has been opened a message can also be received on the port. This is done via the recv method. Let’s look at the syntax and the following example.
Syntax
recv(Socket, length)
Parameters
Socket − This is the socket created with the gen_udp:open command.
Length − This is the length of the message which needs to be received.
Return Values
An ok message is returned if the message was sent properly.
For example
-module(helloworld).
-export([start/0]).

start() ->
   {ok, Socket} = gen_udp:open(8789),
   io:fwrite("~p",[Socket]),
   io:fwrite("~p",[gen_udp:send(Socket,"localhost",8789,"Hello")]),
   io:fwrite("~p",[gen_udp:recv(Socket, 20)]).
The Complete Program
Now obviously we cannot have the same send and receive message in the same program. You need to have them defined in different programs. So let create the following code which creates a server component that listens to messages and a client component which sends messages.
Example
-module(helloworld).
-export([start/0,client/1]).

start() ->
   spawn(fun() -> server(4000) end).

server(Port) ->
   {ok, Socket} = gen_udp:open(Port, [binary, {active, false}]),
   io:format("server opened socket:~p~n",[Socket]),
   loop(Socket).

loop(Socket) ->
   inet:setopts(Socket, [{active, once}]),
   receive
      {udp, Socket, Host, Port, Bin} ->
      io:format("server received:~p~n",[Bin]),
      gen_udp:send(Socket, Host, Port, Bin),
      loop(Socket)
   end.

client(N) ->
   {ok, Socket} = gen_udp:open(0, [binary]),
   io:format("client opened socket=~p~n",[Socket]),
   ok = gen_udp:send(Socket, "localhost", 4000, N), Value = receive
      {udp, Socket, _, _, Bin} ->
         io:format("client received:~p~n",[Bin]) after 2000 ->
      0
   end,

gen_udp:close(Socket),
Value.
The following things need to be noted about the above program.
We define 2 functions, the first is server. This will be used to listen on the port 4000. The second is the client which will be used to send the message “Hello” to the server component.
The receive loop is used to read the messages sent within a define loop.
Output
Now you need to run the program from 2 windows. The first window will be used to run the server component by running the following code in the erl command line window.
helloworld:start().
This will display the following output in the command line window.
server opened socket:#Port<0.2314>
Now in the second erl command line window, run the following command.
Helloworld:client(“<<Hello>>”).
When you issue this command, the following output will be displayed in the first command line window.
server received:<<"Hello">>
Erlang - Distributed Programming
Distributed Programs are those programs that are designed to run on networks of computers and that can coordinate their activities only by message passing.
There are a number of reasons why we might want to write distributed applications. Here are some of them.
Performance − We can make our programs go faster by arranging that different parts of the program are run parallel on different machines.
Reliability − We can make fault-tolerant systems by structuring the system to run on several machines. If one machine fails, we can continue on another machine.
Scalability − As we scale up an application, sooner or later we will exhaust the capabilities of even the most powerful machine. At this stage we have to add more machines to add capacity. Adding a new machine should be a simple operation that does not require large changes to the application architecture.
The central concept in distributed Erlang is the node. A node is a self-contained.
The Erlang system contains a complete virtual machine with its own address space and own set of processes.
Let’s look at the different methods which are used for Distributed Programming.
| Sr.No. | Methods & Description |
|---|---|
| 1 |
This is used to create a new process and initialize it. |
| 2 |
This is used to determine the value of the node on which the process needs to run. |
| 3 |
This is used to create a new process on a node. |
| 4 |
This returns true if the local node is alive and can be part of a distributed system. |
| 5 |
This is used to create a new process link on a node. |
Erlang - OTP
OTP stands for Open Telecom Platform. It’s an application operating system and a set of libraries and procedures used for building large-scale, fault-tolerant, distributed applications. If you want to program your own applications using OTP, then the central concept that you will find very useful is the OTP behavior. A behavior encapsulates common behavioral patterns — think of it as an application framework that is parameterized by a callback module.
The power of OTP comes from the properties such as fault tolerance, scalability, dynamic-code upgrade, and so on, can be provided by the behavior itself. So the first basic concept is to create a server component that mimics the basics of an OTP environment, let’s look at the following example for the same.
Example
-module(server).
-export([start/2, rpc/2]).

start(Name, Mod) ->
   register(Name, spawn(fun() -> loop(Name, Mod, Mod:init()) end)).
rpc(Name, Request) ->
   Name ! {self(), Request},
   receive
      {Name, Response} -> Response
   end.

loop(Name, Mod, State) ->
   receive
      {From, Request} ->
         {Response, State1} = Mod:handle(Request, State),
         From ! {Name, Response},
         loop(Name, Mod, State1)
   end.
The following things need to be noted about the above program −
The process if registered with the system using the register function.
The process spawns a loop function which handles the processing.
Now let’s write a client program that will utilize the server program.
Example
-module(name_server).
-export([init/0, add/2, whereis/1, handle/2]).
-import(server1, [rpc/2]).

add(Name, Place) -> rpc(name_server, {add, Name, Place}).
whereis(Name) -> rpc(name_server, {whereis, Name}).

init() -> dict:new().
handle({add, Name, Place}, Dict) -> {ok, dict:store(Name, Place, Dict)};
handle({whereis, Name}, Dict) -> {dict:find(Name, Dict), Dict}.
This code actually performs two tasks. It serves as a callback module that is called from the server framework code, and at the same time, it contains the interfacing routines that will be called by the client. The usual OTP convention is to combine both functions in the same module.
So here is how the above program needs to be run −
In erl, first run the server program by running the following command.
server(name_server,name_server)
You will get the following output −
Output
true
Then, run the following command
name_server.add(erlang,”Tutorialspoint”).
You will get the following output −
Output
Ok
Then, run the following command −
name_server.whereis(erlang).
You will get the following output −
Output
{ok,"Tutorialspoint"}
Erlang - Concurrency
Concurrent programming in Erlang needs to have the following basic principles or processes.
The list includes the following principles −
piD = spawn(Fun)
Creates a new concurrent process that evaluates Fun. The new process runs in parallel with the caller. An example is as follows −
Example
-module(helloworld).
-export([start/0]).

start() ->
   spawn(fun() -> server("Hello") end).

server(Message) ->
   io:fwrite("~p",[Message]).
The output of the above program is −
Output
“Hello”
Pid ! Message
Sends a message to the process with identifier Pid. Message sending is asynchronous. The sender does not wait but continues with what it was doing. ‘!’ is called the send operator.
An example is as follows −
Example
-module(helloworld).
-export([start/0]).
start() ->
   Pid = spawn(fun() -> server("Hello") end),
   Pid ! {hello}.

server(Message) ->
   io:fwrite("~p",[Message]).
Receive…end
Receives a message that has been sent to a process. It has the following syntax −
Syntax
receive

Pattern1 [when Guard1] ->

Expressions1;

Pattern2 [when Guard2] ->

Expressions2;
...
End
When a message arrives at the process, the system tries to match it against Pattern1 (with possible guard Guard1); if this succeeds, it evaluates Expressions1. If the first pattern does not match, it tries Pattern2, and so on. If none of the patterns matches, the message is saved for later processing, and the process waits for the next message.
An example of the entire process with all 3 commands is shown in the following program.
Example
-module(helloworld).
-export([loop/0,start/0]).

loop() ->
   receive
      {rectangle, Width, Ht} ->
         io:fwrite("Area of rectangle is ~p~n" ,[Width * Ht]),
         loop();
      {circle, R} ->
      io:fwrite("Area of circle is ~p~n" , [3.14159 * R * R]),
      loop();
   Other ->
      io:fwrite("Unknown"),
      loop()
   end.

start() ->
   Pid = spawn(fun() -> loop() end),
   Pid ! {rectangle, 6, 10}.
The following things need to be noted about the above program −
The loop function has the receive end loop. So when a message is sent , it will processed by the receive end loop.
A new process is spawned which goes to the loop function.
The message is sent to the spawned process via the Pid ! message command.
The output of the above program is −
Output
Area of the Rectangle is 60
Maximum Number of Processes
In concurrency it is important to determine the maximum number of processes that are allowed on a system. You should then be able to understand how many process can execute concurrently on a system.
Let’s see an example of how we can determine what is the maximum number of processes that can execute on a system.
-module(helloworld).
-export([max/1,start/0]).

max(N) ->
   Max = erlang:system_info(process_limit),
   io:format("Maximum allowed processes:~p~n" ,[Max]),

   statistics(runtime),
   statistics(wall_clock),

   L = for(1, N, fun() -> spawn(fun() -> wait() end) end),
   {_, Time1} = statistics(runtime),
   {_, Time2} = statistics(wall_clock), lists:foreach(fun(Pid) -> Pid ! die end, L),

   U1 = Time1 * 1000 / N,
   U2 = Time2 * 1000 / N,
   io:format("Process spawn time=~p (~p) microseconds~n" , [U1, U2]).
   wait() ->

   receive
      die -> void
   end.

for(N, N, F) -> [F()];
for(I, N, F) -> [F()|for(I+1, N, F)].

start()->
   max(1000),
   max(100000).
On any machine which has a good processing power, both of the above max functions will pass. Following is a sample output from the above program.
Maximum allowed processes:262144

Process spawn time=47.0 (16.0) microseconds

Maximum allowed processes:262144

Process spawn time=12.81 (10.15) microseconds
Receive with a Timeout
Sometimes a receive statement might wait forever for a message that never comes. This could be for a number of reasons. For example, there might be a logical error in our program, or the process that was going to send us a message might have crashed before it sent the message. To avoid this problem, we can add a timeout to the receive statement. This sets a maximum time that the process will wait to receive a message.
Following is the syntax of the receive message with a timeout specified
Syntax
receive
Pattern1 [when Guard1] ->
Expressions1;

Pattern2 [when Guard2] ->
Expressions2;
...
after Time ->
Expressions
end
The simplest example is to create a sleeper function as shown in the following program.
Example
-module(helloworld).
-export([sleep/1,start/0]).

sleep(T) ->
   receive
   after T ->
      true
   end.

start()->
   sleep(1000).
The above code will sleep for 1000 Ms before actually exiting.
Selective Receive
Each process in Erlang has an associated mailbox. When you send a message to the process, the message is put into the mailbox. The only time this mailbox is examined is when your program evaluates a receive statement.
Following is the general syntax of the Selective receive statement.
Syntax
receive
Pattern1 [when Guard1] ->
Expressions1;

Pattern2 [when Guard1] ->
Expressions1;
...
after
Time ->
ExpressionTimeout
end
This is how the above receive statement works −
When we enter a receive statement, we start a timer (but only if an after section is present in the expression).
Take the first message in the mailbox and try to match it against Pattern1, Pattern2, and so on. If the match succeeds, the message is removed from the mailbox, and the expressions following the pattern are evaluated.
If none of the patterns in the receive statement matches the first message in the mailbox, then the first message is removed from the mailbox and put into a “save queue.” The second message in the mailbox is then tried. This procedure is repeated until a matching message is found or until all the messages in the mailbox have been examined.
If none of the messages in the mailbox matches, then the process is suspended and will be rescheduled for execution the next time a new message is put in the mailbox. Note that when a new message arrives, the messages in the save queue are not rematched; only the new message is matched.
As soon as a message has been matched, then all messages that have been put into the save queue are reentered into the mailbox in the order in which they arrived at the process. If a timer was set, it is cleared.
If the timer elapses when we are waiting for a message, then evaluate the expressions ExpressionsTimeout and put any saved messages back into the mailbox in the order in which they arrived at the process.
Erlang - Performance
When talking about performance the following points need to be noted about Erlang.
Funs are very fast − Funs was given its own data type in R6B and was further optimized in R7B.
Using the ++ operator − This operator needs to be used in the proper way. The following example is the wrong way to do a ++ operation.
Example
-module(helloworld).
-export([start/0]).

start()->
   fun_reverse([H|T]) ->
   fun_reverse(T)++[H];
   fun_reverse([]) ->
   [].
As the ++ operator copies its left operand, the result is copied repeatedly, leading to quadratic complexity.
Using Strings − String handling can be slow if done improperly. In Erlang, you need to think a little more about how the strings are used and choose an appropriate representation. If you use regular expressions, use the re-module in STDLIB instead of the obsolete regexp module.
BEAM is a Stack-Based Byte-Code Virtual Machine − BEAM is a register-based virtual machine. It has 1024 virtual registers that are used for holding temporary values and for passing arguments when calling functions. Variables that need to survive a function call are saved to the stack. BEAM is a threaded-code interpreter. Each instruction is word pointing directly to executable C-code, making instruction dispatching very fast.
Erlang - Drivers
Sometimes we want to run a foreign-language program inside the Erlang Runtime System. In this case, the program is written as a shared library that is dynamically linked into the Erlang runtime system. The linked-in driver appears to the programmer as a port program and obeys exactly the same protocol as for a port program.
Creating a Driver
Creating a linked-in driver is the most efficient way of interfacing foreign-language code with Erlang, but it is also the most dangerous. Any fatal error in the linked-in driver will crash the Erlang System.
Following is an example of a driver implementation in Erlang −
Example
-module(helloworld).
-export([start/0, stop/0]).
-export([twice/1, sum/2]).

start() ->
   start("example1_drv" ).
start(SharedLib) ->
   case erl_ddll:load_driver("." , SharedLib) of
   ok -> ok;
      {error, already_loaded} -> ok;
      _ -> exit({error, could_not_load_driver})
   end,

   spawn(fun() -> init(SharedLib) end).

init(SharedLib) ->
   register(example1_lid, self()),
   Port = open_port({spawn, SharedLib}, []),
   loop(Port).

stop() ->
   example1_lid ! stop.

twice(X) -> call_port({twice, X}).
sum(X,Y) -> call_port({sum, X, Y}). call_port(Msg) ->
   example1_lid ! {call, self(), Msg}, receive
      {example1_lid, Result} ->
      Result
   end.

LINKED-IN DRIVERS 223
loop(Port) ->
receive
   {call, Caller, Msg} ->
   Port ! {self(), {command, encode(Msg)}}, receive
   {Port, {data, Data}} ->
   Caller ! {example1_lid, decode(Data)}
   end,

loop(Port);
stop -> Port !
   {self(), close},
   receive
      {Port, closed} ->
      exit(normal)
   end;

      {'EXIT', Port, Reason} ->
      io:format("~p ~n" , [Reason]),
      exit(port_terminated)
   end.

encode({twice, X}) -> [1, X];
encode({sum, X, Y}) -> [2, X, Y]. decode([Int]) -> Int.
Please note that working with drivers is extremely complex and care should be taken when working with drivers.
Erlang - Web Programming
In Erlang, the inets library is available to build web servers in Erlang. Let’s look at some of the functions available in Erlang for web programming. One can implement the HTTP server, also referred to as httpd to handle HTTP requests.
The server implements numerous features, such as −
- Secure Sockets Layer (SSL)
- Erlang Scripting Interface (ESI)
- Common Gateway Interface (CGI)
- User Authentication (using Mnesia, Dets or plain text database)
- Common Logfile Format (with or without disk_log(3) support)
- URL Aliasing
- Action Mappings
- Directory Listings
The first job is to start the web library via the command.
inets:start()
The next step is to implement the start function of the inets library so that the web server can be implemented.
Following is an example of creating a web server process in Erlang.
For example
-module(helloworld).
-export([start/0]).

start() ->
   inets:start(),
   Pid = inets:start(httpd, [{port, 8081}, {server_name,"httpd_test"},
   {server_root,"D://tmp"},{document_root,"D://tmp/htdocs"},
   {bind_address, "localhost"}]), io:fwrite("~p",[Pid]).
The following points need to be noted about the above program.
The port number needs to be unique and not used by any other program. The httpd service would be started on this port no.
The server_root and document_root are mandatory parameters.
Output
Following is the output of the above program.
{ok,<0.42.0>}
To implement a Hello world web server in Erlang, perform the following steps −
Step 1 − Implement the following code −
-module(helloworld).
-export([start/0,service/3]).

start() ->
   inets:start(httpd, [
      {modules, [
         mod_alias,
         mod_auth,
         mod_esi,
         mod_actions,
         mod_cgi,
         mod_dir,
         mod_get,
         mod_head,
         mod_log,
         mod_disk_log
      ]},

      {port,8081},
      {server_name,"helloworld"},
      {server_root,"D://tmp"},
      {document_root,"D://tmp/htdocs"},
      {erl_script_alias, {"/erl", [helloworld]}},
      {error_log, "error.log"},
      {security_log, "security.log"},
      {transfer_log, "transfer.log"},

      {mime_types,[
         {"html","text/html"}, {"css","text/css"}, {"js","application/x-javascript"} ]}
   ]).

service(SessionID, _Env, _Input) -> mod_esi:deliver(SessionID, [
   "Content-Type: text/html\r\n\r\n", "<html><body>Hello, World!</body></html>" ]).
Step 2 − Run the code as follows. Compile the above file and then run the following commands in erl.
c(helloworld).
You will get the following output.
{ok,helloworld}
The next command is −
inets:start().
You will get the following output.
ok
The next command is −
helloworld:start().
You will get the following output.
{ok,<0.50.0>}
Step 3 − You can now access the url - http://localhost:8081/erl/hello_world:service.