- Cucumber Tutorial
- Cucumber - Home
- Cucumber - Overview
- Cucumber - Environment
- Cucumber - Gherkins
- Cucumber - Features
- Cucumber - Scenarios
- Cucumber - Annotations
- Cucumber - Scenario Outline
- Cucumber - Tags
- Cucumber - Data Tables
- Cucumber - Comments
- Cucumber - Hooks
- Cucumber - Command Line Options
- Cucumber - JUnit Runner
- Cucumber - Reports
- Cucumber - Debugging
- Cucumber - Java Testing
- Cucumber - Ruby Testing
- Cucumber Useful Resources
- Cucumber - Quick Guide
- Cucumber - Useful Resources
- Cucumber - Discussion
Cucumber - Quick Guide
Cucumber - Overview
In order to get better advantage of the software testing, organizations are nowadays taking a step forward. They implement important acceptance test scenarios while development is in-progress. This approach is commonly known as Behavior Driven Development (BDD).
Behavior Driven Development gives us an opportunity to create test scripts from both the developer’s and the customer’s perspective as well. So in the beginning, developers, project managers, QAs, user acceptance testers and the product owner (stockholder), all get together and brainstorm about which test scenarios should be passed in order to call this software/application successful. This way they come up with a set of test scenarios. All these test scripts are in simple English language, so it serves the purpose of documentation also.
Example
If we are developing a user authentication feature, then the following can be few key test scenarios, which needs to get passed in order to call it a success.
The user should be able to login with correct username and correct password.
The user should not be able to login with incorrect username and correct password.
The user should not be able to login with correct username and incorrect password.
How it Works
By the time the code is ready, test scripts are ready too. The code has to pass the test scripts defined in BDD. If it does not happen, code refactoring will be needed. Code gets freezed only after successful execution of defined test scripts.
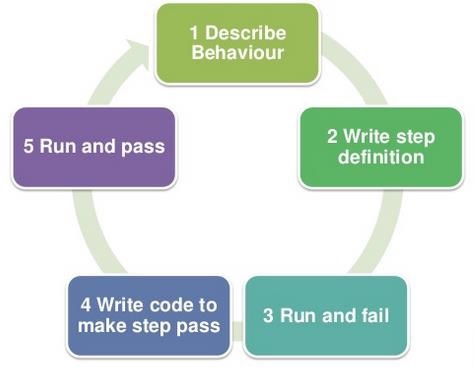
It is a very simple notion, but what we need in order to get this concept implemented. The answer is, Behavior Driven Development (BDD) Framework. Cucumber is one such open source tool, which supports behavior driven development. To be more precise, Cucumber can be defined as a testing framework, driven by plain English text. It serves as documentation, automated tests, and a development aid – all in one.
So what does Cucumber do? It can be described in the following steps −
Cucumber reads the code written in plain English text (Language Gherkin – to be introduced later in this tutorial) in the feature file (to be introduced later).
It finds the exact match of each step in the step definition (a code file - details provided later in the tutorial).
The piece of code to be executed can be different software frameworks like Selenium, Ruby on Rails, etc. Not every BDD framework tool supports every tool.
This has become the reason for Cucumber's popularity over other frameworks, like JBehave, JDave, Easyb, etc.
Cucumber supports over a dozen different software platforms like −
- Ruby on Rails
- Selenium
- PicoContainer
- Spring Framework
- Watir
Advantages of Cucumber Over Other Tools
Cucumber supports different languages like Java.net and Ruby.
It acts as a bridge between the business and technical language. We can accomplish this by creating a test case in plain English text.
It allows the test script to be written without knowledge of any code, it allows the involvement of non-programmers as well.
It serves the purpose of end-to-end test framework unlike other tools.
Due to simple test script architecture, Cucumber provides code reusability.
Cucumber - Environment
In this chapter, we will see the environment setup for Cucumber with Selenium WebDriver and Java, on Windows Machine.
Prerequisites for Environment Setup
Following are the prerequisites required to set up with −
Java
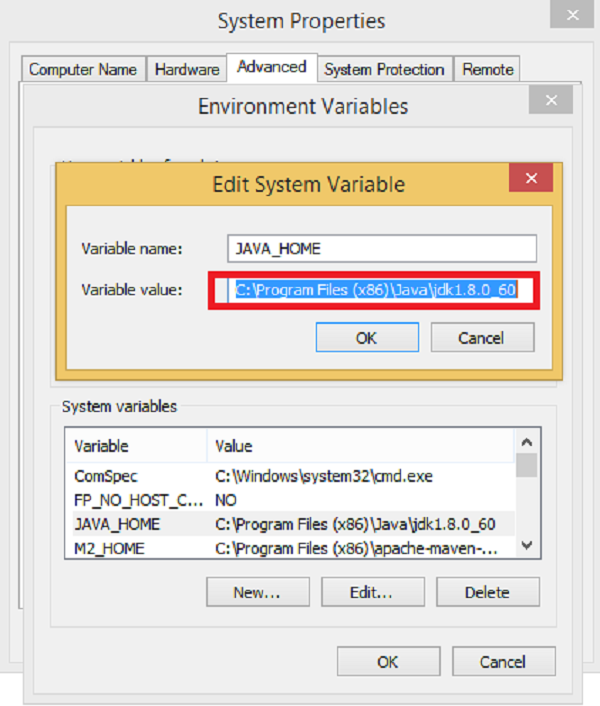
Why we need − Java is a robust programming language. Cucumber supports Java platform for the execution.
How to install −
Step 1 − Download jdk and jre from the following link http://www.oracle.com/technetwork/java/javase/downloads/index.html
Step 2 − Accept license agreement.
Step 3 − Install JDK and JRE.
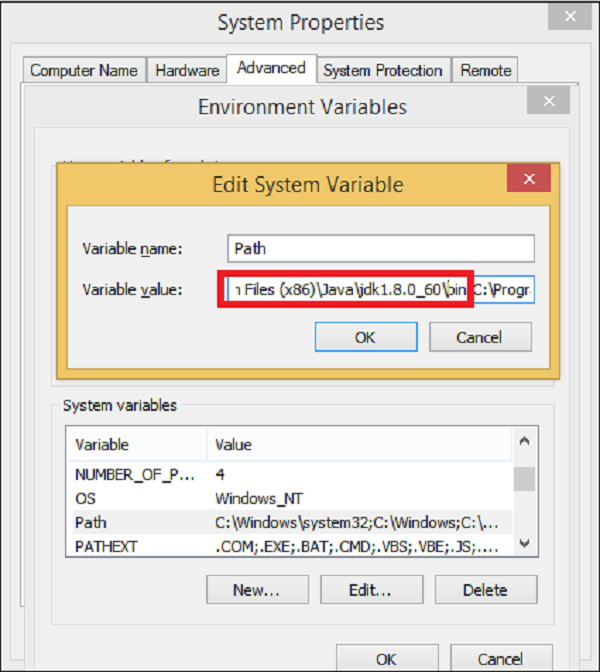
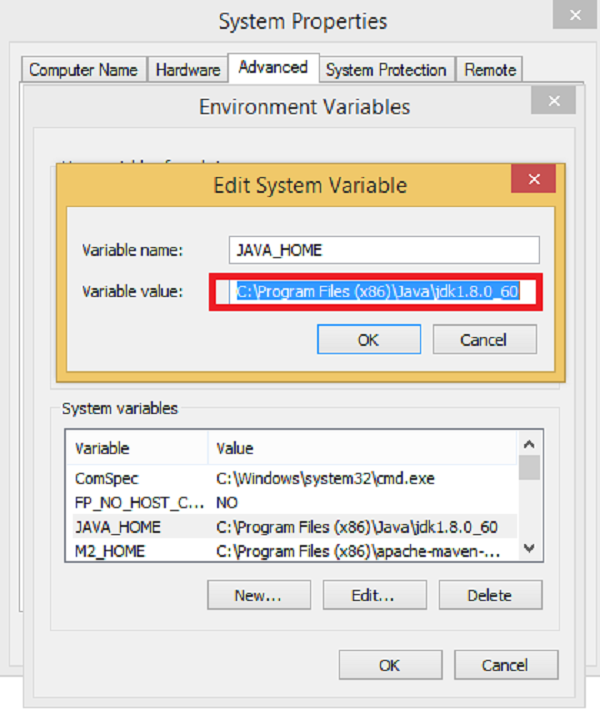
Step 4 − Set the environment variable as shown in the following screenshots.

Eclipse
Why we need − Eclipse is an Integrated Development Environment (IDE). It contains a base workspace and an extensible plug-in system for customizing the environment.
How to install −
Step 1 − Make sure JAVA is installed on your machine.
Step 2 − Download Eclipse from https://eclipse.org/downloads/
Step 3 − Unzip and Eclipse is installed.
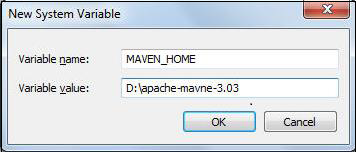
Maven
Why we need − Maven is a build automation tool used primarily for Java projects. It provides a common platform to perform activities like generating source code, compiling code, packaging code to a jar, etc. Later if any of the software versions gets changed, Maven provides an easy way to modify the test project accordingly.
How to install −
Step 1 − Download Maven from the following link − https://maven.apache.org/download.cgi
Step 2 − Unzip the file and remember the location.
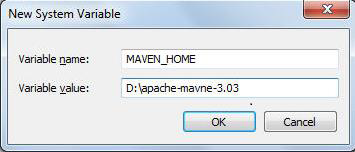
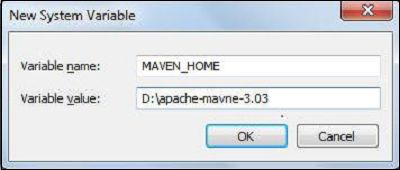
Step 3 − Create environment variable MAVEN_HOME as shown in the following screenshot.
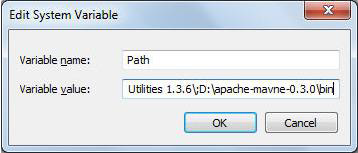
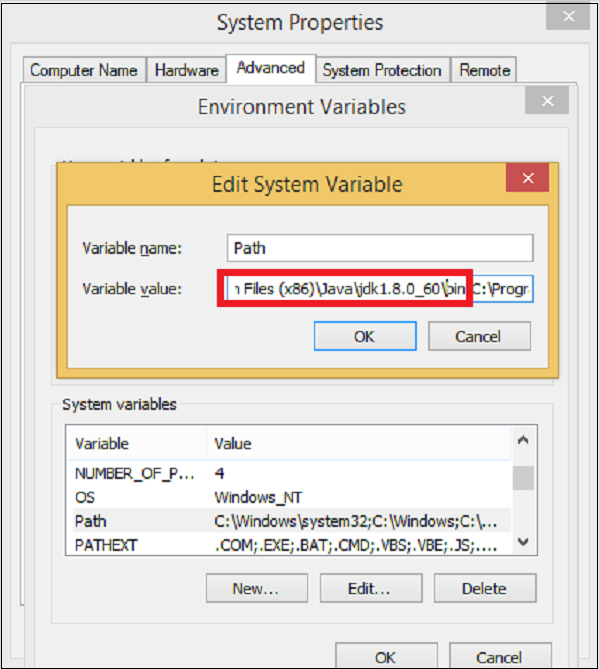
Step 4 − Edit Path variable and include Maven as shown in the following screenshot.
Step 5 − Download MAVEN plugin from Eclipse.
Step 6 − Open Eclipse.
Step 7 − Go to Help → Eclipse Marketplace → Search Maven → Maven Integration for Eclipse → INSTALL.
Configure Cucumber with Maven
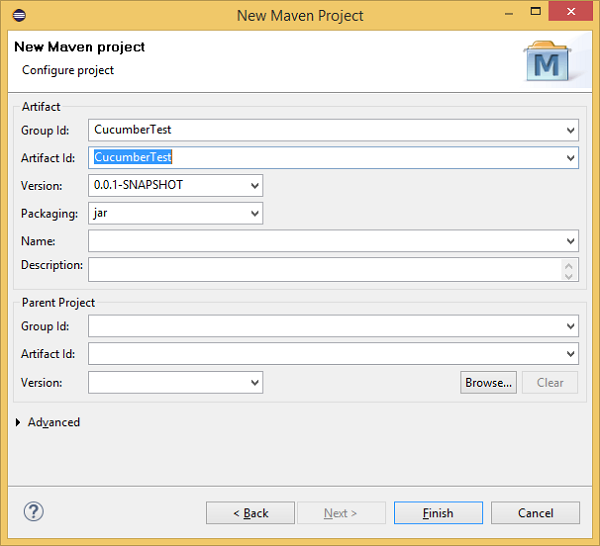
Step 1 − Create a Maven project.
Go to File → New → Others → Maven → Maven Project → Next.
Provide group Id (group Id will identify your project uniquely across all projects).
Provide artifact Id (artifact Id is the name of the jar without version. You can choose any name, which is in lowercase). Click on Finish.
Step 2 − Open pom.xml.
Go to package explorer on the left hand side of Eclipse.
Expand the project CucumberTest.
Locate pom.xml file.
Right-click and select the option, open with “Text Editor”.
Step 3 − Add dependency for selenium: This will indicate Maven which Selenium jar files are to be downloaded from the central repository to the local repository.
Open pom.xml is in the edit mode, create dependencies tag (<dependencies></dependencies>), inside the project tag.
Inside the dependencies tag, create dependency tag (<dependency></dependency>).
Provide the following information within the dependency tag.
<dependency>
   <groupId>org.seleniumhq.selenium</groupId>
   <artifactId>selenium-java</artifactId>
   <version>2.47.1</version>
</dependency>
Step 4 − Add dependency for Cucumber-Java: This will indicate Maven, which Cucumber files are to be downloaded from the central repository to the local repository.
Create one more dependency tag.
Provide the following information within the dependency tag
<dependency>
   <groupId>info.cukes</groupId>
   <artifactId>cucumber-java</artifactId>
   <version>1.0.2</version>
   <scope>test</scope>
</dependency>
Step 5 − Add dependency for Cucumber-JUnit: This will indicate Maven, which Cucumber JUnit files are to be downloaded from the central repository to the local repository.
Create one more dependency tag.
Provide the following information within the dependency tag
<dependency>
   <groupId>info.cukes</groupId>
   <artifactId>cucumber-junit</artifactId>
   <version>1.0.2</version>
   <scope>test</scope>
</dependency>
Step 6 − Add dependency for JUnit: This will indicate Maven, which JUnit files are to be downloaded from the central repository to the local repository.
Create one more dependency tag.
Provide the following information within the dependency tag.
<dependency>
   <groupId>junit</groupId>
   <artifactId>junit</artifactId>
   <version>4.10</version>
   <scope>test</scope>
</dependency>
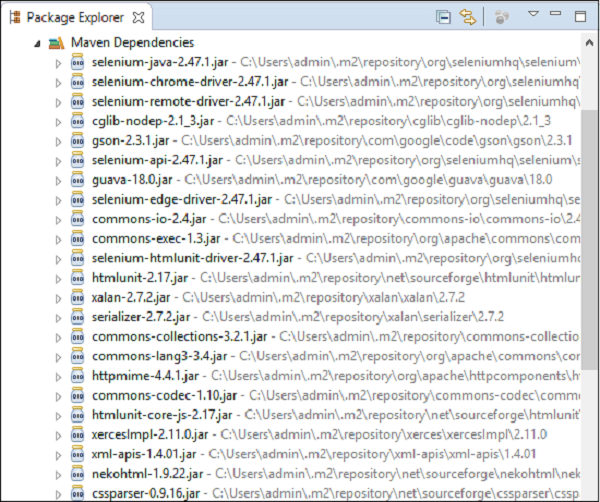
Step 7 − Verify binaries.
Once pom.xml is edited successfully, save it.
Go to Project → Clean − It will take a few minutes.
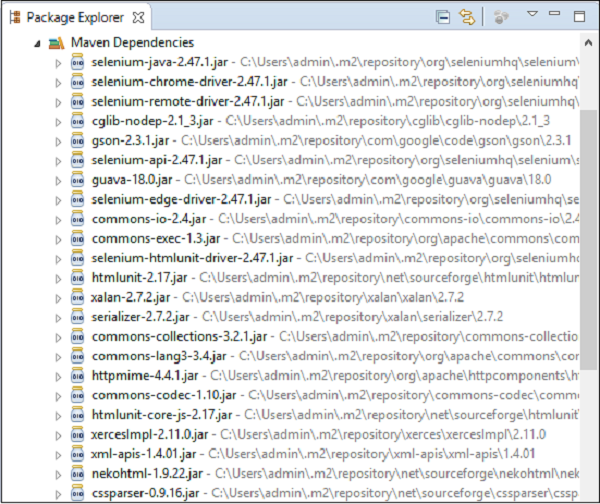
You will be able to see a Maven repository like shown in the following screenshot.
Create a feature file (to be covered later).
Create a step definition file (to be covered later).
Create a JUnit runner to run the test (to be covered later).
Cucumber - Gherkins
So far, we have got an understanding of Cucumber and what it does. It executes the test scripts, which have been defined in the feature file (to be covered in subsequent chapters). The language, in which this executable feature files is written, is known as Gherkin. Gherkin is a plain English text language, which helps the tool - Cucumber to interpret and execute the test scripts.
One may think that, it has been discussed many times that Cucumber supports simple English text then why we need a separate language - Gherkins. The answer lies in the concept of the Behavior Driven Development.
As discussed earlier, we had seen that BDD incorporates different prospectives while creating test scripts. It can be development prospective, business prospective, etc. That said, we will need people from different community like developers, project managers, product owners, and testers while developing test scripts. As these people do not belong to the same category, there is a risk of not using the common language for test script conceptualizing. This was the evolution point for Gherkins.
Gherkin provides the common set of keywords in English text, which can be used by people amongst the different community and yet get the same output in the form of test scripts.
Example
Feature − Login functionality for a social networking site. Given I am a social networking site user. When I enter username as username1. And I enter password as password1. Then I should be redirected to the home page of the site.
The above-mentioned scenario is of a feature called user login. All the words highlighted in bold are Gherkin keywords.
Example of few other keywords −
- Background
- But
- *
- Scenario Outline
- Examples
Gherkin will parse each step written in step definition file (to be covered later). So the steps mentioned in the feature file and the step definition file (to be covered later) should match.
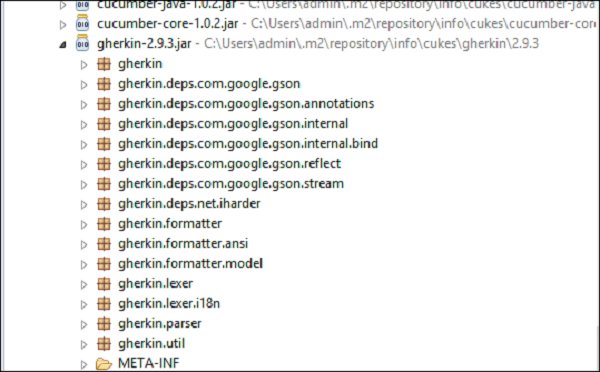
You can locate the Gherkin jars in the Maven Dependency folder in the Package Explorer. It gets downloaded along with the other Cucumber jars. It will look like the following screenshot −
Another interesting fact about Gherkin is, it supports not only English but many other native languages such as French, Finnish, Indonesian, Hungarian, Hindi, Urdu, Gujarati, etc.
Cucumber - Features
A Feature can be defined as a standalone unit or functionality of a project. Let’s take a very common example of a social networking site. How does the feature of this product/project look like? Few basic features can be determined as −
Create and remove the user from the social networking site.
User login functionality for the social networking site.
Sharing photos or videos on the social networking site.
Sending a friend request.
Logout.
By now, it is clear that, each independent functionality of the product under test can be termed as a feature when we talk about Cucumber. It is a best practice later when you start testing, that before deriving the test scripts, we should determine the features to be tested.
A feature usually contains a list of scenarios to be tested for that feature. A file in which we store features, description about the features and scenarios to be tested is known as Feature File. We will see more about feature files in the following chapter.
The keyword to represent a feature under test in Gherkins is “Feature”. The suggested best practice is, to write a small description of the feature beneath the feature title in the feature file. This will fulfill the need of a good documentation as well.
Example
Feature − Login functionality for a social networking site.
The user should be able to login into the social networking site if the username and the password are correct.
The user should be shown the error message if the username and the password are incorrect.
The user should be navigated to home page, if the username and password are correct.
Feature Files
The file, in which Cucumber tests are written, is known as feature files. It is advisable that there should be a separate feature file, for each feature under test. The extension of the feature file needs to be “.feature”.
One can create as many feature files as needed. To have an organized structure, each feature should have one feature file.
For Example −
| Sr.No | Feature | Feature File name |
|---|---|---|
| 1 | User Login | userLogin.feature |
| 2 | Share the Post | sharePost.feature |
| 3 | Create Account | createAccount.feature |
| 4 | Delete Account | deleteAccount.feature |
The naming convention to be used for feature name, feature file name depends on the individual’s choice. There is no ground rule in Cucumber about names.
A simple feature file consists of the following keywords/parts −
Feature − Name of the feature under test.
Description (optional) − Describe about feature under test.
Scenario − What is the test scenario.
Given − Prerequisite before the test steps get executed.
When − Specific condition which should match in order to execute the next step.
Then − What should happen if the condition mentioned in WHEN is satisfied.
Example
Feature − User login on social networking site.
The user should be able to login into the social networking site when the username and the password are correct.
The user should be shown an error message when the username and the password are incorrect.
The user should be navigated to the home page if the username and the password are correct.
Outline − Login functionality for a social networking site.
The given user navigates to Facebook. When I enter Username as "<username>" and Password as "<password>". Then, login should be unsuccessful.
| username  | password  |
| username1 | password1 |
* AND keyword is used to show conjunction between two conditions. AND can be used with any other keywords like GIVEN, WHEN and THEN.
There are no logic details written in the feature file.
Steps Definitions
We have got our feature file ready with the test scenarios defined. However, this is not the complete job done. Cucumber doesn’t really know which piece of code is to be executed for any specific scenario outlined in a feature file.
This calls the need of an intermediate – Step Definition file. Steps definition file stores the mapping between each step of the scenario defined in the feature file with a code of function to be executed.
So, now when Cucumber executes a step of the scenario mentioned in the feature file, it scans the step definition file and figures out which function is to be called.
Example of Step Definition File
public void goToFacebook() {
   driver = new FirefoxDriver();
   driver.navigate().to("https://www.facebook.com/");
}
@When "^user logs in using Username as \"([^\"]*)\" and Password as \"([^\"]*)\"$"
public void I_enter_Username_as_and_Password_as(String arg1, String arg2) {
   driver.findElement(By.id("email")).sendKeys(arg1);
   driver.findElement(By.id("pass")).sendKeys(arg2);
   driver.findElement(By.id("u_0_v")).click();
}
@Then"^login should be unsuccessful$"
public void validateRelogin() {
   if(driver.getCurrentUrl().equalsIgnoreCase(
      "https://www.facebook.com/login.php?login_attempt=1&lwv=110")){
         System.out.println("Test Pass");
   } else {
      System.out.println("Test Failed");
   }
   driver.close();
}
So with each function, whatever code you want to execute with each test step (i.e. GIVEN/THEN/WHEN), you can write it within Step Definition file. Make sure that code/function has been defined for each of the steps.
This function can be Java functions, where we can use both Java and Selenium commands in order to automate our test steps.
Cucumber - Scenarios
Scenario is one of the core Gherkin structures. Every scenario starts with the keyword “Scenario:” (or localized one) and is followed by an optional scenario title. Each feature can have one or more scenarios and every scenario consists of one or more steps. A very simple example of scenario can be −
Scenario − Verify Help Functionality.
Given user navigates to Facebook.
When the user clicks on Help, then the Help page opens.
Consider a case, where we need to execute a test scenario more than once. Suppose, we need to make sure that the login functionality is working for all types of subscription holders. That requires execution of login functionality scenario multiple times. Copy paste the same steps in order to just re-execute the code, does not seem to be a smart idea. For this, Gherkin provides one more structure, which is scenario outline.
Scenario outline is similar to scenario structure; the only difference is the provision of multiple inputs. As you can see in the following example, the test case remains the same and non-repeatable. At the bottom we have provided multiple input values for the variables “Username” and “Password”. While running the actual test, Cucumber will replace the variable with input values provided and it will execute the test. Once pass-1 has been executed, the test will rerun for second iteration with another input value. Such variable or placeholders can be represented with ”<>” while mentioning with gherkin statements.
Example
Scenario Outline − Login functionality for a social networking site. The given user navigates to Facebook.
When the user logs in using the Username as "<username>" and the Password as "<password>", then login should be successful.
| username | password  |
| user1    | password1 |
| user2    | password2 |
There are a few tips and tricks to smartly define the Cucumber scenarios.
Each step should be clearly defined, so that it does not create any confusion for the reader.
Do not repeat the test scenario, if needed use scenario outline to implement repetition.
Develop a test step in a way that, it can be used within multiple scenarios and scenario outlines.
As far as possible, keep each step completely independent. For example: “Given the user is logged in”. This can be divided into two steps
- Given the user enters the user name.
- Clicks on login.
Cucumber - Annotations
Annotation is a predefined text, which holds a specific meaning. It lets the compiler/interpreter know, what should be done upon execution. Cucumber has got the following few annotations −
Given −
It describes the pre-requisite for the test to be executed.
Example − GIVEN I am a Facebook user
When −
It defines the trigger point for any test scenario execution.
Example − WHEN I enter "<username>"
Then −
Then holds the expected result for the test to be executed.
Example − THEN login should be successful.
And −
It provides the logical AND condition between any two statements. AND can be used in conjunction with GIVEN, WHEN and THEN statement.
Example − WHEN I enter my "<username>" AND I enter my "<password>"
But −
It signifies logical OR condition between any two statements. OR can be used in conjunction with GIVEN, WHEN and THEN statement.
Example − THEN login should be successful. BUT home page should not be missing.
Scenario −
Details about the scenario under the test needs to be captured after the keyword “Scenario:”
Example −
Scenario:
GIVEN I am a Facebook user
WHEN I enter my
AND I enter my
THEN login should be successful.
BUT home page should not be missing.
Scenario Outline − (To be covered later)
Examples − (To be covered later)
Background −
Background generally has the instruction on what to setup before each scenario runs. However, it gets executed after “Before” hook (to be covered later). So this is ideal to be used for code when we want to set up the web-browser or we want to establish the database connectivity.
Example −
Background:
Go to Facebook home page.
Example Scenario
Let’s automate a scenario in order to understand annotations better.
Step 1
Create a Maven Test Project named as AnnotationTest.
Go to File → New → Others → Maven → Maven Project → Next.
Provide group Id (group Id will identify your project uniquely across all projects).
Provide artifact Id (artifact Id is the name of the jar without version. You can choose any name which is in lowercase).
Click on Finish.
Open pom.xml −
Go to package explorer on the left hand side of Eclipse.
Expand the project AnnotationTest.
Locate pom.xml file.
Right-click and select the option, Open with “Text Editor”.
Add dependency for Selenium − This will indicate Maven, which Selenium jar files are to be downloaded from the central repository to the local repository.
Open pom.xml is in edit mode, create dependencies tag (<dependencies></dependencies>), inside the project tag.
Inside the dependencies tag, create dependency tag (<dependency></dependency>).
Provide the following information within the dependency tag.
<dependency>
   <groupId>org.seleniumhq.selenium</groupId>
   <artifactId>selenium-java</artifactId>
   <version>2.47.1</version>
</dependency>
Add dependency for Cucumber-Java − This will indicate Maven, which Cucumber files are to be downloaded from the central repository to the local repository.
Create one more dependency tag.
Provide following information within the dependency tag.
<dependency>
   <groupId>info.cukes</groupId>
   <artifactId>cucumber-java</artifactId>
   <version>1.0.2</version>
   <scope>test</scope>
</dependency>
Add dependency for Cucumber-JUnit − This will indicate Maven, which Cucumber JUnit files are to be downloaded from the central repository to the local repository.
Create one more dependency tag.
Provide the following information within the dependency tag.
<dependency>
   <groupId>info.cukes</groupId>
   <artifactId>cucumber-junit</artifactId>
   <version>1.0.2</version>
   <scope>test</scope>
</dependency>
Add dependency for JUnit − This will indicate Maven, which JUnit files are to be downloaded from the central repository to the local repository.
Create one more dependency tag.
Provide the following information within the dependency tag.
<dependency>
   <groupId>junit</groupId>
   <artifactId>junit</artifactId>
   <version>4.10</version>
   <scope>test</scope>
</dependency>
Verify binaries.
Once pom.xml is edited successfully, save it.
Go to Project → Clean − It will take a few minutes.
Step 2
Create a package named Annotation under src/test/java
Select the newly created project.
Right-click and select ‘New’.
Select option as ‘Package’.
Name it as ‘Annotation’.
Save it.
Step 3
Create a feature file named annotation.feature.
Select and right-click on the package outline.
Click on ‘New’ file.
Give the file a name such as outline.feature.
Write the following text within the file and save it.
Feature: annotation
#This is how background can be used to eliminate duplicate steps

Background:
   User navigates to Facebook Given
   I am on Facebook login page

#Scenario with AND
Scenario:
   When I enter username as "TOM"
   And I enter password as "JERRY"
   Then Login should fail

#Scenario with BUT
Scenario:
   When I enter username as "TOM"
   And I enter password as "JERRY"
   Then Login should fail
   But Relogin option should be available
Step 4
Create a step definition file.
Select and right-click on the package outline.
Click on ‘New’ file.
Give the file name as annotation.java
Write the following text within the file and save it.
package Annotation;

import org.openqa.selenium.By;
import org.openqa.selenium.WebDriver;
import org.openqa.selenium.firefox.FirefoxDriver;

import cucumber.annotation.en.Given;
import cucumber.annotation.en.Then;
import cucumber.annotation.en.When;

public class annotation {
   WebDriver driver = null;
   @Given("^I am on Facebook login page$")

   public void goToFacebook() {
      driver = new FirefoxDriver();
      driver.navigate().to("https://www.facebook.com/");
   }

   @When("^I enter username as \"(.*)\"$")
   public void enterUsername(String arg1) {
      driver.findElement(By.id("email")).sendKeys(arg1);
   }

   @When ("^I enter password as \"(.*)\"$")
   public void enterPassword(String arg1) {
      driver.findElement(By.id("pass")).sendKeys(arg1);
      driver.findElement(By.id("u_0_v")).click();
   }

   @Then("^Login should fail$")
   public void checkFail() {
      if(driver.getCurrentUrl().equalsIgnoreCase(
         "https://www.facebook.com/login.php?login_attempt=1&lwv=110")){
            System.out.println("Test1 Pass");
      } else {
         System.out.println("Test1 Failed");
      }
      driver.close();
   }

   @Then("^Relogin option should be available$")
   public void checkRelogin() {
      if(driver.getCurrentUrl().equalsIgnoreCase(
         "https://www.facebook.com/login.php?login_attempt=1&lwv=110")){
            System.out.println("Test2 Pass");
      } else {
         System.out.println("Test2 Failed");
      }
      driver.close();
   }
}
Step 5
Create a runner class file.
Select and right-click on the package outline.
Click on ‘New’ file.
Give the file a name, such as runTest.java
Write the following text within the file and save it.
package Annotation;

import org.junit.runner.RunWith;
import cucumber.junit.Cucumber;

@RunWith(Cucumber.class)
@Cucumber.Options(format = {"pretty", "html:target/cucumber"})

public class runTest {
}
Step 6
Run the test using option −
Select runTest.java file from the package explorer.
Right-click and select the option ‘Run as’
Select JUnit test.
You will observe the following things when you run this class file −
Facebook opens in a new Firefox web-browser instance.
TOM will be passed as an input to the username field.
JERRY will be passed as an input to the password field.
Login will be clicked.
Message will be displayed on the browser regarding unsuccessful login.
In the console, you will see “Test Pass” printed
Step result 1. to 5. Will be re-executed for username as "" and password as "".
Cucumber - Scenario Outline
Scenario outline basically replaces variable/keywords with the value from the table. Each row in the table is considered to be a scenario.
Let’s continue with the same example of Facebook login feature. So far we have been executing one scenario: Upon providing the correct user name, login is successful. Now, suppose we want to check if login is successful for all three possible types of inputs, which are username, email address, or phone number. To achieve this, we will need to write three different scenarios, where each scenario will vary with the type of input, login is successful. In this case, scenarios will look like the following.
Scenario:
Given user navigates to Facebook
When I enter correct username and password
Then login should be successful
Scenario:
Given user navigates to Facebook
When I enter correct email address and password
Then login should be successful
Scenario:
Given user navigates to Facebook
When I enter correct phone number and password
Then login should be successful
Here, if we see closely, for above three scenarios: statements are the same, only the input parameter (username/email address/phone number) is changing. That’s where the importance of scenario outline comes into picture.
When we define any scenario with scenario outline, we can specify one test scenario and at the bottom of it we can provide a number of inputs. The scenario will get executed as many times as the number of inputs provided.
Example
Let’s create an example of a scenario outline −
Step 1 − Create a Maven Test Project named as ScenarioOutlineTest
Go to File → New → Others → Maven → Maven Project → Next.
Provide group Id (group Id will identify your project uniquely across all projects).
Provide artifact Id (artifact Id is the name of the jar without version. You can choose any name which is in lowercase).
Click on Finish.
Open pom.xml −
Go to package explorer on the left hand side of Eclipse.
Expand the project CucumberTest.
Locate pom.xml file.
Right-click and select the option, Open with “Text Editor”.
Add dependency for Selenium − This will indicate Maven, which Selenium jar files are to be downloaded from the central repository to the local repository.
Open pom.xml is in edit mode, create dependencies tag (<dependencies></dependencies>), inside the project tag.
Inside the dependencies tag, create dependency tag (<dependency></dependency>).
Provide the following information within the dependency tag.
<dependency>
   <groupId>org.seleniumhq.selenium</groupId>
   <artifactId>selenium-java</artifactId>
   <version>2.47.1</version>
</dependency>
Add dependency for Cucumber-Java: This will indicate Maven, which Cucumber files are to be downloaded from the central repository to the local repository.
Create one more dependency tag.
Provide following information within the dependency tag.
<dependency>
   <groupId>info.cukes</groupId>
   <artifactId>cucumber-java</artifactId>
   <version>1.0.2</version>
   <scope>test</scope>
</dependency>
Add dependency for Cucumber-JUnit: This will indicate Maven, which Cucumber JUnit files are to be downloaded from the central repository to the local repository.
Create one more dependency tag.
Provide the following information within the dependency tag.
<dependency>
   <groupId>info.cukes</groupId>
   <artifactId>cucumber-junit</artifactId>
   <version>1.0.2</version>
   <scope>test</scope>
</dependency>
Add dependency for JUnit - This will indicate Maven, which JUnit files are to be downloaded from the central repository to the local repository.
Create one more dependency tag.
Provide the following information within the dependency tag.
<dependency>
   <groupId>junit</groupId>
   <artifactId>junit</artifactId>
   <version>4.10</version>
   <scope>test</scope>
</dependency>
Verify binaries.
Once pom.xml is edited successfully, save it.
Go to Project → Clean − It will take a few minutes.
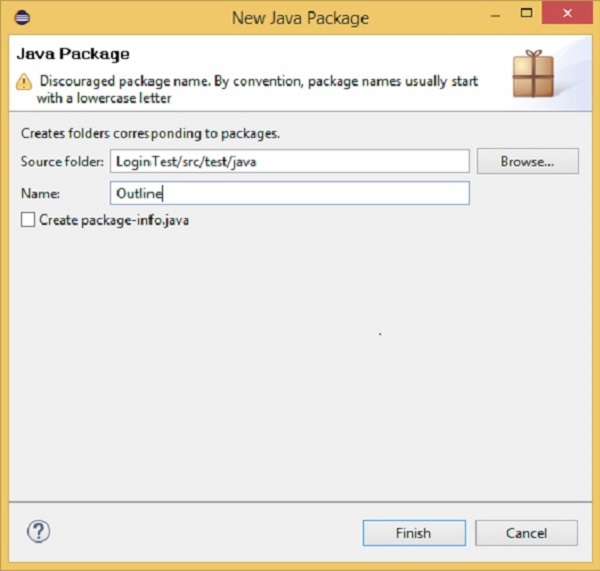
Step 2 − Create a package named “outline” under src/test/java
Step 3 − Create a feature file named “outline.feature”
Select and right-click on the package outline.
Click on ‘New’ file.
Give the file name such as “outline.feature”
Write the following text within the file and save it.
Feature − Scenario Outline
Scenario Outline − Login functionality for a social networking site.
Given user navigates to Facebook
When I enter Username as "<username>" and Password as "<password>"
Then login should be unsuccessful
Example −
| username  | password  |
| username1 | password1 |
| username2 | password2 |
Note − Here, example annotation describes the range of input to be provided upon scenario execution. Test scenario will be executed for each of the input provided. So, in the given example, test scenario will be executed three times.
Step 4 − Create a step definition file.
Select and right-click on the package outline.
Click on ‘New’ file.
Give the file name as stepdefinition.java
Write the following text within the file and save it.
package Outline;

import org.openqa.selenium.By;
import org.openqa.selenium.WebDriver;
import org.openqa.selenium.firefox.FirefoxDriver;

import cucumber.annotation.en.Given;
import cucumber.annotation.en.Then;
import cucumber.annotation.en.When;

public class stepdefinition {
   WebDriver driver = null;

   @Given("^user navigates to facebook$")
   public void goToFacebook() {
      driver = new FirefoxDriver();
      driver.navigate().to("https://www.facebook.com/");
   }

   @When("^I enter Username as \"([^\"]*)\" and Password as \"([^\"]*)\"$")
   public void I_enter_Username_as_and_Password_as(String arg1, String arg2) {
      driver.findElement(By.id("email")).sendKeys(arg1);
      driver.findElement(By.id("pass")).sendKeys(arg2);
      driver.findElement(By.id("u_0_v")).click();
   }

   @Then("^login should be unsuccessful$")
   public void validateRelogin() {
      if(driver.getCurrentUrl().equalsIgnoreCase(
      "https://www.facebook.com/login.php?login_attempt=1&lwv=110")){
         System.out.println("Test Pass");
      } else {
         System.out.println("Test Failed");
      }
      driver.close();
   }
}
Note − In the above code, we have to define a function having two input argument: one username and other will be for password. So for each set of input provided in the example tag, Set of GIVEN, WHEN and THEN will be executed.
Step 5 − Create a runner class file.
Select and right-click on the package outline.
Click on ‘New’ file.
Give the file name such as runTest.java
Write the following text within the file and save it.
package Outline;

import org.junit.runner.RunWith;
import cucumber.junit.Cucumber;

@RunWith(Cucumber.class)
@Cucumber.Options(format = {"pretty", "html:target/cucumber"})

public class runTest { }
Run the test using option −
Select runTest.java file from package explorer.
Right-click and select the option ‘Run as’.
Select JUnit test.
You will observe the following things when you run this class file
Facebook opens in a new Firefox web-browser instance.
Username1 and password1 will be passed as an input to username and password field.
Login will be clicked.
Message will be displayed on the browser regarding unsuccessful login.
In the console, you will see “Test Pass” printed.
Step result 1 to 5 will be re-executed for username2 and password2.
In nutshell, when scenario does not change but only the data value gets changed, it is advisable to use scenario outline data tables.
Cucumber - Tags
It looks simple when we just have one, two, or maybe five scenarios in a feature file. However, in real life it does not happen. For each feature under test, we may have 10, 20, or may be more number of scenarios in a single feature file. They may represent different purpose (Smoke test/Regression test), different prospectives (Developer/QA/BA), different status (Ready for execution/Work in progress), etc. How to manage execution for such a mass?
For this, Cucumber has already provided a way to organize your scenario execution by using tags in feature file. We can define each scenario with a useful tag. Later, in the runner file, we can decide which specific tag (and so as the scenario(s)) we want Cucumber to execute. Tag starts with “@”. After “@” you can have any relevant text to define your tag. Let’s understand this with an example.
Suppose, there are two or more scenarios in a feature file. We want to execute only one scenario as part of smoke test. So first thing is to identify that scenario and second is to tag it with “@SmokeTest” text at the beginning of the scenario. Let’s take a deep look at it −
Step 1 − Create a Maven project named as cucumberTag.
Step 2− Create a package named cucumberTag under src/test/java
Step 3− Create a feature file named cucumberTag.feature.
Write the following text within the file and save it. This feature file contains two scenarios where only one has been marked as SmokeTest tag.
Feature − Cucumber Tag
Scenario Outline − Login functionality for a social networking site.
Given user navigates to Facebook
When I enter Username as "<username>" and Password as "<password>"
Then login should be unsuccessful
Examples
| username  | password  |
| username1 | password1 |
| username2 | password2 |
#following scenario has been tagged as SmokeTest and this should get executed. @SmokeTest
Scenario:
Given user navigates to Facebook
When I enter Username as "<>" and Password as "<>"
Then the user should be redirected to login retry
Step 4 − Create a step definition file.
Select and right-click on the package outline.
Click on ‘New’ file.
Give the file a name such as cucumberTag.java
Write the following text within the file and save it.
package cucumberTag;

import org.openqa.selenium.By;
import org.openqa.selenium.WebDriver;
import org.openqa.selenium.firefox.FirefoxDriver;

import cucumber.annotation.en.Given;
import cucumber.annotation.en.Then;
import cucumber.annotation.en.When;

public class cucumberTag {
   WebDriver driver = null;

   @Given("^user navigates to facebook$")
   public void goToFacebook() {
      driver = new FirefoxDriver();
      driver.navigate().to("https://www.facebook.com/");
   }

   @When("^I enter Username as \"([^\"]*)\" and Password as \"([^\"]*)\"$")
   public void I_enter_Username_as_and_Password_as(String arg1, String arg2) {
      driver.findElement(By.id("email")).sendKeys(arg1);
      driver.findElement(By.id("pass")).sendKeys(arg2);
      driver.findElement(By.id("u_0_v")).click();
   }

   @Then("^login should be unsuccessful$")
   public void validateRelogin() {
      if(driver.getCurrentUrl().equalsIgnoreCase(
         "https://www.facebook.com/login.php?login_attempt=1&lwv=110")){
            System.out.println("Test Pass");
      } else {
         System.out.println("Test Failed");
      }
      driver.close();
   }

   @Then("^User should be redirected to login retry$")
   public void loginRetry() {
      if(driver.getCurrentUrl().equalsIgnoreCase(
         "https://www.facebook.com/login.php?login_attempt=1&lwv=110")){
            System.out.println("Test Pass");
      } else {
         System.out.println("Test Failed");
      }
      driver.close();
   }
}
Step 5 − Create a runner class file.
Create a runner class named as runTest.java inside the package.
Write the following code.
Save the file.
package cucumberTag;

import org.junit.runner.RunWith;
import cucumber.junit.Cucumber;

@RunWith(Cucumber.class)
@Cucumber.Options(format = {"pretty", "html:target/cucumber"})

public class runTest { }
Run the test option.
Right-click and select the option ‘Run as’.
Select JUnit test.
You will observe the following things, when you run this class file.
Facebook opens in a new Firefox web-browser instance.
No value will be provided to the username and the password field.
Login will be clicked.
Login retry page will be loaded.
There is no limit in defining tags within the feature file. Based on your need, you can derive tags to be used and scenarios to be executed.
There are mainly two types of tag −
Default tag − Default tag has their predefined meanings. Example @Dev,@Ignore
Custom tag − Custom tag provides you full flexibility to choose appropriate text for defining your tag.
Tag can also be defined at a feature level. Once you define a tag at the feature level, it ensures that all the scenarios within that feature file inherits that tag. Depending on the nature of the scenario, we can use more than one tag for the single feature. Whenever Cucumber finds an appropriate call, a specific scenario will be executed.
Cucumber also provides a way to inverse the choice of tags. Consider that out of 25 defined scenarios, 10 are marked as smoke test. We are required to execute only regression test scenarios.
For this, we can use “~” in JUnit runner class to exclude smoke test scenario. It will look like the following.
@RunWith(Cucumber.class)
@Cucumber.Options(format = {"pretty", "html:target/cucumber"},
   tags = {"~@SmokeTest"})

public class runTest { }
While defining multiple tags, we can also define logical or/and logical and operation.
Defining logical or in runner class − @dev,@wip − It says that scenarios matching any of this tag needs to be executed.
Defining logical or in runner class − [@dev,~@wip] − It says that scenarios matching both these tag needs to be executed.
Cucumber - Data Tables
While working on automation, we may face variety of scenarios. Each scenario carries a different meaning and needs.
Since the beginning, we have been taking an example of login functionality for a social networking site, where we just had two input parameters to be passed. Let’s think of some more possibility. How about “New user registration” functionality? Typically, what can be the input parameters while registering a new user for a social networking site? Something like the following −
- User Name
- Email Address
- Password
- Re-enter password
- Birthdate
- Gender
- Phone number
Feature − New user registration.
Verify that the new user registration is unsuccessful after passing the incorrect inputs.
Given I am on a new user registration page.
When I enter the user name and an e-mail address as email address and password as, and re-enter password as and Birthdate as and Gender as and phone number as then the user registration should be unsuccessful.
It looks a bit messy at first glance. So, is there any better way to manage such chunk of inputs? Answer can be “Data Table”. Data table is a set of input to be provided for a single tag. This tag can be GIVEN, WHEN, or THEN.
Let’s write the above scenario with the help of data table and it will look like the following −
Given I am on a new user registration page
When I enter valid data on the page
| Fields                 | Values              |
| First Name             | Tom                 |
| Last Name              | Kenny               |
| Email Address          | someone@someone.com |
| Re-enter Email Address | someone@someone.com |
| Password               | Password1           |
| Birthdate              | 01                  |
Then the user registration should be successful.
Example
Let’s automate an example of a data table.
Step 1 − Create a Maven Test Project named “DataTableTest”.
Go to File → New → Others → Maven → Maven Project → Next.
Provide group Id (group Id will identify your project uniquely across all projects).
Provide artifact Id (artifact Id is the name of the jar without version. You can choose any name which is in lowercase).
Click on Finish.
Open pom.xml −
Go to package explorer on the left hand side of Eclipse.
Expand the project CucumberTest.
Locate pom.xml file.
Right-click and select the option, Open with “Text Editor”.
Add dependency for Selenium: This will indicate Maven, which Selenium jar files are to be downloaded from the central repository to the local repository.
Open pom.xml is in edit mode, create dependencies tag (<dependencies></dependencies>), inside the project tag.
Inside the dependencies tag, create dependency tag. (<dependency></dependency>).
Provide the following information within the dependency tag.
<dependency>
   <groupId>org.seleniumhq.selenium</groupId>
   <artifactId>selenium-java</artifactId>
   <version>2.47.1</version>
</dependency>
Add dependency for Cucumber-Java − This will indicate Maven, which Cucumber files are to be downloaded from the central repository to the local repository.
Create one more dependency tag.
Provide the following information within the dependency tag.
<dependency>
   <groupId>info.cukes</groupId>
   <artifactId>cucumber-java</artifactId>
   <version>1.0.2</version>
   <scope>test</scope>
</dependency>
Add dependency for Cucumber-JUnit − This will indicate Maven, which Cucumber JUnit files are to be downloaded from the central repository to the local repository.
Create one more dependency tag.
Provide the following information within the dependency tag.
<dependency>
   <groupId>info.cukes</groupId>
   <artifactId>cucumber-junit</artifactId>
   <version>1.0.2</version>
   <scope>test</scope>
</dependency>
Add dependency for JUnit − This will indicate Maven, which JUnit files are to be downloaded from the central repository to the local repository.
Create one more dependency tag.
Provide the following information within the dependency tag
<dependency>
   <groupId>junit</groupId>
   <artifactId>junit</artifactId>
   <version>4.10</version>
   <scope>test</scope>
</dependency>
Verify binaries.
Once pom.xml is edited successfully, save it.
Go to Project → Clean − It will take a few minutes.
Step 2 − Create a package named dataTable under src/test/java
Step 3 − Create a Feature file.
Create a feature file, named as dataTable.feature inside the package dataTable (see section scenario outline for more detailed steps).
Write the following text.
Feature − Data table
Verify that the new user registration is unsuccessful after passing incorrect inputs.
Scenario:
Given I am on the new user registration page
When I enter invalid data on the page
| Fields                 | Values              |
| First Name             | Tom                 |
| Last Name              | Kenny               |
| Email Address          | someone@someone.com |
| Re-enter Email Address | someone@someone.com |
| Password               | Password1           |
| Birthdate              | 01                  |
Then the user registration should be unsuccessful
Save the file.
Step 4 − Create step definition file.
Create the step definition file named as ‘dataTable.java’ inside the package dataTable (see section scenario outline for more detailed steps).
Write the following code.
package dataTable;

import java.util.List;

import org.openqa.selenium.By;
import org.openqa.selenium.WebDriver;
import org.openqa.selenium.WebElement;
import org.openqa.selenium.firefox.FirefoxDriver;
import org.openqa.selenium.support.ui.Select;

import cucumber.annotation.en.Given;
import cucumber.annotation.en.Then;
import cucumber.annotation.en.When;
import cucumber.table.DataTable;

public class stepdefinition {
   WebDriver driver = null;

   @Given("^I am on new user registration page$")
   public void goToFacebook() {
      //Intiate web browser instance. driver = new FirefoxDriver();
      driver.navigate().to("https://www.facebook.com/");
   }

   @When("^I enter invalid data on the page$")
   public void enterData(DataTable table){
      //Initialize data table
      List<list> data = table.raw();
      System.out.println(data.get(1).get(1));

      //Enter data
      driver.findElement(By.name("firstname")).sendKeys(data.get(1).get(1));
      driver.findElement(By.name("lastname")).sendKeys(data.get(2).get(1));
      driver.findElement(By.name("reg_email__")).sendKeys(data.get(3).get(1));
      driver.findElement(By.name("reg_email_confirmation__")).
         sendKeys(data.get(4).get(1));
      driver.findElement(By.name("reg_passwd__")).sendKeys(data.get(5).get(1));

      Select dropdownB = new Select(driver.findElement(By.name("birthday_day")));
      dropdownB.selectByValue("15");

      Select dropdownM = new Select(driver.findElement(By.name("birthday_month")));
      dropdownM.selectByValue("6");

      Select dropdownY = new Select(driver.findElement(By.name("birthday_year")));
      dropdownY.selectByValue("1990");

      driver.findElement(By.className("_58mt")).click();
      // Click submit button driver.findElement(By.name("websubmit")).click();
   }

   @Then("^User registration should be unsuccessful$")
   public void User_registration_should_be_unsuccessful() {
      if(driver.getCurrentUrl().equalsIgnoreCase("https://www.facebook.com/")){
         System.out.println("Test Pass");
      } else {
         System.out.println("Test Failed");
      }
      driver.close();
   }
}
Save the file.
Step 5 − Create a runner class file.
Create runner class named as runTest.java inside the package.
Write the following code.
package dataTable;

import org.junit.runner.RunWith;
import cucumber.junit.Cucumber;

@RunWith(Cucumber.class)
@Cucumber.Options(format = {"pretty", "html:target/cucumber"})

public class runTest { }
Save the file.
Run the test using the option
Select runTest.java file from the package explorer.
Right-click and select the option, Run as.
Select JUnit test.
You may observe the following things upon successful execution.
Facebook website gets loaded.
Data will be entered on the registration page.
Submit button will be clicked.
We will see that home page will not displayed and “Test Pass” will be written on the console.
Cucumber - Comments
Comment is basically a piece of code meant for documentation purpose and not for execution. Be it a step definition file or a feature file, to make it more readable and understandable. So, it is important to use/put comments at appropriate places in the file. This also helps while debugging the code. Cucumber feature files can have comments at any place. To put comments, we just need to start the statement with “#” sign.
Different programming languages have got different norms for defining the comments. Let’s see how Cucumber deals with it.
Step definition file − If you are using Java as a platform then mark your comments with “//”.
Feature File − In case of feature file, we just need to put # before beginning your comment.
Example
The highlighted text in the program refer to the comments in the code.
Feature: annotation

#This is how background can be used to eliminate duplicate steps
Background:
User navigates to Facebook
Given I am on Facebook login page

#Scenario with AND
Scenario:
When I enter username as "TOM"
And I enter password as "JERRY"
Then Login should fail

#Scenario with BUT
Scenario:
When I enter username as "TOM"
And I enter password as "JERRY"
Then Login should fail
But Relogin option should be available
Cucumber - Hooks
Cucumber hook allows us to better manage the code workflow and helps us to reduce the code redundancy. We can say that it is an unseen step, which allows us to perform our scenarios or tests.
To understand this notion better, let’s take an example of a feature file and a step definition file.
The highlighted portion in the given statement actually does the job of setting up the webdriver and ending the webdriver session. So, it is actually not relevant to the essence of “Given statement”, and it is more like a setup for the test. Also if we think with a broader prospective, then in case of multiple scenarios for this feature, this webdriver setup and cleanup will run with each given statement. Logically, it makes sense to have the setup and cleanup executed only once.
So to bring optimization, hooks can be utilized. More often we use two types of hooks: “Before” hook and “After” hook. Method/function/piece of code, defined within Before and After hooks, always run, even if the scenario gets passed or failed.
As the name suggests, before hook gets executed well before any other test scenarios, and after hook gets executed after executing all the scenarios.
Hooks are defined within the step definition file only.
Let’s automate an example of before and after hook.
Step 1 − Create Maven project as hookTest, add necessary dependency in pom.xml.
Step 2 − Create a Java package named as hookTest under src/test/java
Step 3 − Create a step definition file named as hookTest.java under the package.
package hookTest;

import org.openqa.selenium.By;
import org.openqa.selenium.WebDriver;
import org.openqa.selenium.firefox.FirefoxDriver;

import cucumber.annotation.en.Given;
import cucumber.annotation.en.Then;
import cucumber.annotation.en.When;

public class hookTest {
   WebDriver driver = null;

   @Before public void setUp(){
      driver = new FirefoxDriver();
   }

   @Given("^user navigates to facebook$")
   public void goToFacebook() {
      driver.navigate().to("https://www.facebook.com/");
   }

   @When("^I enter Username as \"([^\"]*)\" and Password as \"([^\"]*)\"$")
   public void I_enter_Username_as_and_Password_as(String arg1, String arg2) {
      driver.findElement(By.id("email")).sendKeys(arg1);
      driver.findElement(By.id("pass")).sendKeys(arg2);
      driver.findElement(By.id("u_0_v")).click();
   }

   @Then("^login should be unsuccessful$")
   public void validateRelogin() {
      if(driver.getCurrentUrl().equalsIgnoreCase(
         "https://www.facebook.com/login.php?login_attempt=1&lwv=110")){
            System.out.println("Test Pass");
      } else {
         System.out.println("Test Failed");
      }
      driver.close();
   }

   @After public void cleanUp(){
      driver.close();
   }
}
Step 4 − Create a feature file named “hookTest.feature” under the package.
Feature − Scenario Outline.
Scenario Outline − Hook Test
Given user navigates to Facebook
When I enter Username as "<username>" and Password as "<password>"
Then login should be unsuccessful
Examples
| username  | password  |
| username1 | password1 |
Step 5 − Create a runner class file.
Create the runner class as runTest.java inside the package dataTable (see the section scenario outline for more detailed steps).
Write the following code.
package hookTest;

import org.junit.runner.RunWith;
import cucumber.junit.Cucumber;

@RunWith(Cucumber.class)
@Cucumber.Options(format = {"pretty", "html:target/cucumber"})

public class runTest { }
Save the file.
Run the test using option −
Select runTest.java file from the package explorer.
Right-click and select the option, Run as.
Select JUnit test.
So now when we run this, following will be the sequence of execution.
Before hook − Set up the webdriver and other prerequisites to run the test.
Given statement
When statement
Then statement
After hook − Close the webdriver and do the cleanup process.
Tagged Hooks
We can also indicate if we want before and after hooks to be executed with a specific tag only. Example − @Before(‘@Web’). The same concept of tag logical and/or can be applied with hooks as well. Example − @Before(@dev,@wip), @Before(@dev,~@wip)
Cucumber - Command Line Options
Cucumber can be used to test almost any computer system. So far we have seen how to run a test using Eclipse IDE. There is one more way through which we can run the Cucumber test that is through command line interface. So what is the advantage of doing it?
Running any test framework from the Terminal has its own advantages, such as overriding the run configurations mentioned in the code.
In order to execute Cucumber test with command prompt, use the following steps after system configuration.
Step 1− Create a Maven Test Project named commandLine.
Go to File → New → Others → Maven → Maven Project → Next.
Provide group Id (group Id will identify your project uniquely across all projects).
Provide artifact Id (artifact Id is the name of the jar without version. You can choose any name which is in lowercase).
Click on Finish.
Open pom.xml −
Go to the package explorer on the left hand side of Eclipse.
Expand the project CucumberTest.
Locate pom.xml file.
Right-click and select the option, Open with “Text Editor”.
Add dependency for Selenium − This will indicate Maven, which Selenium jar files are to be downloaded from the central repository to the local repository.
Open pom.xml is in edit mode, create dependencies tag (<dependencies></dependencies>), inside the project tag.
Inside the dependencies tag, create dependency tag. (<dependency></dependency>).
Provide the following information within the dependency tag.
<dependency>
   <groupId>org.seleniumhq.selenium</groupId>
   <artifactId>selenium-java</artifactId>
   <version>2.47.1</version>
</dependency>
Add dependency for Cucumber-Java − This will indicate Maven, which Cucumber files are to be downloaded from the central repository to the local repository.
Create one more dependency tag.
Provide the following information within the dependency tag.
<dependency>
   <groupId>info.cukes</groupId>
   <artifactId>cucumber-java</artifactId>
   <version>1.0.2</version>
   <scope>test</scope>
</dependency>
Add dependency for Cucumber-JUnit − This will indicate Maven, which Cucumber JUnit files are to be downloaded from the central repository to the local repository.
Create one more dependency tag.
Provide the following information within the dependency tag.
<dependency>
   <groupId>info.cukes</groupId>
   <artifactId>cucumber-junit</artifactId>
   <version>1.0.2</version>
   <scope>test</scope>
</dependency>
Add dependency for JUnit − This will indicate Maven, which JUnit files are to be downloaded from the central repository to the local repository.
Create one more dependency tag.
Provide following information within the dependency tag.
<dependency>
   <groupId>junit</groupId>
   <artifactId>junit</artifactId>
   <version>4.10</version>
   <scope>test</scope>
</dependency>
Verify binaries.
Once pom.xml is edited successfully, save it.
Go to Project → Clean − It will take few minutes.
Step 2 − Create a package named “outline” under src/test/java
Step 3 − Create a feature file named “commandLine.feature”.
Select and right-click on the package outline.
Click on ‘New’ file.
Give the file a name such as “commandLine.feature”
Write below text within the file and save it.
Feature − Scenario Outline
Scenario Outline − Login functionality for a social networking site.
Given the user navigates to Facebook
When I enter Username as "<username>" and Password as "<password>"
Then login should be unsuccessful
Examples
| username  | password  |
| username1 | password1 |
| username2 | password2 |
Note − Here, example annotation describes the range of input to be provided upon scenario execution. Test scenario will be executed for each of the input provided. So, in the given example, test scenario will be executed three times.
Step 4 − Create a step definition file.
Select and right-click on the package outline.
Click on ‘New’ file.
Name the file as commandLine.java
Write the following text within the file and save it.
package Outline;

import org.openqa.selenium.By;
import org.openqa.selenium.WebDriver;
import org.openqa.selenium.firefox.FirefoxDriver;

import cucumber.annotation.en.Given;
import cucumber.annotation.en.Then; i
import cucumber.annotation.en.When;

public class stepdefinition {
   WebDriver driver = null;

   @Given("^user navigates to facebook$")
   public void goToFacebook() {
      driver = new FirefoxDriver();
      driver.navigate().to("https://www.facebook.com/");
   }

   @When("^I enter Username as \"([^\"]*)\" and Password as \"([^\"]*)\"$")
   public void I_enter_Username_as_and_Password_as(String arg1, String arg2) {
      driver.findElement(By.id("email")).sendKeys(arg1);
      driver.findElement(By.id("pass")).sendKeys(arg2);
      driver.findElement(By.id("u_0_v")).click();
   }

   @Then("^login should be unsuccessful$")
   public void validateRelogin() {
      if(driver.getCurrentUrl().equalsIgnoreCase(
         "https://www.facebook.com/login.php?login_attempt=1&lwv=110")){
            System.out.println("Test Pass");
      } else {
         System.out.println("Test Failed");
      }
      driver.close();
   }
}
Note − In code, we have to define a function having two input arguments: one username and other will be for password. So, for each set of input provided in the example tag, set of GIVEN, WHEN and THEN will be executed.
Step 5 − Create a runner class file.
Select and right-click on the package outline.
Click on ‘New’ file.
Give the file a name such as, runTest.java
Write the following text within the file and save it.
package Outline;

import org.junit.runner.RunWith;
import cucumber.junit.Cucumber;

@RunWith(Cucumber.class)
@Cucumber.Options(format = {"pretty", "html:target/cucumber"})

public class runTest { }
Open a command prompt.
Go to the directory where this package “commandLine” resides. e:\Workspace\LoginTest\src>cd test\java
Run the command mvn test: You will see that all the scenario, described in the feature file have been executed (if there isn’t any error). Finally, at the bottom you will find the following information.
Result
This describes the total test run, along with failure if any.
The previous command runs everything as mentioned in the JUnit Runner class. However, if we want to override the configurations mentioned in the Runner, following are the few examples to do it.
Now run command mvn test - Dcucumber.options="--help" on command prompt. Running this will print all available options.
To run the specific tags only, run the command mvn test -Dcucumber.options="--tags @SmokeTest" on command prompt. It will run only tags, which are marked with @SmokeTest.
In order to change the format of the result, run the command E:\Workspace\LoginTest>mvn test -Dcucumber.options="--plugin junit:target/cucumber-junit-report.xml" on command prompt It changes the report format to JUnit report generator.
Cucumber - JUnit Runner
It is important to understand what Junit is, before we begin our discussion for Cucumber JUnit Runner. JUnit is an open source unit testing framework for the Java programming language. JUnit has been important in the development of test-driven development, and is one of a family of unit testing frameworks, which is collectively known as xUnit that originated with SUnit.
Benefits of Using JUnit
Unit has a Graphical User Interface (GUI), making it possible to write and test source code quickly and easily.
JUnit allows the developer to incrementally build test suites to measure progress and detect unintended side effects.
Test can be run continuously.
JUnit shows test progress in a bar that is normally green but turns red when a test fails.
By now, we have seen the benefits of using JUnit, but the reason we are discussing it right now is Cucumber framework. On one hand, Cucumber is providing a way for non-technical person to define test cases for a product, and on the other hand, our expectation is for smooth and timely execution of such test cases.
JUnit acts as a bridge between these two. So, the flow of execution will look like the following −
Stakeholders write down the feature file.
Step definition file will be created accordingly.
Specify the JUnit runner class to run the series of test cases.
Once we run the JUnit runner class −
It will parse the Gherkin feature file.
It will execute the functions written in the step definition file according to feature file statements.
JUnit will combine the test case result.
It will build the test report in the specified format (which can be html/JSON).
The important point here is how to configure JUnit to do all these things? Following are the steps −
Step 1 − Install Java.
Download jdk and jre from the link http://www.oracle.com/technetwork/java/javase/downloads/index.html
Accept license agreement.
Install JDK and JRE.
Set environment variable as shown in the following screenshot.
Step 2 − Install Eclipse.
Why we need − Eclipse is an Integrated Development Environment (IDE). It contains a base workspace and an extensible plug-in system for customizing the environment.
How to install −
Make sure JAVA is installed on your machine.
Download Eclipse from http://www.eclipse.org/downloads
Unzip and Eclipse is installed.
Step 3 − Install Maven.
Why we need − Maven is a build automation tool used primarily for Java projects. It provides a common platform to perform activities like generating source code, compiling code, packaging code to a jar, etc. Also later if any of the software versions gets changed, Maven provides an easy way to modify the test project accordingly.
How to install −
Download Maven − https://maven.apache.org/download.cgi
Unzip the file and remember the location.
Create environment variable MAVEN_HOME as shown in the following screenshot.
Edit Path variable and include Maven as shown in the following screenshot.
Download MAVEN plugin from Eclipse.
Open Eclipse.
Got to Help → Eclipse Marketplace → Search maven → Maven Integration for Eclipse → INSTALL.
Step 4 − How to configure Cucumber with Maven
Create a Maven project in Eclipse.
Go to File → New → Others → Maven → Maven Project → Next.
Provide group Id (group Id will identify your project uniquely across all projects).
Provide artifact Id (artifact Id is the name of the jar without version. You can choose any name which is in lowercase).
Click on Finish.
Open pom.xml
Go to package explorer on the left hand side of Eclipse.
Expand the project CucumberTest.
Locate pom.xml file.
Right-click and select the option, Open with “Text Editor”.
Add dependency for Selenium − This will indicate Maven, which Selenium jar files are to be downloaded from the central repository to the local repository.
Open pom.xml is in edit mode, create dependencies tag (<dependencies></dependencies>), inside the project tag.
Inside the dependencies tag, create dependency tag. (<dependency></dependency>).
Provide the following information within the dependency tag.
<dependency>
   <groupId>org.seleniumhq.selenium</groupId>
   <artifactId>selenium-java</artifactId>
   <version>2.47.1</version>
</dependency>
Add dependency for Cucumber-Java − This will indicate Maven, which Cucumber files to be downloaded from the central repository to the local repository.
Create one more dependency tag.
Provide the following information within the dependency tag.
<dependency>
   <groupId>info.cukes</groupId>
   <artifactId>cucumber-java</artifactId>
   <version>1.0.2</version>
   <scope>test</scope>
</dependency>
Add dependency for Cucumber-JUnit: This will indicate Maven, which Cucumber JUnit files are to be downloaded from the central repository to the local repository.
Create one more dependency tag.
Provide the following information within the dependency tag.
<dependency>
   <groupId>info.cukes</groupId>
   <artifactId>cucumber-junit</artifactId>
   <version>1.0.2</version>
   <scope>test</scope>
</dependency>
Add dependency for JUnit − This will indicate Maven, which JUnit files are to be downloaded from the central repository to the local repository.
Create one more dependency tag.
Provide the following information within the dependency tag.
<dependency>
   <groupId>junit</groupId>
   <artifactId>junit</artifactId>
   <version>4.10</version>
   <scope>test</scope>
</dependency>
Verify binaries
Once pom.xml is edited successfully, save it.
Go to Project → Clean − It will take a few minutes.
After that you will be able to see a Maven repository like the following screenshot.
Step 5 − Create feature file (to be covered later).
Step 6 − Create step definition file (to be covered later).
Step 7 − Create Junit runner to run the test (to be covered later).
Cucumber - Reports
We do test execution in order to understand the stability of a product, so be it manual test or an automated test, it is very important to generate a concise report that can depict the stability of a product. Hence, while we are automating our test scenario with Cucumber, it is essential to know, how better we can generate our Cucumber test reports. As we know that Cucumber is a BDD framework, it does not have a fancy reporting mechanism.
In order to achieve this, we need to integrate Cucumber with other open source tool like Ant/Junit. Here, we will take examples of JUnit further because, it provides support for Java language.
Let’s look into the details of different report format, which is available and easy to use −
Pretty Format (HTML Report)
Pretty Format generates the Cucumber test report in the HTML format, i.e. an HTML file. It is the most readable report format. It generates the report in the same way as it is a feature file, so tracing is also made easy. Also, you can specify the location where you want this report to be placed after the test execution. It can be −
Local Directory − We can specify target directory for report as any local directory of the machine where the test will run.
Server Directory − Also we have a provision to specify a target directory as any directory on the server, which is publically accessible. This generally helps when we want our clients/stakeholders to view the test results at any given point of time.
Example
Let’s automate an example of a pretty format.
Step 1 − Create a Maven project named cucumberReport in Eclipse.
Step 2 − Create a package named CucumberReport under src/test/java
Step 3 − Create a feature file named cucumberReport.feature
Write the following text within the file and save it.
Feature − Cucumber Report
#This is to check test result for Pass test case
Scenario: Login functionality exists
Given I have opened the browser
When I open Facebook website
Then Login button should exist
#This is to check test result for Failed test case
Scenario: Forgot password exists
Given I have open the browser
When I open Facebook website
Then Forgot password link should exist
Note − Here scenario first will pass, whereas the second scenario will fail. So that we can witness how the pass and failed report looks like.
Step 4 − Create a step definition file.
Select and right-click on the package outline.
Click on ‘New’ file.
Give the file name as cucumberReport.java
Write the following text within the file and save it.
package CucumberReport;

import org.openqa.selenium.By;
import org.openqa.selenium.WebDriver;
import org.openqa.selenium.firefox.FirefoxDriver;

import cucumber.annotation.en.Given;
import cucumber.annotation.en.Then;
import cucumber.annotation.en.When;

public class cucumberReport {
   WebDriver driver = null;

   @Given("^I have open the browser$")
   public void openBrowser() {
      driver = new FirefoxDriver();
   }

   @When("^I open Facebook website$")
   public void goToFacebook() {
      driver.navigate().to("https://www.facebook.com/");
   }

   @Then("^Login button should exits$")
   public void loginButton() {
      if(driver.findElement(By.id("u_0_v")).isEnabled()) {
         System.out.println("Test 1 Pass");
      } else {
         System.out.println("Test 1 Fail");
      }
   }

   @Then("^Forgot password link should exist$")
   public void forgotPWD() {
      if(driver.findElement(By.id("")).isEnabled()) {
         System.out.println("Test 1 Pass");
      } else {
         System.out.println("Test 1 Fail");
      }
   }
}
Step 5 − Create a runner class file.
Create a runner class named runTest.java inside the package.
Write the following code. Save the file.
package CucumberReport;

import org.junit.runner.RunWith;
import cucumber.junit.Cucumber;

@RunWith(Cucumber.class)
@Cucumber.Options(
   format = {"pretty", "html:target/Destination"} )
//Specifying pretty as a format option ensure that HTML report will be generated.
//When we specify html:target/Destination - It will generate the HTML report

inside the Destination folder, in the target folder of the maven project.

public class runTest { }
Run the test using option
Select runTest.java file from package explorer.
Right-click and select the option, Run as.
Select JUnit test.
You will observe the following things when you run this class file.
Both the scenario will get executed one by one.
A folder named Destination will be created inside the target directory.

The report will be there named as “Index.html”.
Open Index.html with web browser.
You will see the report mentioned in the following image −
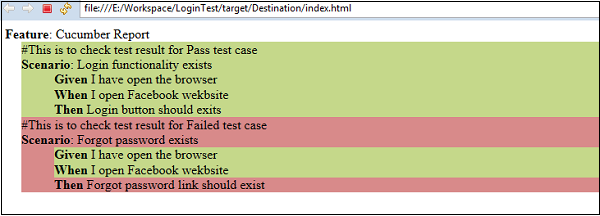
It exactly highlights the color of failed scenario. Moreover, you will see highlight for failed step in that scenario. This makes the debugging very easy.
JSON Report
By now we have seen how easy HTML report is. However, if we want to pass on this report information to any other application, that’s kind of tricky in case of HTML reports. Here comes the need of another reporting format. JSON-Java script object notation is another format for generating Cucumber test reports. JSON is an object containing a lot of information stored in text format. JSON reports bring a different value to the table. JSON report can also be used as a payload of information to be transferred between different servers. Further, it can be used to be displayed as a web page. In a nutshell, JSON reports can be used by other application.
What is payload information? When data is sent over the Internet, each unit transmitted includes both header information and the actual data being sent. The header identifies the source and destination of the packet, while the actual data is referred to as the payload. In order to generate a JSON report, we just need to make a change in the runner file.
Change the format option in the runner file as follows.
package CucumberReport;

import org.junit.runner.RunWith;
import cucumber.junit.Cucumber;

@RunWith(Cucumber.class)
@Cucumber.Options( format={"json:target/Destination/cucumber.json"})

//When we specify json:target/Destination/cucumber.json - It will generate the JSON
report inside the Destination folder, in the target folder of the maven project.

public class runTest {}
Run the test using option −
Select runTest.java file from package explorer.
Right click and select option Run as.
Select JUnit test.
You will observe the following things when you run this class file.
Both the scenario will get executed one by one.

The report will be there named as cucumber.json (as provided in runner class).
Open cucumber.json file with the text editor.
You will see the report mentioned in the following screenshot after placing line breaks −
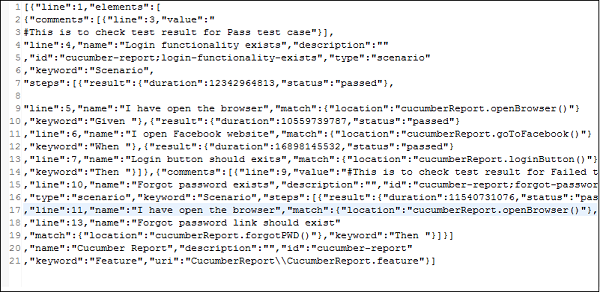
Note − JSON is less readable as compared to the HTML report format.
Cucumber - Debugging
It is very likely that your test may fail due to unknown reasons. Identifying the cause of failure and correcting it is very important. This process is known as debugging. Following are a few tips and tricks, which makes Cucumber debugging a bit easy.
Debugging option is available with Eclipse. Place the break point. Click the file and debug using the following steps −
Step 1 − Place the manual break points in the Ruby step definition file.
Example
require 'ruby-debug'
Then /^the process should exit cleanly$/ do
breakpoint
assert @exited_cleanly, "Process did not exit cleanly: #{@stdout}"
end
Step 2 − We can also define a separate debug step like the following in the step definition file.
Then /^I debug$/ do
breakpoint
0
end
Step 3 − Webrat is the default tool for cucumber testing with Rails. It lets you do things like click links, type and submit forms, and so on.
There will be times where you try to click on something, for example, and it’s not there. You’ll get a big blob of HTML thrown back, and figuring out what that exactly means can be a real drag.
save_and_open_page
Webrat provides a method save_and_open_page which captures the current HTML, saves it, and then will open it in a browser for you. Extremely useful.
When /^I follow "(.*)"$/ do |link|
save_and_open_page
click_link(link)
end
Cucumber - Java Testing
To run Cucumber test with Java, following are the steps.
Step 1 − Install Java −
Download jdk and jre from
http://www.oracle.com/technetwork/java/javase/downloads/index.html
Accept license agreement.
Install JDK and JRE.
Set environment variable as shown in the following picture.
Step 2 − Install Eclipse IDE −
Make sure JAVA is installed on your machine.
Download Eclipse from https://eclipse.org/downloads/
Unzip and Eclipse installed.
Step 3 − Install Maven −
Download Maven −https://maven.apache.org/download.cgi
Unzip the file and remember the location.
Create environment variable MAVEN_HOME as shown in the following image.
Edit Path variable and include Maven.
Download MAVEN plugin from Eclipse
Open Eclipse.
Got to Help → Eclipse Marketplace → Search maven → Maven Integration for Eclipse →INSTALL
Step 4 − Configure Cucumber with Maven.
Create a Maven project.
Go to File → New → Others → Maven → Maven Project → Next.
Provide group Id (group Id will identify your project uniquely across all projects).
Provide artifact Id (artifact Id is the name of the jar without version. You can choose any name which is in lowercase).
Click on Finish.

Step 5 − Open pom.xml −
Go to the package explorer on the left hand side of Eclipse.
Expand the project CucumberTest.
Locate pom.xml file.
Right-click and select the option, Open with “Text Editor”.
Step 6 − Add dependency for Selenium − This will indicate Maven, which Selenium jar files are to be downloaded from the central repository to the local repository.
Open pom.xml is in edit mode, create dependencies tag (<dependencies></dependencies>), inside the project tag.
Inside the dependencies tag, create dependency tag. (<dependency></dependency>)
Provide the following information within the dependency tag.
<dependency>
   <groupId>org.seleniumhq.selenium</groupId>
   <artifactId>selenium-java</artifactId>
   <version>2.47.1</version>
</dependency>
Step 7 − Add dependency for Cucumber-Java − This will indicate Maven, which Cucumber files are to be downloaded from the central repository to the local repository.
Create one more dependency tag.
Provide following information within the dependency tag.
<dependency>
   <groupId>info.cukes</groupId>
   <artifactId>cucumber-java</artifactId>
   <version>1.0.2</version>
   <scope>test</scope>
</dependency>
Step 8 − Add dependency for Cucumber-JUnit − This will indicate Maven, which Cucumber JUnit files are to be downloaded from the central repository to the local repository.
Create one more dependency tag.
Provide the following information within the dependency tag.
<dependency>
   <groupId>info.cukes</groupId>
   <artifactId>cucumber-junit</artifactId>
   <version>1.0.2</version>
   <scope>test</scope>
</dependency>
Step 9− Add dependency for JUnit − This will indicate Maven, which JUnit files are to be downloaded from the central repository to the local repository.
Create one more dependency tag.
Provide the following information within the dependency tag.
<dependency>
   <groupId>junit</groupId>
   <artifactId>junit</artifactId>
   <version>4.10</version>
   <scope>test</scope>
</dependency>
Step 10 − Verify binaries.
Once pom.xml is edited successfully, save it.
Go to Project → Clean − It will take a few minutes.
You will be able to see a Maven repository.
Step 11 − Create a package under src/test/java named as cucumberJava.
Step 12 − Create feature file
Select and right-click on the package outline.
Click on ‘New’ file.
Give the file a name such as cucumberJava.feature.
Write the following text within the file and save it.
Feature: CucumberJava
Scenario: Login functionality exists
Given I have open the browser
When I open Facebook website
Then Login button should exits
Step 13 − Create step definition file −
Select and right-click on the package outline.
Click on ‘New’ file.
Give the file name a name such as annotation.java.
Write the following text within the file and save it.
package CucumberJava;
import org.openqa.selenium.By;
import org.openqa.selenium.WebDriver;
import org.openqa.selenium.firefox.FirefoxDriver;

import cucumber.annotation.en.Given;
import cucumber.annotation.en.Then;
import cucumber.annotation.en.When;

public class cucumberJava {
   WebDriver driver = null;
   @Given("^I have open the browser$")
   public void openBrowser() {
      driver = new FirefoxDriver();
   }
   @When("^I open Facebook website$")
   public void goToFacebook() {
      driver.navigate().to("https://www.facebook.com/");
   }
   @Then("^Login button should exits$")
   public void loginButton() {
      if(driver.findElement(By.id("u_0_v")).isEnabled()) {
         System.out.println("Test 1 Pass");
      } else {
         System.out.println("Test 1 Fail");
      }
      driver.close();
   }
}
Step 14 − Create a runner class file.
Select and right-click on the package outline.
Click on ‘New’ file.
Give the file name as runTest.java.
Write the following text within the file and save it.
package cucumberJava;
import org.junit.runner.RunWith;
import cucumber.junit.Cucumber;

@RunWith(Cucumber.class)
@Cucumber.Options(format = {"pretty", "html:target/cucumber"})
public class runTest {
}
Step 15 − Run the test using option −
Select runTest.java file from the package explorer.
Right-click and select the option, Run as.
Select JUnit test.
You will observe the following things upon execution −
An instance of Firefox web browser will open.
It will open the Facebook login page on the browser.
It will detect the login button.
The browser will close.
In the JUnit window, you will see a scenario with green tick mark, which indicates success of the test execution.
Cucumber - Ruby Testing
Ruby language has the following advantages −
It is easy to understand.
It is an object-oriented language.
It is a powerful class library.
It has massive online support.
Following is the step-by-step process of how Cucumber works with Ruby.
Step 1 − Install Ruby.
Go to RubyInstaller download page.
Download the version best suited for your operating system (i.e. 32 or 64 bit).
Run the downloaded exe.
During the installation, tick the option “Add Ruby…” and “Associate …”, as shown in the following image.
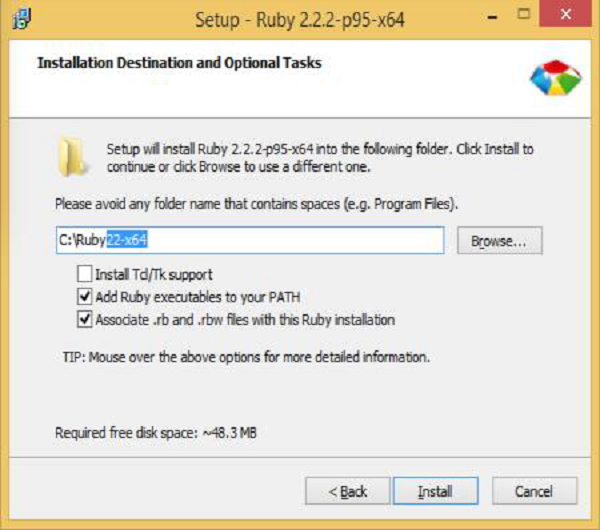
Step 2 − Download and extract Dev kit.
Go to RubyInstaller download page.
Download the Devkit version best suited for your operating system (i.e. 32 or 64 bit).
Extract the devkit at c:\Ruby\Devkit folder.
Open the command prompt.
Inside the Ruby devkit, run the following command.
C:\Ruby\devkit> ruby dk.rb init
C:\Ruby\devkit> ruby dk.rb install
Step 3 − Install Cucumber and other Ruby gem.
To install Cucumber, first update the current gem setup
C:\Users\Admin> gem update –system
Next, install the gems you need for Cucumber web testing.
C:\Users\Admin> gem install --no-ri --no-rdoc rspec
C:\Users\Admin> gem install --no-ri --no-rdoc win32console
C:\Users\Admin> gem install --no-ri --no-rdoc watir-webdriver
C:\Users\Admin> gem install --no-ri --no-rdoc cucumber
Run Cucumber
C:\Users\Admin\Documents>cucumber –init
C:\Users\Admin\Documents>cucumber
Step 4 − Install IDE – KOMODO.
Go to the page http://www.activestate.com/komodo-ide/downloads
Download the free trial installer.
Double-click on the downloaded exe.
Follow the installation steps.
Finish the installation and open the IDE.
Step 5 − Install Watir − Go to command prompt and run the following command, "gem install watir"
Step 6 − Install rspec − Go to command prompt and run the following command, "gem install rspec"
Step 7 − Create feature file.
Open KOMODO editor.
Click on new file icon.
Write the following text.
Feature: Users must be able to search for content using Google.
Scenario: Search for a term.
Given I have entered "watir" into the query.
When I click "search"
Then I should see some results
Click save icon.
Give the name as CucumberRuby.feature.
Choose any folder, for example: “e:\WithRuby”
Save the file.
Step 8 − Create step definition file.
Open KOMODO editor.
Click ‘New’ file icon.
Write the following code.
require "watir-webdriver"
require "rspec/expectations"

Given /^I have entered "([^"]*)" into the query$/ do |term|
@browser ||= Watir::Browser.new :firefox
@browser.goto "google.com"
@browser.text_field(:name => "q").set term
end

When /^I click "([^"]*)"$/ do |button_name|
@browser.button.click
end

Then /^I should see some results$/ do
@browser.div(:id => "resultStats").wait_until_present
@browser.div(:id => "resultStats").should exist
@browser.close
End
Click save icon.
Give the name as CucumberRuby.rb
Choose any folder for example: “e:\WithRuby”
Save the file.
Step 9 − Create the test file.
Open KOMODO editor.
Click on ‘New’ file icon.
Write the following code.
require "rubygems"
require "test/unit"
require "watir-webdriver"

class GoogleSearch < Test::Unit::TestCase
def setup
@browser ||= Watir::Browser.new :firefox
end

def teardown
@browser.close
end

def test_search
@browser.goto "google.com"
@browser.text_field(:name => "q").set "watir"
@browser.button.click
@browser.div(:id => "resultStats").wait_until_present assert
@browser.title == "watir - Google Search"
end
end
Click Save icon.
Name the file as test.rb and choose any folder for example: “e:\WithRuby”
Save the file.
Step 10 − Run the feature file.
Go to command prompt.
Go to directory e:\WithRuby
Run the following command.
e:\With Ruby>ruby test.rb
You will observe the following things upon execution −
A web browser instance will open.
Google.com webpage will get loaded.
Search text watir will be entered.
Search button will be placed.
Search results shall be displayed on the webpage.
Browser instance will get closed.