- Concordion Tutorial
- Concordion - Home
- Concordion - Overview
- Concordion - Environment Setup
- Concordion - First Application
- Concordion - set Command
- assertEquals Command
- Concordion - assertTrue Command
- Concordion - assertFalse Command
- Concordion - execute Command
- Concordion - returning Object
- Concordion - returning Map
- returning MultiValueResult
- Concordion - execute on tables
- Concordion - execute on list
- Concordion - verifyRows Command
- Concordion - run Command
- Concordion Useful Resources
- Concordion - Quick Guide
- Concordion - Useful Resources
- Concordion - Discussion
Concordion - First Application
Let us start programming with Concordion. Before you start writing your first example using Concordion, you have to make sure that you have set up your Concordion environment properly as explained in Concordion - Environment Setup tutorial. We also assume that you have a little bit working knowledge of Eclipse IDE.
So let us proceed to write a simple Concordion application which will print the following acceptance test −
Example
When Robert logs in the system, a greeting "Hello Robert!" is displayed.
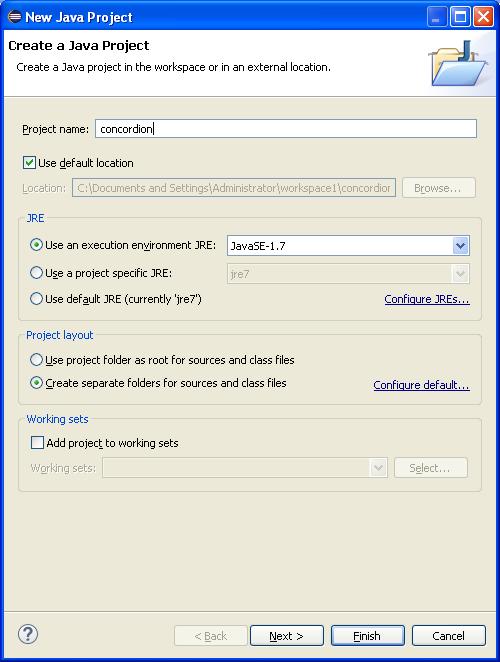
Step 1 - Create Java Project
The first step is to create a simple Java project using Eclipse IDE. Follow the option File → New → Project and finally select Java Project wizard from the wizard list. Now name your project as Concordion using the wizard window as follows −
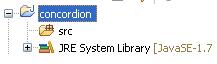
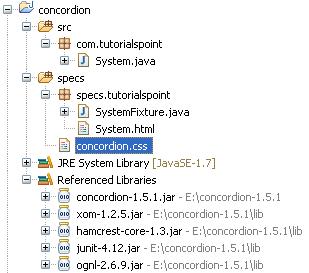
Once your project is created successfully, you will have the following content in your Project Explorer −
Step 2 - Add Required Libraries
Let us add concordion and its dependencies in our project. To do this, right-click on your project name concordion and then follow the options available in the context menu: Build Path → Configure Build Path to display the Java Build Path window as follows −
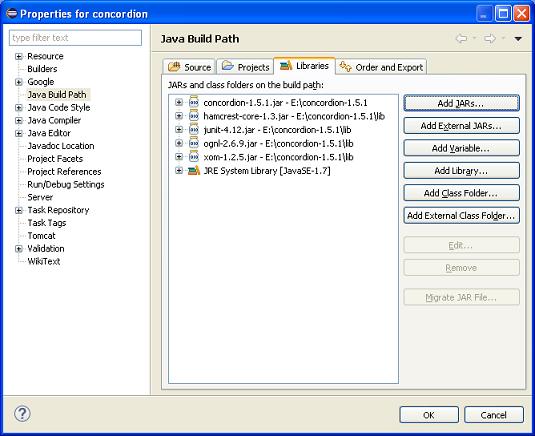
Now use Add External JARs button available under Libraries tab to add the following core JAR from the Concordion folder.
- concordion-1.5.1
- hamcrest-core-1.3
- junit-4.12
- ognl-2.6.9
- xom-1.2.5
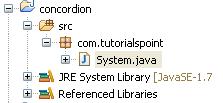
Step 3 - Create Source Files
Now let us create actual source files under the concordion project. First, we need to create a package called com.tutorialspoint. To do this, right-click on src in the package explorer section and follow the option : New → Package.
Next, we will create System .java file under the com.tutorialspoint package.
Here is the content of System.java file −
package com.tutorialspoint;

public class System {
   public String getGreeting(String userName){
      return "Hello " + userName + "!";
   }
}
Step 4 - Create Specification Files
Now let us create actual specification files under the concordion project. First, we need to create a new source folder named specs. This folder will contain specification files like JUnitFixture or test runner and html files which are specifications. Now we need to create a package called specs.tutorialspoint. To do this, right-click on spec in the package explorer section and follow the option : New → Package.
Next, we will create System.html and SystemFixture.java files under the specs.tutorialspoint package. Thereafter, we will add concordion.css under specs source folder.
Here is the content of the System.html file −
<html xmlns:concordion = "http://www.concordion.org/2007/concordion">
   <head>
      <link href = "../concordion.css" rel = "stylesheet" type="text/css" />
   </head>

   <body>
      <h1>System Specifications</h1>
      <p>We are building specifications for our online order tracking application.</p>
      <p>Following is the requirement to show greeting to logged in user:</p>
      <div class = "example">
         <h3>Example</h3>
         <p>When <span concordion:set = "#userName">Robert</span>
            logs in the system, a greeting "<span concordion:assertEquals = "getGreeting(#userName)">
            Hello Robert!</span>" is displayed.</p>
      </div>
   </body>

</html>
Here is the content of the SystemFixture.java file −
package specs.tutorialspoint;

import com.tutorialspoint.System;
import org.concordion.integration.junit4.ConcordionRunner;
import org.junit.runner.RunWith;

@RunWith(ConcordionRunner.class)

public class SystemFixture {

   System system = new System();

   public String getGreeting(String userName){
      return system.getGreeting(userName);
   }
}
Here is the content of the concordion.css file −
* {
   font-family: Arial;
}

body {
   padding: 32px;
}

pre {
   padding: 6px 28px 6px 28px;
   background-color: #E8EEF7;
}

pre, pre *, code, code *, kbd {
   font-family: Courier New, Courier;
   font-size: 10pt;
}

h1, h1 * {
   font-size: 24pt;
}

p, td, th, li, .breadcrumbs {
   font-size: 10pt;
}

p, li {
   line-height: 140%;
}

table {
   border-collapse: collapse;
   empty-cells: show;
   margin: 8px 0px 8px 0px;
}

th, td {
   border: 1px solid black;
   padding: 3px;
}

td {
   background-color: white;
   vertical-align: top;
}

th {
   background-color: #C3D9FF;
}

li {
   margin-top: 6px;
   margin-bottom: 6px;
}

.example {
   padding: 6px 16px 6px 16px;
   border: 1px solid #D7D7D7;
   margin: 6px 0px 28px 0px;
   background-color: #F7F7F7;
}

.example h3 {
   margin-top: 8px;
   margin-bottom: 8px;
   font-size: 12pt;
}

.special {
  font-style: italic;
}

.idea {
  font-size: 9pt;
  color: #888;
  font-style: italic;
}

.tight li {
  margin-top: 1px;
  margin-bottom: 1px;
}

.commentary {
  float: right;
  width: 200px;
  background-color: #ffffd0;
  padding:8px;
  border: 3px solid #eeeeb0;
  margin: 10px 0px 10px 10px;
}

.commentary, .commentary * {
  font-size: 8pt;
}
There are two important points to note about the specification html file and the Test Fixture −
System.html is the specification html file that uses the concordion namespace.
<html xmlns:concordion="http://www.concordion.org/2007/concordion">
System.html uses concordion:set command to set a value of temporary variables userName to be Robert. Here, userName is the parameter to be passed to the getGreeting method of System fixture.
When <span concordion:set="#userName">Robert</span> logs in the system
System.html uses concordion:assertEquals command to check the output of getGreeting(userName) function to be Hello Robert!.
a greeting "<span concordion:assertEquals="getGreeting(#userName)">
Hello Robert!</span>" is displayed.
SystemFixture is a JUnit test fixture annotated with ConcordionRunner.class.
@RunWith(ConcordionRunner.class)
public class SystemFixture {}
SystemFixture has a getGreeting method that returns greetings to the user.
public String getGreeting(String userName){
   return system.getGreeting(userName);
}
Step 5 - Running the Program
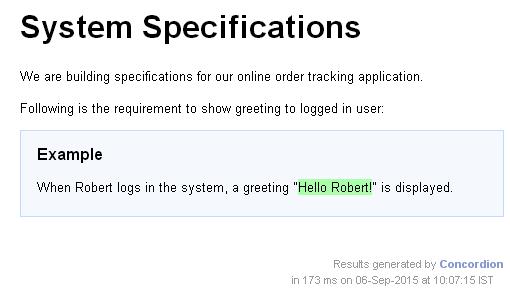
Right-click on the content area of SystemFixture and select Run as > JUnit Test Case. You will see the following output with junit success.
C:\DOCUME~1\ADMINI~1\LOCALS~1\Temp\concordion\specs\tutorialspoint\System.html
Successes: 1, Failures: 0
System.html is the output of Concordion test run.
Congratulations, you have created your first Concordion Acceptance test successfully. Further, let us start doing something more interesting in the next few chapters.