- CICS Tutorial
- CICS - Home
- CICS - Overview
- CICS - Environment
- CICS - Basic Terms
- CICS - Nucleus
- CICS - Transactions
- CICS - COBOL Basics
- CICS - BMS
- CICS - MAP
- CICS - Interface Block
- CICS - Pseudo Programming
- CICS - Aid Keys
- CICS - File Handling
- CICS - Error Handling
- CICS - Control Operations
- CICS - Temporary Storage
- CICS - Intercommunication
- CICS - Status Codes
- CICS - Interview Questions
- CICS Useful Resources
- CICS - Quick Guide
- CICS - Useful Resources
- CICS - Discussion
CICS - MAP
BMS receives the data entered by the user and then formats it into a symbolic map area. The application program has access only to the data present in the symbolic map. The application program processes the data and the output is sent to the symbolic map. BMS will merge the output of the symbolic data with the physical map.
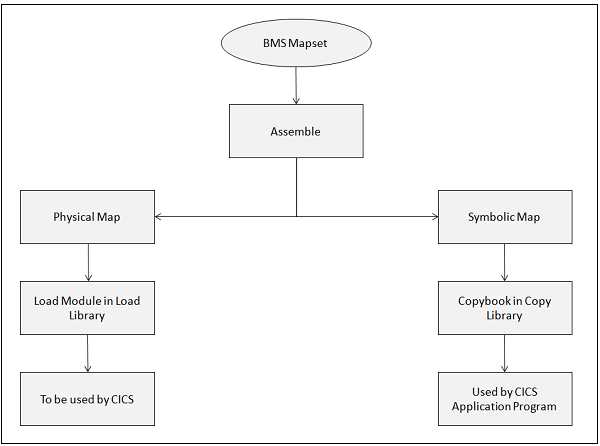
Physical Map
Physical Map is a load module in the load library which contains information about how the map should be displayed.
It contains the details about the attributes of all the fields in the map and their positions.
It contains the display format of the map for a given terminal.
It is coded using BMS macros. It is assembled separately and link edited into the CICS library.
Symbolic Map
A Symbolic Map is a Copy book in the library. The Copy book is used by the CICS application program to send and receive data from the terminal.
It contains all the variable data which is copied into program's WORKINGSTORAGE section.
It has all the named fields. The application programmer uses these fields to read and write data into the map.
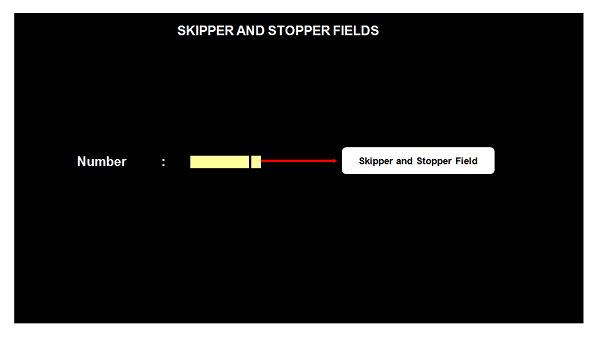
Skipper and Stopper Field
For an unprotected named field, in a map, if we have specified a length of 10, this means that the name field can take values whose length cannot exceed 10. But when you display this map using CICS and start entering values for this field on the screen, we can enter more than 10 Characters, i.e., till the end of the screen and we can enter even in the next line. To prevent this, we use Skipper field or stopper field. A Skipper field would generally be an Unnamed field of length 1, specified after a named field.
Skipper Field
If we place a skipper field after the named unprotected field, then while entering the value, once the specified length is reached, the cursor will automatically position to the next unprotected field. The following example shows how to add a skipper field −
NUMBER  DFHMDF POS = (01,01), X
   LENGTH = 5, X
   ATTRB = (UNPROT,IC)
      DFHMDF POS = (01,07), X
      LENGTH = 1, X
      ATTRB = (ASKIP)
Stopper Field
If we place a stopper field after the named unprotected field, then while entering the value, once the specified length is reached, the cursor will stop its positioning. The following example shows how to add a stopper field −
NUMBER  DFHMDF POS = (01,01), X
   LENGTH = 5, X
	ATTRB = (UNPROT,IC)
	   DFHMDF POS = (01,07), X
      LENGTH = 1, X
      ATTRB = (PROT)
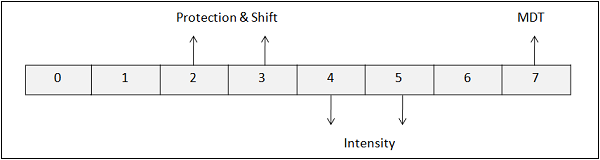
Attribute Byte
The attribute byte of any field stores information about the physical properties of the field. The following diagram and the table explain the significance of each bit.
| Bit Position | Description | Bit Settings |
|---|---|---|
| 0 & 1 | Determined by contents of bit 2 to 7 | |
| 2 & 3 | Protection & Shift | 00 - Unprotected Alphanumeric 01 - Unprotected Numeric 10 - Protected Stop 11 - Protected Skip |
| 4 & 5 | Intensity | 00 - Normal 01 - Normal 10 - Bright 11 - No-display ( Dark ) |
| 6 | Must be Zero Always | |
| 7 | Modified Data Tag | 0 - Field has not been modified 1 - Field has been modified |
Modified Data Tag
Modified Data Tag (MDT) is the last bit in the attribute byte.
MDT is a flag which holds a single bit. It specifies whether the value is to be transferred to the system or not.
Its default value is 1, when the field value is changed.
If MDT is 0, then data cannot be transferred; and if MDT is 1, then data can be transferred.
Send Map
The send map command writes formatted output to the terminal. It is used to send the map to the terminal from the application program. The following code segment shows how to send a map to the terminal −
EXEC CICS SEND
   MAP('map-name')
   MAPSET('mapset-name')
   [FROM(data-area)]
   [LENGTH(data_value)]
   [DATAONLY]
   [MAPONLY]
   [CURSOR]
   [ERASE/ERASEAUP]
   [FREEKB]
   [FRSET]
END-EXEC
The following table lists the parameters used in a send map command along with their significance.
| Sr.No | Parameter & Description |
|---|---|
| 1 | Map-name It is the name of the map which we want to send. It is mandatory. |
| 2 | Mapset-name It is the name of the map set that contains the mapname. The mapset name is needed unless it is the same as the map name. |
| 3 | FROM It is used if we have decided to use a different DSECT name, we must use the option FROM (dsect-name) along with SEND MAP command. |
| 4 | MAPONLY It means that no data from your program is to be merged into the map and only the information in the map is transmitted. |
| 5 | DATAONLY It is the logical opposite of MAPONLY. We use it to modify the variable data in a display that has already been created. Only the data from your program is sent to the screen. The constants in the map are not sent. |
| 6 | ERASE It causes the entire screen to be erased before what we are sending is shown. |
| 7 | ERASEUP It causes only unprotected fields to be erased. |
| 8 | FRSET Flag Reset turns off the modified data tag in the attribute byte for all the fields on the screen before what you are sending is placed there. |
| 9 | CURSOR It can be used to position the cursor on the terminal screen. Cursor can be set by moving -1 to the L part of the field and then sending the map. |
| 10 | ALARM It causes the audible alarm to be sounded. |
| 11 | FREEKB. The keyboard is unlocked if we specify FREEKB in either the map or the SEND command. |
| 12 | It allows the output of a SEND command to be printed on a printer. |
| 13 | FORMFEED It causes the printer to restore the paper to the top of the next page before the output is printed. |
Receive Map
When we want to receive input from a terminal, we use the RECEIVE MAP command. The MAP and MAPSET parameters have exactly the same meaning as for the SEND MAP command. The following code segment shows how to receive a map −
EXEC CICS RECEIVE
   MAP('map-name')
   MAPSET('mapset-name')
   [INTO(data-area)]
   [FROM(data-area)]
   [LENGTH(data_value)]
END-EXEC
Mapset Execution
The following steps are necessary to develop and execute a mapset −
Step 1 − Open a TSO session.
Step 2 − Create a new PDS.
Step 3 − Code a mapset in a new member according to the requirement.
Step 4 − Assemble the mapset using the JCL provided by the CICS administrator.
Step 5 − Open a CICS Session.
Step 6 − Install the program using the command −
CEMT SET PROG(mapset-name) NEW
Step 7 − Type the following command to send the Map to the terminal −
CECI SEND MAP(map-name) MAPSET(mapset-name) ERASE FREEKB