- Behave Tutorial
- Behave - Home
- Behave - Introduction
- Behave - Installation
- Behave - Command Line
- Behave - Configuration Files
- Behave - Feature Testing Setup
- Behave - Gherkin Keywords
- Behave - Feature Files
- Behave - Step Implementations
- Behave - First Steps
- Behave - Supported Languages
- Behave - Step Parameters
- Behave - Scenario Outlines
- Behave - Multiline Text
- Behave - Setup Table
- Behave - Steps in a Step
- Behave - Background
- Behave - Data Types
- Behave - Tags
- Behave - Enumeration
- Behave - Step Matchers
- Behave - Regular Expressions
- Behave - Optional Part
- Behave - Multi-Methods
- Behave - Step Functions
- Behave - Step Parameters
- Behave - Runner Script
- Behave - Exclude Tests
- Behave - Retry Mechanism
- Behave - Reports
- Behave - Hooks
- Behave - Debugging
- Behave Useful Resources
- Behave - Quick Guide
- Behave - Useful Resources
- Behave - Discussion
Behave - Quick Guide
Behave - Introduction
Behave is a tool used for Behaviour driven development (BDD) in Python programming language. In an Agile development framework, BDD creates a culture where testers, developers, business analysts, and other stakeholders of the project can contribute towards the software development.
In short, both technical and non-technical individuals have a role to play towards the overall project. Behave has tests developed in plain text with the implementation logic in Python.
The BDD format begins with the description of the characteristics of the software similar to a story.
It then continues with the development and carries out the following tasks −
Developing a failing test case for characteristics.
Implement the logic for a test to pass.
Code refactor to fulfil the project guidelines.
There are numerous libraries for BDD like the Mocha which supports JavaScript, Cucumber which supports Java/Ruby, and Behave which supports Python, and so on.
In this tutorial, we shall discuss in detail about Behave.
Let us see a basic structure of a BDD. It mainly consists of the feature file, the step definition file, and so on.
Feature File
The feature file in Behave can be as follows −
Feature − Verify book name added in Library.
Scenario − Verify Book name.
Given − Book details.
Then − Verify book name.
Corresponding step definition file
Following is the corresponding definition file in Behave tool −
from behave import *
@given('Book details')
def impl_bk(context):
   print('Book details entered')
@then('Verify book name')
def impl_bk(context):
   print('Verify book name')
Output
The output obtained after running the feature file is as follows −

The output shows the Feature and Scenario names, along with the test results, and the duration of the respective test execution.
Behave - Installation
Behave installation can be done by the following ways −
With pip
For Behave installation, we should have pip – the package installer for the Python language installed in our system. The pip is installed by default, if the Python version is greater than 2(upto 2.7.9).
To install pip, run the below mentioned command −
pip install pip
To install pip with Behave, run the command given below −
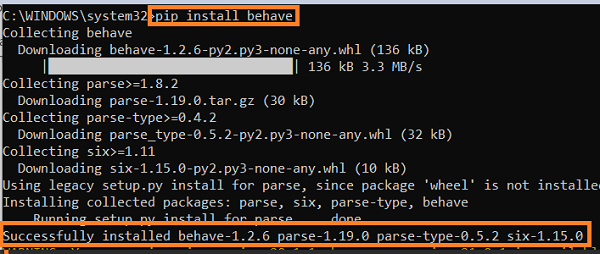
pip install behave
The following screen will appear on your computer −
We can update an existing version of Behave with the following command −
pip install –U behave
We can also use the easy_install for the Behave installation.
To install Setuptools, run the below mentioned command−
pip install setuptools
Now, for the Behave installation, run the command stated below:
easy_install behave
We can update an existing version of behave with the command given below:
easy_install –U behave
With Source Distribution
Post unpacking of the source distribution of Behave, type the new generated directory 'behave-<version>' and execute the below mentioned command −
python setup.py install
With Git Repository
We should first have the pip installed in the system.
Later on, to install the latest version of Behave with Git repository, run the below mentioned command −
pip install git+https://github.com/behave/behave
If we use the PyCharm Editor for writing the Behave code, we should have the Professional version of PyCharm along with the Gherkin plugin installed with it.
Behave - Command Line
Behave has a collection of command line arguments and it can also be outlined from the configuration files. The values set in the configuration files are used automatically, however, it can be overruled by the command line arguments.
Command Line Arguments
Let us discuss some of the command line arguments −
–c, --no-color
Impair the usage of the ANSI color escapes.
--color -
Utilise the ANSI color escapes. This is an in-built characteristic and can overrule a setting in the configuration file.
–d, --dry-run
Summons the formatter without running the steps.
-D, --define
Declares the customised information for the config.userdata dictionary.
–e, --exclude Pattern
Exclude feature files which are identical to a pattern of regular expression from the execution.
–i, --include Pattern
Include feature files which are identical to a pattern of regular expression during the execution.
--no-junit
Omit JUnit reports as output.
--junit
Add JUnit reports as output. When JUnit is turned on, every stdout and stderr will be a part of the junit report. (Irrespective of the -capture/-no-capture options).
–f, --format
Define a formatter. If omitted, the in-built formatter is utilised. The –format-help command shall display all the available formats.
-steps-catalog
Displays a catalogue of all the existing step definitions.
–k, --no-skipped
Exclude skipped steps from printing in console.
no-snippets
Exclude snippets from printing in console for the steps, which are still not implemented.
--snippets
Include snippets, while printing in console for the steps which are still not implemented. This is an in-built characteristic and can overrule a configuration file setting.
–m, --no-multiline
Exclude multiple lines tables and strings under steps.
--multiline
Include multiple lines tables and strings under steps. This is an in-built characteristic and can overrule a configuration file setting.
–n, --name
Include the feature elements, which are identical to the specified name in the run. If the option is provided multiple times, it shall match with all the names.
--no-capture
Exclude stdout from capturing.
--capture
Include stdout. This is an in-built characteristic and can overrule a configuration file setting.
--no-capture-stderr
Exclude stderr from capturing.
--capture-stderr
Include stderr. This is an in-built characteristic and can overrule a configuration file setting.
--no-logcapture
Exclude log from capturing.
--logcapture
Include log capturing. Every log for a step will be present and available during the failures. This is an in-built characteristic and can overrule a configuration file setting.
--logging-level
Mention the logging level that shall be captured. The default value is INFO.
--logging-format
Mention the user-defined format for printing statements. The default value is %(levelname)s:%(name)s:%(message)s.
--logging-datefmt
Mention the user-defined date and time format for printing statements.
--logging-filter
Mention if the statements are to be filtered or not. All the statements are captured by default. In case the output is too lengthy, we can utilise the option to filter out the unnecessary output.
--logging-clear-handlers
Remove all the handlers which are used for logging.
--no-summary
Exclude summary post the execution.
-summary
Include summary post the execution.
–o, --outfile
Write the given file instead of using stdout.
–q, --quiet
Alias are used for –no-snippets –no-source.
–s, --no-source
Exclude printing the file and the line of step definition along with steps.
--show-source
Include printing the file and the line of step definition along with the steps. This is an in-built characteristic and can overrule a configuration file setting.
--stage
--stop
Terminate executing tests after encountering the first failure.
–t, --tags
Include the features/scenarios having tags, which are identical to TAG_EXPRESSION in the execution.
–T, --no-timings
Exclude printing duration of execution for each step.
--show-timings
Capture the duration taken by each step to complete in seconds in the console. This is an in-built characteristic and can overrule a configuration file setting.
–v, --verbose
Displays the loaded features and files.
–w, --wip
Execute the scenarios having the wip tag. Moreover, we have to use the plain formatter and not record the stdout or log output and terminate post first failure.
–x, --expand
Flatten the table of Scenario Outline in output.
--lang
Utilise keywords for a language except English.
--lang-list
Displays all the languages present in –lang.
--lang-help
Displays all the translations acquired for a single language.
--tags-help
Display help for tag statements.
--version
Displays version.
junit –directory
This is the directory location where the Junit reports are stored.
--show-skipped
Include skipped steps while printing in console. This is an in-built characteristic and can overrule a configuration file setting.
Behave - Configuration Files
Behave configuration files are known as the .behaverc/behave.ini/setup.cfg/tox.ini(any one and is set as per user choice).
The files can be located in the following places −
The present working directory.
User home directory.
For Windows users, in the directory %APPDATA%.
The command behave –v, shall display all the configuration details. The configuration files should begin with the keyword [behave] and follow Windows INI style format.
For example,
[behave]
format = plain
dry_run = false
Types of Parameters
Types of configuration parameters in Behave include the following −
Text − To assign a text to the configuration setting.
Bool − Assigns Boolean value to the configuration setting. The text defines the behaviour (true values include 1, true, yes, and on). The false values include 0, false, no, and off).
Sequence<text> − To accept multiple values on new lines.
For example, tag expression can be as follows −
tags=@a, ~@b
         @c
This is equivalent to the following tag expression −
--tags @a, ~@b --tags @c
Configuration Parameters
Some of the configuration parameters in Behave are explained below −
color − bool
Utilise ANSI color escapes. This is an in-built characteristic and can overrule a setting in the configuration file.
dry_run − bool
Calls the formatters without running the steps.
userdata_defines − sequence<text>
Declares the customised data for the config.userdata dictionary.
exclude_re − text
Exclude the feature files which are identical to a pattern of regular expression from the execution.
include_re − text
Include the feature files which are identical to a pattern of regular expression during the execution.
junit − bool
Add JUnit reports as output. When JUnit is turned on, every stdout and stderr will be a part of the junit report. (Irrespective of the -capture/-no-capture options).
junit_directory − text
This is the directory location where the JUnit reports are stored.
default_format − text
Declare default formatter. The default value is pretty.
format: sequence<text>
Define a formatter. If omitted, the in-built formatter is utilised. The –format-help command shall display all the available formats.
steps_catalog − bool
Displays a catalogue of all the existing step definitions.
scenario_outline_annotation_schema: text
Mention annotation schema for scenario outline.
show_skipped − bool
Include the skipped steps while printing in console. This is an in-built characteristic and can overrule a configuration file setting.
show_snippets − bool
Include snippets while printing in console for the steps, which are still not implemented. This is an in-built characteristic and can overrule a configuration file setting.
show_multiline − bool
Include multiple lines tables and strings under steps. This is an in-built characteristic and can overrule a configuration file setting.
name − sequence<text>
Include the feature elements which are identical to the specified name in the run. If the option is provided multiple times, it shall match all the specified names.
stdout_capture − bool
Include stdout. This is an in-built characteristic and can overrule a configuration file setting.
stderr_capture − bool
Include stderr. This is an in-built characteristic and can overrule a configuration file setting.
log_capture − bool
Include log capturing. Every log for a step will be present and available during the failures. This is an in-built characteristic and can overrule a configuration file setting.
logging_level − text
Mention the logging level to be captured. The default value is INFO.
logging_format − text
Mention user-defined format for printing statements. The default value is %(levelname)s:%(name)s:%(message)s.
logging_datefmt − text
Mention user-defined date and time format for printing statements.
logging_filter − text
Mention the statements which are to be filtered. All the statements are captured by default. In case the output is too lengthy, we can utilise the option to filter out the unnecessary output.
logging_clear_handlers : bool
Remove all the handlers which are used for logging.
summary − bool
Include a summary post the execution.
outfiles − sequence<text>
Write the given file instead of using stdout.
paths − sequence<text>
Mention the default paths of feature files.
quiet − bool
Alias is used for –no-snippets –no-source.
show-source − bool
Include printing the file and the line of step definition along with steps. This is an in-built characteristic and can overrule a configuration file setting.
stage − text
Describes the present stage of the test. The stage name is utilised as the name affix for the environment file along with the directory for steps.
stop − bool
Terminate executing tests after encountering the first failure.
tags − sequence<text>
Include the features/scenarios having tags which are identical to TAG_EXPRESSION in the execution.
default_tags − text
Declare the default tags if they are not given.
show_timings − bool
Capture the duration taken by each step to complete in seconds in the console. This is an in-built characteristic and can overrule a configuration file setting.
verbose − bool
Displays the loaded features and files.
wip − bool
Execute the scenarios having the wip tag. Moreover, we have to use the plain formatter and not record the stdout or log output and terminate post first failure.
expand − bool
Flatten the table of Scenario Outline in output.
lang − text
Utilise keywords for a language except English.
Behave - Feature Testing Setup
Behave works with three different file types, which are as follows −
Feature files which are created by a Business analyst or any project stakeholder and contains behaviour related use cases.
Step Implementation file for the scenarios defined in the feature file.
Environment Setup files where, the pre/post conditions are to be executed prior and post the steps, features, scenarios, and so on.
Feature File
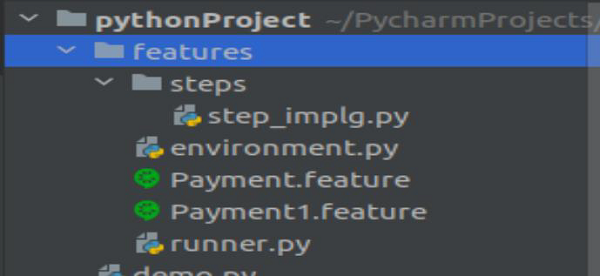
A feature file should be within a folder called as the features. Also, there should be a sub-directory steps within the features directory.
Launching Feature file
We can launch the feature file with various command line arguments. These are explained below −
If no information is available, all the feature files within the features directory shall be loaded for execution in Behave.
If the path of the features directory is provided, then it is mandatory to have at least one feature file (with .feature extension) and a sub-directory named steps within the features directory.
Also, if the environment.py is present, it should be within the directory that has the steps directory and not within the steps directory.
If the path to a feature file is provided, then it instructs Behave to search for it. To get the corresponding steps directory for that feature file, the parent directory is searched.
If not found in the current parent directory, then it searches its parents. This shall continue until it reaches the file system root. Also, if the environment.py is present, it should be within the directory that has the steps directory and not within the steps directory.
Behave - Gherkin Keywords
Gherkin keywords in Behave are listed below −
Features
Scenario
Steps
Background
Scenario Outline
Text
Table
Tags
Given
When
Then
But
And
Feature files are written in Gherkin language. It is in plain text and created by non- technical members of the team (business analyst). Feature files can be used for both automation testing and documentation.
Line endings finish statements are included in Behave. We can use tabs/spaces for indentation. Majority of lines begin with the keywords like Scenario, Given, Then, and so on. Comments can be added in any location within the file. They start with/without spaces, followed by # symbol along with text.
Let us discuss some key Gherkin keywords.
Feature
A Feature consists of Scenarios. They may/may not contain description, background, and a group of tags.
The structure of a feature file is as follows −
Feature − Verify book name added in Library
Scenario − Verify Book name
Given Book details
Then Verify book name
The name of the feature should have a description for the feature which is being tested. However, a lengthy description is not mandatory and a description is only added to remove ambiguity in the feature name.
Background
A Background is added to have a group of steps. It is close to a Scenario. We can add a context to the multiple Scenarios with Background. It is run prior to every Scenario of a feature, but post the execution of before hooks.
Background is generally used for executing preconditions like login Scenarios or database connection, and so on.
A Background description can be added for better human readability. A Background can appear only a single time in a feature file and it must be declared prior to a Scenario or Scenario Outline.
A Background should not be used to create a complex state (only, if it cannot be avoided). This segment should be brief and authentic. Also, we should avoid having a large number of scenarios within one feature file.
Feature File with Background
The feature file with Background keyword is as follows −
Feature: Payment Process
   Background:
      Given launch application
      Then Input credentials
   Scenario: Credit card transaction
      Given user is on credit card payment screen
      Then user should be able to complete credit card payment
   Scenario: Debit card transaction
      Given user is on debit card payment screen
      Then user should be able to complete debit card payment
Scenario
A Scenario defines a behaviour of the application that is being tested. It has a title to describe its objective. Its description can be added for better human readability.
A Scenario may have multiple steps, which begins with the keywords Given, Then, When, and so on. It is recommended to have a Scenario to check a single characteristic or an expected result.
Feature File with Scenario
The feature file with Scenario keyword is as follows:
Feature − Payment Process
      Scenario − Credit card transaction
   Given user is on credit card payment screen
   Then user should be able to complete credit card payment
Scenario Outline
A Scenario Outline is used if we have a group of similar criteria and the results to be passed in a Scenario. A Scenario Outline is accompanied with an Examples table and can have multiple Examples tables.
The tests get executed once for every row found after the header row within the Examples table. The values to be tested are represented by their names enclosed in brackets<>. These names should match with the Examples table header.
It helps to reduce the lines of code as it eliminates the repeating steps and orders our tests.
Feature File with Scenario Outline
The feature file with Scenario Outline keyword is as follows −
Feature − User information
Scenario Outline: Check login functionality
   Given user enters <email> and <password>
   Then user should be logged in
Example
Following is an example of the feature file with Scenario Outline −
Examples: Credentials
   | email        | password  |
   | qa@gmail.com | pwd1      |
   | qe@gmail.com | pwd2      |
The same test gets executed with a varied set of parameters.
Given
A step starting the keyword Given is used to place the system in a familiar circumstance prior to the interaction of the user with the system (similar to a precondition). It is recommended not to describe a user action in the Given step.
A Given step can be added for setting the configuration in the database, log in to the application, and so on.
Feature File with Given
The feature file with Given keyword is as follows −
Feature − Payment Process
            Scenario − Credit card transaction
   Given user is on credit card payment screen
   Then user should be able to complete credit card payment
When
A step starting with the keyword When is used to add the essential task to be performed by the user. With this, there is a user communication with the system that brings about the changes to system’s state or an impact elsewhere.
Feature File with When
The feature file with When keyword is as follows −
Feature − Payment Process
            Scenario − Credit card transaction
   Given user is on credit card payment screen
      When user clicks on the Payment with Credit Card button
   Then user should be able to complete credit card payment
Then
A step starting with the keyword Then is used to get the expected results. The results observed (ideally in form of an output - messages, reports, and so on) in this step should be connected to a business scenario and the feature file where it is present.
It is recommended not to use the Then steps for database scenarios as it is essentially used to describe an aftermath which is noticeable to the end user.
Feature File with Then
The feature file with When keyword is as follows −
Feature − Payment Process
            Scenario − Credit card transaction
   Given user is on credit card payment screen
   When user clicks on the Payment with Credit Card button
   Then user should be able to complete credit card payment
And, But
If we have multiple Given, When, Then consecutive steps, we can use And and But steps. It brings better readability to the user.
Feature File with multiple consecutive Then/Given steps
The feature file with multiple consecutive Then/Given steps in Behave is as follows −
Feature − Verify book names added in Library
   Scenario − Verify Book name
      Given Book1 details
      Given Book2 details
      Then Verify book names
      Then Verify newly added book names should not be in Delete History
Feature File without multiple Then/Given steps
The feature file without multiple Then/Given steps is as follows −
Feature − Verify book names added in Library
   Scenario − Verify Book name
      Given Book1 details
      And Book2 details
      Then Verify book names
         But Verify newly added book names should not be in Delete History
Step Data – Table
A step can have a text and data table associated with it. We can add a data table with a step. It is recommended to have the table data indented and it is mandatory to have an equal column number for each line.
A column data should be separated by the | symbol.
Feature File with Table
The feature file with table keyword is as follows −
Feature − User Registration
Scenario − User enters registration details
   When User enters name and password
      | name |password |
      | t1   | pwd     |
      | t2   | pwd1    |
Then user should be able to complete registration
A table is accessible to the implementation Python code with the .table attribute within the context variable (passed in the step function). A table is an instance of Table.
Implementation logic for Table
Given below is an implementation logic for .table attribute in Table −
@when('User enters name and password')
def step_impl(context):
   for r in context.table:
      model.delete_usr(name=r['name'], password=r['password'])
Step Data – Text
A block of text after a step enclosed in """ will be linked with that step. Here, the indentation is parsed. All the whitespaces at the beginning are removed from the text. Also, all the succeeding lines must have at least a minimum whitespace as the starting line.
A text is accessible to the implementation Python code with the .text attribute within the context variable (passed in the step function).
Feature File with Text
The feature file with text keyword is as follows −
Feature − Verify book name added in Library

   Scenario − Verify Book name
      Given Book details
         """
          Text added for a step
         """
      Then Verify book name
Tags
A section of a feature file can be tagged so that the Behave is capable of verifying only a certain section of the feature file. A Scenario, Feature, Scenario Outline can only be tagged.
Also, a tag which is used for a feature shall be inherited by all its Scenarios and Scenario Outlines. Tags are placed before a Scenario or a Feature that we want to tag. We can also have multiple tags separated by spaces within a line. A tag begins with @ followed by the tag name.
Feature File with tags
The feature file with tags keyword is as follows:
@payment
@high
Feature − Payment Process
      Scenario − Credit card transaction
   Given user is on credit card payment screen
   Then user should be able to complete credit card payment
Tags help to manage the test execution by excluding/including the specific scenarios or features depending on the tag.
Behave - Feature Files
Behave works with three different file types, as explained earlier. These files are as follows −
Feature files which are created by the Business analyst or any project stakeholder and contains behaviour related use cases.
Step Implementation file for the scenarios defined in the feature file.
Environment Setup files where the pre/post conditions are to be executed prior and post steps, features, scenarios, and so on.
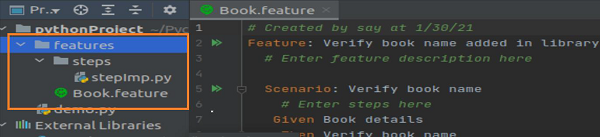
A Feature file should be within a folder called as the features. Also, there should be a sub-directory steps within the features directory.
The following screen will appear on your computer −

Launching Feature file
We can launch the feature file with various command line arguments, as explained below −
If no information is available, all the feature files within the features directory shall be loaded for the execution in Behave.
If the path of the features directory is provided, then it is mandatory to have at least one feature file (with .feature extension) and a sub-directory named steps within the features directory.
Also, if the environment.py is present, it should be within the directory that has the steps directory and not within the steps directory.
If the path to a feature file is provided, then it instructs Behave to search for it. To get the corresponding steps directory for that feature file, the parent directory is searched.
If not found in the current parent directory, then it searches its parents. This shall continue until it reaches the file system root. Also, if the environment.py is present it should be within the directory that has the steps directory and not within the steps directory.
Structure of a Feature File
A Feature consists of Scenarios. They may/may not contain a description, background, and a group of tags.
A structure of a feature file is as follows −
Feature File
The format of a feature file is as follows −
Feature − Verify book name added in Library
   Scenario − Verify Book name
      Given Book details
      Then Verify book name
Corresponding Step Implementation File.
The corresponding step implementation file looks like the one mentioned below −
from behave import *
@given('Book details')
def impl_bk(context):
      print('Book details entered')
@then('Verify book name')
def impl_bk(context):
      print('Verify book name')
Output
The output obtained after running the feature file is as follows −

The output shows the Feature and Scenario names, along with the test results and duration of the test execution.
Behave - Step Implementations
The steps of a Scenario in the feature file in Behave should have implementation logic written in Python. This is known as the implementation/step definition file (.py extension) and should be present within the steps directory.
All the necessary imports are present in this file. The steps directory should be a part of the features directory.
The following screen will appear on your computer −
The step definition file contains Python functions which define the steps in the feature file. At the start of the Python functions, it is mandatory to have decorators which begins with @given, @when, and so on. These decorators compare and match with the Given, Then, When, and other steps in the feature file.
Feature File
The feature file is as follows −
Feature − Verify book name added in Library
   Scenario − Verify Book name
      Given Book details
      Then Verify book name
Corresponding Step Implementation File
The corresponding step implementation file looks like the one mentioned below −
from behave import *
@given('Book details')
def impl_bk(context):
      print('Book details entered')
@then('Verify book name')
def impl_bk(context):
      print('Verify book name')
Output
The output obtained after running the feature file is as follows −
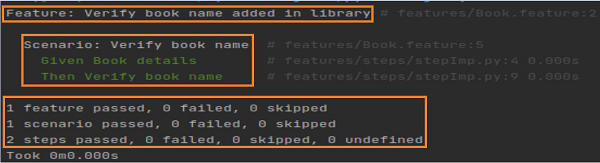
The output shows the Feature and Scenario names, along with test results, and duration of test execution.
Behave - First Steps
Let us create a basic Behave test.
Feature File
The feature file for the Feature titled Payment Types is as follows −
Feature − Payment Types

   Scenario − Verify user has two payment options
      Given User is on Payment screen
      When User clicks on Payment types
      Then User should get Types Cheque and Cash
Corresponding Step Implementation File
The corresponding step implementation file for the above mentioned feature is as follows −
from behave import *
@given('User is on Payment screen')
def impl_bkpy(context):
      print('User is on Payment screen')
@when('User clicks on Payment types')
def impl_bkpy(context):
      print('User clicks on Payment types')
@then('User should get Types Cheque and Cash')
def impl_bkpy(context):
      print('User should get Types Cheque and Cash')
Project Structure
The project structure for the feature “Payment Types” is as follows −

Output
The output obtained after running the feature file is as mentioned below and the command used here is behave
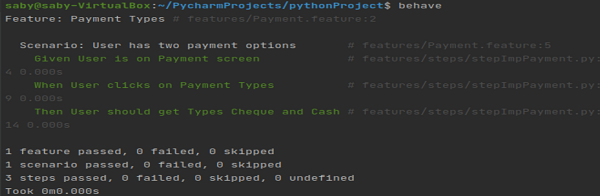
The output shows the Feature and Scenario names, along with test results, and duration of test execution.
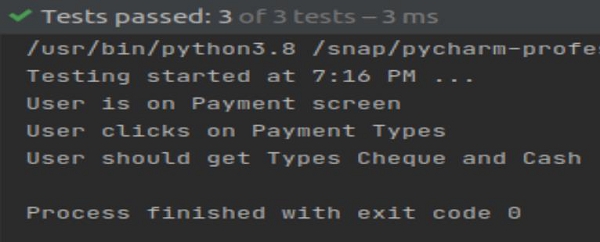
Python Console output is given below −
Behave - Supported Languages
We have the option to utilise other languages apart from English in the feature file. This is because, the majority of BDD tools have the support for internationalisation. The important fact is that the keywords - Then, When, Given can be described in other native languages like Spanish, French, and so on.
In that case, the developer can implement the step definitions in other languages as well. The list of all the languages can be obtained with the command: behave --lang-list.
The following screen will appear on your computer after using the command behave --lang-list −
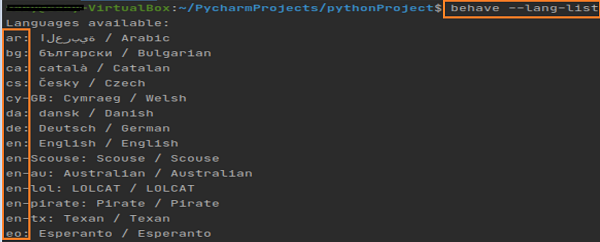
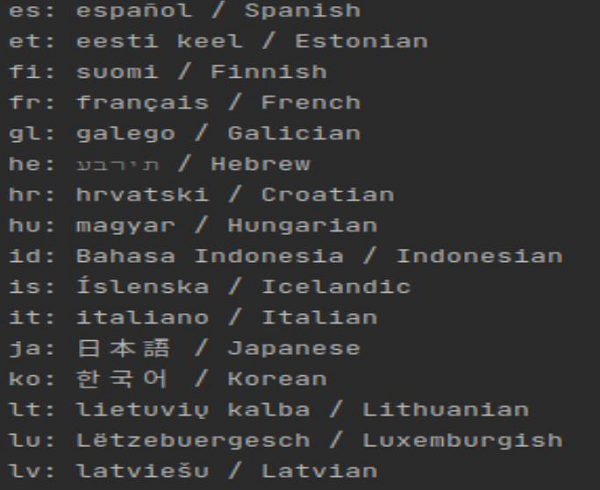
Some more languages included in Behave are mentioned below −
A feature file can be associated with a particular language. At this time, the BDD framework chooses the keywords for that specific language. The language can be set as default in the configuration file.
Behave configuration files can be either, .behaverc or behave.ini files. The value for the parameter lang should be set to da in the configuration file, if we want the language to be to Danish.
Configuration file setup
The feature file set up for selecting a particular language is given below and the language used as an example is Danish (da).
[behave]
lang = da
Behave - Step Parameters
We can pass parameters to steps in Behave. Let us see a feature file containing steps having multiple parameters where the varied values have been set. This is helpful in making the automation implementation easier, since the total step definitions is lessened.
Feature File
Consider an example of feature file as given below −
Feature − Schedule
   Scenario − Verify Day and Night Schedule
   Given I reach office at "day" shift
   And I reach office at "night" shift
The feature file contains almost the similar steps as in the Given and in the And steps. The only difference is that in the day and night shift timings. Instead of repeating the implementations for almost the similar steps, we can pass parameters to the steps in the step definition file.
Please Note − We have kept the day and night parameters in double-quoted text (single-quoted text can also be used) in the feature file. In the step implementation, we shall pass the parameter enclosed in {}.
Also, the parameter is passed as one of the arguments to the implementation method.
Corresponding Step Implementation File
The corresponding step implementation file is as follows −
from behave import *
@given('I reach office at "{time}" shift')
def step_implpy(context, time):
      print("Shift is: {}".format(time))
Output
The output obtained after running the feature file is as follows and the command used is behave --no-capture -f plain−
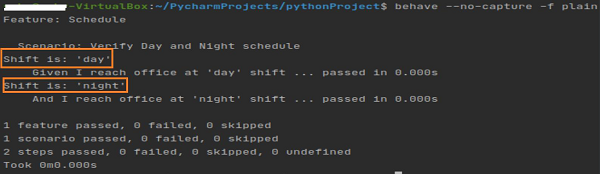
The output shows Shift is: day and Shift is: night printed. Here, the parameters day and night are passed from the step.
Behave - Scenario Outlines
A Scenario Outline is used if we have a group of similar criteria and the results are to be passed in a Scenario. A Scenario Outline is accompanied with an Examples table. A Scenario Outline can have multiple Examples tables.
The tests get executed once for every row found (after the header row) within the Examples table. The values to be tested are represented by their names enclosed in brackets<>. These names should match with the Examples table header.
It helps to reduce the lines of code (eliminates repeating steps) and orders our tests.
Feature File
The feature file for scenario outline is as follows −
Feature − User information
Scenario Outline: Check login functionality
   Given user enters "<name>" and "<password>"
   Then user should be logged in
   Examples: Credentials
      | name   | password |
      | user1  | pwd1     |
      | user2  | pwd2     |
Please Note: We have kept the name and password parameters enclosed in "<>". These parameters are column headers provided below the Examples section. In the step implementation, we shall pass the parameters enclosed in "{}".
Also, these parameters need to be passed as arguments to the implementation method.
Corresponding Step Implementation File
The corresponding step implementation file is as follows −
from behave import *
@given('user enters "{name}" and "{password}"')
def step_implpy(context, name, password):
      print("Username for login: {}".format(name))
         print("Password for login: {}".format(password))
@then('user should be logged in')
def step_implpy(context):
      pass
Output
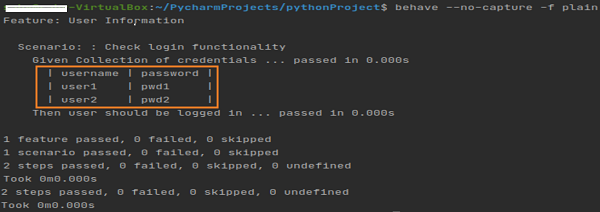
The output is obtained after running the feature file and the command used is behave --no-capture -f plain.
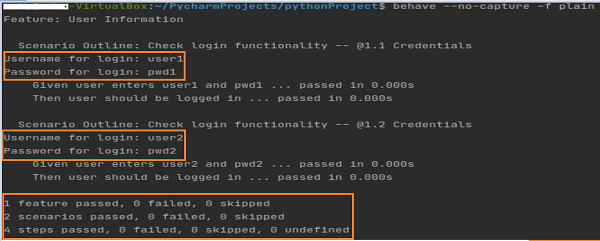
The output shows Username for login: user1, Password for login: pwd1 and Username for login: user2, Password for login: pwd2 printed. Here, the two data sets were passed from the Examples.
Behave - Multiline Text
A block of text after a step enclosed in """ will be linked with that step. Here, the indentation is parsed. All the whitespaces at the beginning are removed from the text and all the succeeding lines must have at least a minimum whitespace as the starting line.
A text is accessible to the implementation Python code with the .text attribute within the context variable (passed in the step function).
Feature File
The feature file for feature titled User information is as follows −
Feature − User information
Scenario − Check login functionality
   Given user enters name and password
         """
         Tutorialspoint Behave
          Topic – Multiline Text
         """
   Then user should be logged in
Corresponding Step Implementation File
The corresponding step implementation file for the feature is as follows −
from behave import *
@given('user enters name and password')
def step_impl(context):
#access multiline text with .text attribute
      print("Multiline Text: " + context.text)
@then('user should be logged in')
def step_impl(context):
      pass
Output
The output obtained after running the feature file is mentioned below and the command used is behave --no-capture -f plain.
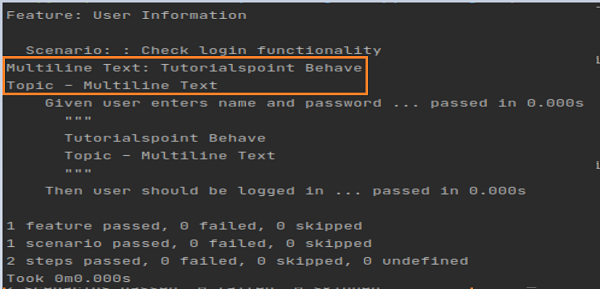
The output shows the multiline text printed.
Behave - Setup Table
A step can have a text and data table associated with it. We can add a data table with a step. It is recommended to have the table data indented and it is mandatory to have an equal column number for each line.
A column data should be separated by the | symbol.
Feature File with Table (Login.feature)
The feature file is as mentioned below −
Feature − User Information
Scenario − Check login functionality
   Given Collection of credentials
      | username |password |
      | user1    | pwd1    |
      | user2    | pwd2    |
   Then user should be logged in
A table is accessible to the implementation Python code with the .table attribute within the context variable (passed in the step function). A table is an instance of Table. We can use the set up table to facilitate setting up the test.
Python code
The python code to access table.(login_module.py) is as follows −
class Deprt(object):
   def __init__(self, username, ms=None):
      if not ms:
         ms = []
      self.username = username
      self.ms = ms
   def m_addition(self, usernane):
      assert usernane not in self.ms
      self.ms.append(usernane)
class LModel(object):
   def __init__(self):
      self.loginusrs = []f
      self.passwords = {}
   def usr_addition(self, username, password):
      assert username not in self.loginusrs
      if password not in self.passwords:
         self.passwords[password] = Deprt(password)
      self.passwords[password].m_addition(username)
Corresponding Step Implementation File(step_implg.py)
The file is as follows −
from behave import *
from features.steps.login_module import LModel
@given('Collection of credentials')
def step_impl(context):
   model = getattr(context, "model", None)
   if not model:
      context.model = LModel()
   #iterate rows of table
    for r in context.table:
      context.model.usr_addition(r["username"], password=r["password"])
@then('user should be logged in')
def step_impl(context):
   pass
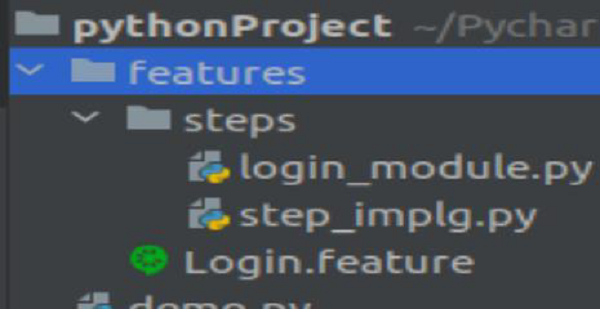
Project setup
The project set up for the file in Python project is as follows
Output
The output obtained after running the feature file is given below and the command used is behave --no-capture -f plain.
The output shows the step up table printed.
Behave - Steps in a Step
We can substitute multiple steps in a Scenario with one macro step. This helps us not to repeat the same code in the step definition file. A BDD framework has the capability to invoke multiple steps from the step definition.
Feature File with Similar Steps
The feature file with the similar steps is as follows −
Feature − Payment Module
   Scenario − Verify message after payment
      Given User is on payment screen
      When User enters payment details
      And User completes payment
      Then User should get success message
   Scenario − Verify new users can process payment
      Given User keys in payment info and submits
      Then success message should get displayed
In the feature file, we have two Scenario with similar steps. In Behave, we can execute more than one step in a single step. This can be done with the help of context.execute_steps method in the step implementation file.
Corresponding Step Implementation File
The corresponding step implementation file for the above mentioned feature file is as follows −
from behave import *
@given('User is on payment screen')
def is_on_payment_screen(context):
   print('User is on payment screen')
@when('User enters payment details')
def enters_payment_details(context):
   print('When User enters payment details')
@when('User completes payment')
def completes_payment(context):
   print('When User completes payment')
@then('User should get success message')
def get_success_message(context):
   print('Then User should get success message')
   @given('User keys in payment info and submits')
def payment_info_and_submits(context):
#passing steps within steps with context.execute_steps
   context.execute_steps(u"""
      Given User is on payment screen
      When User enters payment details
      And User completes payment
      """)
@then('success message should get displayed')
def success_message(context):
   print('Then success message should get displayed')
Output
The output obtained after running the feature file is given below and the command used is behave --no-capture -f plain.
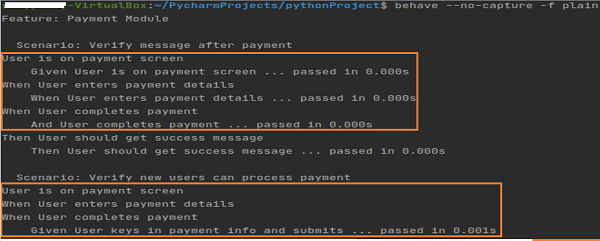
The continued output is as follows −

The output shows that the new users of Scenario Verify can process the payment by having the steps executed from the Scenario Verify new users can process payment.
Behave - Background
A Background is added to have a group of steps. It is close to a Scenario. We can add a context to multiple Scenarios with Background. It is run prior to every Scenario of a feature, but post the execution of before hooks.
Background is generally used for executing preconditions like login Scenarios or database connection, and so on.
A Background description can be added for the better human readability. It can appear only for a single time in a feature file and must be declared prior to a Scenario or Scenario Outline.
A Background should not be used to create a complex state (only if it cannot be avoided). This segment should be brief and authentic. Also, we should avoid having a large number of scenarios within one feature file.
Feature File with Background
The feature file with background for the feature titled payment process is as follows −
Feature − Payment Process
   Background:
      Given launch application
      Then Input credentials
   Scenario − Credit card transaction
      Given user is on credit card payment screen
      Then user should be able to complete credit card payment
   Scenario − Debit card transaction
      Given user is on debit card payment screen
      Then user should be able to complete debit card payment
Corresponding Step Implementation File
The file is given below −
from behave import *
@given('launch application')
def launch_application(context):
   print('launch application')
@then('Input credentials')
def input_credentials(context):
   print('Input credentials')
@given('user is on credit card payment screen')
def credit_card_pay(context):
   print('User is on credit card payment screen')
@then('user should be able to complete credit card payment')
def credit_card_pay_comp(context):
   print('user should be able to complete credit card pay')
@given('user is on debit card payment screen')
def debit_card_pay(context):
   print('User is on debit card payment screen')
@then('user should be able to complete debit card payment')
def debit_card_pay_comp(context):
   print('user should be able to complete debit card payment')
Output
The output obtained after running the feature file is mentioned below and the command used here is behave --no-capture -f plain.

The continued output is as follows −
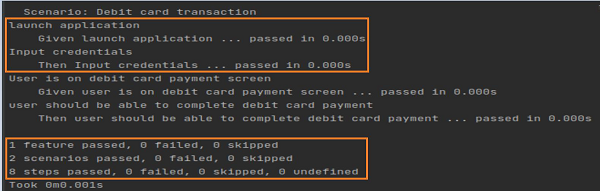
The output shows the Background steps (Given Launch applications & Then Input Credentials) running twice before each of the Scenarios.
Behave - Data Types
There are two types of Data Types in Behave, which are Predefined and User-defined. Let us first understand what are the predefined data types.
Pre-defined Data types
Behave utilises the parse module for the parsing parameters in the step definitions. Let us explore some of the parse types that have support for step definitions and do not need be registered like user-defined data types.
w (of str type) − Underscore & letters.
W (of str type) − Underscore & non-letters.
s (of str type) − Whitespace.
S (of str type) − Non - Whitespace.
d (of int type) − Digits.
D (of str type) − Non - Digits.
n (of int type) − Numbers having thousands separators.
% (of float type) − Percentage. (translated to value/100.0)
f (of float type) − Fixed − point numbers.
e (of float type) − Floating − point numbers along with exponent.
g (of float type) − Number format.
b (of int type) − Numbers in binary.
(of int type) − Numbers in octal.
x (of int type) − Numbers in hexadecimal.
ti (of datetime type) − Time in ISO 8601 date/time format.
te (of datetime type) − Time in RFC 2822 email data/time format.
tg (of datetime type) − Time in Global data/time format.
ta (of datetime type) − Time in US data/time format.
tc (of datetime type) − ctime() data/time format.
th (of datetime type) − Time in HTTP log data/time format.
tt (of time type)
In the step implementation, we shall pass the parameter: data type enclosed in "{}".
Feature File with % data type
The feature file with % data type is as follows −
Feature − Payment Process
   Scenario Outline: Credit card transaction
   Given user is on credit card payment screen
   When user makes a payment of "<p>" percent of total
   Examples: Amounts
      | p      |
      |80%     |
      |90%     |
Corresponding Step Implementation File
The file is as follows −
from behave import *
@given('user is on credit card payment screen')
def credit_card_pay(context):
   print('User is on credit card payment screen')
#passing parameter in % datatype enclosed in {}
@when('user makes a payment of "{p:%}" percent of total')
def step_impl(context, p):
   print('Number is: ')
   print(p)
Output
The output is obtained after running the feature file and the command used is behave --no-capture -f plain.
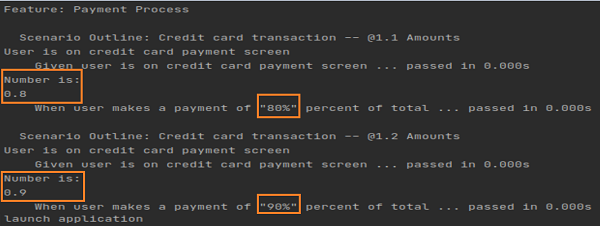
The continued output is as follows −

The output shows 0.8 and 0.9 which is obtained from the % data type to represent 80% and 90% values passed from the feature file.
User-defined Data types
Behave also has the user-defined data types. The method register_type is used to register a user defined type that can be parsed for any type conversion at the time of matching the step.
Feature File
The feature file for feature titled payment process is as follows −
Feature − Payment Process
   Scenario Outline: Credit card transaction
      Given user is on credit card payment screen
      When user makes a payment of "<amount>" of total
      Examples: Amounts
         |amount  |
         |75      |
         |85      |
In the step implementation, we shall pass the parameter: user-defined datatype enclosed in "{}". The method register_type is used to register a user defined type that can be parsed for any type conversion at the time of matching the step.
Corresponding Step Implementation File
The file is as follows −
from behave import *
from behave import register_type
#convert parsed text to float
def parse_percent(t):
   return float(t)
#register user-defined type
register_type(Float=parse_percent)
@given('user is on credit card payment screen')
def credit_card_pay(context):
   print('User is on credit card payment screen')
@when('user makes a payment of "{amount:Float}" of total')
def step_impl(context, amount):
   print('Number is: ')
   print(amount)
Output
The output is obtained after running the feature file and the command used is behave --no-capture -f plain.

The continued output is as follows −

The output shows 75.0 and 85.0 which have been converted to float values (with the help of user-defined conversion). These parameters are passed as the integer types from the feature file.
Behave - Tags
A section of a feature file can be tagged so that the Behave is capable of verifying only a certain section of the feature file. A Scenario, Feature, Scenario Outline can only be tagged.
Also, a tag which is used for a feature shall be inherited by all its Scenarios and the Scenario Outlines. Tags are placed before a Scenario or a Feature that we want to tag. We can also have multiple tags which are separated by spaces within a line.
A tag begins with @ and is followed by the tag name.
Feature File with tags (Payment.feature)
The feature file with tags is as follows −
@high
Feature − Payment Process
@creditpayment
            Scenario − Credit card transaction
   Given user is on credit card payment screen
   Then user should be able to complete credit card payment
@debitpayment
            Scenario − Debit card transaction
   Given user is on debit card payment screen
   Then user should be able to complete debit card payment
Tags help to manage the test execution by excluding/including the specific scenarios or features depending on the tag.
In the above example, to run a specific scenario with tag creditpayment, we have to run the below mentioned command −
behave payment.feature --tags=creditpayment
To run the feature with tag high and execute all the Scenarios, we have to run the following command −
behave payment.feature --tags=high
If run the command stated below, it means that the command shall execute the Scenarios which are tagged with creditpayment or debitpayment.
behave payment.feature --tags= creditpayment, debitpayment
If run the command given below, it means that the command shall execute both the Scenarios which are tagged with creditpayment and debitpayment.
behave payment.feature --tags= creditpayment --tags=debitpayment
If run the command mentioned below, it means that the command shall not execute the Scenario which is tagged with creditpayment.
behave payment.feature --tags= ~ creditpayment
Hence, the Feature File with tags(Payment.feature) will now be as follows −
@high
Feature − Payment Process
@creditpayment @payment
   Scenario − Credit card transaction
      Given user is on credit card payment screen
@debitpayment @payment
      Scenario − Debit card transaction
      Given user is on debit card payment screen
   Scenario − Cheque transaction
      Given user is on cheque payment screen
Corresponding Step Implementation File
The file is as follows −
from behave import *
@given('user is on credit card payment screen')
def credit_card_pay(context):
   print('User is on credit card payment screen')
@given('user is on debit card payment screen')
def debit_card_pay(context):
   print('user is on debit card payment screen')
@given('user is on cheque payment screen')
def cheque_pay(context):
   print('user is on cheque payment screen')
Output
The output obtained after running the feature file is mentioned below. Here, we have used the command behave --no-capture Payment.feature --tags=payment.
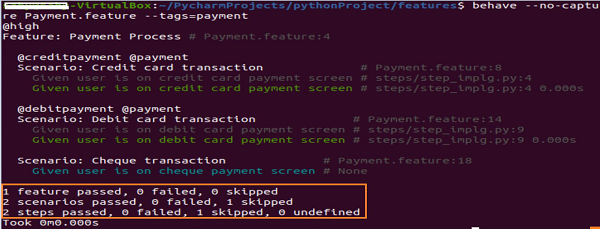
The output shows two scenarios passed, as there are two Scenarios in the features file having Scenario tag with payment.
When we use the command behave --no-capture Payment.feature --tags=~creditpayment, the output is as follows −
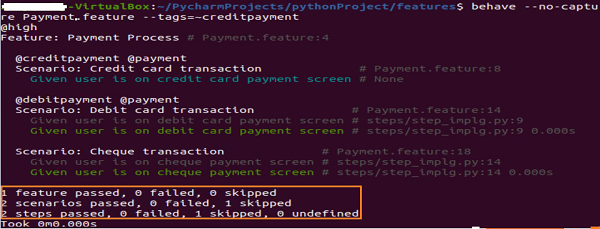
The output shows two scenarios passed, as there are two Scenarios in the features file not having Scenario tag with creditpayment.
When we use the command behave --no-capture Payment.feature --tags=high, the output is given below −
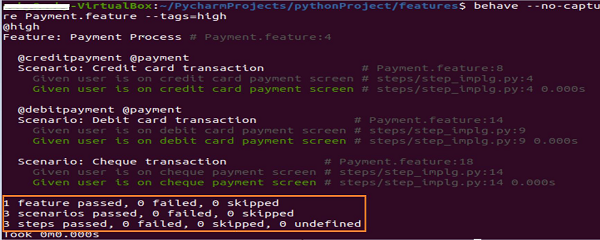
The output shows three scenarios passed, as there are three Scenarios in the features file not having features tagged with high.
Use the command behave --no-capture Payment.feature --tags=payment,creditpayment to get the below mentioned output −
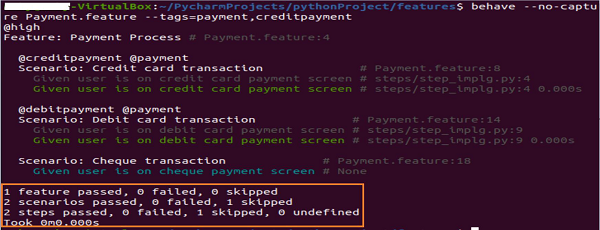
The output shows two scenarios passed, as there are two Scenarios in the features file not having Scenario tagged with payment or creditpayment.
Behave - Enumeration
Enumeration is used to map the multiple distinctive string based words to the values.
We may require a user-defined data type having the following characteristics −
A handful of words must be matched.
Pre-defined values prior to the test execution.
For the above scenarios, enumeration based on string can be used.
Feature File
Consider a feature file for the Feature titled payment process, as mentioned below −
Feature − Payment Process
Scenario − Response
      When User asks "Is payment done?"
      Then response is "No"
In the step implementation file, TypeBuilder.make_enum function evaluates a regular expression pattern for the provided enumeration of words or strings. The method register_type is used to register a user defined type that can be parsed for any type conversion at the time of matching the step.
Also, we shall pass the parameter: user-defined enum datatype enclosed in "{}".
Corresponding Step Implementation File
The step implementation file for the above Feature is as follows −
from behave import *
from behave import register_type
from parse_type import TypeBuilder
# -- ENUM: Yields True (for "yes"), False (for "no")
parse_response = TypeBuilder.make_enum({"yes": True, "no": False})
register_type(Response=parse_response)
@when('User asks "{q}"')
def step_question(context, q):
   print("Question is: ")
   print(q)
@then('response is "{a:Response}"')
def step_answer(context, a):
   print("Answer is: ")
   print(a)
Output
The output obtained after running the feature file is mentioned below. Here, we have used the command behave --no-capture -f plain.
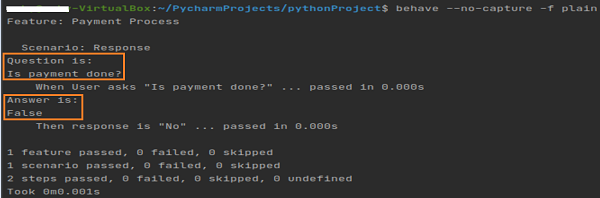
The output shows Is payment done? and False. The output False comes from the enumeration data type.
Behave - Step Matchers
There are three types of Step Matchers in Behave. They are explained below −
ParseMatcher (parse) − Based on the parse module.
extended ParseMatcher(cfparse) − Allows cardinality syntax.
RegexMatcher (re) − Based on regular expressions for matching patterns.
Parse matcher
It is the in-built step matcher which has the below mentioned features:
Simple to use and comprehend.
Predefined and user-defined data types support this matcher.
Re-utilises regular expressions with the help of data types.
Conceals the complexity of regular expression.
extended Parse matcher
It extends the Parse Matcher. It has additional features along with the features of Parse matcher.
The additional features include −
Comprehends the cardinality field syntax.
Generates missing type converters for the fields with cardinality field parts.
Built on parse-type.
Regex matcher
It has the below features −
Backward compatible to Cucumber.
Easier to use compared to a parse matcher.
Let us understand the parse matchers in detail.
Parse Matchers
There are maybe steps in the feature file having almost similar phrases. Behave has the parsing ability. The method use_step_parser is used for this and we have to pass the parser type as a parameter to that method.
For parse matchers, we have to pass the parameter parse. It utilises the parse for regular expressions parsing and matching.
Feature File (almost Given similar steps)
The feature file for the similar steps is as follows −
Feature − Payment Process
Scenario − Check Debit transactions
      Given user is on "debit" screen
      When user makes a payment
Scenario − Check Credit transactions
      Given user is on "credit" screen
Corresponding Step Implementation File
The step implementation file is as follows −
from behave import *
#define parser type
use_step_matcher("parse")
@given('user is on "{p}" screen')
def step_impl(context, p):
   print(p)
@when('user makes a payment')
def step_pay_complete(context):
   pass
Output
The output obtained after running the feature file is mentioned below. Here, we have used the command behave --no-capture -f plain.
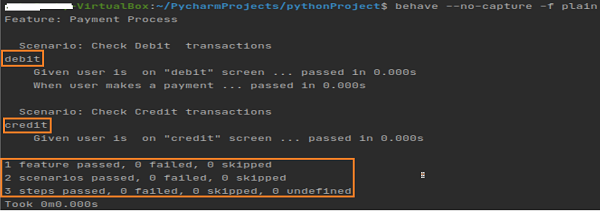
The output shows debit and credit. These two values have been passed with almost similar Given steps in the feature file. In step implementation, we have parsed both the steps.
Behave - Regular Expressions
Let us have an overall view of the syntax of regular expressions −
Dot (.) − Equivalent to any character.
Caret (^) − Equivalent to beginning of string. (^…)
Dollar Sign ($) − Equivalent to end of string. (…$)
| − Expression x| y, matches x or y.
\ − Escape character.
\. − Matches dot. (.)
\\ − Matches backslash. (\)
[…] − Declares a set of characters. ([A-Za-z])
\d − Matches digit. ([0-9])
\D − Matches non-digit.
\s − Matches whitespace character.
\S − Matches non - whitespace character.
\w − Matches alphanumeric.
\W − Matches non-alphanumeric.
(…) − Group a pattern of regular expression.
\number − Matches text of previous group by index. (\1)
(? P<name>…) − Matches pattern and stores it in the name parameter.
(?P=name) − Matches all text which was matched by the previous group name.
(?:…) − Matches a pattern, however cannot capture text.
(?#...) − Comment (not considered). Narrates details of pattern.
In case a character, character set or group needs to repeat multiple times, it is mandatory to provide the cardinality of the pattern of regular expression.
? : Pattern having cardinality 0... 1:not mandatory(question mark)
- : Pattern having cardinality 0 or more, 0..( asterisk)
+ - : Pattern having cardinality 1 or more, 1..(plus)
{n}: Matches a pattern for n repetitions.
{a ,b}: Matches from a to b for a pattern repetitions.
[A-Za-z]+ : Matches multiple alphabetical characters.
There are maybe steps in the feature file having almost the similar phrases. Behave has the parsing ability. The method use_step_parser is used for this and we have to pass the parser type as a parameter to that method.
For regular expression matchers, we have to pass the parameter re. The parameter (? P<name>...) is utilised to obtain parameters from the step definition.
Feature File (almost similar steps)
The feature file for similar steps is as follows −
Feature − Payment Process
Scenario − Check Debit transactions
      Given user is on "debit" screen
   Scenario − Check Credit transactions
      Given user is on "credit" screen
Corresponding Step Implementation File
The step implementation file is as follows −
from behave import *
#define parser type
use_step_matcher("re")
#regular expression parsing
@given('user is on "(?P<payment>.*)" screen')
def step_impl(context, payment):
   print("Screen type: ")
   print(payment)
Output
The output obtained after running the feature file is as follows. Here, we have used the command behave --no-capture -f plain.
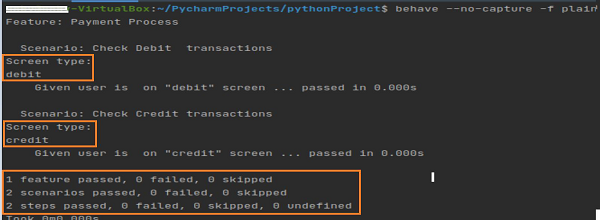
The output shows the debit and credit. These two values have been passed with almost the similar steps in the feature file. In step implementation, we have parsed both the steps with regular expression.
Behave - Optional Part
There are maybe steps in the feature file having almost similar phrases. Behave has the parsing ability so that one step definition can cover these steps. The method use_step_parser is used for this and we have to pass the parser type as a parameter to that method.
For extended parse matchers, we have to pass the parameter cfparse. It has the Cardinality Field (CF) support. By default, it generates the missing type converters for connected cardinality (if type converter for cardinality equal to one is given).
It can support the below parse expressions −
{values:Type+} – Cardinality=1..N, many
{values:Type*} – Cardinality=0..N, many0
{values:Type?} – Cardinality=0..1, optional
Feature File (almost similar steps)
The feature file with almost similar steps is as follows −
Feature − Payment Process
Scenario − Check Debit transactions
      Given user is on "debit" screen
   Scenario − Check Credit transactions
      Given user is on "credit" screen
The method register_type is used to register a user defined type that can be parsed for any type conversion at the time of matching the step.
Corresponding Step Implementation File
The step implementation file is given below −
from behave import *
import parse
#define parse type
use_step_matcher("cfparse")
# for whitespace characters
@parse.with_pattern(r"x\s+")
def parse_string(s):
#type converter for "x" succeeded by single/multiple spaces
   return s.strip()
#register user-defined datatype
register_type(x_=parse_string)
#optional part :x_? cardinality field in parse expression
@given('user is on {:x_?}{payment} screen')
def step_payment(context, x_, payment):
   print("Payment type: ")
   print(payment)
Output
The output obtained after running the feature file is given below and the command used is behave --no-capture -f plain.
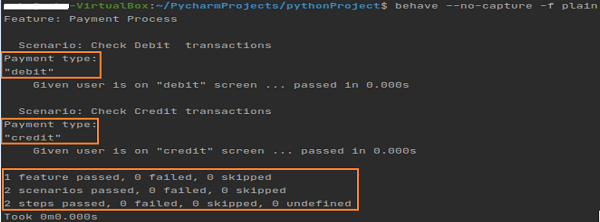
The output shows the debit and credit. These two values have been passed with almost similar steps in the feature file. In step implementation, we have parsed both the steps with cardinality fields within parse expression.
Behave - Multi-Methods
There are maybe steps in the feature file having almost similar phrases. For instance,
Given user makes payment of 100 INR
And user makes payment of 10 Dollar
Here, we can have different step definitions to differentiate the INR and Dollar. For this, we can use the multi-method approach, where it is mandatory to have varied regular expressions for the dissimilar data types.
Feature File (almost similar steps)
Consider the feature file as given below −
Feature − Multi-Methods
   Scenario − Purchase
      Given User is on shop
      When user purchases 3 shirts
      And user purchases 4 pants
In the step implementation file, TypeBuilder.make_choice function evaluates a regular expression pattern for the provided choices. The method register_type is used to register a user defined type that can be parsed for any type conversion at the time of matching the step.
Also, we shall pass the parameter: user-defined datatype enclosed in "{}".
Corresponding Step Implementation File
The step implementation file is as follows −
from behave import *
from behave import register_type
from parse_type import TypeBuilder
parse_dress = TypeBuilder.make_choice(["shirts", "t-shirts"])
#register user-defined datatype
register_type(Dress=parse_dress)
parse_pant = TypeBuilder.make_choice(["pants", "gowns"])
#register user-defined datatype
register_type(Pant=parse_pant)
@given("User is on shop")
def step_user_shop(context):
      pass
# multiple methods being used .
@when(u"user purchases {count:n} {d:Dress}")
def step_dress(context, count, d):
      print("User purchased: ")
      print(d)
      print("Count is:")
      print(count)
@when(u"user purchases {count:n} {p:Pant}")
def step_pant(context, count, p):
      print("User purchased: ")
      print(p)
      print("Count is:")
      print(count)
Output
The output obtained after running the feature file is given below and the command used is behave --no-capture -f plain.
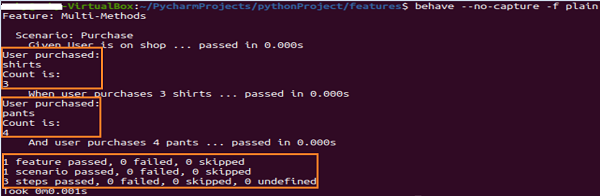
The output shows the purchase items and their counts. These two values have been passed with almost similar steps (but dissimilar data types) in the feature file. In step implementation, we have used multiple methods to obtain the values.
Behave - Step Functions
Step functions are created in the Python files which exist within the steps directory. Every Python file (having extension as .py) inside that directory gets imported to get the step implementations.
Once the feature files get triggered for execution, the implementation files get loaded. The step functions are associated with the step decorators.
The step implementations must begin with the import, by using the command mentioned below −
from behave import *
This will import multiple decorators described in Behave to help us to locate our step functions. The decorators like the given, when, then, and so on accepts one string argument.
For example, consider the code given herewith −
@given('user is on admin screen')
def step_impl(context):
      pass
The above code shall match the Given step of the below feature file, which is as follows −
Feature − Admin Module
Scenario − Admin verification
      Given user is on admin screen
The steps starting with And/But in the feature file are renamed to their earlier step keyword.
For example, consider the feature file given below −
Feature − Admin Module
Scenario − Admin verification
      Given user is on admin screen
       And user is on history screen
       Then user should be able to see admin name
         But user should not able to check history
The And step shall be renamed to the Given step and the But step shall be renamed to the earlier step keyword. All these are handled internally.
If there are more than one And/But steps consecutively, they would inherit the keyword of non And or But keyword.
The step function having the step decorator shall have a minimum one parameter. The first parameter is known as the context variable. Other parameters come from step parameters (if required).
For example, refer the step function as per the step parameter.
@given('user is on admin screen')
def step_impl(context):
      pass
Project Structure
The project structure for the feature is as follows −
Behave - Step Parameters
We can have parameters within the step names. These parameters can be taken care of by the regular expressions or by the default or extended parser with the help of the use_step_matcher method.
behave.use_step_matcher(name)
Modify the parameter matcher in parsing the step text. There are multiple in-built parsers present in Behave, as explained below −
parse − It gives an easy parser that restores regular expression for the step parameters with plain syntax. For example, {parameter: type}. It allows type conversion with type converters.
cfparse − It has the Cardinality Field (CF) support. By default, it generates the missing type converters for connected cardinality (if type converter for cardinality equal to one is given). It can support the below parse expressions −
{values:Type+} – Cardinality=1..N, many
{values:Type*} – Cardinality=0..N, many0
{values:Type?} – Cardinality=0..1, optional
It allows type conversion with type converters.
re − It utilises the complete regular expressions to parse the clause. We have to take the help of the named groups (? P<name>…) to declare variables obtained from the text and then feed it to the step ().
We can have our customised matcher along with new data types with the help of the register_type method.
behave.register_type(w)
Registers a user defined type for parsing during type conversion at the time of step matching.
class behave.matchers.Matcher(func, pattern ,step_type=None)
It extracts the parameters out of step names.
pattern − The pattern matching associated with the step function.
func − The step function is the pattern is associated with.
check_match(step) − To match with the step name provided.
describe(schema=None) − Give description in form of text of the function or matcher object.
regex_pattern: Yields the utilised textual regex expression.
class behave.model_core.Argument(start, end, original, value, name=Name)
An argument for a step name in the feature file obtained with step decorator parameters.
The attributes are as follows −
original − The original text which is matched in the name of the step.
value − The value of the argument which is type converted.
name − The argument name. The value is set to None, if the parameter is not given.
start − The starting index of the argument in step name.
end − The ending index of the argument in step name.
class behave.matchers.Match(func, arguments=None)
A step in the feature file which is parameter-matched and obtained with step decorator parameters.
The attributes are as follows −
func − The step function which is applicable to the given match.
arguments − The argument list the instances having the matched parameter obtained from the name of the step.
Behave - Runner Script
We can run a Behave test, by running the command line arguments, or we can create a runner script. This script gives the provision of running the test and generating the corresponding report.
We can do a re-try and execute the failed test. Also, before executing the entire suite, the runner script is capable of making an application programming interface (API) call and ensuring that there are no issues with the API.
Steps for Runner Script
Follow the steps given below to create and execute a runner script successfully in Behave.
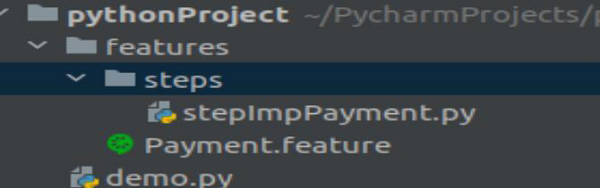
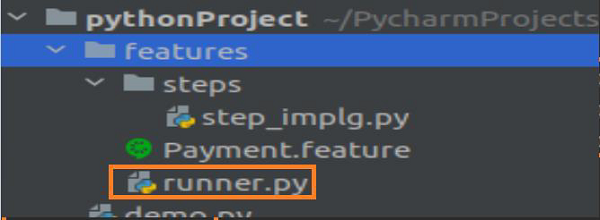
Step 1 − Create a runner script (runner.py) within the features folder.
The following screen will appear on your computer −
Step 2 − Runner Script Implementation to run tests
The runner script can be implemented to run the tests by using the below mentioned code −
import subprocess
if __name__ == '__main__':
#command line args along with error capture on failure with check true
      s = subprocess.run('behave --no-capture',shell=True, check=True)
Step 3 − Execute the runner script
Execute runner.py file with command python3 runner.py (if Python version is 3). The following screen will appear on your computer:

Step 4 − Parametrise runner script by passing command line arguments.
The runner script implementation to run tests can be done as follows −
import argparse
import subprocess
if __name__ == '__main__':
   p = argparse.ArgumentParser()
  #--testdir command line argument added
   p.add_argument('--testdir', required=False, help="File path")
   a = p.parse_args()
   testdir = a.testdir
   #complete command
   c= f'behave --no-capture {testdir}'
   s = subprocess.run(c, shell=True, check=True)
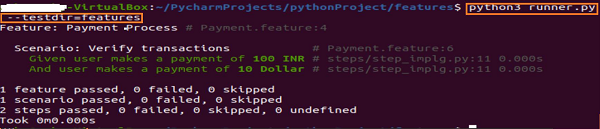
Step 5 − Execute the runner script
Execute runner.py file with command python3 runner.py --testdir=features.
Behave - Exclude Tests
We can exclude the executing files by its filename from execution.
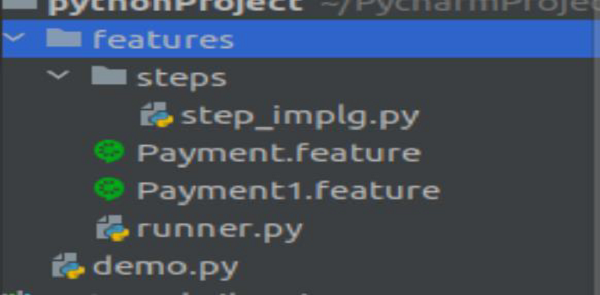
Suppose, we have more than one feature file within the features folder. The following screen can be seen on the computer −
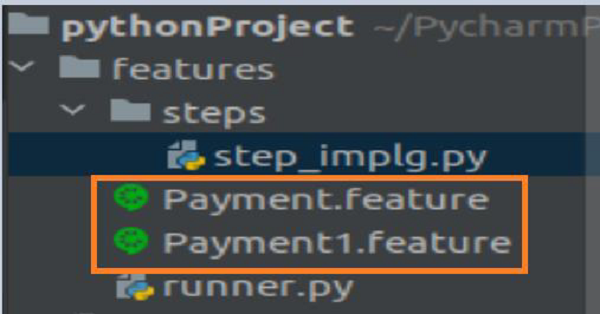
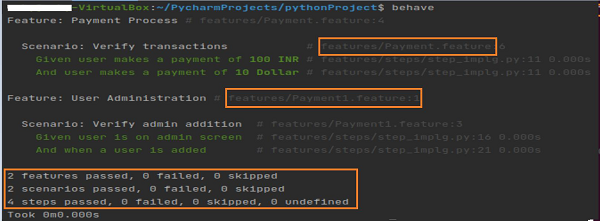
On executing the command behave, the output will be as follows −
If we have to only run the feature file Payment.feature and exclude Payment1.feature, we have to pass the command line argument --e or --exclude followed by pattern of the regular expression.
On executing the command behave --exclude *1.feature, the output is as follows −
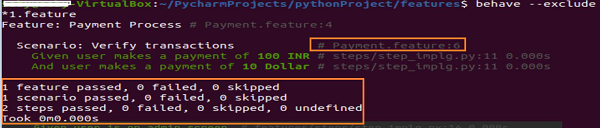
The output shows one feature passed along with the Payment.feature file name. Also, Payment1.feature is not included in the run.
Behave - Retry Mechanism
We can rerun failed Scenarios in the feature file in Behave. This is taken care with the help of the formatters.
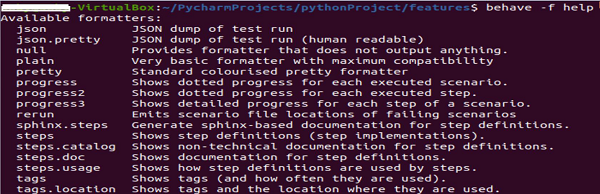
All the available formatters in Behave can be seen with the command given below −
behave –f help
You can see the following screen after using the command −
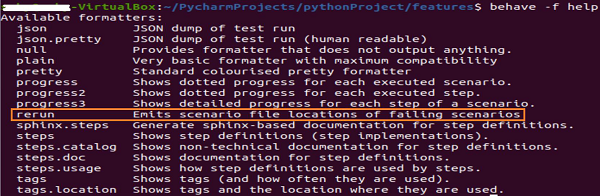
The rerun formatter is used to capture the failing scenario and output it in a separate file. Let us take an example, where we have 1 failed feature.

Then capture the failed feature in another feature file with the command −
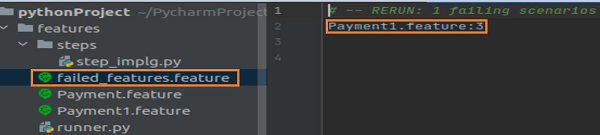
behave –f rerun –o failed_features.feature
You can see the following −

The failed_features.feature file gets generated within the project. It contains the feature file name Payment1.feature where we have a failure.
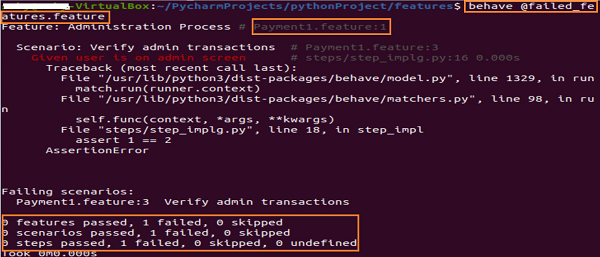
To re-trigger only failed Scenario, we have to run the command stated below −
behave @failed_features.feature
You will see the following screen −
Behave - Reports
Report generation is one of the most important steps towards the test automation framework. At the end of the execution, we cannot rely on the console output rather we should have a detailed report.
It should have the information on the count of tests that passed, failed, skipped, feature and scenario breakdown. Behave does not produce an in-built report but it can output in multiple formats and we can utilize the third-party tools to generate a report.
All the available formatters in Behave are displayed with the command −
behave --format help
When you use the command, the following screen will appear on your computer −
Some of the common Behave reports are −
Allure Report.
Output JSON Report.
JUnit Report
JUnit Report
Let us execute a test having two feature files with the below test results −

Project folder structure for the above test will be as follows −
Step 1 − Execute the command
To create a JUnit report, run the command given below −
behave --junit
Step 2 − Report folder generation
A folder called as the reports gets generated within the project, having the name TESTS-<feature file name>.xml.
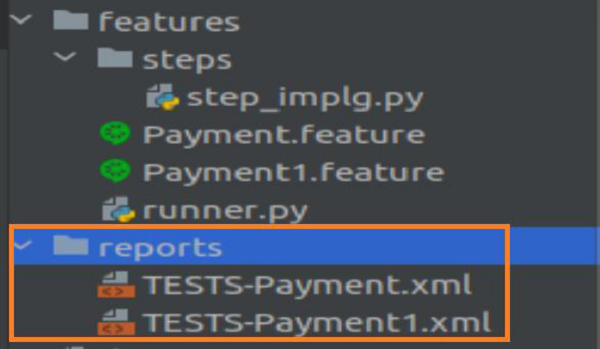
Here, Payment and Payment1 are the names of the feature files.
Step 3 − Report generation to a specific folder
To generate the reports to a specific folder, say my_reports. We have to run the below mentioned command −
behave --junit --junit-directory my_reports
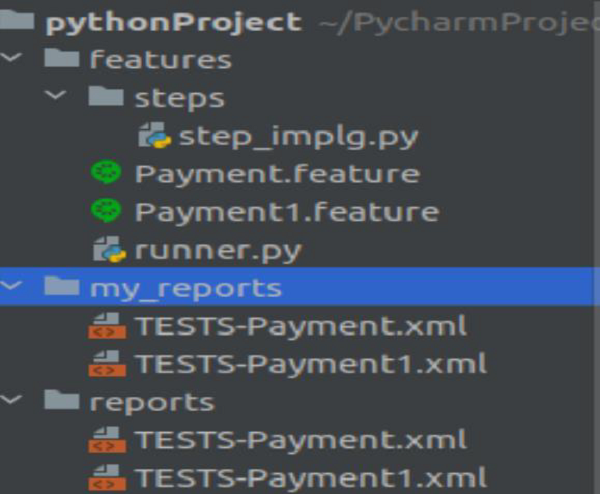
A folder called the my_reports gets generated within the project which contains the reports.
JSON Report
We can create the Behave JSON report. The JSON is actually a formatter.
Let us execute a test having two feature files with the below test results −

Project folder structure for the above test is as follows −

Step 1 − Execute the command
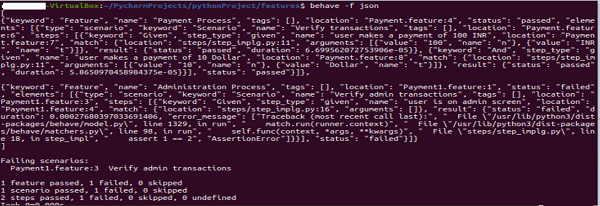
To create a JSON output in console, run the command −
behave -f json
The following screen will appear −
Step 2 − Output in readable format
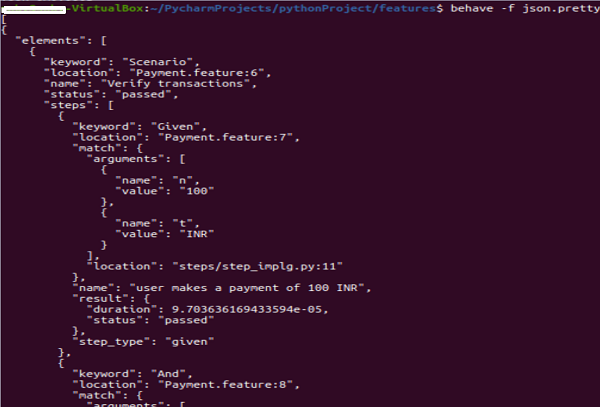
To create a JSON output in a more readable format, run the following command −
behave -f json.pretty
Some portion of the output captured in the below image −
Step 3 − Report generation to a specific folder
To generate the reports to a specific folder say, my_reports.json, we have to run the following command −
behave –f json.pretty –o my_reports.json
The following image represents the screen that will appear on your computer.
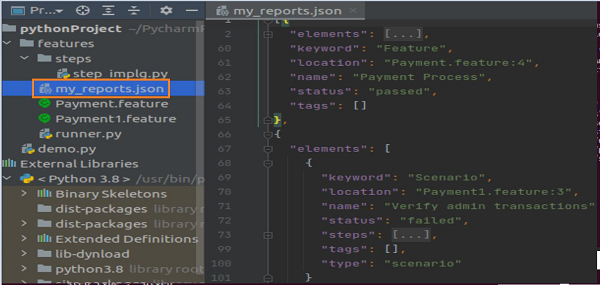
A folder called the my_reports.json gets generated within the project, having details of all the features which are executed.
Allure Report
To generate Allure reports in Behave, first we have to install Allure in the system. For installation from the command line in Linux, run the following commands one after the other −
sudo apt-add-repository ppa:qameta/allure
sudo apt-get update
sudo apt-get install allure
For Mac users, installation is done with the Homebrew with the following command −
brew install allure
For Windows, Allure is installed from the Scoop installer. Run the below command to download and install Scoop and finally, execute it in the PowerShell −
scoop install allure
To update Allure distribution installations from Scoop, run the below command from the installation directory of Scoop −
\bin\checkver.ps1 allure -u
Finally, run the command given below −
scoop update allure
After Allure has been installed, we have to get the Allure-Behave integration plugin for Python. For this, run the following command −
pip install allure-behave
To verify if Allure has been installed successfully, run the command stated below −
allure
Let us execute a test having two feature files with the below test results −

Project folder structure for the above test is as follows −

Step 1 − Report generation to a specific folder
To generate the reports to a specific folder, say my_allure, we have to run the following command −
behave -f allure_behave.formatter:AllureFormatter –o my_allure
You will get the screen as shown below −
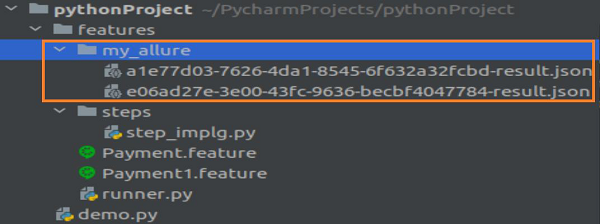
A folder called the my_allure gets generated within the project, having files with .json extension.
Step 2 − Start the web server
To start the web server, run the command given below −
allure serve my_allure
Here, the my_allure is the directory which contains the allure json files.

Simultaneously, a browser gets opened, with the Allure report as shown below −
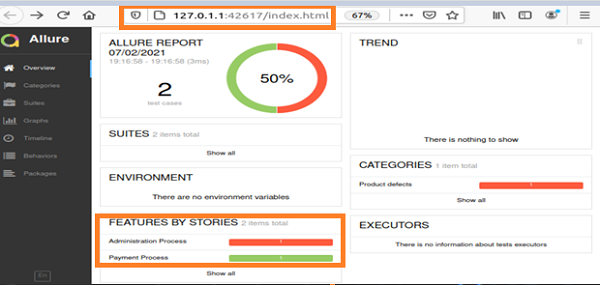
We can also click on individual features and find their breakdowns, as shown below −
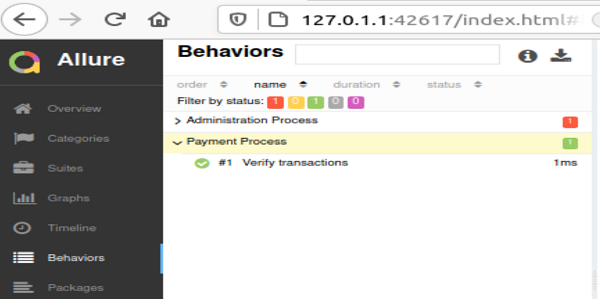
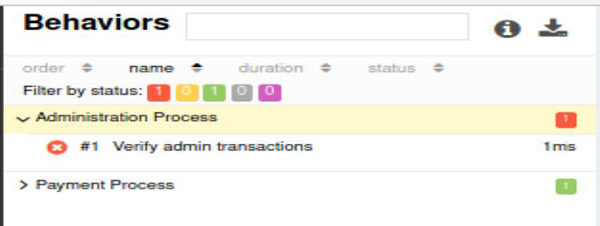
Behave - Hooks
Behave setup and teardown functions are implemented in a file called the environment.py which is within the same directory that contains the steps folder. The setup functions include – browser open, database connection, configurations, and so on.
The teardown functions include browser closure, database connection termination, reversing changes, and so on.
The environment.py file contains the following functions −
before_feature(context, feature) − Executes prior every feature.
before_scenario(context, scenario) − Executes prior every scenario.
before_step(context, step) − Executes prior every step.
before_tag(context, tag) − Executes prior every tag.
before_all(context) − Executes prior everything.
after_feature(context, feature) − Executes post every feature.
after_scenario(context, scenario) − Executes post every scenario.
after_step(context, step) − Executes post every step.
after_tag(context, tag) − Executes post every tag.
after_all(context) − Executes post everything.
The above functions are used as hooks in Behave. Project structure should be as follows −
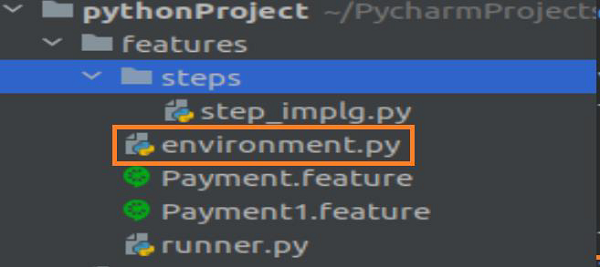
Feature File with hooks (Payment.feature)
The feature file with hooks for Payment.feature is as follows −
Feature − Payment Process
Scenario − Verify transactions
         Given user makes a payment of 100 INR And user makes a payment of 10 Dollar
Feature File with hooks (Payment1.feature)
Given below is the feature file with hooks for Payment1.feature −
Feature − Administration Process
Scenario − Verify admin transactions
         Given user is on admin screen
Corresponding step Implementation File
The step implementation file is as follows −
from behave import *
from parse_type import TypeBuilder
parse_amt = TypeBuilder.make_choice(["100", "10"])
register_type(Amt=parse_amt)
parse_curr = TypeBuilder.make_choice(["INR", "Dollar"])
register_type(Curn=parse_curr)
@given("user makes a payment of {n:Amt} {t:Curn}")
def step_payment(context, n, t):
   pass
@given('user is on admin screen')
def step_admin(context):
   pass
Step 4 − Hooks in environment.py file
The hooks in environment.py file are as follows:
# before all
def before_all(context):
   print('Before all executed')
# before every scenario
def before_scenario(scenario, context):
   print('Before scenario executed')
# after every feature
def after_feature(scenario, context):
   print('After feature executed')
# after all
def after_all(context):
   print('After all executed')
Output
The output obtained after running the feature files is as follows −
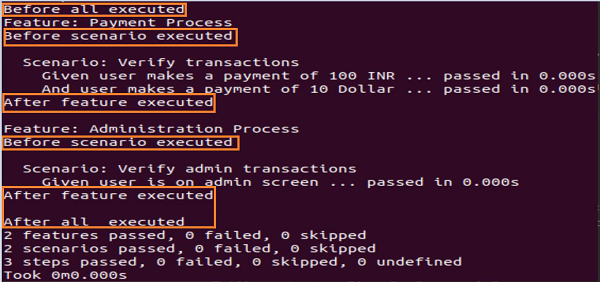
Behave - Debugging
Behave scripts can be debugged by dry running the test steps. The dry run helps to go over all the test steps without actually running it. It helps to determine the un-defined steps in the step definition file.
It verifies if there are any missing import statements, syntax errors, and so on. All these issues get detected in a quick time by dry run. If we are doing mass updates or any configuration changes, dry running helps to detect any errors in a short time.
If we would have to run an entire suite for debugging, that would be time consuming. In Behave, we can do a debug by dry run with the help of the below mentioned command −
behave --no-capture --dry-run
You will get the screen as shown below −

The output shows 3 untested which shows the count of the test steps.
Let us dry run feature files having unimplemented steps, as shown below −
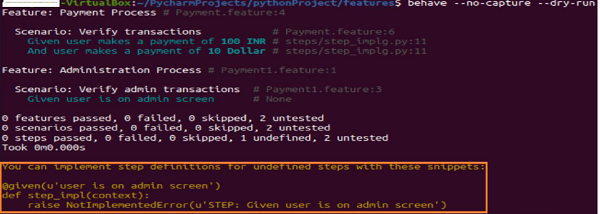
The output clearly defines the un-defined steps in the step definition file obtained by dry run.