- AWS ElastiCache Tutorial
- Home
- Overview
- Environment
- Interfaces
- Launching Cluster
- Viewing Cluster Details
- Cluster Endpoints
- Accessing Cluster
- Modifying Cluster
- Rebooting Cluster
- Adding Nodes
- Removing Nodes
- Scaling the Clusters
- Delete Cluster
- Redis Shards
- Parameter Group
- Listing Parameters
- Deleting Parameters
- Engine Parameters
- Backup and Restore
- Monitoring Node - Metrics
- Memcached & Redis
- Accessing Memcached Cluster
- Lazy Loading
- Write Through
- Add TTL
- Memcached VPC
- Creating Memcached Cluster
- Connecting to Cluster in VPC
- Delete Memcached Cluster
- IAM policies
- SNS Notifications
- Events
- Managing Tags
- Managing Costs
- AWS ElastiCache - Resources
- Quick Guide
- Useful Resources
- Discussion
AWS ElastiCache - Quick Guide
AWS ElastiCache - Overview
ElastiCache is a distributed cache environment for providing faster access to data by using cloud-based caching. Querying for data directly from databases or through remote API calls is much slower than querying the data from cache. AWS provides ElastiCache service which has high performance, scalability and cost-effectiveness. It removes the complexities associated with managing a distributed cache.
Use Cases for ElastiCache
Below are some of the use cases which leverage ElastiCache for fastness in querying in a cost-effective manner.
Real−time analytics −When customers do online shopping, the recommendation of products have to generated instantly when the customer is still browsing the catalogue. This needs the existing products already chosen by the customer to be stored in the cache and analysed in real time for recommending the next set of products.
Message Management −When the message is sent to subscribers through some channels, there is always a flux of some subscribers cancelling their subscription and some other joining the specific channel. Without caching mechanism there is a chance of messages getting missed or misplaced due to delay. So ElastiCache helps in maintain the subscription status current and accurate.
Leader boards −In the gaming industry there is a constant update on the points scored by the gamers and their position in the leader board. This needs continuous update and caching is very much needed here to be able to display the changing leadership positions continuously.
ElastiCache Content
Everything can not be and need not be cached. So, the various factors that influence what kind of content need to be cached are discussed below.
Database content − Those content which are fetched after a complex and expensive query processing are definitely a candidate for caching. It reduces latency by avoiding repetition of query processing and brings down the cost of database disk read/write.
Frequently accessed data − Even when there is a type of data that does not involve expensive query, it may need caching if it is more frequently accessed that other chunks of data.
Access Pattern − If the data changes too frequently, then it is not useful for caching. So, we need to look for the ways where the accessed data is relatively static but frequently needed by user.
Tolerance for Staleness − Once cached, the data starts becoming stale until it is read again. In such scenarios, if the application needing the data has low tolerance for stale data then caching does not help. For example, when you are buying a stock, the price needs to be accurate at the moment hence no caching needed. But yesterday’s closing stock price which will be frequently referred for today’s calculation is static and needs to be cached.
Components of ElastiCache
The ElastiCache provisioned by AWS has the following important components. We will see their configuration and use in the subsequent chapters.
Node − A node is a fixed-size chunk of secure, network−attached RAM. Each cache node has its own Domain Name Service (DNS) name and port.
ElastiCache for Redis Shards − It is a group of one to six related nodes. A cluster can have one to 90 shards.
ElastiCache for Redis Clusters − A Redis cluster is a logical grouping of one or more ElastiCache for Redis Shards. Data is partitioned across the shards in a Redis (cluster mode enabled) cluster.
ElastiCache for Redis Endpoints − It is a unique address your application uses to connect to an ElastiCache node or cluster.
Features of ElastiCache
The various features of ElastiCache helps us to plan for the proper configuration and cost estimation. The important features are as below.
ElastiCache for Redis Replication − Replication is implemented by grouping from two to six nodes in a shard. One of these nodes is the read/write primary node. All the other nodes are read-only replica nodes.
Regions and Availability Zones − The cache can be built and used in any locations that meet your business requirements. The AWS ElastiCache service is available in multiple AWS regions worldwide.
ElastiCache Parameter Groups − An ElastiCache parameter group is a named collection of engine-specific parameters that you can apply to a cluster. They are used to control memory usage, eviction policies and item sizes etc.
ElastiCache for Redis Security −You can control the Amazon EC2 instances that can access your cluster by using subnet groups or security groups.
AWS ElastiCache - Environment
For using any Aws service, you ned to set up an AWS account. We assume you have set up the AWS account by following the guide lines mentioned in the Amazon Web Services aws home page. Below are the preliminary steps to access the RDS services from the console.
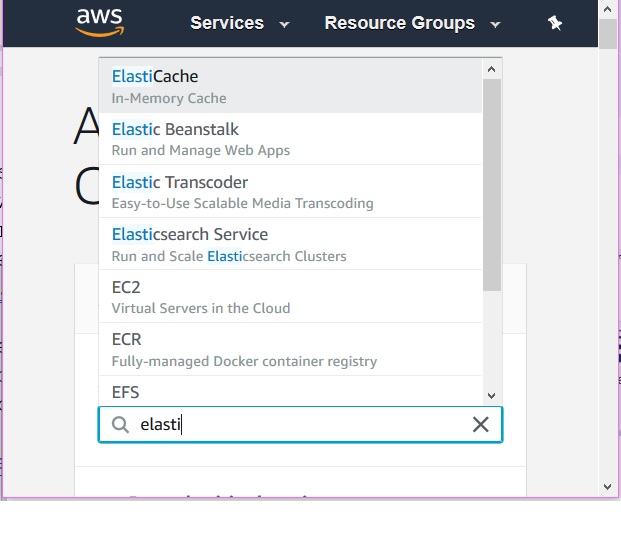
Step-1
After logging in to the amazon console, to access the ElastiCache services we need to navigate to the Amazon ElastiCache home page by searching for ElastiCache in the search box of under the services tag as shown in the diagram below.
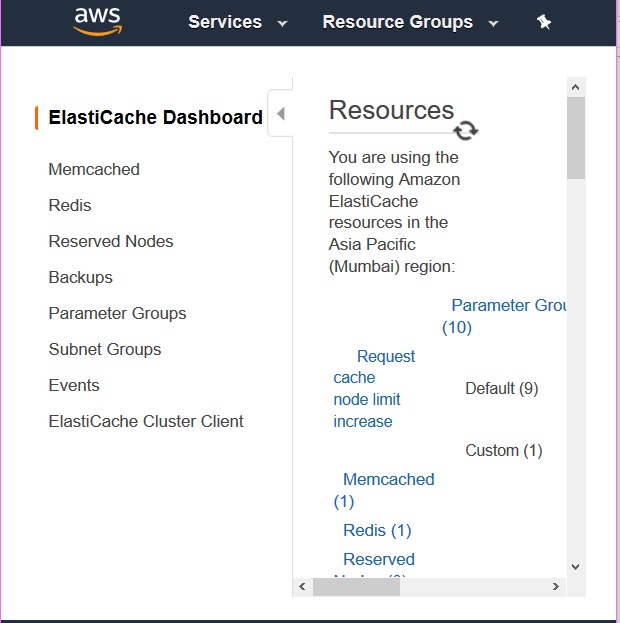
Step-2
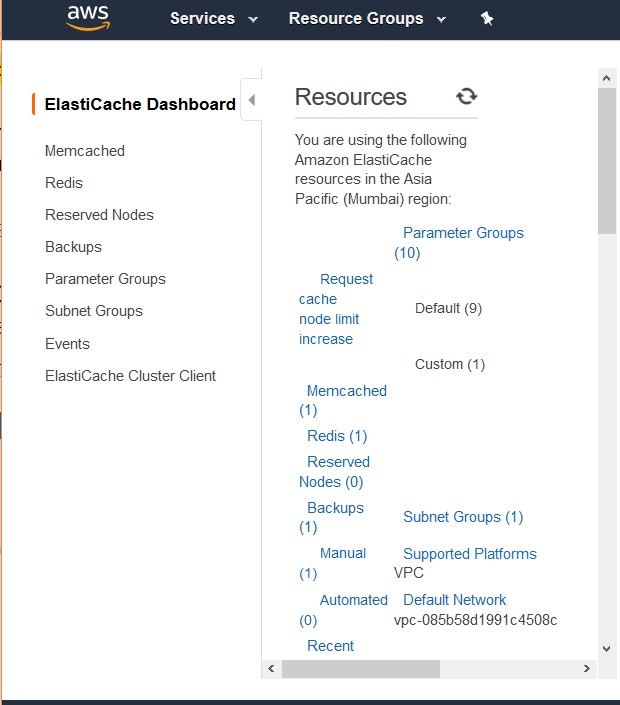
On clicking the link above we get the Amazon ElastiCache home page. If it is the first time ever you are accessing ElastiCache services, then it will show you a screen showing the ElastiCache home page. But in case you have already created some ElastiCache resources a summary of that will be available by scrolling down in the above page. A screen shot is shown below.
Step-3
The next screen gives us an option to select the cache engine we need and that is the start of our configuration steps for the cache service we need.
In the next chapter we will see the details on each of these ElastiCache engine’s configuration and usage one by one.
Step-4
We also need to assign a appropriate policy to give permission to the user to use ElastiCache service. We need to attach the AWS-managed policy named AmazonElastiCacheFullAccess to the existing user. This role comes pre-provisioned with permission that the service requires to create a service-linked role on your behalf.
AWS ElastiCache - Interfaces
The ElastiCache set up in the previous chapter can aslo be done by one of the following methods. Below are the interfaces through we can interact with AWS ElastiCache.
AWS Management Console
The AWS Management Console is the easiest way to manage Amazon ElastiCache. The console lets you create cache clusters, add and remove cache nodes, and perform other administrative tasks without having to write any code. The console also provides cache node performance graphs from CloudWatch, showing cache engine activity, memory and CPU utilization, as well as other metrics.
The below diagram shows the ElastiCache dashboard after we login to the AWS console and navigate to ElastiCache service.
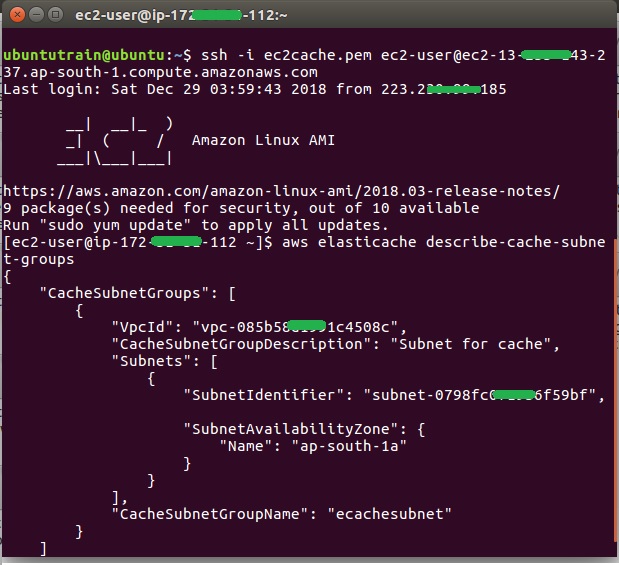
AWS CLI
You can also use the AWS Command Line Interface (AWS CLI) for ElastiCache. The AWS CLI makes it easy to perform one-at-a-time operations, such as starting or stopping your cache cluster. You can also invoke AWS CLI for ElastiCache commands from a scripting language of your choice, letting you automate repeating tasks.
The below diagram shows the result of AWS CLI command to describe the subnet groups we have for the ElastiCache clusters created.
AWS SDK
If you want to access ElastiCache from an application, you can use one of the AWS software development kits (SDKs). The SDKs wrap the ElastiCache API calls and insulate your application from the low-level details of the ElastiCache API. You provide your credentials, and the SDK libraries take care of authentication and request signing.
AWS ElastiCache - Launching Cluster
A Redis cluster is a logical grouping of one or more ElastiCache shards. Data is partitioned across the shards in a Redis cluster. But you can also run Redis with the cluster mode enabled or disabled. With cluster mode disabled, we call it a standalone Redis cluster. With cluster mode enabled, it is called Redis cluster with multiple shards.
Before we start creating the cluster, we need to finalize the requirements for the cluster which will help us configure the cluster while creating it. The factors that needs to be decided for this step are as below.
Memory −The total memory you need to hold the data in cache.
Version −The version of Redis you need to run. As different versions have some feature differences which you may need in your application.
Write Efficiency −If your application needs to write new data or update existing data frequently, then you needs significantly higher amount of memory allocation.
Cluster mode −Whether it is a standalone cluster or a cluster with Shards.
In this chapter we are creating a standalone Redis cluster. Below are the steps to create such a cluster.
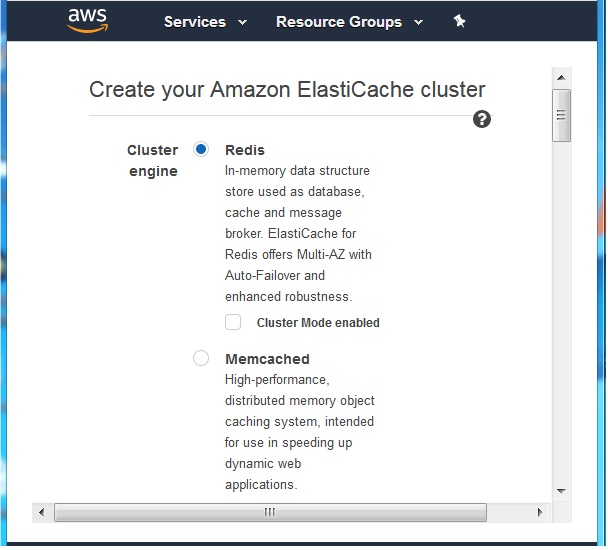
Choose Cluster Type
After your login to your Amazon account, navigate to the ElastiCache home page and choose create ElastiCache cluster. The below screen pops-up which needs us to select the cluster engine. We choose Redis as shown below.
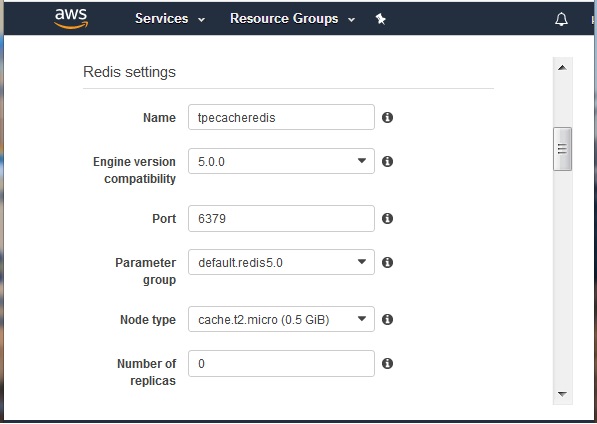
Redis Settings
Next, we choose the settings to select the Redis engine version, Node type et. The important points in this step is to select the correct engine version and the node type which will decide the type of computing power you are utilising for the cluster and hence the cost. The port number in this step is the default value of 6379 that is assigned by the platform. The below diagram shows the inputs.
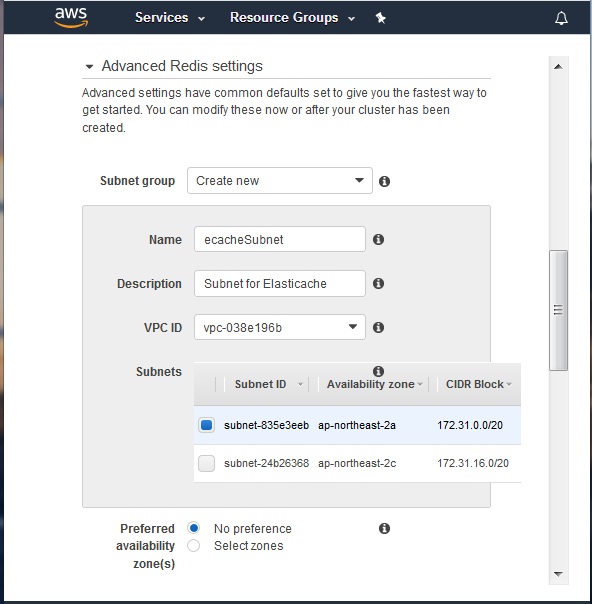
Advanced Redis Settings
The advanced Redis settings step asks for the details like the VPC and the subnet we are going to use for this cluster. We choose one of the existing VPC ID ID we have already created in the AWS account. We choose one of the subnets from one of the availability zones.
Security Group
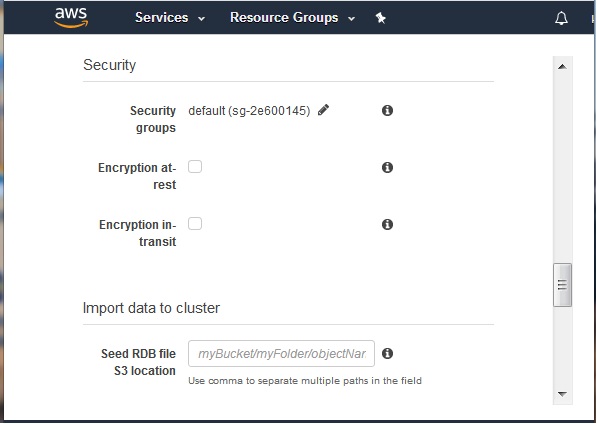
In the next step we are required to select the security group and encryption options. For our purpose we choose the default security group and leave the encryptions options blank.
Backup Configuration
In this step we choose how and when to do backup of the cache cluster. There is a option to enable the automatic backup in which case the platform will carry out backup without any user intervention. We can aslo suggest a maintenance window where we specify the exact timings of the backup. We can aslo leave the maintenance window without any preference. We also have option to set up SNS notification in this step. We will leave it blank in this step.
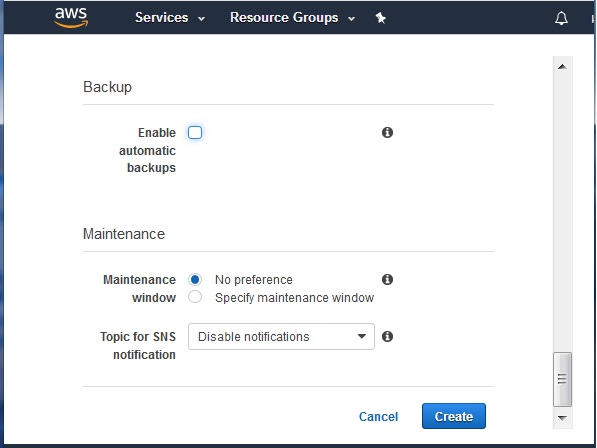
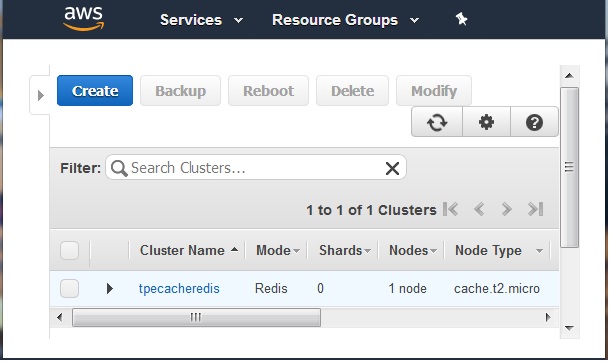
At the end of this step we click the create button so that the creation of the cluster begins will the configurations we have set above.
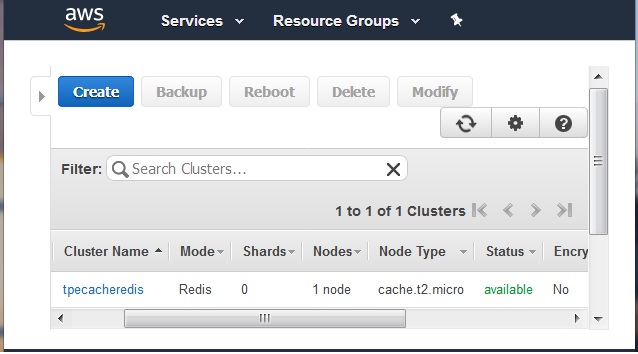
The below diagram shows the status of the cluster as available after few minutes.
AWS ElastiCache - Viewing Cluster Details
We can get the detailed information about a cluster for plannign for additional nodes or estimate the cost etc. AWS ElastiCache provides an interface to access the details of the cluster in a single web page and use those values as needed for various tuning up or estimation processes. The steps to access the cluster details are very straight forward where we can use either the console or also AWS CLI. We will see both the methods below.
Identify the Cluster
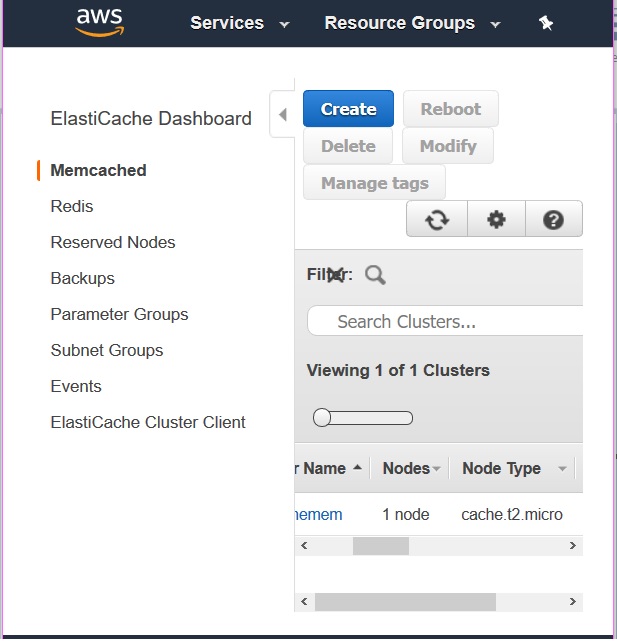
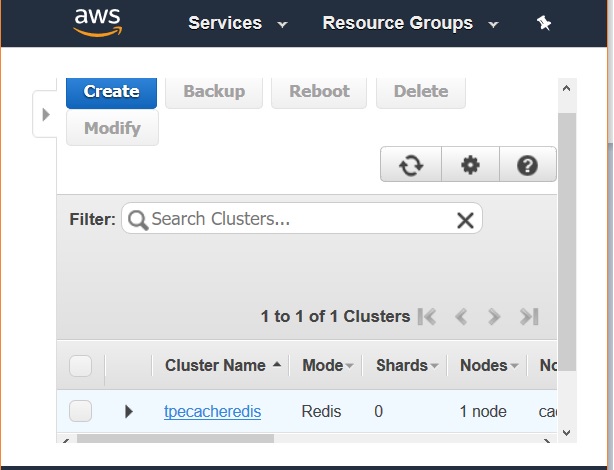
In this method we login to the aws console and go to the ElastiCache dashboard. From the dashboard we choose the name of the cluster whose details we need. In the below diagram we see the name of the cluster as a hyperlink after visiting the ElastiCache dashboard.
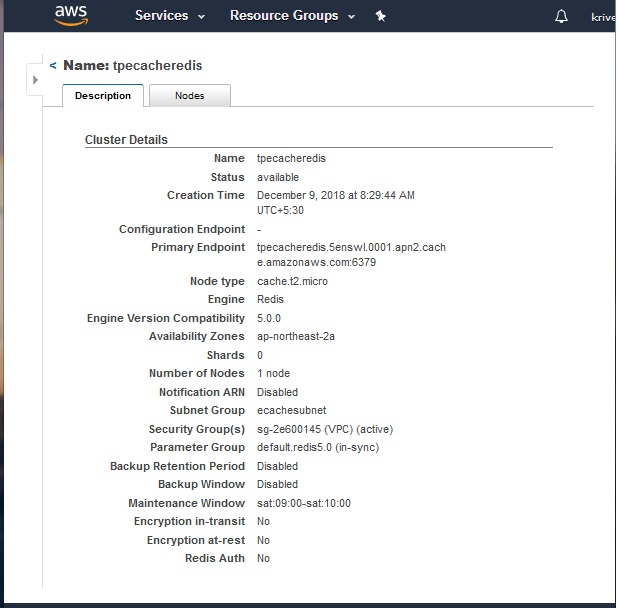
Cluster Description
Clicking on the name of the cluster above takes us to the page which shows two tabs, one describing the node details and another tab giving the description of the cluster. Next, we click on the description tab and get the details shown below. As you can find, the complete details of the cluster mentioning the Endpoint, Availability zone, security group and parameter group etc is listed down here. We use the mentioned Endpoint to access the node in the cluster from a EC2 box.
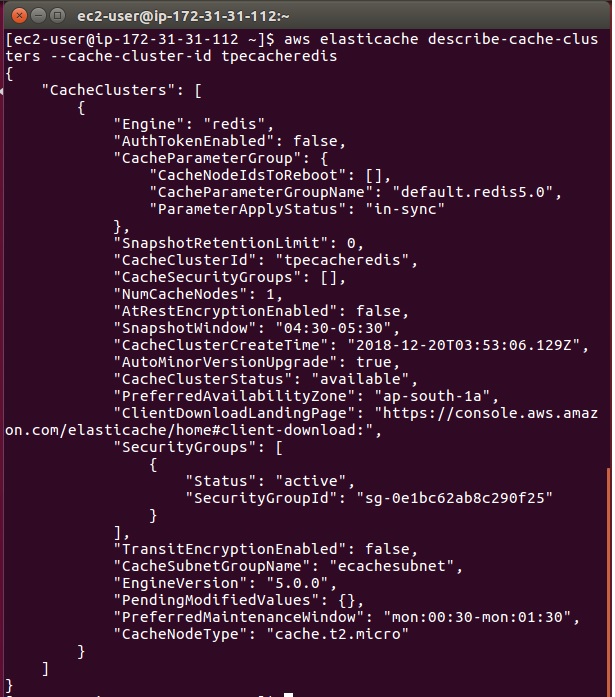
Through AWS CLI
We can also get the cluster details by using the AWS command line interface or CLI. We need to have the AWS CLI tool installed in the machine from where we will access the cluster details. Below is the command which needs to be executed in the EC2 box which can give us the details of the cluster in json format. The format of the output is configured as part of the AWS CLI configuration process.
aws elasticache describe-cache-clusters --cache-cluster-id tpecacheredis
The result can be seen in the screens shot shown below.
AWS ElastiCache - Cluster Endpoints
After you have created the cluster and its status shows as available then you can take steps to access the cluster. But you also have to authorized access to the cluster. Next you can log in to an Amazon EC2 instance and connect to the cluster. To do so, you must first determine the endpoint.
Endpoints are the URLs through which you can interact with cluster by passing the required commands for the cache engine. We will learn about the details of using the commands in another chapter. In this chapter we will see the steps to locate the end point of the clusters.
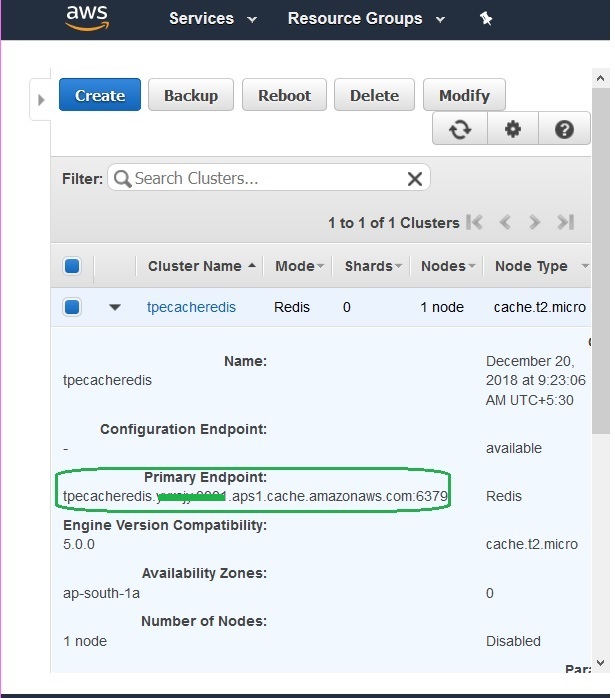
Redis Endpoint
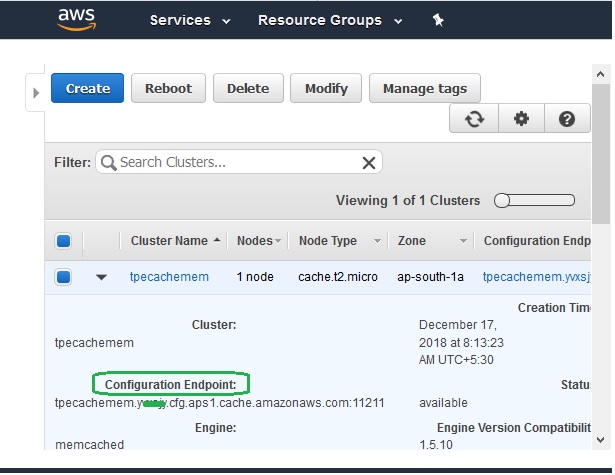
To identify the endpoint of a Redis cluster we visit the ElastiCache dashboard and select the check box against the Redis cluster name we need. It brings out the below screen which shows the primary Endpoint for a Redis cluster.
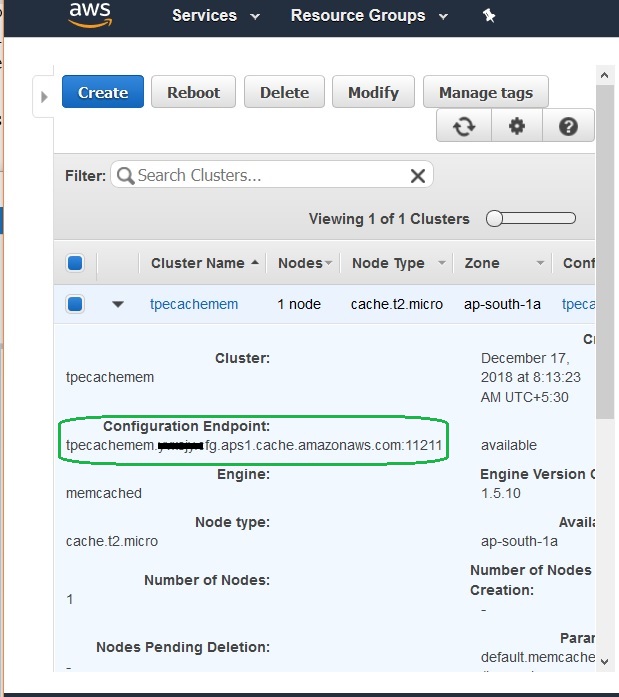
Memcached Endpoint
It is the same method as the Redis cluster above except that in the ElastiCache dashboard, we choose Memcached while selecting the cluster name. In the result we see the description of the cluster details along with the name of the Endpoint.
AWS ElastiCache - Accessing Cluster
To access the nodes in a cluster we use the Endpoint associated with node. We have already seen how to check for the endpoints in the earlier chapter. In this chapter we will see how to configure the EC2 machine security group and the security group for the cluster so that it can be accessed from the EC2.
There are different scenarios on how the Redis cluster and the VPC can be configured. The cluster and the EC2 instance may be in the same VPC or in different VPC. When they are in different VPC, they can be in the same region or in different region. Also, the ElastiCache cluster may run in customer’s data centre. All these different scenarios need different approach to the security group configurations.
We consider the simplest case of configuring both the cluster and the EC2 instance being present in the same VPC. Below are the steps to achieve security group configuration.
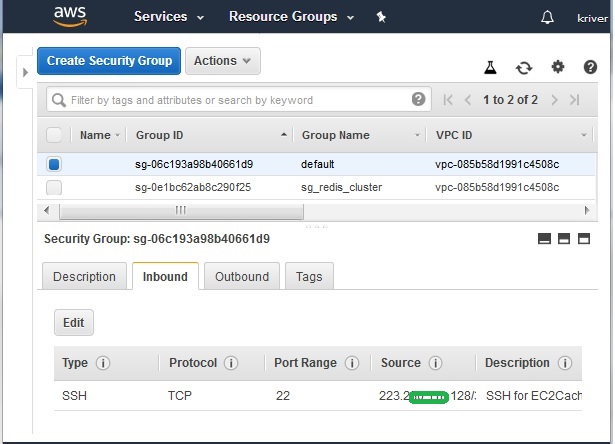
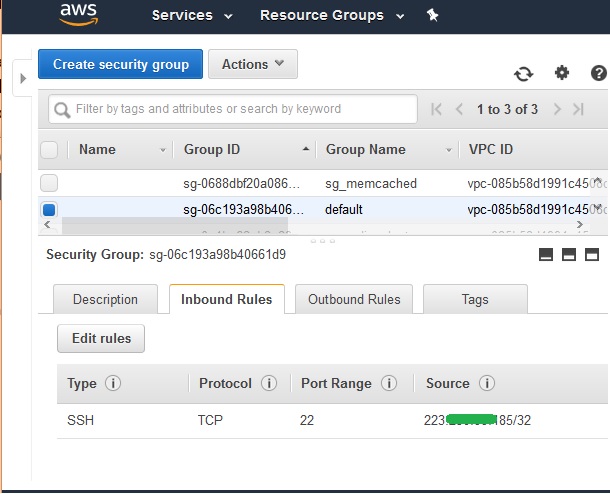
Security Group for EC2
We create an EC2 instance and which will be needed to access the cluster. This EC2 instance is made a part of the default security group that is created. The idea is to login to this EC2 instance from your local machine using AWS CLI. So, we configure the below inbound condition for the default security group to allow the IP address of your local machine to SSH into the EC2 instance.
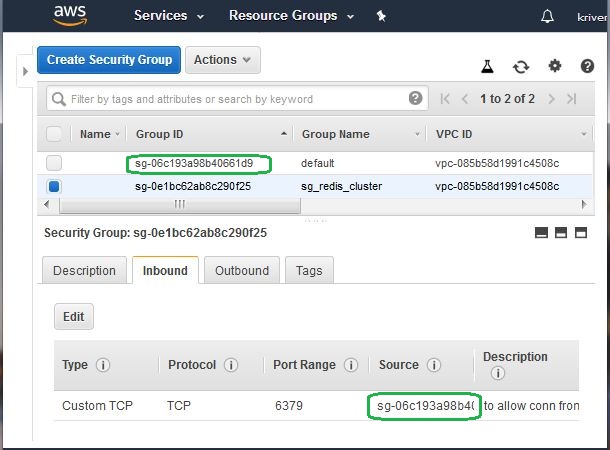
Security Group for Cluster
Next, we configure another security group for Redis cluster. The goal is to allow the inbound connection request from EC2 to this security group holding the cluster nodes. In the below diagram we create a security group named sg_redis_cluster and assign this security group to the Redis cluster.
In the inbound condition, we choose the connection type as custom TCP and allow the security group of the default VPC as the source.
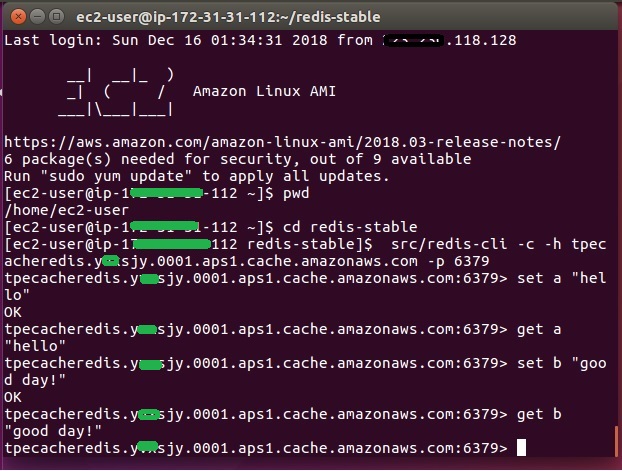
Select the EndPoint
We obtain the EbdPoint of the node from the description tab of the node as shown below.
Connecting to Redis EndPoint
Next, we use our local machine which has AWS CLI already installed, to login to the EC2 instance we have configured above. Then navigate to the specific Redis directory as shown below and use the Redis commands to populate and retrieve values into the Redis cache.
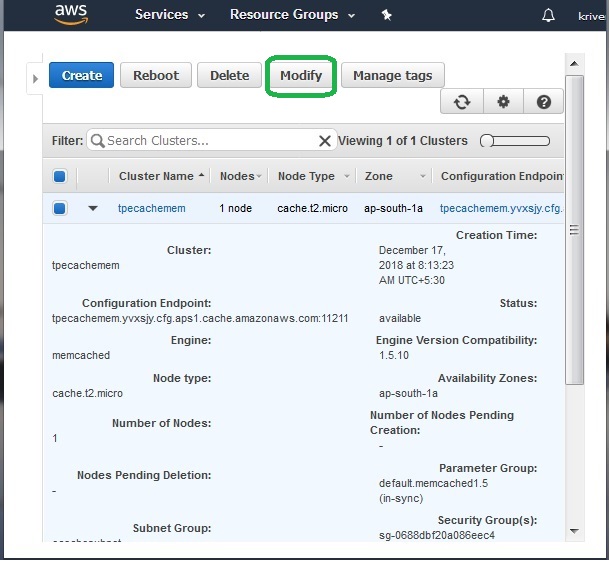
AWS ElastiCache - Modifying Cluster
There are various reasons for which you will need to modify an existing cluster. For example, you have a increase in demand for larger data sets to be put into the cache. In that case you will need to change the node type to a higher configuration. Below are the steps through which we can modify the configuration of an existing cluster.
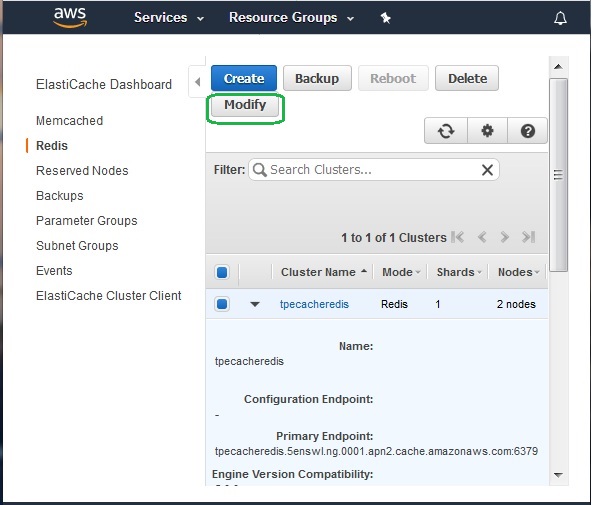
Identify the Cluster
In this method we login to the aws console and go to the ElastiCache dashboard. From the dashboard we choose the name of the cluster whose details we need. In the below diagram we see the name of the cluster as a hyperlink after visiting the ElastiCache dashboard.
Cluster Description
Clicking on the name of the cluster above takes us to the page which shows two tabs, one describing the node details and another tab giving the description of the cluster. Next, we click on the description tab and get the details shown below. As you can find, the complete details of the cluster mentioning the Endpoint, Availability zone, security group and parameter group etc is listed down here.

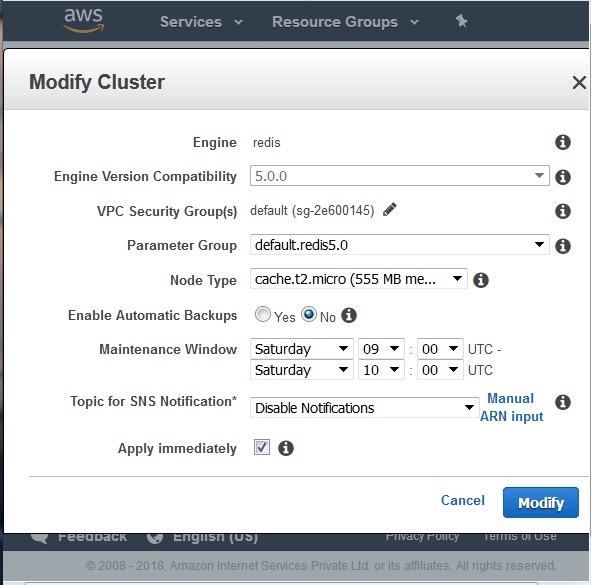
Modify Cluster
The above cluster can be modified by clicking on the modify button. The below screen pops up, which has the fields with the drop downs to change the value in that field. One important point during modification is the option to apply the changes immediately to the cluster. The Apply Immediately box applies only to node type and engine version modifications. To apply changes immediately, choose the Apply Immediately check box. Other modifications, such as changing the maintenance window, are applied immediately.
AWS ElastiCache - Rebooting Cluster
Many times, we need to change a parameter value for a cluster. To apply the new value the cluster needs to be restarted. This is also called rebooting a cluster. When a reboot happens, the cluster flushes all its data and restarts its engine and remains inaccessible during the reboot.
Below are the two steps to reboot a cluster.
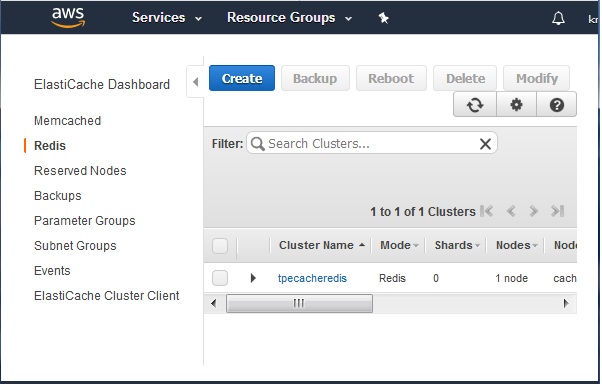
Identify the Cluster
In this method we login to the aws console and go to the ElastiCache dashboard. From the dashboard we choose the name of the cluster whose details we need. In the below diagram we see the name of the cluster details after clicking the name of the cluster as a hyperlink in the ElastiCache dashboard.

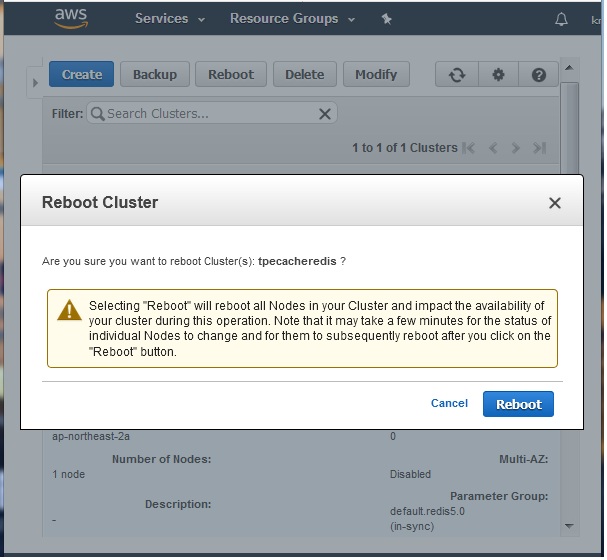
Reboot the Cluster
Choose the reboot button as highlighted in the previous diagram. This will bring up the next screen, warning about the unavailability of the nodes in the cluster for few minutes. On clicking the Reboot button, the cluster restart process starts and after few minutes the cluster becomes available again.
AWS ElastiCache - Adding Nodes
When we want to expand a cluster, we do so either by adding more nodes or changing the existing nodes to a higher configuration. Depending on many factors like the cost involved, the memory requirement etc, we may choose one of these approaches. In this chapter we will see how to expand a cluster by adding nodes to the clusters.
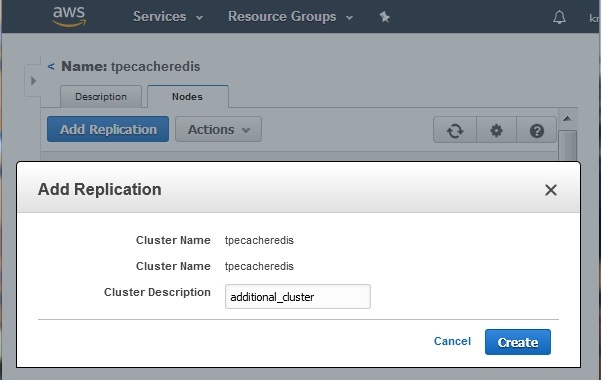
To add a node to a single-node Redis cluster (one without replication enabled), we need to go through a two-step process. The first step is to add replication, and the second step is to add a replica node.
Below are the details of all the steps to add a node to an existing cluster.
Identify the Cluster
We login to the AWS console and go to the ElastiCache dashboard. From the dashboard we choose the name of the cluster whose details we need. In the below diagram we see the name of the cluster details after clicking the name of the cluster as a hyperlink in the ElastiCache dashboard.
Add Replication
To a single-node Redis that does not have replication enabled, we first add replication. Then the existing node becomes the primary node in the replication-enabled cluster. After replication is added, you can add up to 5 replica nodes to the cluster. Under the Nodes tab we choose Add Replication button. Then fill up the description for the cluster replication and click create.
Add Read Replica
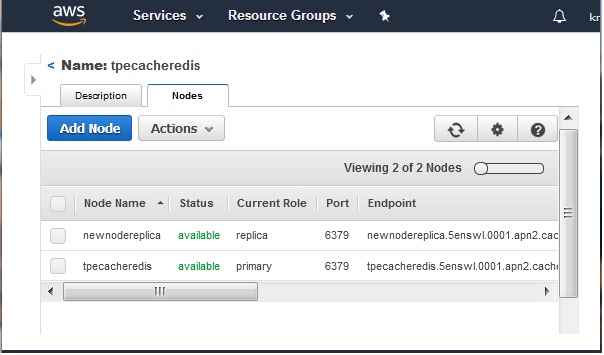
In this step we assign a name to the node we are adding to the cluster. Click on Add Node and mention the name of the read replica.
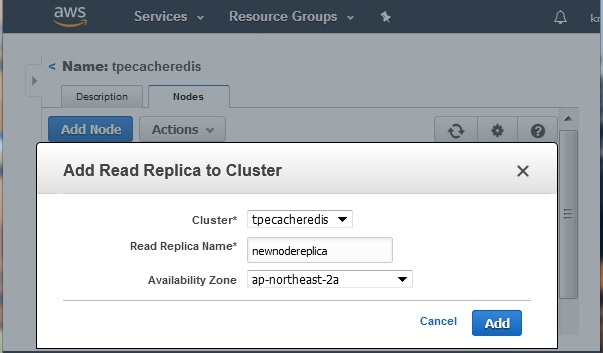
On clicking the button labelled Add we get the following screen shot. It shows the new node being added to the cluster. It takes a while to complete. The status shows as creating
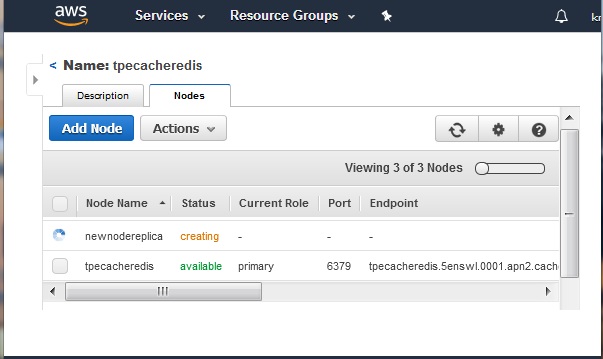
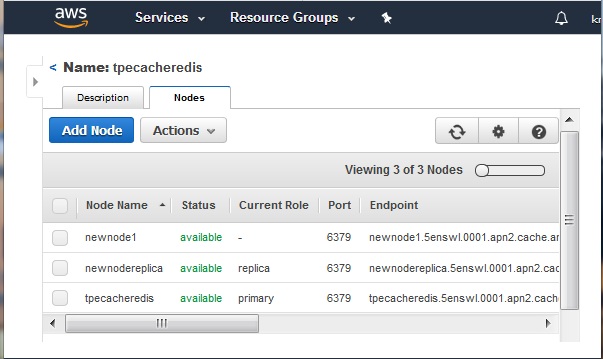
After a while on refreshing the web page we can see that the actual node has been added to the cluster. Its port number and Endpoint becomes available along with the change in its status.
AWS ElastiCache - Removing Nodes
As part of scaling down the cluster or modifying the cluster, we may need to remove some existing node from cluster. The process of removing node is very similar to that of adding the node. In the below steps we see how we remove a node form a cluster.
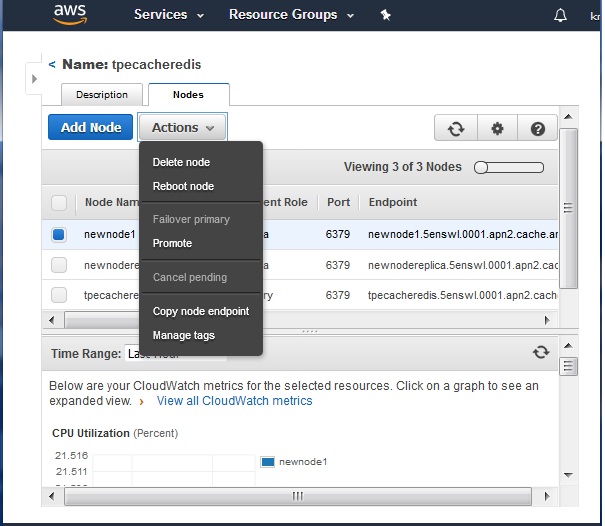
Selecting the Node
We login to the AWS console and go to the ElastiCache dashboard. From the dashboard we choose the name of the cluster whose node we want to remove. Then we see the name of the cluster as a hyperlink in the ElastiCache dashboard. Clicking on it gives us the description tab and the Nodes tab.
In the nodes tab we find the Action button. Clicking on the Action button drop down shows the option of deleting a node as shown in the diagram below.
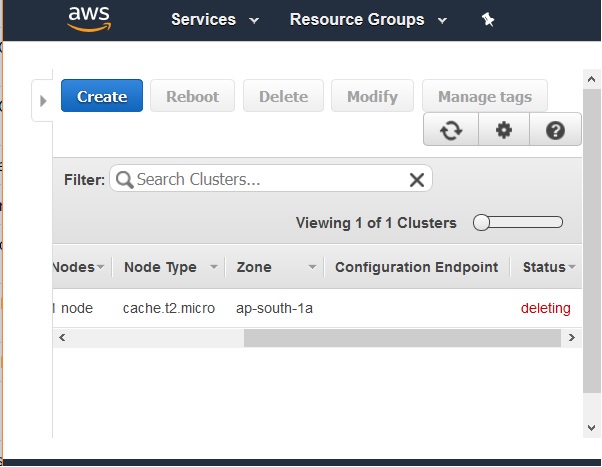
Delete the Node
Next, we select the checkbox against the node we want to delete and press the delete option from the Actions button. This initiates the process of deleting the node. As the process takes time, we can see the process of deletion on the web page marked in red as deleting.

After a while if we refresh the screen, we can see the below diagram where the chosen node is removed from the cluster.
AWS ElastiCache - Scaling the Clusters
As the demand for the ElastiCache service increases we eventually reach a point where we need to increase the memory and processing power allocated to Cache configuration. This is known as scaling up the cluster. But as the cache server is already running, we have certain constraints under which the scale up can happen.
All reads from and writes to the cache cluster are stopped.
A new cache cluster with the new node type is created in the same Availability Zone as the existing cache cluster.
The cache data in the existing cache cluster is copied to the new cache cluster. How long this process takes depends upon your node type and how much data is in the cache cluster.
Reads and writes are resumed using the new cache cluster. Because the new cache cluster's endpoints are the same as they were for the old cache cluster, there is no need to update the endpoints in your application.
ElastiCache deletes the old cache cluster.
Below are the two steps we follow to achieve the scaling up of a cluster.
Choosing the Cluster
We login to the AWS console and go to the ElastiCache dashboard. From the dashboard in the left we choose the cluster type as Redis. Then we see the name of the cluster as a hyperlink in the ElastiCache dashboard. We click on the check box to the left of the name of the cluster. This shows the option to modify the cluster along with other options.
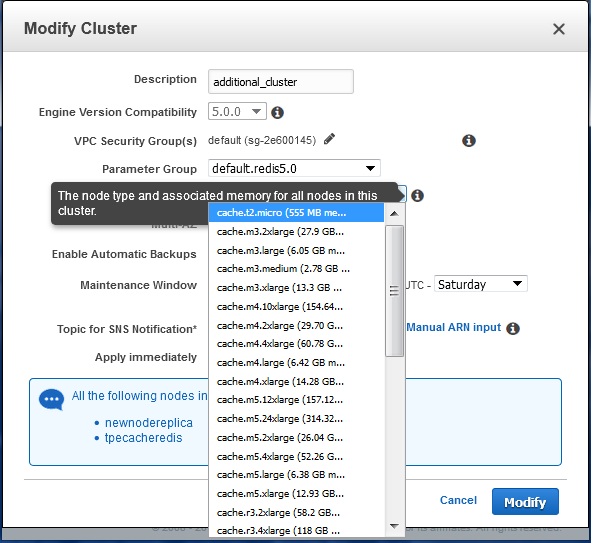
Changing the Node Type
Next, we modify the cluster to choose the required node type of higher configuration. After clicking on the modify button we get the option to change the node type as shown in the below diagram. Clicking on the modify button after finalizing the node type configuration brings in the new cache size to the node.
AWS ElastiCache - Delete Cluster
Once you have achieved the purpose of using a ElastiCache cluster, you will eventually reach a point when you no longer need the cluster either because you have a new design in place or you are moving into something else. Hence the need to delete a cluster. Once the status of the cluster changes to deleting, you stop incurring any cost associated with the cluster.
The steps to delete a cluster is very similar to the steps you use to modify a cluster. You first identify the cluster name you want to delete then carry out the delete operation. The below steps illustrate this.
Selecting the Cluster
We login to the AWS console and go to the ElastiCache dashboard. From the dashboard in the left we choose the cluster type as Redis. Then we see the name of the cluster as a hyperlink in the ElastiCache dashboard. We click on the check box to the left of the name of the cluster. This shows the option to delete the cluster along with other options.
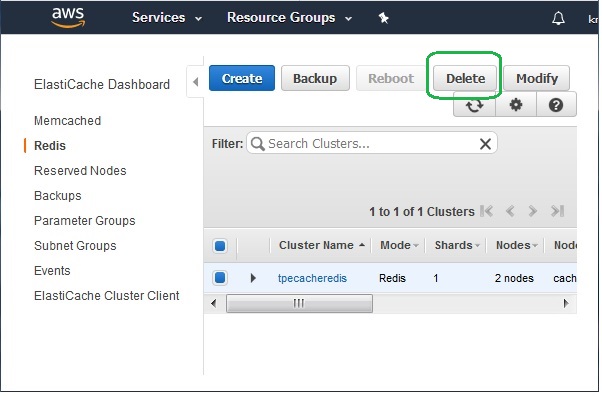
Delete the Cluster
After selecting the check box in the left for the cluster, we choose the delete button. On clicking the delete button, we are presented with a warning prompting us to be sure about the impact of the delete operation. The important point is, once the delete operation starts it can not be stopped or undone. The data will be lost. Hence, we should have maintained the backup for the cluster, if we see any need for it in future. The below diagram shows the implications of delete option.
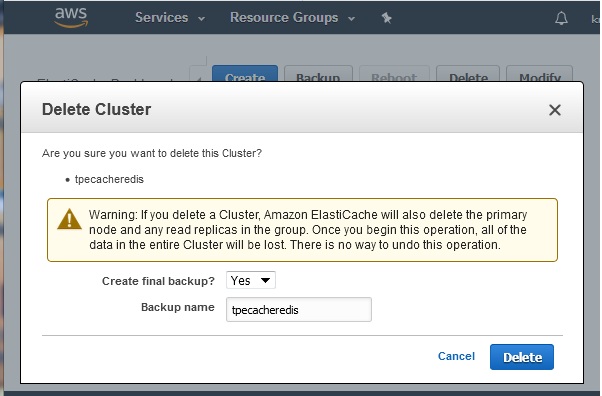
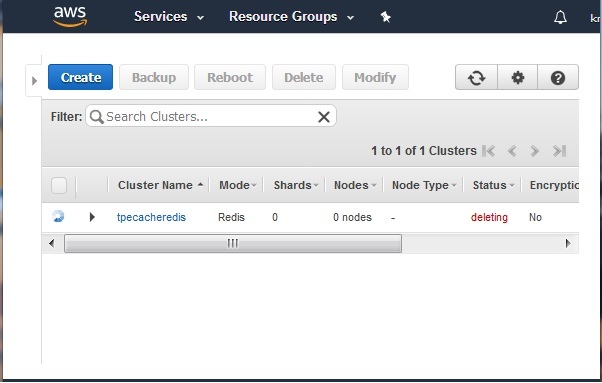
On confirming by pressing the Delete button we see the status of the cluster change to deleting as shown in the diagram below. After a while on refreshing the screen, the cluster will disappear from the dashboard.
AWS ElastiCache - Redis Shards
A shard is a collection of one or more nodes in an ElastiCache cluster. It is created to support replication of data into various nodes in the ElastiCache cluster so that cache remains reachable in case of loss of few nodes. Depending on how the cluster mode is configured, a Redis cluster can have one or more shards. If the cluster mode is disabled, then the Redis cluster will have only one shard.
A shard = Primary Node + Read Replicas
Primary Node
One of the nodes in a shard is designated as a primary node. Applications can write only to the primary node. Data written to the primary are asynchronously propagated to all the read replicas. An existing primary node can exchange its role with one of the read replicas for better performance.
Read Replicas
Read replica maintains a copy of the data from the cluster's primary node. Read replicas improve read throughput and guard against data loss in cases of a node failure. Applications can read from any node in the cluster whether read replica or primary node.
Disabled Cluster Mode
In this mode we create a Redis cluster in which there is only one shard which contains all the Redis nodes. One of the nodes is designated as primary node and others are called read-only replica nodes.
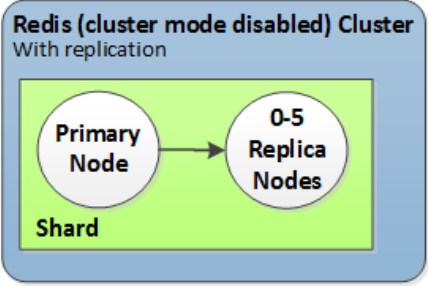
Following are the features of a Redis cluster in which the cluster mode is disabled.
All the nodes in a Redis (cluster mode disabled) cluster must reside in the same region. To improve fault tolerance, you can provision read replicas in multiple Availability Zones within that region.
When you add a read replica to a cluster, all the data from the primary is copied to the new node. From that point on, whenever data is written to the primary, the changes are asynchronously propagated to all the read replicas.
Use Redis (cluster mode disabled) clusters with replica nodes to scale your Redis solution for ElastiCache to handle applications that are read-intensive.
Cluster Mode Enabled
In this mode we create a Redis cluster in which there are 1 to 90 shards. Each shard has a primary node and up to five read-only replica nodes. Each read replica in a shard maintains a copy of the data from the shard's primary node.
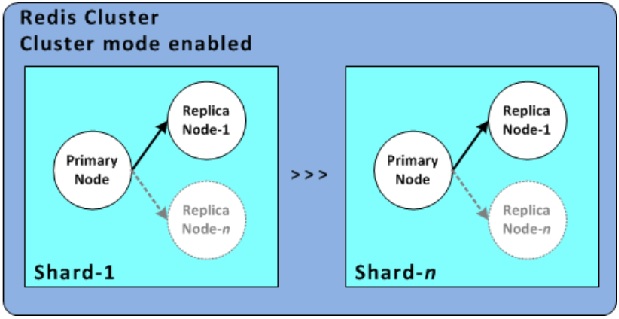
Following are the features of a Redis cluster in which the cluster mode is disabled.
Asynchronous replication mechanisms are used to keep the read replicas synchronized with the primary. Applications can read from any node in the cluster. Applications can write only to the primary nodes.
All of the nodes in this Redis cluster must reside in the same region.
You cannot manually promote any of the replica nodes to primary.
You can only change the structure of a cluster, the node type, and the number of nodes by restoring from a backup.
AWS ElastiCache - Parameter Group
Parameter Groups are a collection of parameters which control the behaviour of the ElastiCache cluster. They are automatically created as part of creating the cluster. But many times, we need our own list of parameters to be grouped together for some specific configuration needs. In such case we can create our own custom parameter groups.
In the custom parameter group, we create, we can edit the values of the parameters from the default value to a desired value.
Parameter Group Dashboard
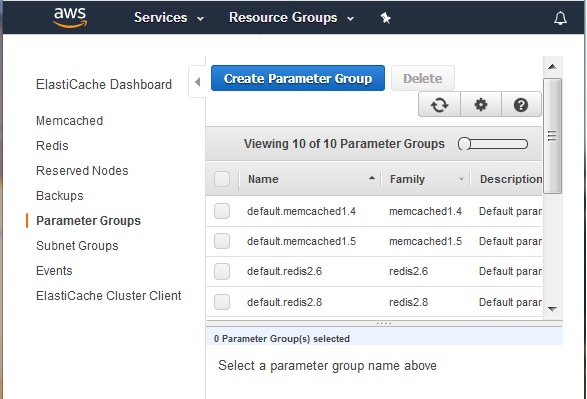
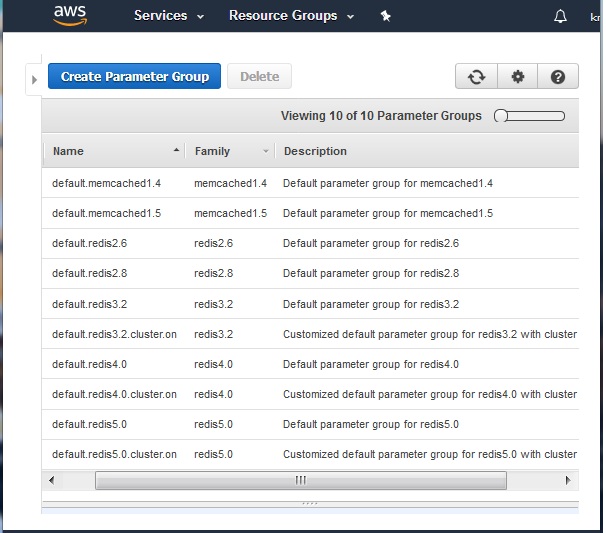
We login to the AWS console and go to the ElastiCache dashboard. From the dashboard in the left we choose Parameter Groups. Then we see the name of the parameter group along with the family to which the parameter group belongs. The family of the group indicates the type of cache whether Redis or Memcached along with the version of the engine.
The below screen shows the result of selecting the parameter group form the left tab.
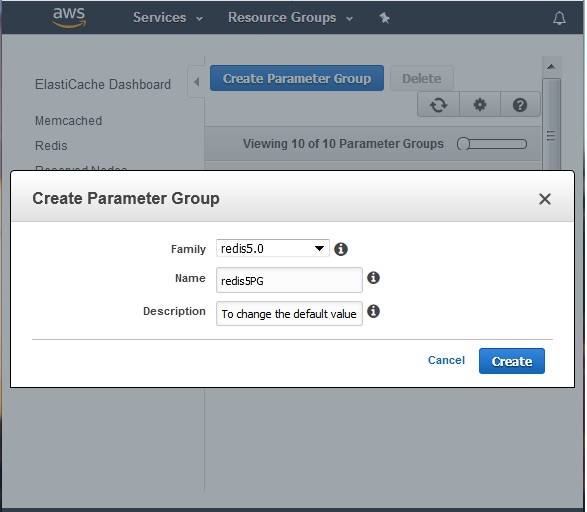
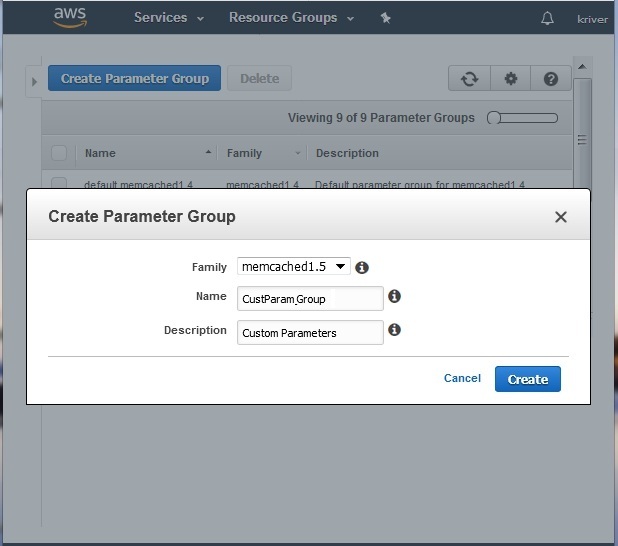
Create Parameter Group
Next, we click on the button Create Parameter Group to create a parameter group. It prompts for the family of the cluster, which is the type of the cluster like Redis or Memcached along with the Engine version of the cluster. We also mention the name and description of parameter group in the input screen.
Edit Parameters
We can edit the parameters in a parameter group by selecting the check box to the left of it and then clicking on the button edit parameters as shown below.
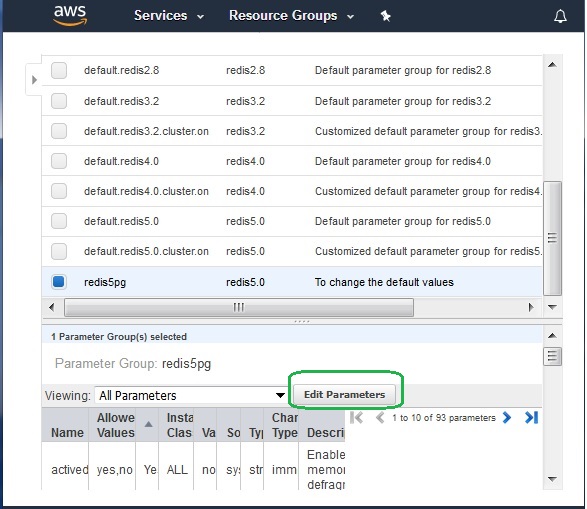
On clicking the edit parameters button, we get the window where we can put our custom values in the various parameters listed. After changing them we can click Save Changes to make the new values effective.

Please note, we also have option to restore the parameter values to default values in case we have a need. That safeguards us against any incorrect parameter configuration we do by allowing us to go back to the original configuration.
AWS ElastiCache - Listing Parameters
To control the runtime behaviour of the Redis cluster nodes we use many parameters which we have already seen in previous chapter. In this chapter we see the exact steps to list the parameters that are available in different versions of Redis and Memcached clusters in the AWS platform.
Parameter Group Dashboard
We login to the AWS console and go to the ElastiCache dashboard. From the dashboard in the left we choose Parameter Groups. Then we see the name of the parameter group along with the family to which the parameter group belongs. The family of the group indicates the type of cache whether Redis or Memcached along with the version of the engine.
The below screen shows the result of selecting the parameter group form the left tab.
We can expand the parameter group details display by sliding the dashboard details to the left. In the below screen we have the list of all the latest parameter groups available in the AWS platform. The description tag indicates the cluster version and engine type.
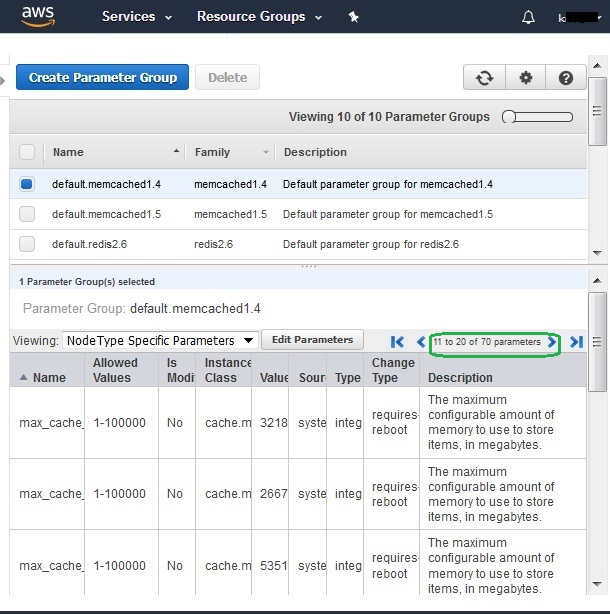
Parameter List
Next, we can view the details of the parameters under each parameter group. Click on the check box of a specific parameter group. This will bring out a list of all the parameters associated with that group in the bottom of the screen. You can aslo notice the number of parameters associated with that parameter group.
AWS ElastiCache - Deleting Parameters
Parameter Groups are a collection of parameters which control the behaviour of the ElastiCache cluster. But many times, we need our own list of parameters to be grouped together for some specific configuration needs. In such case we can create and delete our own custom parameter groups.
In this chapter we will see how to create a custom parameter group and delete it also.
Create Parameter Group
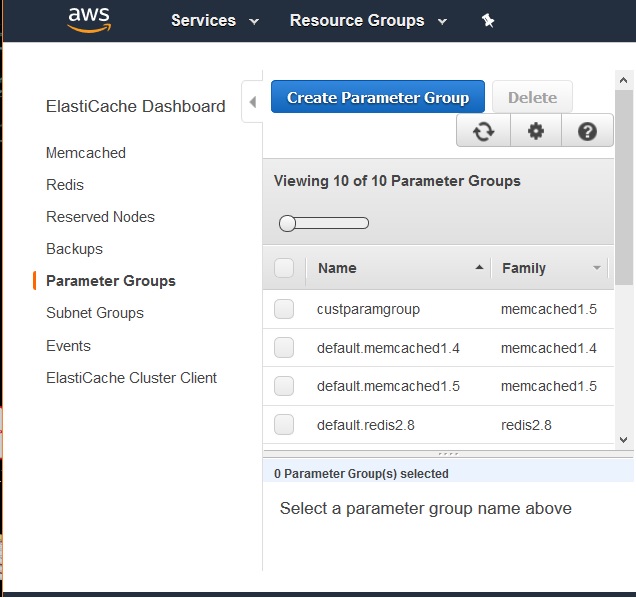
From the ElastiCache dashboard, we choose the Memcached engine and go to the screen describing the Memcached engine. Then we click on the create parameter group button and provide the following inputs to cerate a custom parameter group.
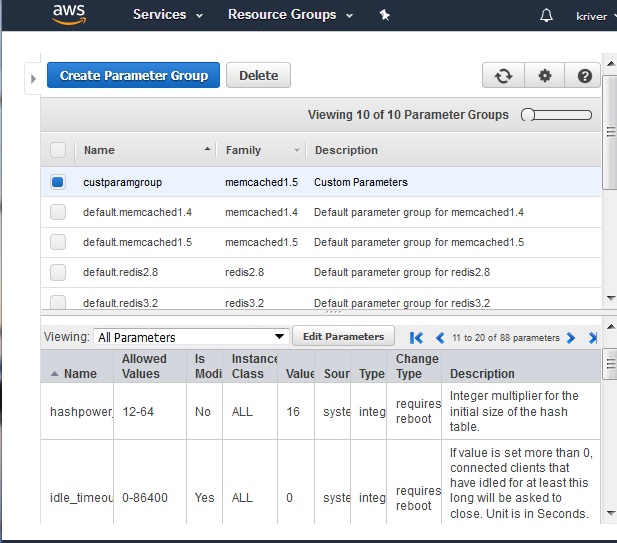
View Parameter Group
After clicking the create button in the above screen, we get the custom parameter group created. We can see the list of parameters in this group after selecting the check box to the left of the name of the custom group as shown below. We can see a list of parameters and their descriptions.
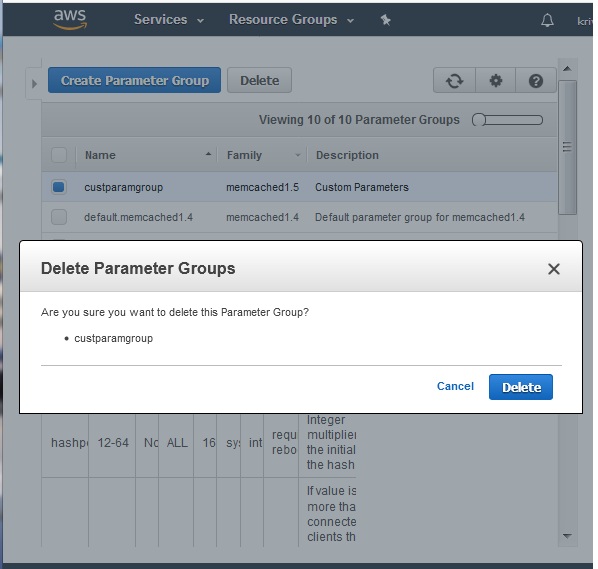
Delete Parameter Group
Next, we can delete the parameters by deleting the parameter group. We select the parameter group to be deleted and click the delete button. The below windows prompt for confirming the delete action and on confirming the group gets deleted.
AWS ElastiCache - Engine Parameters
To control the runtime behaviour of the Redis cluster nodes we use many parameters which are in-built in-to the cluster. As the engine version of the cluster changes, more additional parameters come into picture. Many parameters are grouped together and given a name for the group, so that it is easy to manage the parameters which have dependencies or affect each other’s values.
The parameter values on a specific parameter group apply to all nodes that are associated with the group, regardless of which cluster they belong to. To fine-tune the cluster's performance, we can modify some parameter values or change the cluster's parameter group.
Examples
Below is a list of few examples of what a parameter looks like and what can it control.
| Name | Use |
|---|---|
| cluster-node-timeout | Cluster node timeout is the amount of milliseconds a node must be unreachable for it to be considered in failure state. |
| reserved-memory-percent | The percent of a node's memory reserved for non-data use. By reserving memory, you can set aside some of the available memory for non-Redis purposes to help reduce the amount of paging. |
| cluster-enabled | Indicates whether this is a Redis replication group in cluster mode or a replication group in non-cluster mode. |
| proto-max-bulk-len | Max size of a single element request. |
| client-query-buffer-limit | Max size of a single client query buffer. |
| activedefrag | Enabled active defragmentation. |
| maxclients 10000 | Set the max number of connected clients at the same time. By default this limit is set to 10000 clients, however if the Redis server is not able to configure the process file limit to allow for the specified limit the max number of allowed clients is set to the current file limit minus 32. |
Rules of Parameter Management
You cannot modify or delete the default parameter groups. If you need custom parameter values, you must create a custom parameter group.
If you change a cluster's parameter group, the values for any conditionally modifiable parameter must be the same in both the current and new parameter groups.
When you change a cluster's parameters, the change is applied to the cluster either immediately or after the cluster is restarted. This is true whether you change the cluster's parameter group itself or a parameter value within the cluster's parameter group.
AWS ElastiCache - Backup and Restore
AWS ElastiCache clusters running Redis can be used to create back up which then can be used to restore a cluster or seed a new cluster. The backup is made up of the cluster's metadata, along with all of the data in the cluster. All backups are written to Amazon Simple Storage Service (Amazon S3). At any time, you can restore your data by creating a new Redis cluster and populating it with data from a backup. One backup for each cluster is stored free of charge but additional backups have a cost associated with them.
Below are the steps for creating the backup.
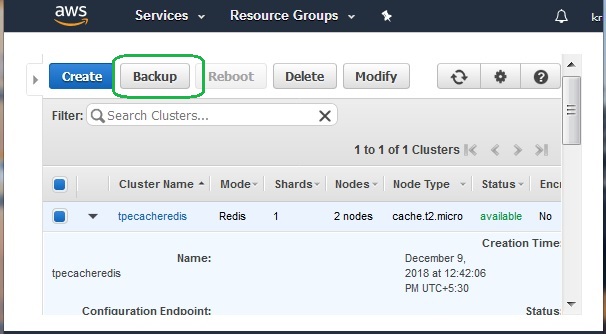
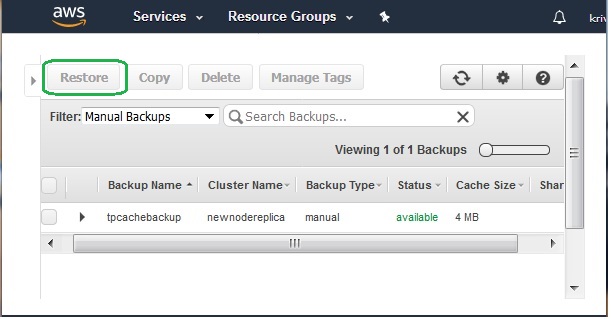
Selecting the Cluster
We login to the AWS console and go to the ElastiCache dashboard. From the dashboard in the left we choose the cluster type as Redis. Then we see the name of the cluster as a hyperlink in the ElastiCache dashboard. We click on the check box to the left of the name of the cluster. This shows the option to back up the cluster along with other options.
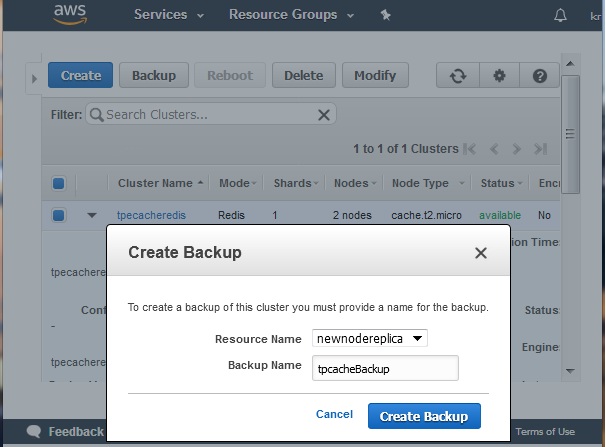
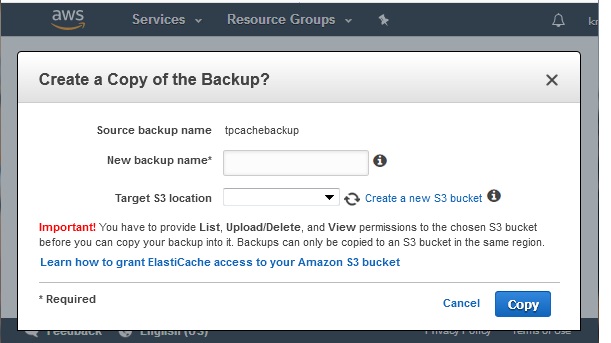
Creating Backup
Next, we click on the backup button to configure the backup process by providing the name for the backup cluster. The backup method is selected automatically based upon available memory. If there is sufficient available memory, a child process is spawned which writes all changes to the cache's reserved memory while the cache is being backed up.
If there is insufficient memory available, a forkless, cooperative background process is employed. The forkless method can impact both latency and throughput.
On clicking the backup button, the backup process starts, and it continues for a while. As we can see in the diagram below, the status of the process remains as creating. It also mentions the cache size and backup type as manual.
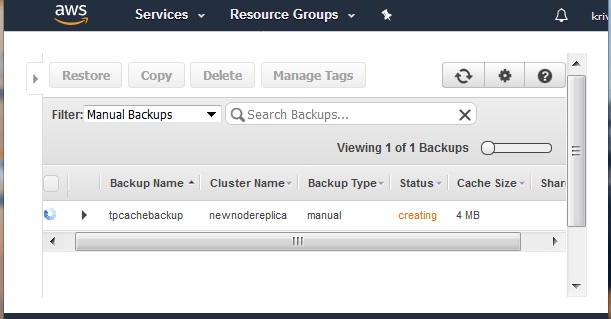
After a while the status of the new backup cluster changes to available. This indicates the completion of the backup process.
Restore from Backup
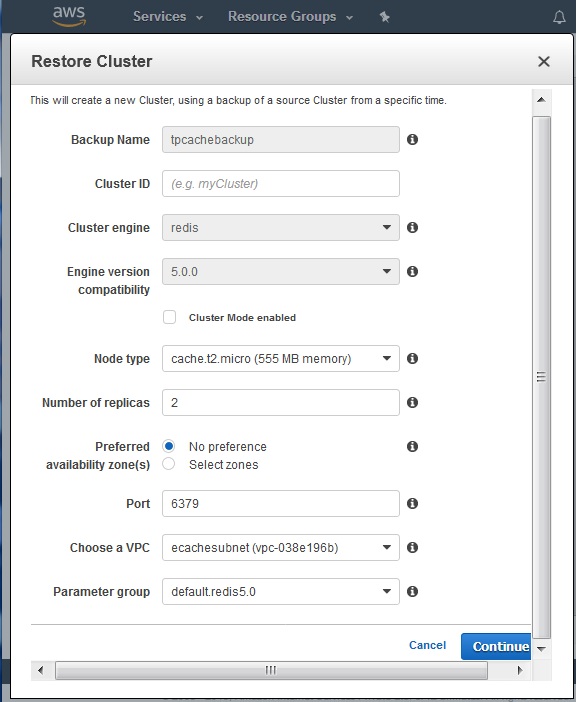
To use the backup for restoring data, we create a new cluster from the above backup. This new copy will be used for the restore command which will bring in data from backup to the newly created cluster.
After the creation of the new cluster, we finally use the restore button. In the diagram below, we supply the values for the restore option.
AWS ElastiCache - Monitoring Node-Metrics
To monitor the usage and health of clusters, ElastiCache provides metrics which can be accessed through CloudWatch. These metrics can be host-level metrics. CPU utilization is an example of host-level metrics. There are also metrics that are specific to the cache engine software. Cache gets and cache misses are examples of engine specific metrics. These metrics are measured and published for each Cache node in 60-second intervals.
Host Level Metrics
Host level metrics measure various aspects of performance of the host machine where the ElastiCache node is located. Below is the example of few important host level metrics. Also, different metrics have different types of measurements. Like one metric is measure as a percentage while the other is measured as count value.
| Metric | Description | Unit |
|---|---|---|
| CPUUtilization | The percentage of CPU utilization for the entire host. Because Redis is single-threaded, we recommend you monitor EngineCPUUtilization metric if available. | Percent |
| FreeableMemory | The amount of free memory available on the host. This is derived from the RAM, buffers and cache that the OS reports as freeable. | Bytes |
| SwapUsage | The amount of swap used on the host. | Bytes |
| NetworkBytesIn | The number of bytes the host has read from the network. | |
| NetworkBytesOut | The number of bytes sent out on all network interfaces by the instance. | Bytes |
Engine Level Metrics
These metrics depend on the type and version of the engine deployed in ElastiCache. They measure the performance of the engine and based on their values we can decide whether to change engine or re-configure some parameters in that cache engine. Each metric is calculated at the cache node level. Below is the list of few such metrics.
| Metric | Description | Unit |
|---|---|---|
| CacheHits | The number of successful read-only key lookups in the main dictionary. This is derived from keyspace_hits statistic. | Count |
| CacheMisses | The number of unsuccessful read-only key lookups in the main dictionary. This is derived from keyspace_misses. | Count |
| CurrConnections | The number of client connections, excluding connections from read replicas. ElastiCache uses two to three of the connections to monitor the cluster in each case. This is derived from the connected_clients statistic. | Count |
| EngineCPUUtilization | EngineCPUUtilization provides access to the Redis process CPU utilization to gain better insights into your Redis workloads. As Redis is single threaded and uses just one CPU core at any given point in time, EngineCPUUtilization provides more precise visibility into the load of the Redis process itself. | Percent |
| NewConnections | The total number of connections that have been accepted by the server during this period. This is derived from the total_connections_received statistic. | Count |
Monitoring the Metrics
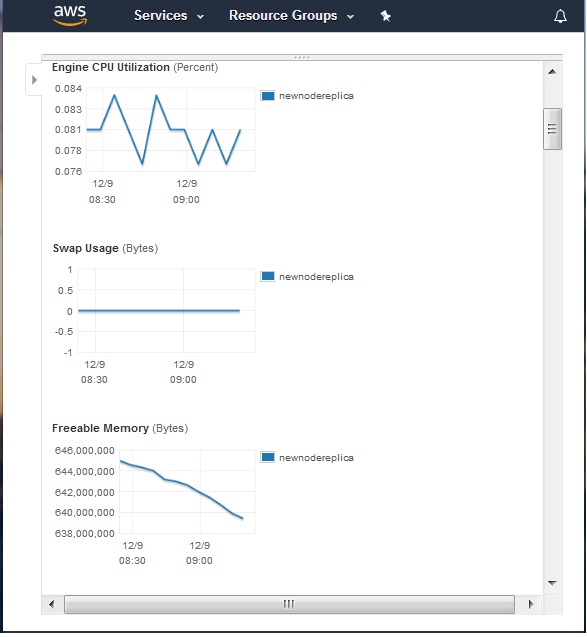
We can look at the values of the metrics across different time periods. Like in past 1 hour or past 1 day etc. For this we go to the console then ElastiCache dashboard. From the dashboard select the cluster and then the name of the node whose metrics we want to monitor. Select the nodes and then select the check box beside the name of the node we want to monitor. The below diagram shows the metrics window that pops-up.
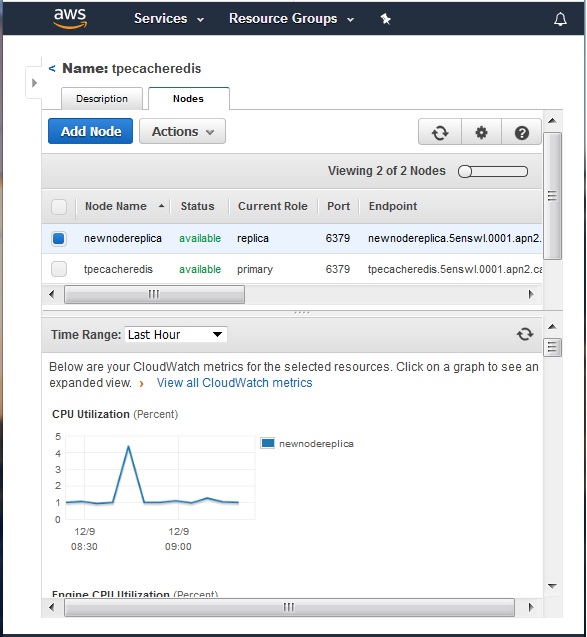
On scrolling down further we see many more metrices which are presented as a graph showing values at different time intervals.
AWS ElastiCache - Memcached and Redis
Amazon ElastiCache supports the Redis and Memcached cache engines. Redis is an open-source in-memory data structure implementing a distributed, in-memory key-value database. Memcached is also a distributed memory caching system. It is often used to speed up dynamic database-driven websites by caching data and objects to reduce the number of times an external data source must be read to get the values in to the web application.
Below are the scenarios under which we should choose the specific engine in the AWS platform.
Using Redis
The below list of features show how Redis is capable of handling more cmplex data structures, provide persistence and sorting etc. So the scenarios under which we should favour Redis as the platfrom in ElastiCache are described here.
Need to store complex data types, such as strings, hashes, lists, sets, sorted sets, and bitmaps.
Need to sort or rank in-memory datasets.
Need persistence of your key store.
Need to replicate your data from the primary to one or more read replicas for read intensive applications.
Need automatic failover if your primary node fails.
Need automatic failover if your primary node fails.
Need backup and restore capabilities.
Need to support multiple databases.
Using Memcached
Memcached is more suitable for simpler data structures and does not provide persistence. So the below scenarios are appropriate for Memcached use.
Need the simplest data model possible to store Key-Value pairs.
Need to run large nodes with multiple cores or threads
Need the ability to scale out and in, adding and removing nodes as demand on your system increases and decreases.
Need to cache objects, such as a database.
AWS ElastiCache - Accessing Memcached Cluster
To access the nodes in a cluster we use the Endpoint associated with node. We have already seen how to check for the endpoints in the earlier chapter. In this chapter we will see how to configure the EC2 machine security group and the security group for the cluster so that it can be accessed from the EC2.
There are different scenarios on how the Memcached cluster and the VPC can be configured. The cluster and the EC2 instance may be in the same VPC or in different VPC. When they are in different VPC, they can be in the same region or in different region. Also, the ElastiCache cluster may run in customer’s data centre. All these different scenarios need different approach to the security group configurations.
We consider the simplest case of configuring both the cluster and the EC2 instance being present in the same VPC. Below are the steps to achieve security group configuration.
Security Group for EC2
We create an EC2 instance and which will be needed to access the cluster. This EC2 instance is made a part of the default security group that is created. The idea is to login to this EC2 instance from your local machine using AWS CLI. So, we configure the below inbound condition for the default security group to allow the IP address of your local machine to SSH into the EC2 instance.
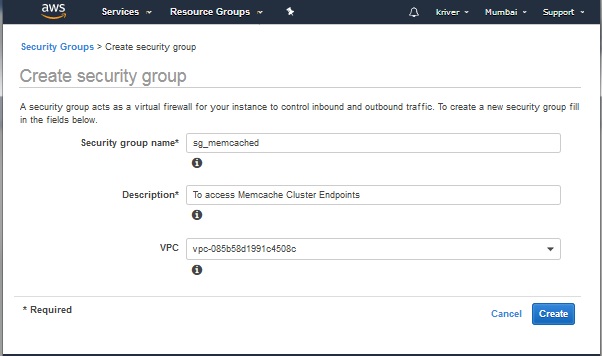
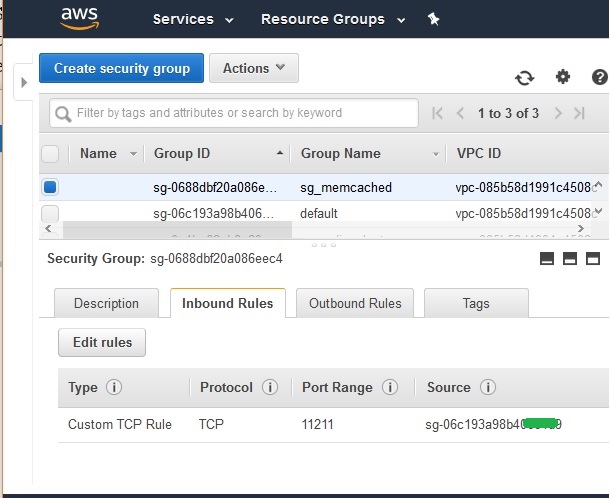
Next, we configure another security group for Redis cluster. The goal is to allow the inbound connection request from EC2 to this security group holding the cluster nodes. In the below diagram we create a security group named sg_memcached and assign this security group to the Redis cluster.
In the inbound condition, we choose the connection type as custom TCP and allow the security group of the default VPC as the source.
Select the Endpoint
We obtain the Endpoint of the node from the description tab of the node as shown below.
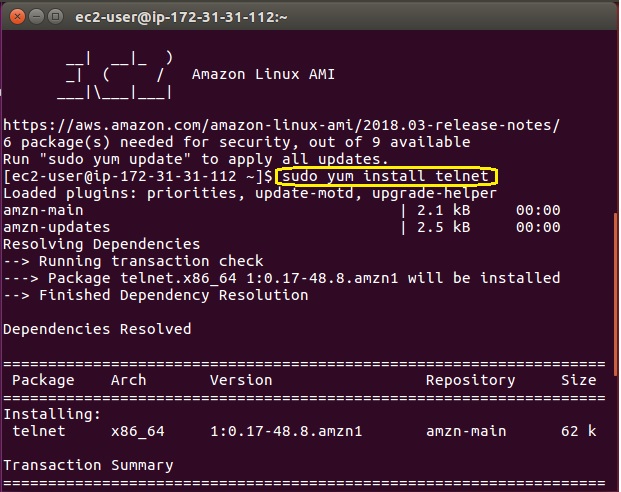
Installing Telnet
To access the memchached we install telnet service in the EC2 instance. This will be used to connect to the node in the Memcached cluster.
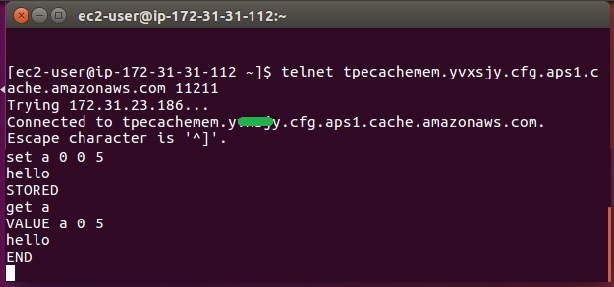
Connecting to Memcached Endpoint
Next, we use our local machine which has AWS CLI already installed, to login to the EC2 instance we have configured above. Then navigate to the specific Redis directory as shown below and use the Redis commands to populate and retrieve values into the Redis cache.
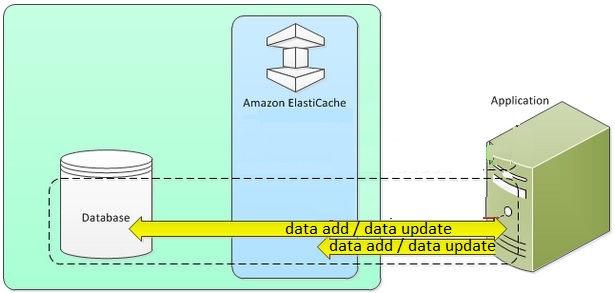
AWS ElastiCache - Lazy Loading
There are different ways to populate the cache and keep maintaining the cache. These different ways are known as caching strategies. A gaming site maintaining the leaderboard data needs a different strategy than the trending news display in a news website. In this chapter we will study about on such strategy known as Lazy Loading.
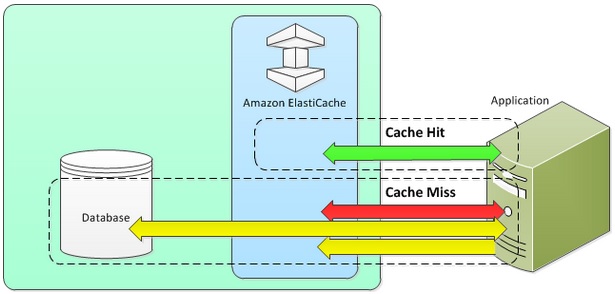
When data is requested by the application, the request searches for data in the cache of ElastiCache. There are two possibilities. Either the data exists in the cache or it does not. Accordingly we classify the situation in to following two categories.
Cache Hit
The application requests the data from Cache.
The cache query finds that updated data is available in the cache.
The result is returned to the requesting application.
Cache Miss
The application requests the data from Cache.
The cache query finds that updated data is not available in the cache.
A null is returned by cache query to the requesting application.
Now the application requests the data directly form the database and receives it.
The requesting application then updates the cache with the new data it received directly from the database.
Next time the same data is requested, it will fall into cache hit scenario above.
The above scenarios can be generally depicted by the below diagram.
Advantages of Lazy Loading
Only requested data is cached-Since most data is never requested, lazy loading avoids filling up the cache with data that isn't requested.
Node failures are not fatal-When a node fails and is replaced by a new, empty node the application continues to function, though with increased latency. As requests are made to the new node each cache miss results in a query of the database and adding the data copy to the cache so that subsequent requests are retrieved from the cache.
Disadvantages of Lazy Loading
Cache miss penalty −Each cache miss results in 3 trips. One, Initial request for data from the cache, two, query of the database for the data and finally writing the data to the cache. This can cause a noticeable delay in data getting to the application.
Stale data −If data is only written to the cache when there is a cache miss, data in the cache can become stale since there are no updates to the cache when data is changed in the database. This issue is addressed by the Write Through and Adding TTL strategies, which we will see in the next chapters.
AWS ElastiCache - Write Through
Like lazy loading, write through is another caching strategy but unlike lazy loading, it does not wait for a hit or miss. It is a straight forward strategy in which the syncing between cache and database happens as soon as some data is written into the database.
It can be easily understood from the below diagram.
Advantages of Write Through
Data in the cache is never stale −Since the data in the cache is updated every time it is written to the database, the data in the cache is always current.
Write penalty vs. Read penalty −
Every write involves two trips, a write to the cache and a write to the database. This adds latency to the process. That said, end users are generally more tolerant of latency when updating data than when retrieving data. There is an inherent sense that updates are more work and thus take longer.
Disadvantages of Write Through
Missing data −In the case of spinning up a new node, whether due to a node failure or scaling out, there is missing data which continues to be missing until it is added or updated on the database. This can be minimized by implementing Lazy Loading in conjunction with Write Through.
Cache churn -Since most data is never read, there can be a lot of data in the cluster that is never read. This is a waste of resources. By Adding TTL you can minimize wasted space, which we will see in the next chapter.
AWS ElastiCache - Add TTL
TTL is also known as Time to live. It is used to take advantage of both the lazy load strategy as well as write through strategy. These two strategies were discussed in the previous chapters. Write through ensures that data is always fresh but may fail with empty nodes and may populate the cache with superfluous data. By adding a time to live (TTL) value to each write, we are able to get the advantages of each strategy and largely avoid cluttering up the cache with superfluous data.
How TTL Works
Time to live (TTL) is an integer value that specifies the number of seconds until the key expires. When an application attempts to read an expired key, it is treated as though the key is not found, meaning that the database is queried for the key and the cache is updated. This does not guarantee that a value is not stale, but it keeps data from getting too stale and requires that values in the cache are occasionally refreshed from the database.
TTL Example
The below code gives an example of how TTL is implemented by using a function. It takes help of the set command used by Memcached.
Code for Write Through Strategy
save_customer(customer_id, values)

    customer_record = db.query(""UPDATE Customers WHERE id = {0}"", customer_id, values)
    cache.set(customer_id, customer_record, 300)

    return success
Code for Lazy Load Strategy
get_customer(customer_id)

    customer_record = cache.get(customer_id)

    if (customer_record != null)
        if (customer_record.TTL < 300)
            return customer_record        // return the record and exit function

    // do this only if the record did not exist in the cache OR
    //    the TTL was >= 300, i.e., the record in the cache had expired.
    customer_record = db.query(""SELECT * FROM Customers WHERE id = {0}"", customer_id)
    cache.set(customer_id, customer_record, 300)  // update the cache
    return customer_record
AWS ElastiCache - Memcached VPC
The VPC of the EC2 instance used for connecting to the Memcached cluster may not be the same VPC in as that of the cluster. In such cases we need to allow the connection between these two VPCs so that they can interact. From the previous chapter, we have already seen an EC2 instance running in the default VPC. Now we create an additional VPC to which we can associate the Memcached cluster and then establish a connection to the EC2 instance through peering mechanism.
This will need the following steps to be followed.
Creating a New VPC
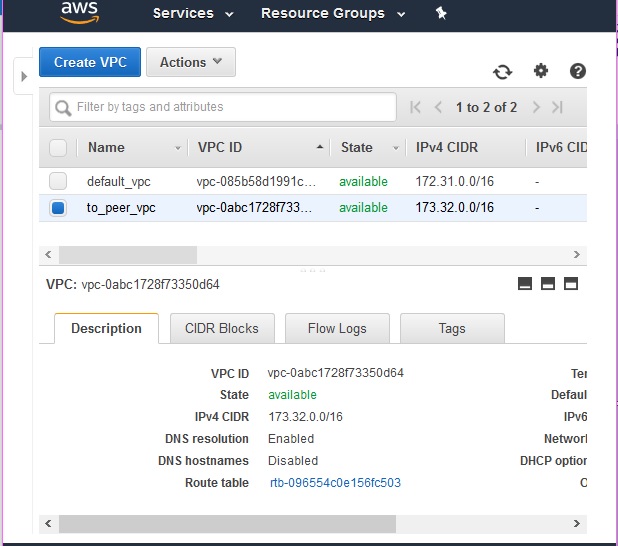
To create a new VPC, we go to the VPC dashboard from the homepage of AWS account. Then we click on the Create VPC button which will prompt us for the name of the VPC and CIDR block address etc. After filling in those details we can see the following VPC being created. Please note that we have to careful in mentioning the CIDR block as that should not overlap with the CIDR block of existing VPC which has the EC2 instance.
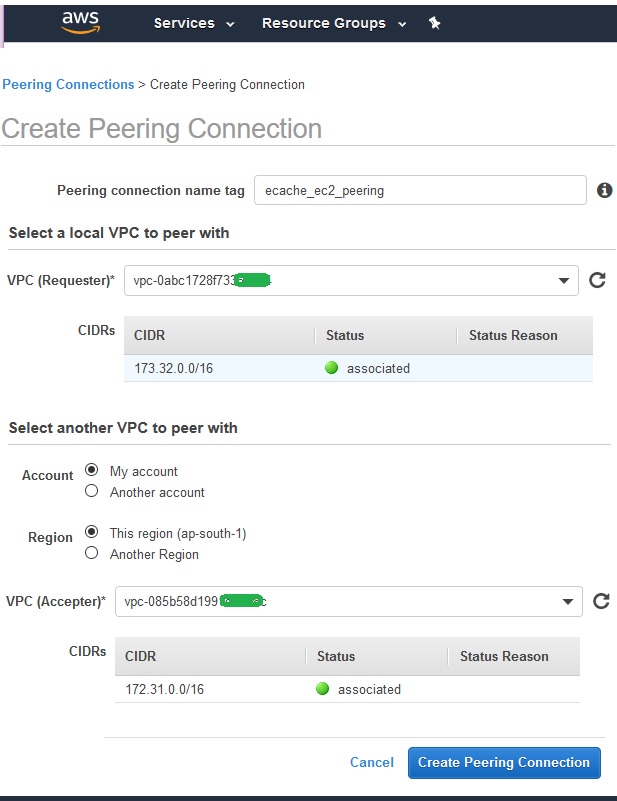
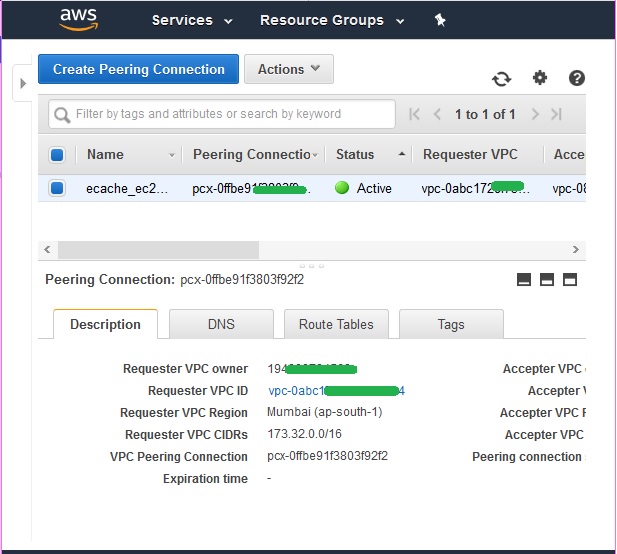
Creating a VPC Peering
Next, we create a peering connection between the above to VPCs. From the VPC dashboard, we choose the Peering Connections option in the left tab. That brings up the following screen which we need to fill in as shown below.
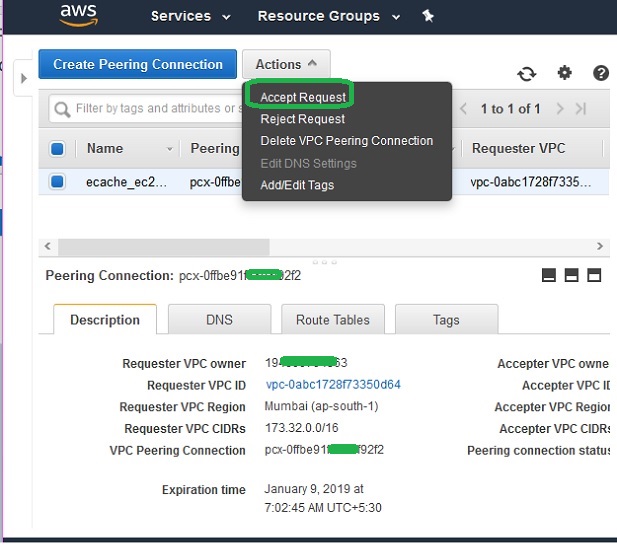
After clicking on the create Peering Connection button above, we have to accept the peering connection request as shown in the screen shot below.
Next, we edit the route table to reflect the target gateway in the other VPC. This will enable the connection between the VPCs.
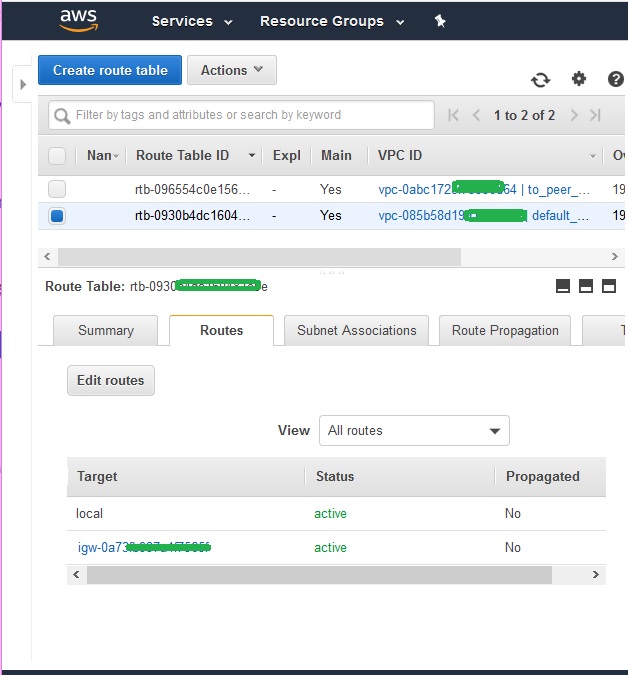
Finally, we can see the peering connection to be active which will enable us to connect to the ElastiCache VPC from the another VPC where the EC2 is located.
AWS ElastiCache - Creating Memcached Cluster
Memcached is an open source, high-performance, distributed memory caching system intended to speed up dynamic web applications by reducing the database load. It is a key-value dictionary of strings, objects, etc., stored in the memory, resulting from database calls, API calls, or page rendering. AWS supports multiple versions of the Memcached engines to be configured for ElastiCache.
Before we start creating the cluster, we need to finalize the requirements for the cluster which will help us configure the cluster while creating it. The factors that needs to be decided for this step are as below.
Memory and Processor Requirements –As the cluster consist of many nodes, we need to analyse the memory and processing capability of the nodes involved. The Memcached engine is multi-threaded, so a node’s number of cores impacts the compute power available to the cluster. Also, the amount of data you have to store has to be taken into account.
Cluster Configuration –Memcached clusters can have 1 to 20 nodes. The data in a Memcached cluster is partitioned across the nodes in the cluster. So, In addition to the node endpoints, the Memcached cluster itself has an endpoint called the Configuration Endpoint. The endpoints of the nodes should be configured and available through the cluster endpoint.
Scaling Need –Amazon ElastiCache for Memcached clusters can be scaled out or in. To scale a Memcached cluster out or in you merely add or remove nodes from the cluster. When scaling up a Memcached cluster the new cluster will start out empty
Access Requirements –Amazon ElastiCache clusters are accessed from Amazon EC2 instances. Depending on the VPC configuration, you need to authorise proper access to the cluster from the EC2 instance using the security group configuration.
In this chapter we are creating a cluster with the steps shown below
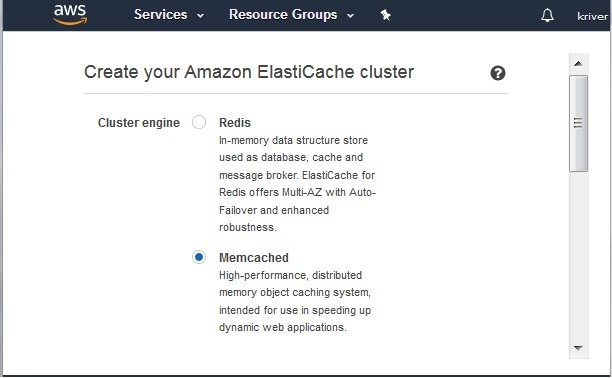
Choose Cluster Type
After your login to your Amazon account, navigate to the ElastiCache home page and choose to create ElastiCache cluster. The below screen pops-up which needs us to select the cluster engine. We choose Memcached as shown below.
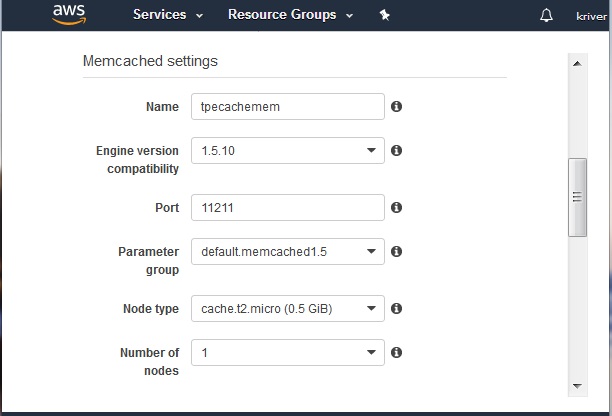
Memcached Settings
Next, we choose the settings to select the Memcached engine version, Node type et. The important points in this step is to select the correct engine version and the node type which will decide the type of computing power you are utilising for the cluster and hence the cost. The port number in this step is the default value of 11211 that is assigned by the platform. The below diagram shows the inputs.
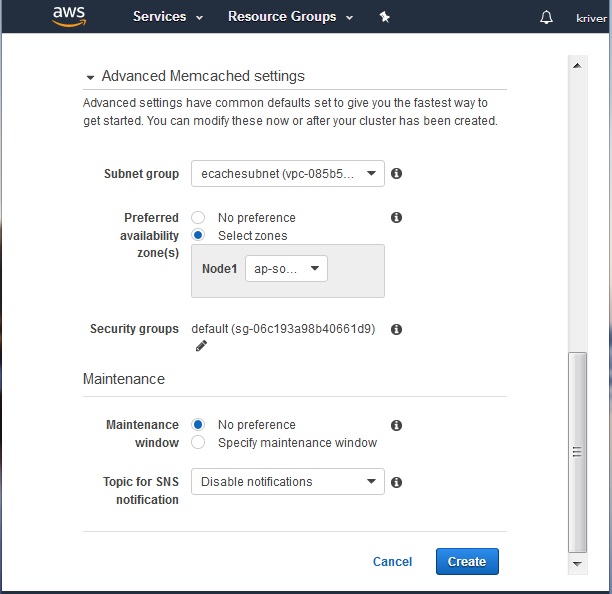
Advanced Memcached Settings
The advanced Memcached settings step asks for the details like the VPC and the subnet we are going to use for this cluster. We choose one of the existing VPC ID we have already created in the AWS account. We choose one of the subnets from one of the availability zones. We do not select any specific time window for maintenance and do not subscribe to SNS notification.
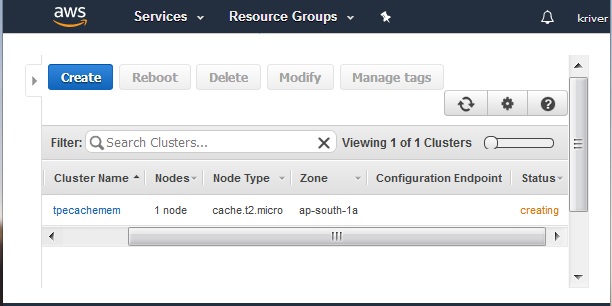
On clicking the create button in the above screen, the cluster creation starts. On visiting the dashboard for Memcached, we find the status of the cluster as creating.
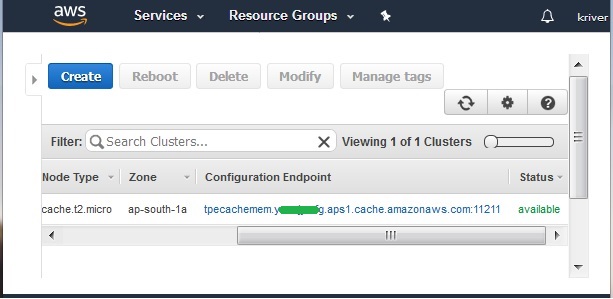
After a while the status changes to available and the cluster’s endpoint is displayed.
AWS ElastiCache - Connecting to Cluster in VPC
The following scenarios are supported by AWS ElastiCache platform to connect to clusters in a VPC. We already know from previous chapters that we use a EC2 instance to connect to a node in a cluster. But the cluster and the EC2 instance may remain in the same VPC or different VPC. Also, they may remain in the same or different regions within the VPCs. Approaches to handle these scenarios are discussed in this chapter.
Following are the access patterns for these scenarios.
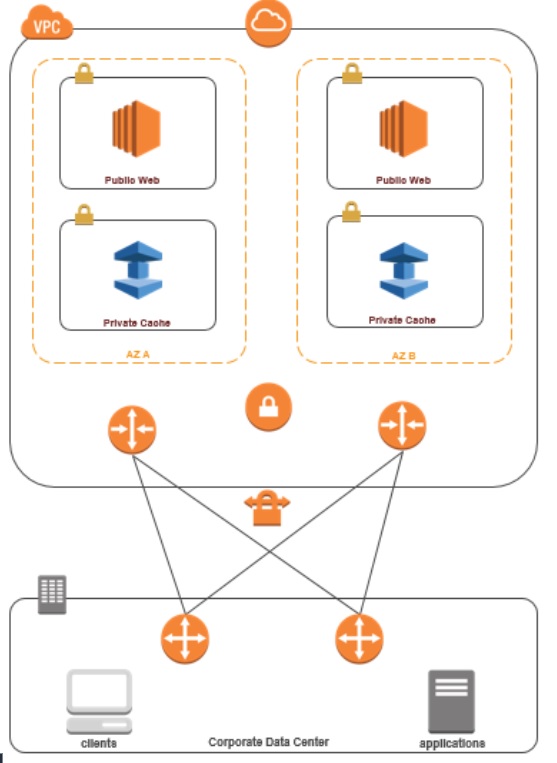
Accessing an ElastiCache Cluster when it and the Amazon EC2 Instance are in the same Amazon VPC
Accessing an ElastiCache Cluster when it and the Amazon EC2 Instance are in Different Amazon VPCs but in the same region
Accessing an ElastiCache Cluster when it and the Amazon EC2 Instance are in Different Amazon VPCs but in different region
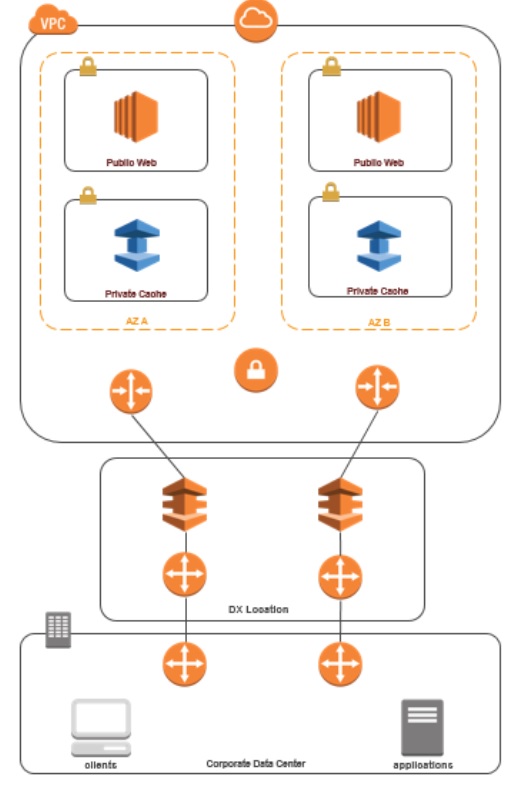
Accessing an ElastiCache Cluster from an Application Running in a Customer's Data Center using VPN connectivity
Accessing an ElastiCache Cluster from an Application Running in a Customer's Data Center using direct connectivity
The first scenario above has already been addressed in the chapter awselasticache_accessing_memcached_cluster.htm and the second scenario is discussed in this chapter.
Different Regions of Different VPCs
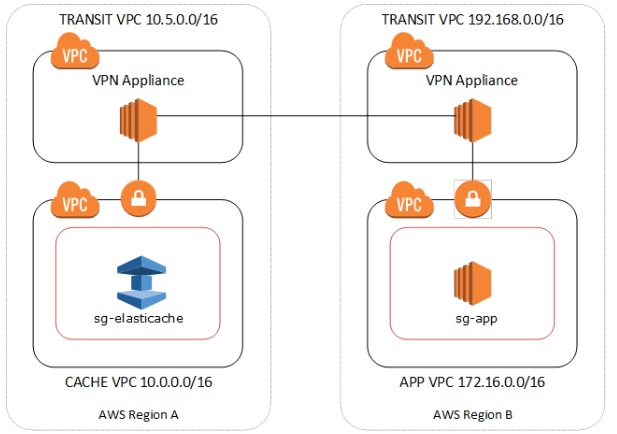
In this scenario, the networks are geographically dispersed. So, we need a transit VPC. A transit VPC simplifies network management and minimizes the number of connections required to connect multiple VPCs and remote networks. This design can save time and effort and also reduce costs, as it is implemented virtually without the traditional expense of establishing a physical presence in a colocation transit hub or deploying physical network gear. The below diagram illustrates how such an arrangement is going to work.
The steps to connect using a transit VPC are listed below.
Deploy a Transit VPC Solution. For more information, see, How do I build a global transit network on AWS.
Update the VPC routing tables in the App and Cache VPCs to route traffic through the VGW (Virtual Private Gateway) and the VPN Appliance. In case of Dynamic Routing with Border Gateway Protocol (BGP) your routes may be automatically propagated.
Modify the Security Group of your ElastiCache cluster to allow inbound connection from the Application instances IP range. Note that you will not be able to reference the application server Security Group in this scenario.
Running in a Customer's Data Center
In this scenario there is a Hybrid architecture where clients or applications in the customer’s data center may need to access an ElastiCache Cluster in the VPC. This scenario is also supported providing there is connectivity between the customers’ VPC and the data center either through VPN or Direct Connect.
Accessing through VPN
The below diagram shows how the transit VPC concelt is going to work through a VPN.
Below are the steps to access the cluster form a client machine using VPN connectivity.
Establish VPN Connectivity by adding a hardware Virtual Private Gateway to your VPC. For more information, see a Hardware Virtual Private Gateway to Your VPC.
Update the VPC routing table for the subnet where your ElastiCache cluster is deployed to allow traffic from your on-premises application server. In case of Dynamic Routing with BGP your routes may be automatically propagated.
Modify the Security Group of your ElastiCache cluster to allow inbound connection from the on-premises application servers
Accessing through Direct Connect
AWS Direct Connect lets you establish a dedicated network connection between your network and one of the AWS Direct Connect locations. This is a dedicated connection can be partitioned into multiple virtual interfaces.
The below diagram indicates how this direct connect is going to work.
The steps to implement for this arrangement are as below.
Establish Direct Connect connectivity. For more information, see, Getting Started with AWS Direct Connect.
Modify the Security Group of your ElastiCache cluster to allow inbound connection from the on-premises application servers.
In all of the above scenarios there will be networking latencies and additional data transfer charges.
AWS ElastiCache - Delete Memcached Cluster
Once you have achieved the purpose of using an ElastiCache cluster, you will eventually reach a point when you no longer need the cluster either because you have a new design in place or you are moving into something else. Hence the need to delete a cluster. Once the status of the cluster changes to deleting, you stop incurring any cost associated with the cluster.
The steps to delete a cluster is very similar to the steps you use to modify a cluster. You first identify the cluster name you want to delete then carry out the delete operation. The below steps illustrate this.
Selecting the Cluster
We login to the AWS console and go to the ElastiCache dashboard. From the dashboard in the left we choose the cluster type as Memcached. Then we see the name of the cluster as a hyperlink in the ElastiCache dashboard. We click on the check box to the left of the name of the cluster. This shows the option to delete the cluster along with other options.
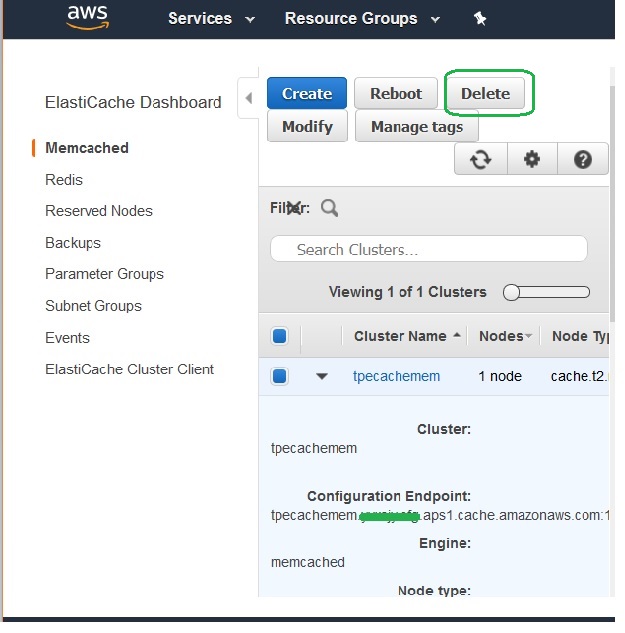
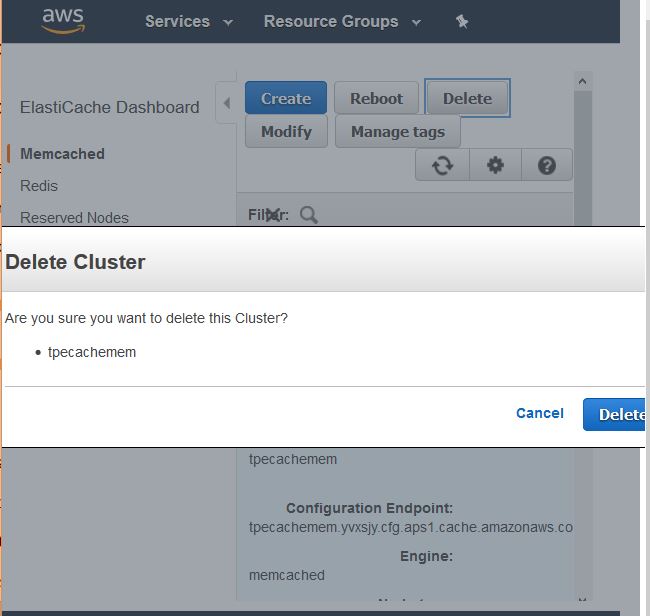
Delete the Cluster
After selecting the check box in the left for the cluster, we choose the delete button. On clicking the delete button, we are presented with a warning prompting us to be sure about the impact of the delete operation. The important point is, once the delete operation starts it can not be stopped or undone.
On confirming by pressing the Delete button we see the status of the cluster change to deleting as shown in the diagram below. After a while on refreshing the screen, the cluster will disappear from the dashboard.
AWS ElastiCache - IAM policies
Using any AWS resource needs permissions from the AWS account holder to the user requesting such permission. Whether it is creation, access or deletion of the resource, all such actions are governed by such permissions. An account administrator can attach permissions policies to IAM identities which are - users, groups, and roles.
Resource Format
In Amazon ElastiCache, the primary resource is a cache cluster. These resources have unique Amazon Resource Names (ARNs) associated with them as shown below. ElastiCache provides a set of operations to work with ElastiCache resources.
ElastiCache Policies
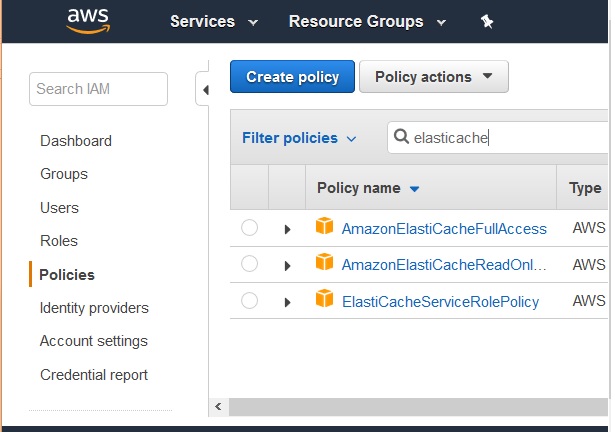
The policies specific to ElastiCache can be searched for by going to IAM dashboard, selecting the policies section from the left tab. In the search box put the term ElastiCache and the result below shows all the policies related to this search term. In the below diagram we see 3 such policies which are owned by AWS.
Policy Summary
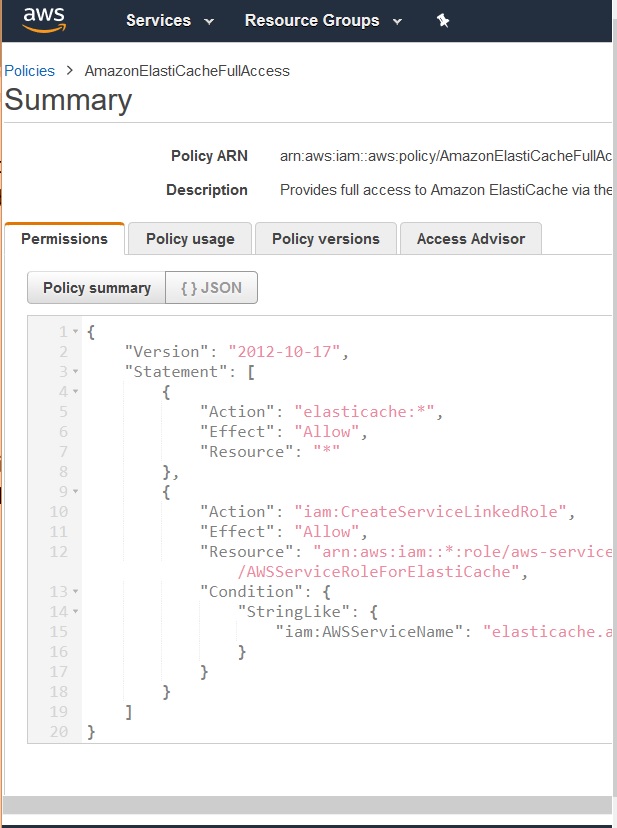
Below is an example of a policy summary which lists the actions allowed and the ARN to which the policy is attached. The * option in action indicates that all actions are allowed. In case we want to restrict the actions in to few values, we can list them here in the policy.
ElastiCache Policy Actions
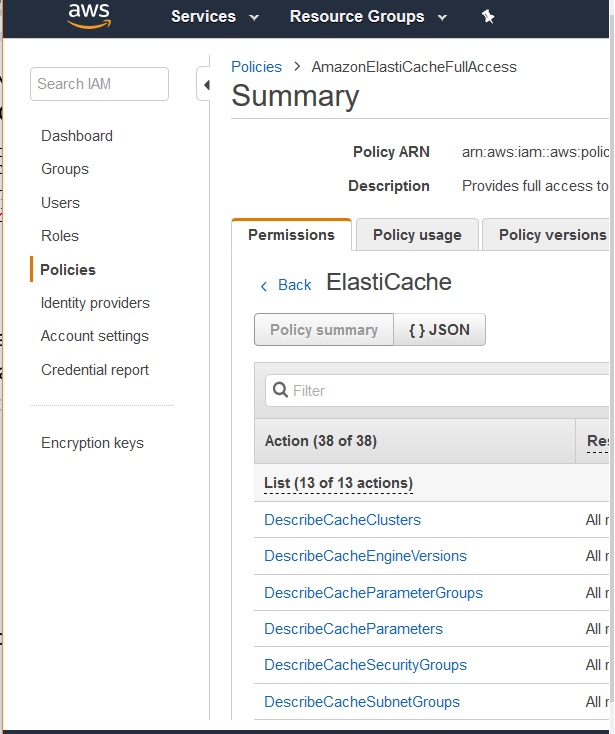
Each policy contains certain actions. Those actions give control to the user to whom the policy is granted. We can select one of the above policies and see the list of action related to that policy.
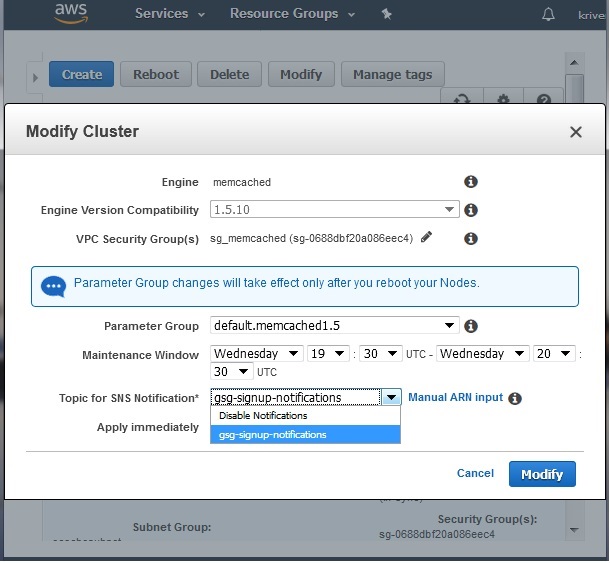
AWS ElastiCache - SNS Notifications
AWS SNS stands for simple notification service. It is used to fan out messages to a large number of subscriber endpoints for parallel processing. For example, used to fan out notifications to end users using mobile push, SMS, and email. We can send messages about important cluster events like, CPU or memory utilization etc., to various subscribers. So that we can keep track of the health of ElastiCache.
Configuring SNS is a straight forward process. Below are the steps we take to configure the SNS topics.
Identify the Cluster
Login to the AWS account and navigate to the ElastiCache dashboard. Next, choose the relevant engine, either Redis and Memcached. Next, choose the name of the cluster in which the SNS service has to be assigned. The below screen represents an example of such a cluster.
Adding SNS Topic
To add the SNS topic we click on the modify button. It presents a screen where we can choose the name of the SNS topic form a dropdown labelled as Topic for SNS Notification . In case we want to put a custom topic and not one listed in the dropdown, we can choose the Manual ARN Input.
Custom SNS Topic
When we click on the Manual ARN Input, the dropdown in the window changes to a text input. We can write the name of the topic we want to be filled in.
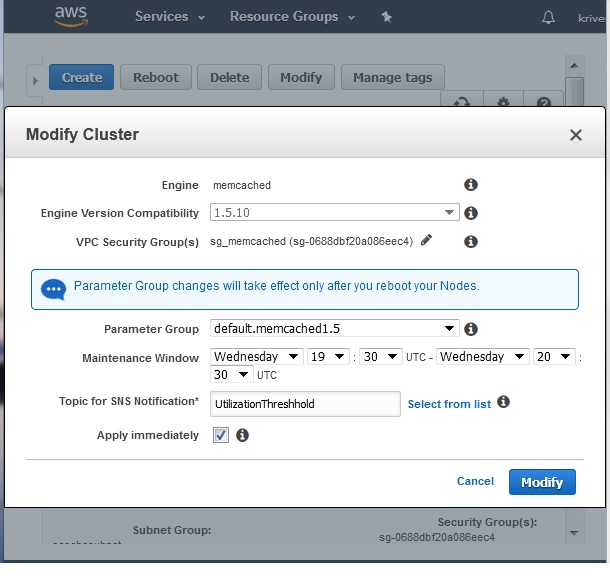
This step can be repeated to change the name of the topic or to remove the existing topics by putting a blank value in the text input box.
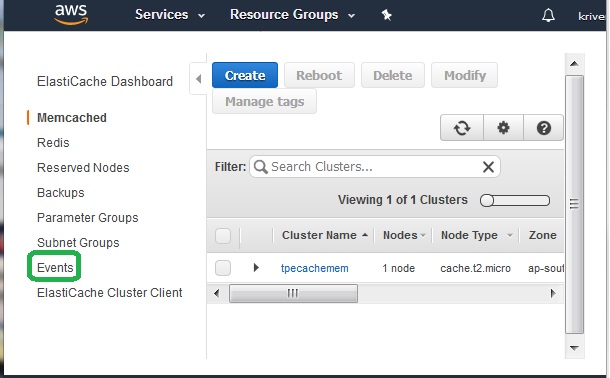
AWS ElastiCache - Events
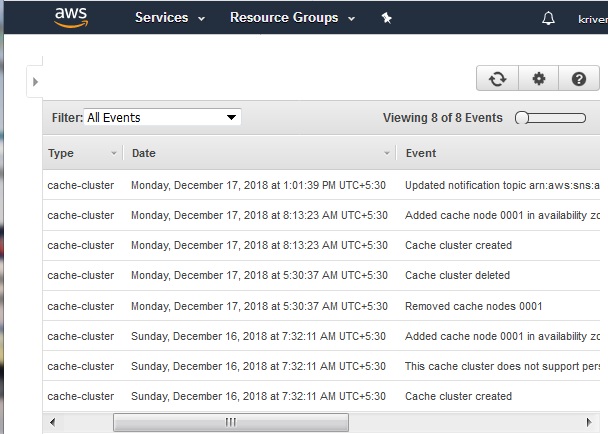
Throughout the lifecycle of the ElastiCache cluster, many things happen, like addition or removal of a node, the SNS notification service being updated etc. These are known as events in ElastiCache. It is important to monitor the events to analyse and enhance the performance of the cluster as well as troubleshoot any issue with the cluster.
These ElastiCache logs events that relate to your cluster instances, security groups, and parameter groups. This information includes the date and time of the event, the source name and source type of the event, and a description of the event.
Accessing Events
To access the log events, we login to the cluster and go to the ElastiCache dashboard. On the left we see various ElastiCache services among which Events is one such service. From the right tab we choose the specific cluster name whose events we want to monitor.
On choosing the above option we can see the list of all the events for that cluster. It also shows the timestamp and the number of events that has occurred for that cluster.
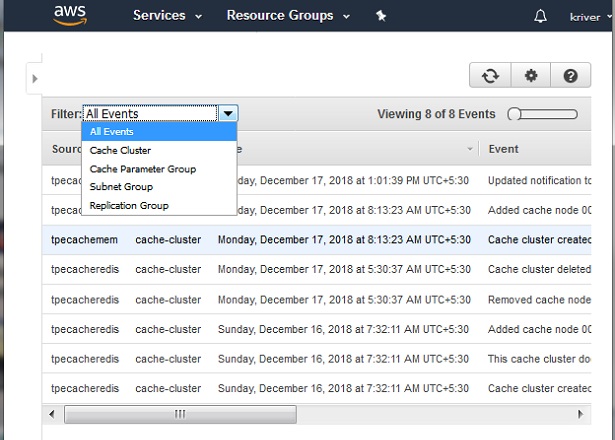
Filtering Event Types
ElastiCache classifies the events into many categories. That makes it easier to narrow the event list to certain types of events needed for our analysis. In the top left corner of the events window we see the drop down showing the filter values. Choosing one of those values gives us the specific type of events.
AWS ElastiCache - Managing Tags
Tags in ElastiCache are also known as cost allocation tags. They are a key-value pair which are associated with one ElastiCache resource. Both the key and the value are case sensitive. You can use the key of a tag to define a category, and the value of the tag can be an item in that category. For example, you can categorise which ElastiCache cluster is used for production and which ones are used for development categories. It is recommended to use a consistent set of tag keys to make it easier to track costs associated with your resources.
Also, you can tag several resources with a specific application name, and then organize your billing information to see the total cost of that application across several services. When you add, list, modify, copy, or remove a tag, the operation is applied only to the specified cluster.
Characteristics of Tags
The tag key is the required name of the tag. The key's string value can be from 1 to 128 Unicode characters long and cannot be prefixed with aws:.
The tag value is the optional value of the tag. The value's string value can be from 1 to 256 Unicode characters in length and cannot be prefixed with aws:.
An ElastiCache resource can have a maximum of 50 tags.
Values do not have to be unique in a tag set.
Cost allocation tags are applied to ElastiCache resources which are specified in CLI and API operations as an ARN.
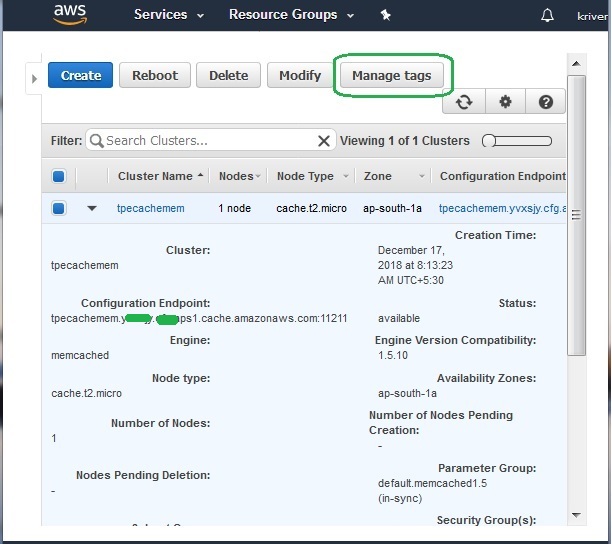
Managing Tags
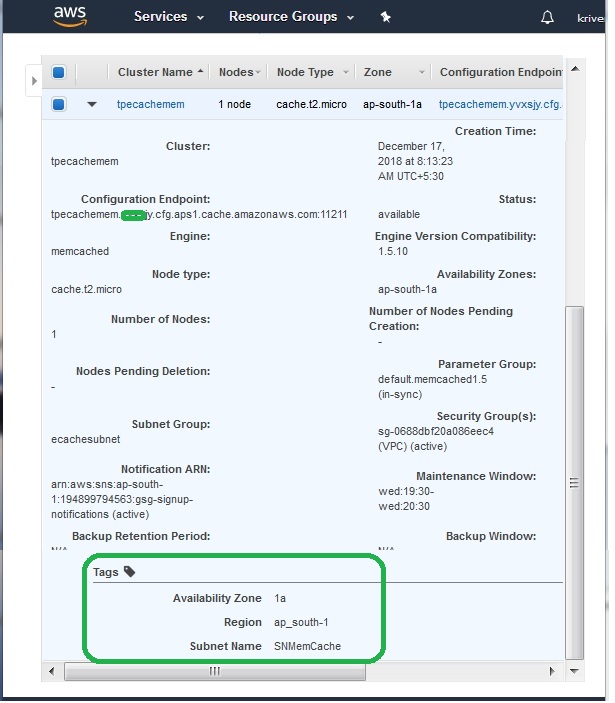
Tags can be created by going to the ElastiCache dashboard, then choosing the specific cluster type. In our case we have chosen the Memcached cluster and use the button named Manage tags .
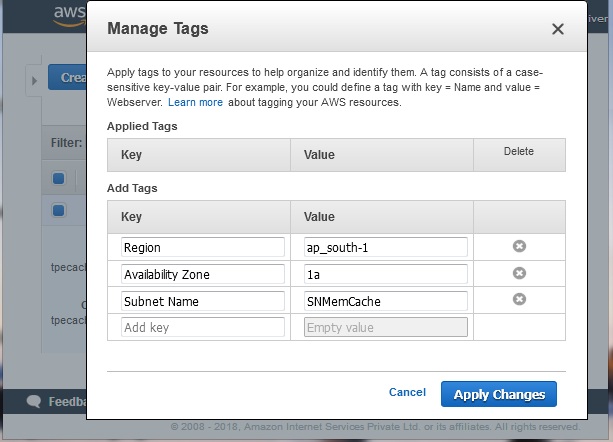
Adding Tags
Clicking on the Manage tags button shown in the step above, we get a screen where we can add tag keys and their values. The value field is optional. To delete a tag, simply use the cross symbol. Click the button Apply Changes to create the actual tag.
Once the tags are applied, we can see them in the cluster details page as shown below.
AWS ElastiCache - Managing Costs
The cost is managed for AWS ElastiCache in two ways. One is using the tags and the other way is by using the pricing for the reserved nodes. The two key factors for cost management are monitoring the utilization of resources and making the prediction of usage as accurate as possible. By studying utilization, we can make adjustments to the configuration so as to reduce the unutilized parts. And by making accurate forecast we can provision only the required resources for a longer time frame and leverage heavily discounted prices.
Using Reserved Nodes
Reserved nodes are charged an upfront fee that depends upon the node type and the length of reservation which is 1 or 3 years. In addition to the upfront charge there is an hourly usage charge which is significantly less than the hourly usage charge you incur with On-Demand nodes. To determine whether reserved nodes would be a cost savings for your use cases, determine the node size and number of nodes you need, estimate the usage of the node, then compare the total cost using On-Demand nodes versus reserved nodes.
To use the reserved nodes for ElastiCache, we take the following steps.
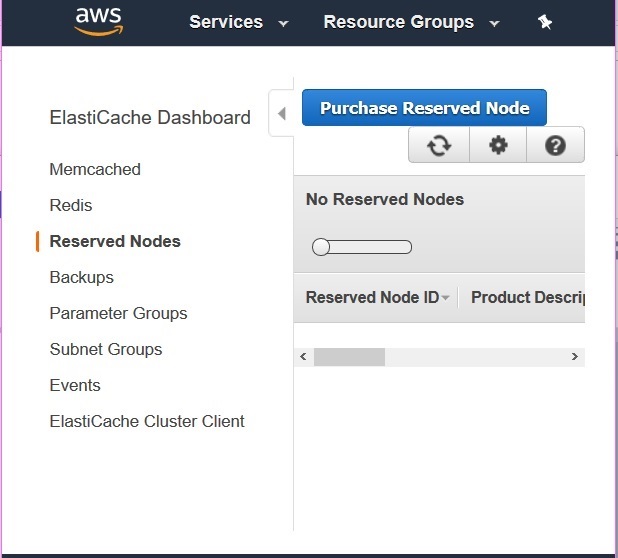
Step-1
First, we navigate to the ElastiCache dashboard. Form the left tab we choose Reserved Nodes option. This will show a button to purchase the reserved nodes. It will also list the reserve nodes you already have.
Step-2
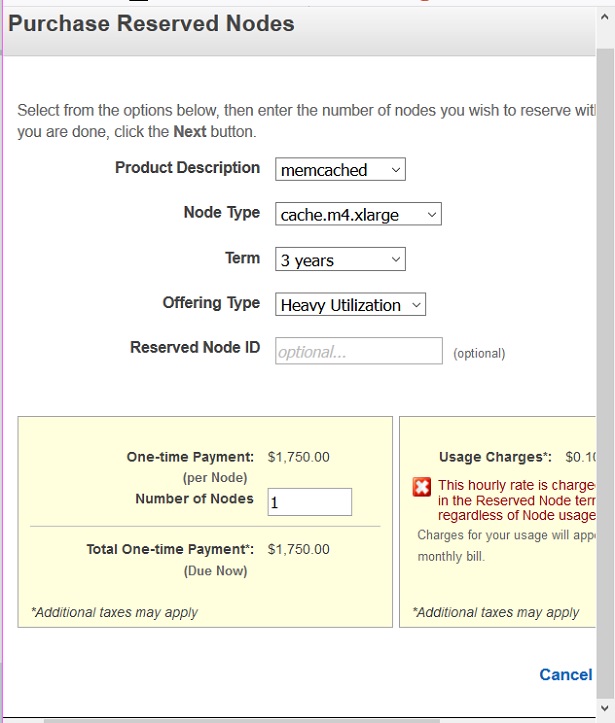
Next, we click on the Purchase Reserved Nodes button. This screen helps us choose the configuration we need for our cluster. It helps us choose the engine type, CPU speed and memory as well as the tenure for which we want to block the reserved nodes.

Step-3
In the next screen we can see the various values in the dropdown. Choosing a specific value in each dropdown we see the cost in the bottom. The current example shows USD 1750 for a heavy utilization offering of type m4 large for 3 years. This is extremely cheap as compared to the on-demand pricing which is billed per hour.
Using Cost Allocation Tags
We can use cost allocation tags to organize the AWS bill to reflect the cost structure by region, department or type of cache engine etc. To see the cost of combined resources, we organize the billing information according to resources with the same tag key values. For example, we can tag several resources with a specific application name, and then organize your billing information to see the total cost of that application across several services.
To track the service costs by region we can use the tag keys Service and Region. On one resource we might have the values ElastiCache and Asia Pacific (Mumbai), and on another resource the values ElastiCache and EU (Frankfurt). Now we can then see your total ElastiCache costs broken out by region.