- ASP.NET Core Tutorial
- ASP.NET Core - Home
- ASP.NET Core - Overview
- ASP.NET Core - Environment Setup
- ASP.NET Core - New Project
- ASP.NET Core - Project Layout
- ASP.NET Core - Project.Json
- ASP.NET Core - Configuration
- ASP.NET Core - Middleware
- ASP.NET Core - Exceptions
- ASP.NET Core - Static Files
- ASP.NET Core - Setup MVC
- ASP.NET Core - MVC Design Pattern
- ASP.NET Core - Routing
- ASP.NET Core - Attribute Routes
- ASP.NET Core - Action Results
- ASP.NET Core - Views
- Setup Entity Framework
- ASP.NET Core - DBContext
- ASP.NET Core - Razor Layout Views
- ASP.NET Core - Razor View Start
- ASP.NET Core - Razor View Import
- ASP.NET Core - Razor Tag Helpers
- ASP.NET Core - Razor Edit Form
- ASP.NET Core - Identity Overview
- ASP.NET Core - Authorize Attribute
- Identity Configuration
- ASP.NET Core - Identity Migrations
- ASP.NET Core - User Registration
- ASP.NET Core - Create a User
- ASP.NET Core - Log In and Log Out
- ASP.NET Core Useful Resources
- ASP.NET Core - Quick Guide
- ASP.NET Core - Useful Resources
- ASP.NET Core - Discussion
ASP.NET Core - User Registration
In this chapter, we will discuss the User registration. We now have a working database, and it is time to start adding some of the features to the application. We have also configured our application and we have a working database schema. Let us now go to the application home page.
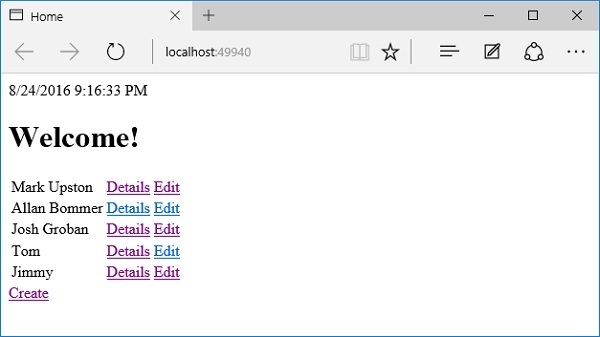
Open the developer tools by pressing F12 and then click on the Edit link. Previously, when we clicked on the Edit link, the MVC framework detected the presence of the Authorize attribute and returned a 401 status code because the user wasn't logged in.
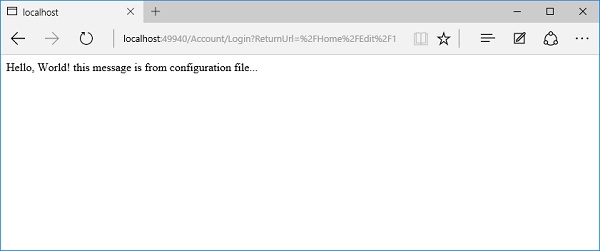
You will now see that we get a message on the screen from the configuration file.
Let us now go to the developer tools.
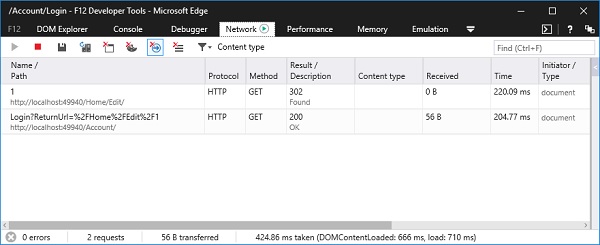
You will see that the browser requested for the edit page, and the MVC framework decided the user is not authorized to view this resource.
So somewhere inside the MVC framework, a 401 status code was generated.
We now have the Identity middleware in place. The Identity middleware looks at that 401 status code that's going to go out to the user and replaces it with a 302 status code, which is a redirect status code.
The Identity framework knows that the user will have to try to log in before it can reach this resource.
The Identity framework directed us to this URL, as we can see in the address bar — /Account/Login.
This is a configurable endpoint with the Identity framework, inside the Startup when you are registering these services and the middleware. There are different options you can set and one of the options is to change the login URL.
By default, the URL is going to be /Account/Login. Currently, we don't have an account controller, so ultimately what we want to do is to create an account controller and allow a user to log in.
But before the users can even log in, they will need to register on the site and save their usernames and a passwords.
Both the login and the register features can be part of an account controller.
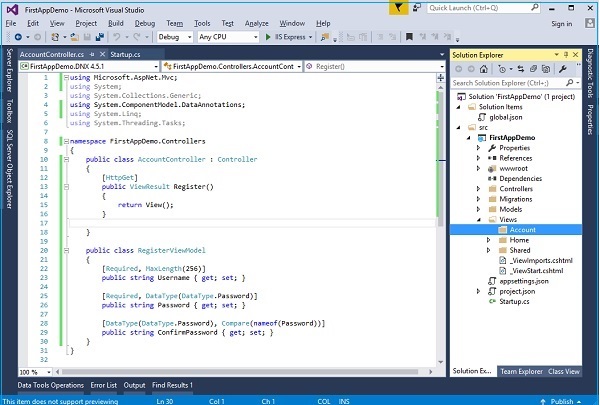
Let us now move ahead and add a new class in Controllers folder, and call it the AccountController. We will derive this from the MVC framework base Controller class.
using Microsoft.AspNet.Mvc;

using System;
using System.Collections.Generic;
using System.ComponentModel.DataAnnotations;
using System.Linq;
using System.Threading.Tasks;

namespace FirstAppDemo.Controllers {
   public class AccountController : Controller {
   }
}
We will now have to set up a feature where a user can register for this site.
It is going to be very much like an edit form.
When the user wants to register, we will first display a form that allows them to fill the required information. They can then upload this form to the site.
This information is then saved on the database.
Let us now create the action that will return a view when we go to /account/register.
public class AccountController : Controller {
   [HttpGet]
   public ViewResult Register() {
      return View();
   }
}
We don't need to look anything up, the user will provide all the information that we need. Before we build the ViewModel for that view, we need to decide on the information that the view will display. We also need to decide on the information that we will need to receive from the user?
Let us create a view model for this scenario by adding a new class in the AccountController.cs file and call this the RegisterViewModel.
Let us create some properties that will hold the Username, Password and also the user ConfirmPassword by typing it twice and making sure that both passwords match as shown in the following program.
public class RegisterViewModel {
   [Required, MaxLength(256)]
   public string Username { get; set; }

   [Required, DataType(DataType.Password)]
   public string Password { get; set; }

   [DataType(DataType.Password), Compare(nameof(Password))]
   public string ConfirmPassword { get; set; }
}
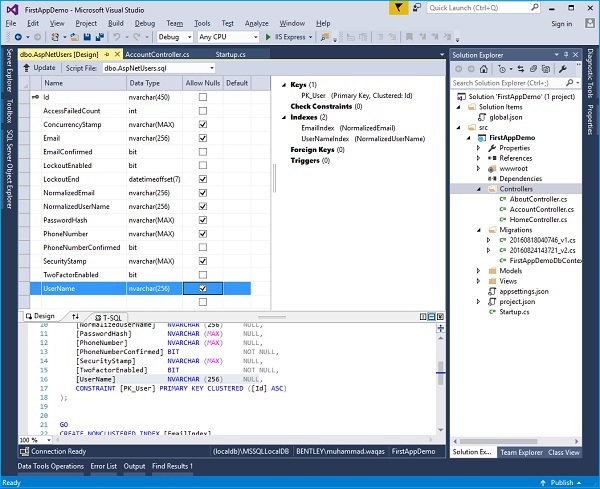
In the above class, you can see some annotations that can help us validate this model. The username is required here and if you look at the database schema, the column to hold a username is 256 characters long.
We will also apply a MaxLength attribute here.
A password is going to be required, and when we render an input for this password, we want the input type to be of Type Password so that the characters don't display on the screen.
The Confirm Password is also going to be the DataType Password and then there is an additional Compare attribute. We will compare the ConfirmPassword field with this other property that we can specify, which is the Password field.
Let us now create the view that we need. We will need to add a new folder to the views and call it Account, so all of the views related to the AccountController will be added in this folder.
Now, right-click on the Account folder and select Add → New Item.
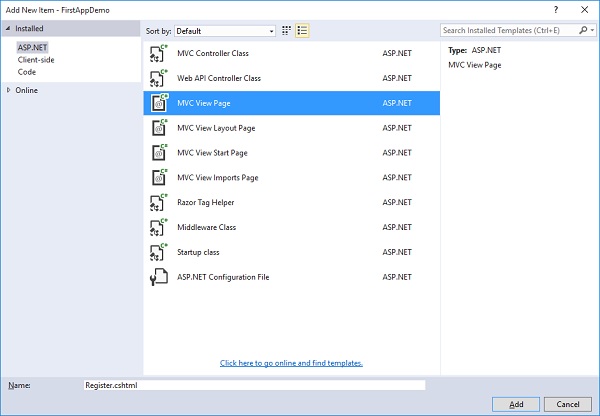
In the middle pane, select the MVC View Page and call it Register.cshtml and then Click on the Add button.
Delete all the existing codes from the Register.cshtml file and add the following code.
@model RegisterViewModel
@{
   ViewBag.Title = "Register";
}
<h1>Register</h1>

<form method = "post" asp-controller = "Account" asp-action = "Register">
   <div asp-validation-summary = "ValidationSummary.ModelOnly"></div>

   <div>
      <label asp-for = "Username"></label>
      <input asp-for = "Username" />
      <span asp-validation-for = "Username"></span>
    </div>

   <div>
      <label asp-for = "Password"></label>
      <input asp-for = "Password" />
      <span asp-validation-for = "Password"></span>
   </div>

   <div>
      <label asp-for = "ConfirmPassword"></label>
      <input asp-for = "ConfirmPassword" />
      <span asp-validation-for = "ConfirmPassword"></span>
   </div>

   <div>
      <input type = "submit" value = "Register" />
   </div>

</form>
You can now see that we have specified the model as the RegisterViewModel that we have just created.
We will also set the title for this page using the ViewBag and we want the title to be Register.
We also need to create a form which contains the fields for Username, Password and ConfirmPassword.
We have also included a div that will display a validation summary. When we use the ASP validation summary, we need to specify what errors are to appear in the summary.
We can have all the errors appear in the summary area, or we can say ValidationSummary.ModelOnly and the only errors that will appear from the model validation inside the summary will be the validation errors that are associated with the model and not a specific property of that model.
In other words, if the users do not fill out their username, but the username is required, and there will be a validation error for that specific property.
But you can also generate model errors that are not associated with a specific property and they will appear in this ValidationSummary.
Inside a <form> tag we have labels and inputs for all of the different fields that we have in our ViewModel.
We need a label for the Username, an input for the Username and also validation messages for the Username.
The other two properties that we need the user to enter are same and that will have a label and input and a span for the Password and a label and an input and a span for ConfirmPassword.
We don't need to specify the input types for the Password and ConfirmPassword, because the asp for tag helper will make sure to set that input type as a password for us.
At the end, we need to have the button that says Register. When the user clicks on this button, we will submit the form back to the controller.
In the AccountController, we also need to implement an HttpPost Register action method. Let us go back to the AccountController and add the following Register action as follows −
[HttpPost]
public IActionResult Register (RegisterViewModel model) {
}
This action method will return an IActionResult. This will receive a RegisterViewModel. Now, we need to interact with the Identity framework to make sure that the user is valid, to tell the Identity framework to create that user, and then since they have just created the account, go ahead and log them in. We will look at implementing all these steps in the next chapter.