- ASP.NET Core Tutorial
- ASP.NET Core - Home
- ASP.NET Core - Overview
- ASP.NET Core - Environment Setup
- ASP.NET Core - New Project
- ASP.NET Core - Project Layout
- ASP.NET Core - Project.Json
- ASP.NET Core - Configuration
- ASP.NET Core - Middleware
- ASP.NET Core - Exceptions
- ASP.NET Core - Static Files
- ASP.NET Core - Setup MVC
- ASP.NET Core - MVC Design Pattern
- ASP.NET Core - Routing
- ASP.NET Core - Attribute Routes
- ASP.NET Core - Action Results
- ASP.NET Core - Views
- Setup Entity Framework
- ASP.NET Core - DBContext
- ASP.NET Core - Razor Layout Views
- ASP.NET Core - Razor View Start
- ASP.NET Core - Razor View Import
- ASP.NET Core - Razor Tag Helpers
- ASP.NET Core - Razor Edit Form
- ASP.NET Core - Identity Overview
- ASP.NET Core - Authorize Attribute
- Identity Configuration
- ASP.NET Core - Identity Migrations
- ASP.NET Core - User Registration
- ASP.NET Core - Create a User
- ASP.NET Core - Log In and Log Out
- ASP.NET Core Useful Resources
- ASP.NET Core - Quick Guide
- ASP.NET Core - Useful Resources
- ASP.NET Core - Discussion
ASP.NET Core - Setup Entity Framework
In this chapter, we will set up and configure our application to save and read data from a SQL Server database.
To work with a database, we are going to use the Entity Framework, which is freshly rewritten to work with the new .NET Framework. If you have worked with EF in the past, you will see many familiar pieces.
In this application, we will use the SQL Server LocalDB. If you are not comfortable with the SQL Server, you can use any database that you like such as local database, remote database, as long as you have permission to create a new database on the instance.
LocalDB is a special edition of SQL Server that is optimized for developers.
Visual Studio 2015 and even its Community edition will install LocalDB by default.
To check the LocalDB, go to the View → SQL Server Object Explorer menu option in Visual Studio.

This is a great tool if you have to work with SQL Server because it allows you to explore databases and browse data and even create data inside a database. When you first open it, it might take a little time, but it should connect to the LocalDB automatically.
Install Entity Framework
The first step in using the Entity Framework is to install the Entity Framework NuGet package from the NuGet package manager or by editing the project.json file directly.
Let us now edit the project.json file directly by adding the following two packages.
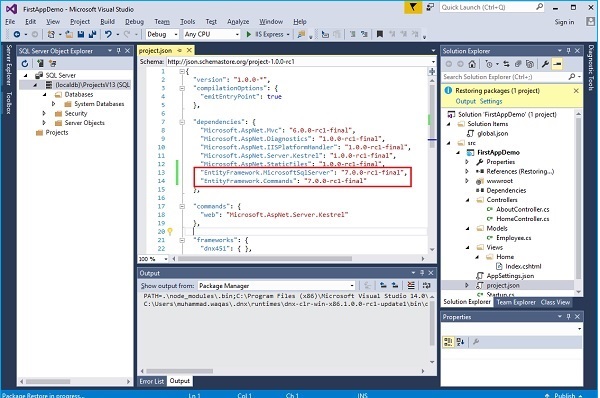
The EntityFramework.Commands package helps us perform tasks with the Entity Framework like creating a database schema based on our C# Entity classes and these tasks are available from a command line tool where the logic lives inside the EntityFramework.Commands package.
In order to use this command line tool, we need to make an additional entry into the commands section of project.json as shown in the following screenshot.
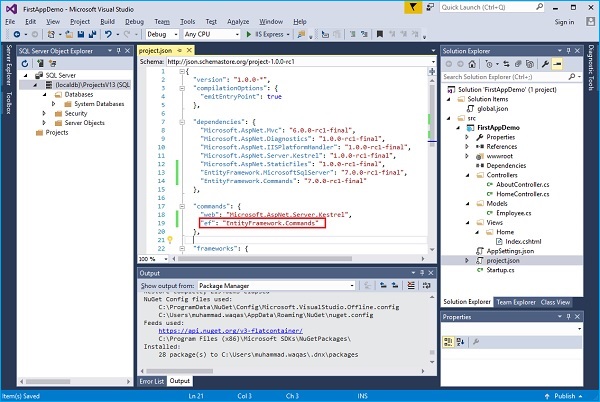
We have just called it “ef” and that will map to this EntityFramework.Commands package. We can use this “ef” to get access to some of the logic that is available inside EntityFramework.Commands.
The following is the implementation of the project.json file.
{
   "version": "1.0.0-*",
   "compilationOptions": {
      "emitEntryPoint": true
   },

   "dependencies": {
      "Microsoft.AspNet.Mvc": "6.0.0-rc1-final",
      "Microsoft.AspNet.Diagnostics": "1.0.0-rc1-final",
      "Microsoft.AspNet.IISPlatformHandler": "1.0.0-rc1-final",
      "Microsoft.AspNet.Server.Kestrel": "1.0.0-rc1-final",
      "Microsoft.AspNet.StaticFiles": "1.0.0-rc1-final",
      "EntityFramework.MicrosoftSqlServer": "7.0.0-rc1-final",
      "EntityFramework.Commands": "7.0.0-rc1-final"
   }

   "commands": {
      "web": "Microsoft.AspNet.Server.Kestrel"
   },

   "frameworks": {
      "dnx451": { },
      "dnxcore50": { }
   },

   "exclude": [
      "wwwroot",
      "node_modules"
   ],

   "publishExclude": [
      "**.user",
      "**.vspscc"
   ]
}