- ArangoDB Tutorial
- ArangoDB - Home
- A Multi-Model First Database
- ArangoDB – Advantages
- Basic Concepts & Terminologies
- ArangoDB – System Requirements
- ArangoDB – Command Line
- ArangoDB - Web Interface
- ArangoDB - Example Case Scenarios
- Data Models & Modeling
- ArangoDB - Database Methods
- ArangoDB - Crud Operations
- Crud Operations Using Web Interface
- Querying The Data With AQL
- ArangoDB - AQL Example Queries
- ArangoDB – How To Deploy
- ArangoDB Useful Resources
- ArangoDB - Quick Guide
- ArangoDB - Useful Resources
- ArangoDB - Discussion
ArangoDB - Web Interface
In this chapter, we will learn how to enable/disable the Authentication, and how to bind the ArangoDB to the Public Network Interface.
# arangosh --server.endpoint tcp://127.0.0.1:8529 --server.database "_system"
It will prompt you for the password saved earlier −
Please specify a password:
Use the password you created for root, at the configuration.
You can also use curl to check that you are actually getting HTTP 401 (Unauthorized) server responses for requests that require authentication −
# curl --dump - http://127.0.0.1:8529/_api/version
Output
HTTP/1.1 401 Unauthorized
X-Content-Type-Options: nosniff
Www-Authenticate: Bearer token_type = "JWT", realm = "ArangoDB"
Server: ArangoDB
Connection: Keep-Alive
Content-Type: text/plain; charset = utf-8
Content-Length: 0
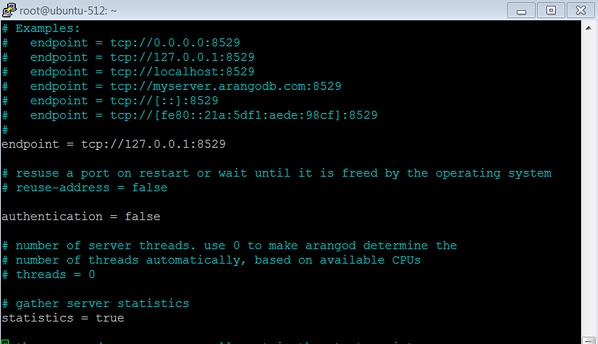
To avoid entering the password each time during our learning process, we will disable the authentication. For that, open the configuration file −
# vim /etc/arangodb3/arangod.conf
You should change the color scheme if the code is not properly visible.
:colorscheme desert
Set authentication to false as shown in the screenshot below.

Restart the service −
# service arangodb3 restart
On making the authentication false, you will be able to login (either with root or created user like Harry in this case) without entering any password in please specify a password.
Let us check the api version when the authentication is switched off −
# curl --dump - http://127.0.0.1:8529/_api/version
Output
HTTP/1.1 200 OK
X-Content-Type-Options: nosniff
Server: ArangoDB
Connection: Keep-Alive
Content-Type: application/json; charset=utf-8
Content-Length: 60
{"server":"arango","version":"3.1.27","license":"community"}