- Apache Tajo Tutorial
- Apache Tajo - Home
- Apache Tajo - Introduction
- Apache Tajo - Architecture
- Apache Tajo - Installation
- Apache Tajo - Configuration Settings
- Apache Tajo - Shell Commands
- Apache Tajo - Data Types
- Apache Tajo - Operators
- Apache Tajo - SQL Functions
- Apache Tajo - Math Functions
- Apache Tajo - String Functions
- Apache Tajo - DateTime Functions
- Apache Tajo - JSON Functions
- Apache Tajo - Database Creation
- Apache Tajo - Table Management
- Apache Tajo - SQL Statements
- Aggregate & Window Functions
- Apache Tajo - SQL Queries
- Apache Tajo - Storage Plugins
- Integration with HBase
- Apache Tajo - Integration with Hive
- OpenStack Swift Integration
- Apache Tajo - JDBC Interface
- Apache Tajo - Custom Functions
- Apache Tajo Useful Resources
- Apache Tajo - Quick Guide
- Apache Tajo - Useful Resources
- Apache Tajo - Discussion
Apache Tajo - SQL Statements
In the previous chapter, you have understood how to create tables in Tajo. This chapter explains about the SQL statement in Tajo.
Create Table Statement
Before moving to create a table, create a text file “students.csv” in Tajo installation directory path as follows −
students.csv
| Id | Name | Address | Age | Marks |
|---|---|---|---|---|
| 1 | Adam | 23 New Street | 21 | 90 |
| 2 | Amit | 12 Old Street | 13 | 95 |
| 3 | Bob | 10 Cross Street | 12 | 80 |
| 4 | David | 15 Express Avenue | 12 | 85 |
| 5 | Esha | 20 Garden Street | 13 | 50 |
| 6 | Ganga | 25 North Street | 12 | 55 |
| 7 | Jack | 2 Park Street | 12 | 60 |
| 8 | Leena | 24 South Street | 12 | 70 |
| 9 | Mary | 5 West Street | 12 | 75 |
| 10 | Peter | 16 Park Avenue | 12 | 95 |
After the file has been created, move to the terminal and start the Tajo server and shell one by one.
Create Database
Create a new database using the following command −
Query
default> create database sampledb;
OK
Connect to the database “sampledb” which is now created.
default> \c sampledb
You are now connected to database "sampledb" as user “user1”.
Then, create a table in “sampledb” as follows −
Query
sampledb>  create external table mytable(id int,name text,address text,age int,mark int)
   using text with('text.delimiter' = ',') location ‘file:/Users/workspace/Tajo/students.csv’;
Result
The above query will generate the following result.
OK
Here, the external table is created. Now, you just have to enter the file location. If you have to assign the table from hdfs then use hdfs instead of file.
Next, the “students.csv” file contains comma separated values. The text.delimiter field is assigned with ‘,’.
You have now created “mytable” successfully in “sampledb”.
Show Table
To show tables in Tajo, use the following query.
Query
sampledb> \d
mytable
sampledb> \d mytable
Result
The above query will generate the following result.
table name: sampledb.mytable
table uri: file:/Users/workspace/Tajo/students.csv
store type: TEXT
number of rows: unknown
volume: 261 B
Options:
'timezone' = 'Asia/Kolkata'
'text.null' = '\\N'
'text.delimiter' = ','
schema:
id INT4
name TEXT
address TEXT
age INT4
mark INT4
List table
To fetch all the records in the table, type the following query −
Query
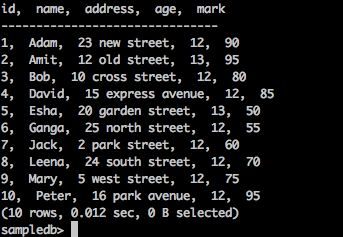
sampledb> select * from mytable;
Result
The above query will generate the following result.

Insert Table Statement
Tajo uses the following syntax to insert records in table.
Syntax
create table table1 (col1 int8, col2 text, col3 text);
--schema should be same for target table schema
Insert overwrite into table1 select * from table2;
                     (or)
Insert overwrite into LOCATION '/dir/subdir' select * from table;
Tajo’s insert statement is similar to the INSERT INTO SELECT statement of SQL.
Query
Let’s create a table to overwrite table data of an existing table.
sampledb> create table test(sno int,name text,addr text,age int,mark int);
OK
sampledb> \d
Result
The above query will generate the following result.
mytable
test
Insert Records
To insert records in the “test” table, type the following query.
Query
sampledb> insert overwrite into test select * from mytable;
Result
The above query will generate the following result.
Progress: 100%, response time: 0.518 sec
Here, “mytable" records overwrite the “test” table. If you don’t want to create the “test” table, then straight away assign the physical path location as mentioned in an alternative option for insert query.
Fetch records
Use the following query to list out all the records in the “test” table −
Query
sampledb> select * from test;
Result
The above query will generate the following result.
This statement is used to add, remove or modify columns of an existing table.
To rename the table use the following syntax −
Alter table table1 RENAME TO table2;
Query
sampledb> alter table test rename to students;
Result
The above query will generate the following result.
OK
To check the changed table name, use the following query.
sampledb> \d
mytable
students
Now the table “test” is changed to “students” table.
Add Column
To insert new column in the “students” table, type the following syntax −
Alter table <table_name> ADD COLUMN <column_name> <data_type>
Query
sampledb> alter table students add column grade text;
Result
The above query will generate the following result.
OK
Set Property
This property is used to change the table’s property.
Query
sampledb> ALTER TABLE students SET PROPERTY 'compression.type' = 'RECORD',
   'compression.codec' = 'org.apache.hadoop.io.compress.Snappy Codec' ;
OK
Here, compression type and codec properties are assigned.
To change the text delimiter property, use the following −
Query
ALTER TABLE students  SET PROPERTY ‘text.delimiter'=',';
OK
Result
The above query will generate the following result.
sampledb> \d students
table name: sampledb.students
table uri: file:/tmp/tajo-user1/warehouse/sampledb/students
store type: TEXT
number of rows: 10
volume: 228 B
Options:
'compression.type' = 'RECORD'
'timezone' = 'Asia/Kolkata'
'text.null' = '\\N'
'compression.codec' = 'org.apache.hadoop.io.compress.SnappyCodec'
'text.delimiter' = ','
schema:
id INT4
name TEXT
addr TEXT
age INT4
mark INT4
grade TEXT
The above result shows that the table’s properties are changed using the “SET” property.
Select Statement
The SELECT statement is used to select data from a database.
The syntax for the Select statement is as follows −
SELECT [distinct [all]] * | <expression> [[AS] <alias>] [, ...]
   [FROM <table reference> [[AS] <table alias name>] [, ...]]
   [WHERE <condition>]
   [GROUP BY <expression> [, ...]]
   [HAVING <condition>]
   [ORDER BY <expression> [ASC|DESC] [NULLS (FIRST|LAST)] [, …]]
Where Clause
The Where clause is used to filter records from the table.
Query
sampledb> select * from mytable where id > 5;
Result
The above query will generate the following result.
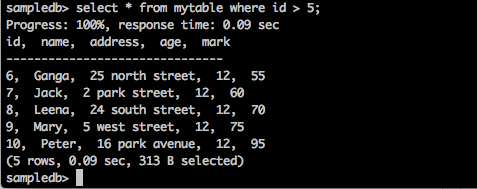
The query returns the records of those students whose id is greater than 5.
Query
sampledb> select * from mytable where name = ‘Peter’;
Result
The above query will generate the following result.
Progress: 100%, response time: 0.117 sec

  id,  name,  address,   age
-------------------------------
10,  Peter,  16 park avenue , 12
The result filters Peter’s records only.
Distinct Clause
A table column may contain duplicate values. The DISTINCT keyword can be used to return only distinct (different) values.
Syntax
SELECT DISTINCT column1,column2 FROM table_name;
Query
sampledb> select distinct age from mytable;
Result
The above query will generate the following result.
Progress: 100%, response time: 0.216 sec
age
-------------------------------
13
12
The query returns the distinct age of students from mytable.
Group By Clause
The GROUP BY clause is used in collaboration with the SELECT statement to arrange identical data into groups.
Syntax
SELECT column1, column2 FROM table_name WHERE [ conditions ] GROUP BY column1, column2;
Query
select age,sum(mark) as sumofmarks from mytable group by age;
Result
The above query will generate the following result.
age,  sumofmarks
-------------------------------
13,  145
12,  610
Here, the “mytable" column has two types of ages — 12 and 13. Now the query groups the records by age and produces the sum of marks for the corresponding ages of students.
Having Clause
The HAVING clause enables you to specify conditions that filter which group results appear in the final results. The WHERE clause places conditions on the selected columns, whereas the HAVING clause places conditions on the groups created by the GROUP BY clause.
Syntax
SELECT column1, column2 FROM table1 GROUP BY column HAVING [ conditions ]
Query
sampledb> select age from mytable group by age having sum(mark) > 200;
Result
The above query will generate the following result.
age
-------------------------------
12
The query groups the records by age and returns the age when the condition result sum(mark) > 200.
Order By Clause
The ORDER BY clause is used to sort the data in ascending or descending order, based on one or more columns. The Tajo database sorts query results in ascending order by default.
Syntax
SELECT column-list FROM table_name
[WHERE condition]
[ORDER BY column1, column2, .. columnN] [ASC | DESC];
Query
sampledb> select * from mytable where mark > 60 order by name desc;
Result
The above query will generate the following result.
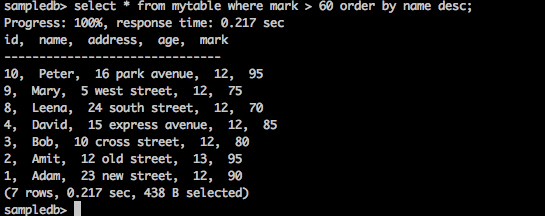
The query returns the names of those students in descending order whose marks are greater than 60.
Create Index Statement
The CREATE INDEX statement is used to create indexes in tables. Index is used for fast retrieval of data. Current version supports index for only plain TEXT formats stored on HDFS.
Syntax
CREATE INDEX [ name ] ON table_name ( { column_name | ( expression ) }
Query
create index student_index on mytable(id);
Result
The above query will generate the following result.
id
———————————————
To view assigned index for the column, type the following query.
default> \d mytable
table name: default.mytable
table uri: file:/Users/deiva/workspace/Tajo/students.csv
store type: TEXT
number of rows: unknown
volume: 307 B
Options:
   'timezone' = 'Asia/Kolkata'
   'text.null' = '\\N'
   'text.delimiter' = ','
schema:
id INT4
name TEXT
address TEXT
age INT4
mark INT4
Indexes:
"student_index" TWO_LEVEL_BIN_TREE (id ASC NULLS LAST )
Here, TWO_LEVEL_BIN_TREE method is used by default in Tajo.
Drop Table Statement
The Drop Table Statement is used to drop a table from the database.
Syntax
drop table table name;
Query
sampledb> drop table mytable;
To check if the table has been dropped from the table, type the following query.
sampledb> \d mytable;
Result
The above query will generate the following result.
ERROR: relation 'mytable' does not exist
You can also check the query using “\d” command to list out the available Tajo tables.