- Apache Tajo Tutorial
- Apache Tajo - Home
- Apache Tajo - Introduction
- Apache Tajo - Architecture
- Apache Tajo - Installation
- Apache Tajo - Configuration Settings
- Apache Tajo - Shell Commands
- Apache Tajo - Data Types
- Apache Tajo - Operators
- Apache Tajo - SQL Functions
- Apache Tajo - Math Functions
- Apache Tajo - String Functions
- Apache Tajo - DateTime Functions
- Apache Tajo - JSON Functions
- Apache Tajo - Database Creation
- Apache Tajo - Table Management
- Apache Tajo - SQL Statements
- Aggregate & Window Functions
- Apache Tajo - SQL Queries
- Apache Tajo - Storage Plugins
- Integration with HBase
- Apache Tajo - Integration with Hive
- OpenStack Swift Integration
- Apache Tajo - JDBC Interface
- Apache Tajo - Custom Functions
- Apache Tajo Useful Resources
- Apache Tajo - Quick Guide
- Apache Tajo - Useful Resources
- Apache Tajo - Discussion
Apache Tajo - Installation
To install Apache Tajo, you must have the following software on your system −
- Hadoop version 2.3 or greater
- Java version 1.7 or higher
- Linux or Mac OS
Let us now continue with the following steps to install Tajo.
Verifying Java installation
Hopefully, you have already installed Java version 8 on your machine. Now, you just need to proceed by verifying it.
To verify, use the following command −
$ java -version
If Java is successfully installed on your machine, you could see the present version of the installed Java. If Java is not installed follow these steps to install Java 8 on your machine.
Download JDK
Download the latest version of JDK by visiting the following link and then, download the latest version.
The latest version is JDK 8u 92 and the file is “jdk-8u92-linux-x64.tar.gz”. Please download the file on your machine. Following this, extract the files and move them to a specific directory. Now, set the Java alternatives. Finally, Java is installed on your machine.
Verifying Hadoop Installation
You have already installed Hadoop on your system. Now, verify it using the following command −
$ hadoop version
If everything is fine with your setup, then you could see the version of Hadoop. If Hadoop is not installed, download and install Hadoop by visiting the following link − https://www.apache.org
Apache Tajo Installation
Apache Tajo provides two execution modes — local mode and fully distributed mode. After verifying Java and Hadoop installation proceed with the following steps to install Tajo cluster on your machine. A local mode Tajo instance requires very easy configurations.
Download the latest version of Tajo by visiting the following link − https://www.apache.org/dyn/closer.cgi/tajo
Now you can download the file “tajo-0.11.3.tar.gz” from your machine.
Extract Tar File
Extract the tar file by using the following command −
$ cd opt/
$ tar tajo-0.11.3.tar.gz
$ cd tajo-0.11.3
Set Environment Variable
Add the following changes to “conf/tajo-env.sh” file
$ cd tajo-0.11.3
$ vi conf/tajo-env.sh

# Hadoop home. Required
export HADOOP_HOME = /Users/path/to/Hadoop/hadoop-2.6.2

# The java implementation to use.  Required.
export JAVA_HOME = /path/to/jdk1.8.0_92.jdk/
Here, you must specify Hadoop and Java path to “tajo-env.sh” file. After the changes are made, save the file and quit the terminal.
Start Tajo Server
To launch the Tajo server, execute the following command −
$ bin/start-tajo.sh
You will receive a response similar to the following −
Starting single TajoMaster
starting master, logging to /Users/path/to/Tajo/tajo-0.11.3/bin/../
localhost: starting worker, logging to /Users/path/toe/Tajo/tajo-0.11.3/bin/../logs/

Tajo master web UI: http://local:26080
Tajo Client Service: local:26002
Now, type the command “jps” to see the running daemons.
$ jps
1010 TajoWorker
1140 Jps
933 TajoMaster
Launch Tajo Shell (Tsql)
To launch the Tajo shell client, use the following command −
$ bin/tsql
You will receive the following output −
welcome to
   _____ ___  _____ ___
  /_  _/ _  |/_  _/   /
   / // /_| |_/ // / /
  /_//_/ /_/___/ \__/  0.11.3

Try \? for help.
Quit Tajo Shell
Execute the following command to quit Tsql −
default> \q
bye!
Here, the default refers to the catalog in Tajo.
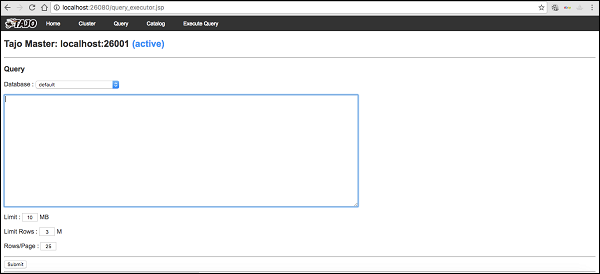
Web UI
Type the following URL to launch the Tajo web UI − http://localhost:26080/
You will now see the following screen which is similar to the ExecuteQuery option.
Stop Tajo
To stop the Tajo server, use the following command −
$ bin/stop-tajo.sh
You will get the following response −
localhost: stopping worker
stopping master