- Apache Storm Tutorial
- Apache Storm - Home
- Apache Storm - Introduction
- Apache Storm - Core Concepts
- Apache Storm - Cluster Architecture
- Apache Storm - Workflow
- Storm - Distributed Msging System
- Apache Storm - Installation
- Apache Storm - Working Example
- Apache Storm - Trident
- Apache Storm in Twitter
- Apache Storm in Yahoo! Finance
- Apache Storm - Applications
- Apache Storm Useful Resources
- Apache Storm - Quick Guide
- Apache Storm - Useful Resources
- Apache Storm - Discussion
Apache Storm - Installation
Let us now see how to install Apache Storm framework on your machine. There are three majo steps here −
- Install Java on your system, if you don’t have it already.
- Install ZooKeeper framework.
- Install Apache Storm framework.
Step 1 − Verifying Java Installation
Use the following command to check whether you have Java already installed on your system.
$ java -version
If Java is already there, then you would see its version number. Else, download the latest version of JDK.
Step 1.1 − Download JDK
Download the latest version of JDK by using the following link − www.oracle.com
The latest version is JDK 8u 60 and the file is “jdk-8u60-linux-x64.tar.gz”. Download the file on your machine.
Step 1.2 − Extract files
Generally files are being downloaded onto the downloads folder. Extract the tar setup using the following commands.
$ cd /go/to/download/path
$ tar -zxf jdk-8u60-linux-x64.gz
Step 1.3 − Move to opt directory
To make Java available to all users, move the extracted java content to “/usr/local/java” folder.
$ su
password: (type password of root user)
$ mkdir /opt/jdk
$ mv jdk-1.8.0_60 /opt/jdk/
Step 1.4 − Set path
To set path and JAVA_HOME variables, add the following commands to ~/.bashrc file.
export JAVA_HOME =/usr/jdk/jdk-1.8.0_60
export PATH=$PATH:$JAVA_HOME/bin
Now apply all the changes in to the current running system.
$ source ~/.bashrc
Step 1.5 − Java Alternatives
Use the following command to change Java alternatives.
update-alternatives --install /usr/bin/java java /opt/jdk/jdk1.8.0_60/bin/java 100
Step 1.6
Now verify the Java installation using the verification command (java -version) explained in Step 1.
Step 2 − ZooKeeper Framework Installation
Step 2.1 − Download ZooKeeper
To install ZooKeeper framework on your machine, visit the following link and download the latest version of ZooKeeper http://zookeeper.apache.org/releases.html
As of now, the latest version of ZooKeeper is 3.4.6 (ZooKeeper-3.4.6.tar.gz).
Step 2.2 − Extract tar file
Extract the tar file using the following commands −
$ cd opt/
$ tar -zxf zookeeper-3.4.6.tar.gz
$ cd zookeeper-3.4.6
$ mkdir data
Step 2.3 − Create configuration file
Open configuration file named “conf/zoo.cfg” using the command "vi conf/zoo.cfg" and setting all the following parameters as starting point.
$ vi conf/zoo.cfg
tickTime=2000
dataDir=/path/to/zookeeper/data
clientPort=2181
initLimit=5
syncLimit=2
Once the configuration file has been saved successfully, you can start the ZooKeeper server.
Step 2.4 − Start ZooKeeper Server
Use the following command to start the ZooKeeper server.
$ bin/zkServer.sh start
After executing this command, you will get a response as follows −
$ JMX enabled by default
$ Using config: /Users/../zookeeper-3.4.6/bin/../conf/zoo.cfg
$ Starting zookeeper ... STARTED
Step 2.5 − Start CLI
Use the following command to start the CLI.
$ bin/zkCli.sh
After executing the above command, you will be connected to the ZooKeeper server and get the following response.
Connecting to localhost:2181
................
................
................
Welcome to ZooKeeper!
................
................
WATCHER::
WatchedEvent state:SyncConnected type: None path:null
[zk: localhost:2181(CONNECTED) 0]
Step 2.6 − Stop ZooKeeper Server
After connecting the server and performing all the operations, you can stop the ZooKeeper server by using the following command.
bin/zkServer.sh stop
You have successfully installed Java and ZooKeeper on your machine. Let us now see the steps to install Apache Storm framework.
Step 3 − Apache Storm Framework Installation
Step 3.1 Download Storm
To install Storm framework on your machine, visit the following link and download the latest version of Storm http://storm.apache.org/downloads.html
As of now, the latest version of Storm is “apache-storm-0.9.5.tar.gz”.
Step 3.2 − Extract tar file
Extract the tar file using the following commands −
$ cd opt/
$ tar -zxf apache-storm-0.9.5.tar.gz
$ cd apache-storm-0.9.5
$ mkdir data
Step 3.3 − Open configuration file
The current release of Storm contains a file at “conf/storm.yaml” that configures Storm daemons. Add the following information to that file.
$ vi conf/storm.yaml
storm.zookeeper.servers:
 - "localhost"
storm.local.dir: “/path/to/storm/data(any path)”
nimbus.host: "localhost"
supervisor.slots.ports:
 - 6700
 - 6701
 - 6702
 - 6703
After applying all the changes, save and return to terminal.
Step 3.4 − Start the Nimbus
$ bin/storm nimbus
Step 3.5 − Start the Supervisor
$ bin/storm supervisor
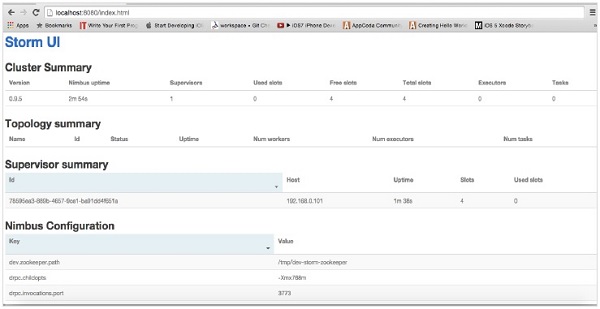
Step 3.6 Start the UI
$ bin/storm ui
After starting Storm user interface application, type the URL http://localhost:8080 in your favorite browser and you could see Storm cluster information and its running topology. The page should look similar to the following screenshot.