- Apache Pig Tutorial
- Apache Pig - Home
- Apache Pig Introduction
- Apache Pig - Overview
- Apache Pig - Architecture
- Apache Pig Environment
- Apache Pig - Installation
- Apache Pig - Execution
- Apache Pig - Grunt Shell
- Pig Latin
- Pig Latin - Basics
- Load & Store Operators
- Apache Pig - Reading Data
- Apache Pig - Storing Data
- Diagnostic Operators
- Apache Pig - Diagnostic Operator
- Apache Pig - Describe Operator
- Apache Pig - Explain Operator
- Apache Pig - Illustrate Operator
- Grouping & Joining
- Apache Pig - Group Operator
- Apache Pig - Cogroup Operator
- Apache Pig - Join Operator
- Apache Pig - Cross Operator
- Combining & Splitting
- Apache Pig - Union Operator
- Apache Pig - Split Operator
- Pig Latin Built-In Functions
- Apache Pig - Eval Functions
- Load & Store Functions
- Apache Pig - Bag & Tuple Functions
- Apache Pig - String Functions
- Apache Pig - date-time Functions
- Apache Pig - Math Functions
- Other Modes Of Execution
- Apache Pig - User-Defined Functions
- Apache Pig - Running Scripts
- Apache Pig Useful Resources
- Apache Pig - Quick Guide
- Apache Pig - Useful Resources
- Apache Pig - Discussion
Apache Pig - Quick Guide
Apache Pig - Overview
What is Apache Pig?
Apache Pig is an abstraction over MapReduce. It is a tool/platform which is used to analyze larger sets of data representing them as data flows. Pig is generally used with Hadoop; we can perform all the data manipulation operations in Hadoop using Apache Pig.
To write data analysis programs, Pig provides a high-level language known as Pig Latin. This language provides various operators using which programmers can develop their own functions for reading, writing, and processing data.
To analyze data using Apache Pig, programmers need to write scripts using Pig Latin language. All these scripts are internally converted to Map and Reduce tasks. Apache Pig has a component known as Pig Engine that accepts the Pig Latin scripts as input and converts those scripts into MapReduce jobs.
Why Do We Need Apache Pig?
Programmers who are not so good at Java normally used to struggle working with Hadoop, especially while performing any MapReduce tasks. Apache Pig is a boon for all such programmers.
Using Pig Latin, programmers can perform MapReduce tasks easily without having to type complex codes in Java.
Apache Pig uses multi-query approach, thereby reducing the length of codes. For example, an operation that would require you to type 200 lines of code (LoC) in Java can be easily done by typing as less as just 10 LoC in Apache Pig. Ultimately Apache Pig reduces the development time by almost 16 times.
Pig Latin is SQL-like language and it is easy to learn Apache Pig when you are familiar with SQL.
Apache Pig provides many built-in operators to support data operations like joins, filters, ordering, etc. In addition, it also provides nested data types like tuples, bags, and maps that are missing from MapReduce.
Features of Pig
Apache Pig comes with the following features −
Rich set of operators − It provides many operators to perform operations like join, sort, filer, etc.
Ease of programming − Pig Latin is similar to SQL and it is easy to write a Pig script if you are good at SQL.
Optimization opportunities − The tasks in Apache Pig optimize their execution automatically, so the programmers need to focus only on semantics of the language.
Extensibility − Using the existing operators, users can develop their own functions to read, process, and write data.
UDF’s − Pig provides the facility to create User-defined Functions in other programming languages such as Java and invoke or embed them in Pig Scripts.
Handles all kinds of data − Apache Pig analyzes all kinds of data, both structured as well as unstructured. It stores the results in HDFS.
Apache Pig Vs MapReduce
Listed below are the major differences between Apache Pig and MapReduce.
| Apache Pig | MapReduce |
|---|---|
| Apache Pig is a data flow language. | MapReduce is a data processing paradigm. |
| It is a high level language. | MapReduce is low level and rigid. |
| Performing a Join operation in Apache Pig is pretty simple. | It is quite difficult in MapReduce to perform a Join operation between datasets. |
| Any novice programmer with a basic knowledge of SQL can work conveniently with Apache Pig. | Exposure to Java is must to work with MapReduce. |
| Apache Pig uses multi-query approach, thereby reducing the length of the codes to a great extent. | MapReduce will require almost 20 times more the number of lines to perform the same task. |
| There is no need for compilation. On execution, every Apache Pig operator is converted internally into a MapReduce job. | MapReduce jobs have a long compilation process. |
Apache Pig Vs SQL
Listed below are the major differences between Apache Pig and SQL.
| Pig | SQL |
|---|---|
| Pig Latin is a procedural language. | SQL is a declarative language. |
| In Apache Pig, schema is optional. We can store data without designing a schema (values are stored as $01, $02 etc.) | Schema is mandatory in SQL. |
| The data model in Apache Pig is nested relational. | The data model used in SQL is flat relational. |
| Apache Pig provides limited opportunity for Query optimization. | There is more opportunity for query optimization in SQL. |
In addition to above differences, Apache Pig Latin −
- Allows splits in the pipeline.
- Allows developers to store data anywhere in the pipeline.
- Declares execution plans.
- Provides operators to perform ETL (Extract, Transform, and Load) functions.
Apache Pig Vs Hive
Both Apache Pig and Hive are used to create MapReduce jobs. And in some cases, Hive operates on HDFS in a similar way Apache Pig does. In the following table, we have listed a few significant points that set Apache Pig apart from Hive.
| Apache Pig | Hive |
|---|---|
| Apache Pig uses a language called Pig Latin. It was originally created at Yahoo. | Hive uses a language called HiveQL. It was originally created at Facebook. |
| Pig Latin is a data flow language. | HiveQL is a query processing language. |
| Pig Latin is a procedural language and it fits in pipeline paradigm. | HiveQL is a declarative language. |
| Apache Pig can handle structured, unstructured, and semi-structured data. | Hive is mostly for structured data. |
Applications of Apache Pig
Apache Pig is generally used by data scientists for performing tasks involving ad-hoc processing and quick prototyping. Apache Pig is used −
- To process huge data sources such as web logs.
- To perform data processing for search platforms.
- To process time sensitive data loads.
Apache Pig – History
In 2006, Apache Pig was developed as a research project at Yahoo, especially to create and execute MapReduce jobs on every dataset. In 2007, Apache Pig was open sourced via Apache incubator. In 2008, the first release of Apache Pig came out. In 2010, Apache Pig graduated as an Apache top-level project.
Apache Pig - Architecture
The language used to analyze data in Hadoop using Pig is known as Pig Latin. It is a highlevel data processing language which provides a rich set of data types and operators to perform various operations on the data.
To perform a particular task Programmers using Pig, programmers need to write a Pig script using the Pig Latin language, and execute them using any of the execution mechanisms (Grunt Shell, UDFs, Embedded). After execution, these scripts will go through a series of transformations applied by the Pig Framework, to produce the desired output.
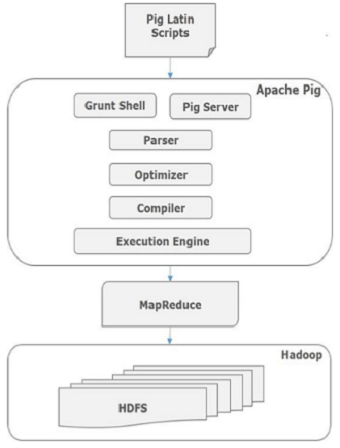
Internally, Apache Pig converts these scripts into a series of MapReduce jobs, and thus, it makes the programmer’s job easy. The architecture of Apache Pig is shown below.
Apache Pig Components
As shown in the figure, there are various components in the Apache Pig framework. Let us take a look at the major components.
Parser
Initially the Pig Scripts are handled by the Parser. It checks the syntax of the script, does type checking, and other miscellaneous checks. The output of the parser will be a DAG (directed acyclic graph), which represents the Pig Latin statements and logical operators.
In the DAG, the logical operators of the script are represented as the nodes and the data flows are represented as edges.
Optimizer
The logical plan (DAG) is passed to the logical optimizer, which carries out the logical optimizations such as projection and pushdown.
Compiler
The compiler compiles the optimized logical plan into a series of MapReduce jobs.
Execution engine
Finally the MapReduce jobs are submitted to Hadoop in a sorted order. Finally, these MapReduce jobs are executed on Hadoop producing the desired results.
Pig Latin Data Model
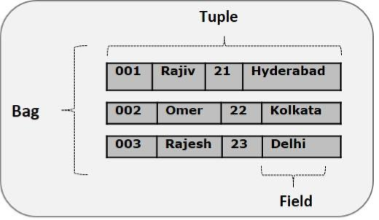
The data model of Pig Latin is fully nested and it allows complex non-atomic datatypes such as map and tuple. Given below is the diagrammatical representation of Pig Latin’s data model.
Atom
Any single value in Pig Latin, irrespective of their data, type is known as an Atom. It is stored as string and can be used as string and number. int, long, float, double, chararray, and bytearray are the atomic values of Pig. A piece of data or a simple atomic value is known as a field.
Example − ‘raja’ or ‘30’
Tuple
A record that is formed by an ordered set of fields is known as a tuple, the fields can be of any type. A tuple is similar to a row in a table of RDBMS.
Example − (Raja, 30)
Bag
A bag is an unordered set of tuples. In other words, a collection of tuples (non-unique) is known as a bag. Each tuple can have any number of fields (flexible schema). A bag is represented by ‘{}’. It is similar to a table in RDBMS, but unlike a table in RDBMS, it is not necessary that every tuple contain the same number of fields or that the fields in the same position (column) have the same type.
Example − {(Raja, 30), (Mohammad, 45)}
A bag can be a field in a relation; in that context, it is known as inner bag.
Example − {Raja, 30, {9848022338, raja@gmail.com,}}
Map
A map (or data map) is a set of key-value pairs. The key needs to be of type chararray and should be unique. The value might be of any type. It is represented by ‘[]’
Example − [name#Raja, age#30]
Relation
A relation is a bag of tuples. The relations in Pig Latin are unordered (there is no guarantee that tuples are processed in any particular order).
Apache Pig - Installation
This chapter explains the how to download, install, and set up Apache Pig in your system.
Prerequisites
It is essential that you have Hadoop and Java installed on your system before you go for Apache Pig. Therefore, prior to installing Apache Pig, install Hadoop and Java by following the steps given in the following link −
https://www.tutorialspoint.com/hadoop/hadoop_enviornment_setup.htm
Download Apache Pig
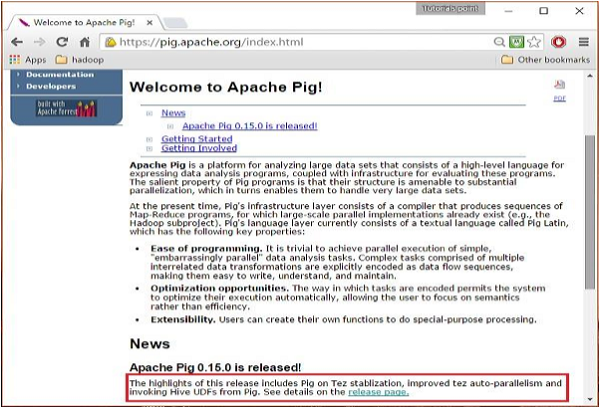
First of all, download the latest version of Apache Pig from the following website − https://pig.apache.org/
Step 1
Open the homepage of Apache Pig website. Under the section News, click on the link release page as shown in the following snapshot.
Step 2
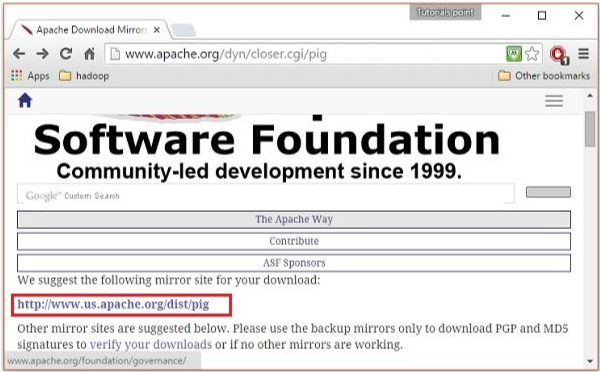
On clicking the specified link, you will be redirected to the Apache Pig Releases page. On this page, under the Download section, you will have two links, namely, Pig 0.8 and later and Pig 0.7 and before. Click on the link Pig 0.8 and later, then you will be redirected to the page having a set of mirrors.

Step 3
Choose and click any one of these mirrors as shown below.
Step 4
These mirrors will take you to the Pig Releases page. This page contains various versions of Apache Pig. Click the latest version among them.
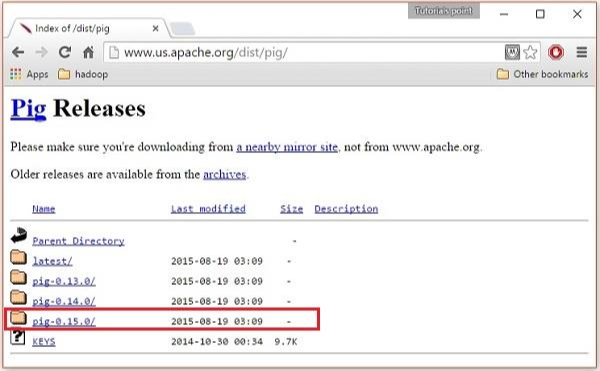
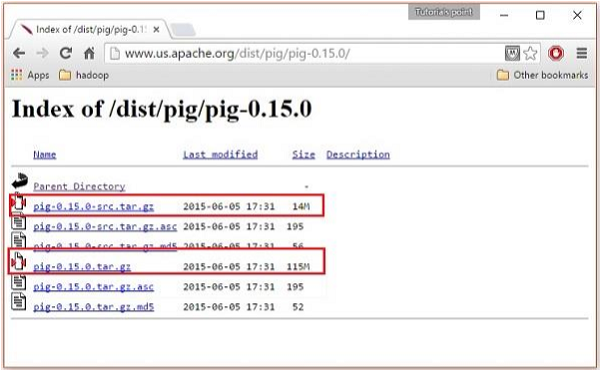
Step 5
Within these folders, you will have the source and binary files of Apache Pig in various distributions. Download the tar files of the source and binary files of Apache Pig 0.15, pig0.15.0-src.tar.gz and pig-0.15.0.tar.gz.
Install Apache Pig
After downloading the Apache Pig software, install it in your Linux environment by following the steps given below.
Step 1
Create a directory with the name Pig in the same directory where the installation directories of Hadoop, Java, and other software were installed. (In our tutorial, we have created the Pig directory in the user named Hadoop).
$ mkdir Pig
Step 2
Extract the downloaded tar files as shown below.
$ cd Downloads/
$ tar zxvf pig-0.15.0-src.tar.gz
$ tar zxvf pig-0.15.0.tar.gz
Step 3
Move the content of pig-0.15.0-src.tar.gz file to the Pig directory created earlier as shown below.
$ mv pig-0.15.0-src.tar.gz/* /home/Hadoop/Pig/
Configure Apache Pig
After installing Apache Pig, we have to configure it. To configure, we need to edit two files − bashrc and pig.properties.
.bashrc file
In the .bashrc file, set the following variables −
PIG_HOME folder to the Apache Pig’s installation folder,
PATH environment variable to the bin folder, and
PIG_CLASSPATH environment variable to the etc (configuration) folder of your Hadoop installations (the directory that contains the core-site.xml, hdfs-site.xml and mapred-site.xml files).
export PIG_HOME = /home/Hadoop/Pig
export PATH  = $PATH:/home/Hadoop/pig/bin
export PIG_CLASSPATH = $HADOOP_HOME/conf
pig.properties file
In the conf folder of Pig, we have a file named pig.properties. In the pig.properties file, you can set various parameters as given below.
pig -h properties
The following properties are supported −
Logging: verbose = true|false; default is false. This property is the same as -v
       switch brief=true|false; default is false. This property is the same
       as -b switch debug=OFF|ERROR|WARN|INFO|DEBUG; default is INFO.
       This property is the same as -d switch aggregate.warning = true|false; default is true.
       If true, prints count of warnings of each type rather than logging each warning.

Performance tuning: pig.cachedbag.memusage=<mem fraction>; default is 0.2 (20% of all memory).
       Note that this memory is shared across all large bags used by the application.
       pig.skewedjoin.reduce.memusagea=<mem fraction>; default is 0.3 (30% of all memory).
       Specifies the fraction of heap available for the reducer to perform the join.
       pig.exec.nocombiner = true|false; default is false.
           Only disable combiner as a temporary workaround for problems.
       opt.multiquery = true|false; multiquery is on by default.
           Only disable multiquery as a temporary workaround for problems.
       opt.fetch=true|false; fetch is on by default.
           Scripts containing Filter, Foreach, Limit, Stream, and Union can be dumped without MR jobs.
       pig.tmpfilecompression = true|false; compression is off by default.
           Determines whether output of intermediate jobs is compressed.
       pig.tmpfilecompression.codec = lzo|gzip; default is gzip.
           Used in conjunction with pig.tmpfilecompression. Defines compression type.
       pig.noSplitCombination = true|false. Split combination is on by default.
           Determines if multiple small files are combined into a single map.

       pig.exec.mapPartAgg = true|false. Default is false.
           Determines if partial aggregation is done within map phase, before records are sent to combiner.
       pig.exec.mapPartAgg.minReduction=<min aggregation factor>. Default is 10.
           If the in-map partial aggregation does not reduce the output num records by this factor, it gets disabled.

Miscellaneous: exectype = mapreduce|tez|local; default is mapreduce. This property is the same as -x switch
       pig.additional.jars.uris=<comma seperated list of jars>. Used in place of register command.
       udf.import.list=<comma seperated list of imports>. Used to avoid package names in UDF.
       stop.on.failure = true|false; default is false. Set to true to terminate on the first error.
       pig.datetime.default.tz=<UTC time offset>. e.g. +08:00. Default is the default timezone of the host.
           Determines the timezone used to handle datetime datatype and UDFs.
Additionally, any Hadoop property can be specified.
Verifying the Installation
Verify the installation of Apache Pig by typing the version command. If the installation is successful, you will get the version of Apache Pig as shown below.
$ pig –version

Apache Pig version 0.15.0 (r1682971)
compiled Jun 01 2015, 11:44:35
Apache Pig - Execution
In the previous chapter, we explained how to install Apache Pig. In this chapter, we will discuss how to execute Apache Pig.
Apache Pig Execution Modes
You can run Apache Pig in two modes, namely, Local Mode and HDFS mode.
Local Mode
In this mode, all the files are installed and run from your local host and local file system. There is no need of Hadoop or HDFS. This mode is generally used for testing purpose.
MapReduce Mode
MapReduce mode is where we load or process the data that exists in the Hadoop File System (HDFS) using Apache Pig. In this mode, whenever we execute the Pig Latin statements to process the data, a MapReduce job is invoked in the back-end to perform a particular operation on the data that exists in the HDFS.
Apache Pig Execution Mechanisms
Apache Pig scripts can be executed in three ways, namely, interactive mode, batch mode, and embedded mode.
Interactive Mode (Grunt shell) − You can run Apache Pig in interactive mode using the Grunt shell. In this shell, you can enter the Pig Latin statements and get the output (using Dump operator).
Batch Mode (Script) − You can run Apache Pig in Batch mode by writing the Pig Latin script in a single file with .pig extension.
Embedded Mode (UDF) − Apache Pig provides the provision of defining our own functions (User Defined Functions) in programming languages such as Java, and using them in our script.
Invoking the Grunt Shell
You can invoke the Grunt shell in a desired mode (local/MapReduce) using the −x option as shown below.
| Local mode | MapReduce mode |
|---|---|
Command − $ ./pig –x local |
Command − $ ./pig -x mapreduce |
Output − 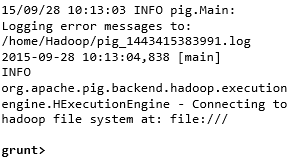 |
Output − 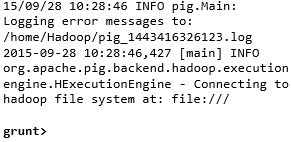 |
Either of these commands gives you the Grunt shell prompt as shown below.
grunt>
You can exit the Grunt shell using ‘ctrl + d’.
After invoking the Grunt shell, you can execute a Pig script by directly entering the Pig Latin statements in it.
grunt> customers = LOAD 'customers.txt' USING PigStorage(',');
Executing Apache Pig in Batch Mode
You can write an entire Pig Latin script in a file and execute it using the –x command. Let us suppose we have a Pig script in a file named sample_script.pig as shown below.
Sample_script.pig
student = LOAD 'hdfs://localhost:9000/pig_data/student.txt' USING
   PigStorage(',') as (id:int,name:chararray,city:chararray);

Dump student;
Now, you can execute the script in the above file as shown below.
| Local mode | MapReduce mode |
|---|---|
| $ pig -x local Sample_script.pig | $ pig -x mapreduce Sample_script.pig |
Note − We will discuss in detail how to run a Pig script in Bach mode and in embedded mode in subsequent chapters.
Apache Pig - Grunt Shell
After invoking the Grunt shell, you can run your Pig scripts in the shell. In addition to that, there are certain useful shell and utility commands provided by the Grunt shell. This chapter explains the shell and utility commands provided by the Grunt shell.
Note − In some portions of this chapter, the commands like Load and Store are used. Refer the respective chapters to get in-detail information on them.
Shell Commands
The Grunt shell of Apache Pig is mainly used to write Pig Latin scripts. Prior to that, we can invoke any shell commands using sh and fs.
sh Command
Using sh command, we can invoke any shell commands from the Grunt shell. Using sh command from the Grunt shell, we cannot execute the commands that are a part of the shell environment (ex − cd).
Syntax
Given below is the syntax of sh command.
grunt> sh shell command parameters
Example
We can invoke the ls command of Linux shell from the Grunt shell using the sh option as shown below. In this example, it lists out the files in the /pig/bin/ directory.
grunt> sh ls

pig
pig_1444799121955.log
pig.cmd
pig.py
fs Command
Using the fs command, we can invoke any FsShell commands from the Grunt shell.
Syntax
Given below is the syntax of fs command.
grunt> sh File System command parameters
Example
We can invoke the ls command of HDFS from the Grunt shell using fs command. In the following example, it lists the files in the HDFS root directory.
grunt> fs –ls

Found 3 items
drwxrwxrwx   - Hadoop supergroup          0 2015-09-08 14:13 Hbase
drwxr-xr-x   - Hadoop supergroup          0 2015-09-09 14:52 seqgen_data
drwxr-xr-x   - Hadoop supergroup          0 2015-09-08 11:30 twitter_data
In the same way, we can invoke all the other file system shell commands from the Grunt shell using the fs command.
Utility Commands
The Grunt shell provides a set of utility commands. These include utility commands such as clear, help, history, quit, and set; and commands such as exec, kill, and run to control Pig from the Grunt shell. Given below is the description of the utility commands provided by the Grunt shell.
clear Command
The clear command is used to clear the screen of the Grunt shell.
Syntax
You can clear the screen of the grunt shell using the clear command as shown below.
grunt> clear
help Command
The help command gives you a list of Pig commands or Pig properties.
Usage
You can get a list of Pig commands using the help command as shown below.
grunt> help

Commands: <pig latin statement>; - See the PigLatin manual for details:
http://hadoop.apache.org/pig

File system commands:fs <fs arguments> - Equivalent to Hadoop dfs  command:
http://hadoop.apache.org/common/docs/current/hdfs_shell.html

Diagnostic Commands:describe <alias>[::<alias] - Show the schema for the alias.
Inner aliases can be described as A::B.
    explain [-script <pigscript>] [-out <path>] [-brief] [-dot|-xml]
       [-param <param_name>=<pCram_value>]
       [-param_file <file_name>] [<alias>] -
       Show the execution plan to compute the alias or for entire script.
       -script - Explain the entire script.
       -out - Store the output into directory rather than print to stdout.
       -brief - Don't expand nested plans (presenting a smaller graph for overview).
       -dot - Generate the output in .dot format. Default is text format.
       -xml - Generate the output in .xml format. Default is text format.
       -param <param_name - See parameter substitution for details.
       -param_file <file_name> - See parameter substitution for details.
       alias - Alias to explain.
       dump <alias> - Compute the alias and writes the results to stdout.

Utility Commands: exec [-param <param_name>=param_value] [-param_file <file_name>] <script> -
       Execute the script with access to grunt environment including aliases.
       -param <param_name - See parameter substitution for details.
       -param_file <file_name> - See parameter substitution for details.
       script - Script to be executed.
    run [-param <param_name>=param_value] [-param_file <file_name>] <script> -
       Execute the script with access to grunt environment.
		 -param <param_name - See parameter substitution for details.
       -param_file <file_name> - See parameter substitution for details.
       script - Script to be executed.
    sh  <shell command> - Invoke a shell command.
    kill <job_id> - Kill the hadoop job specified by the hadoop job id.
    set <key> <value> - Provide execution parameters to Pig. Keys and values are case sensitive.
       The following keys are supported:
       default_parallel - Script-level reduce parallelism. Basic input size heuristics used
       by default.
       debug - Set debug on or off. Default is off.
       job.name - Single-quoted name for jobs. Default is PigLatin:<script name>
       job.priority - Priority for jobs. Values: very_low, low, normal, high, very_high.
       Default is normal stream.skippath - String that contains the path.
       This is used by streaming any hadoop property.
    help - Display this message.
    history [-n] - Display the list statements in cache.
       -n Hide line numbers.
    quit - Quit the grunt shell.
history Command
This command displays a list of statements executed / used so far since the Grunt sell is invoked.
Usage
Assume we have executed three statements since opening the Grunt shell.
grunt> customers = LOAD 'hdfs://localhost:9000/pig_data/customers.txt' USING PigStorage(',');

grunt> orders = LOAD 'hdfs://localhost:9000/pig_data/orders.txt' USING PigStorage(',');

grunt> student = LOAD 'hdfs://localhost:9000/pig_data/student.txt' USING PigStorage(',');
Then, using the history command will produce the following output.
grunt> history

customers = LOAD 'hdfs://localhost:9000/pig_data/customers.txt' USING PigStorage(',');

orders = LOAD 'hdfs://localhost:9000/pig_data/orders.txt' USING PigStorage(',');

student = LOAD 'hdfs://localhost:9000/pig_data/student.txt' USING PigStorage(',');
set Command
The set command is used to show/assign values to keys used in Pig.
Usage
Using this command, you can set values to the following keys.
| Key | Description and values |
|---|---|
| default_parallel | You can set the number of reducers for a map job by passing any whole number as a value to this key. |
| debug | You can turn off or turn on the debugging freature in Pig by passing on/off to this key. |
| job.name | You can set the Job name to the required job by passing a string value to this key. |
| job.priority | You can set the job priority to a job by passing one of the following values to this key −
|
| stream.skippath | For streaming, you can set the path from where the data is not to be transferred, by passing the desired path in the form of a string to this key. |
quit Command
You can quit from the Grunt shell using this command.
Usage
Quit from the Grunt shell as shown below.
grunt> quit
Let us now take a look at the commands using which you can control Apache Pig from the Grunt shell.
exec Command
Using the exec command, we can execute Pig scripts from the Grunt shell.
Syntax
Given below is the syntax of the utility command exec.
grunt> exec [–param param_name = param_value] [–param_file file_name] [script]
Example
Let us assume there is a file named student.txt in the /pig_data/ directory of HDFS with the following content.
Student.txt
001,Rajiv,Hyderabad
002,siddarth,Kolkata
003,Rajesh,Delhi
And, assume we have a script file named sample_script.pig in the /pig_data/ directory of HDFS with the following content.
Sample_script.pig
student = LOAD 'hdfs://localhost:9000/pig_data/student.txt' USING PigStorage(',')
   as (id:int,name:chararray,city:chararray);

Dump student;
Now, let us execute the above script from the Grunt shell using the exec command as shown below.
grunt> exec /sample_script.pig
Output
The exec command executes the script in the sample_script.pig. As directed in the script, it loads the student.txt file into Pig and gives you the result of the Dump operator displaying the following content.
(1,Rajiv,Hyderabad)
(2,siddarth,Kolkata)
(3,Rajesh,Delhi)
kill Command
You can kill a job from the Grunt shell using this command.
Syntax
Given below is the syntax of the kill command.
grunt> kill JobId
Example
Suppose there is a running Pig job having id Id_0055, you can kill it from the Grunt shell using the kill command, as shown below.
grunt> kill Id_0055
run Command
You can run a Pig script from the Grunt shell using the run command
Syntax
Given below is the syntax of the run command.
grunt> run [–param param_name = param_value] [–param_file file_name] script
Example
Let us assume there is a file named student.txt in the /pig_data/ directory of HDFS with the following content.
Student.txt
001,Rajiv,Hyderabad
002,siddarth,Kolkata
003,Rajesh,Delhi
And, assume we have a script file named sample_script.pig in the local filesystem with the following content.
Sample_script.pig
student = LOAD 'hdfs://localhost:9000/pig_data/student.txt' USING
   PigStorage(',') as (id:int,name:chararray,city:chararray);
Now, let us run the above script from the Grunt shell using the run command as shown below.
grunt> run /sample_script.pig
You can see the output of the script using the Dump operator as shown below.
grunt> Dump;

(1,Rajiv,Hyderabad)
(2,siddarth,Kolkata)
(3,Rajesh,Delhi)
Note − The difference between exec and the run command is that if we use run, the statements from the script are available in the command history.
Pig Latin – Basics
Pig Latin is the language used to analyze data in Hadoop using Apache Pig. In this chapter, we are going to discuss the basics of Pig Latin such as Pig Latin statements, data types, general and relational operators, and Pig Latin UDF’s.
Pig Latin – Data Model
As discussed in the previous chapters, the data model of Pig is fully nested. A Relation is the outermost structure of the Pig Latin data model. And it is a bag where −
- A bag is a collection of tuples.
- A tuple is an ordered set of fields.
- A field is a piece of data.
Pig Latin – Statemets
While processing data using Pig Latin, statements are the basic constructs.
These statements work with relations. They include expressions and schemas.
Every statement ends with a semicolon (;).
We will perform various operations using operators provided by Pig Latin, through statements.
Except LOAD and STORE, while performing all other operations, Pig Latin statements take a relation as input and produce another relation as output.
As soon as you enter a Load statement in the Grunt shell, its semantic checking will be carried out. To see the contents of the schema, you need to use the Dump operator. Only after performing the dump operation, the MapReduce job for loading the data into the file system will be carried out.
Example
Given below is a Pig Latin statement, which loads data to Apache Pig.
grunt> Student_data = LOAD 'student_data.txt' USING PigStorage(',')as
   ( id:int, firstname:chararray, lastname:chararray, phone:chararray, city:chararray );
Pig Latin – Data types
Given below table describes the Pig Latin data types.
| S.N. | Data Type | Description & Example |
|---|---|---|
| 1 | int | Represents a signed 32-bit integer. Example : 8 |
| 2 | long | Represents a signed 64-bit integer. Example : 5L |
| 3 | float | Represents a signed 32-bit floating point. Example : 5.5F |
| 4 | double | Represents a 64-bit floating point. Example : 10.5 |
| 5 | chararray | Represents a character array (string) in Unicode UTF-8 format. Example : ‘tutorials point’ |
| 6 | Bytearray | Represents a Byte array (blob). |
| 7 | Boolean | Represents a Boolean value. Example : true/ false. |
| 8 | Datetime | Represents a date-time. Example : 1970-01-01T00:00:00.000+00:00 |
| 9 | Biginteger | Represents a Java BigInteger. Example : 60708090709 |
| 10 | Bigdecimal | Represents a Java BigDecimal Example : 185.98376256272893883 |
| Complex Types | ||
| 11 | Tuple | A tuple is an ordered set of fields. Example : (raja, 30) |
| 12 | Bag | A bag is a collection of tuples. Example : {(raju,30),(Mohhammad,45)} |
| 13 | Map | A Map is a set of key-value pairs. Example : [ ‘name’#’Raju’, ‘age’#30] |
Null Values
Values for all the above data types can be NULL. Apache Pig treats null values in a similar way as SQL does.
A null can be an unknown value or a non-existent value. It is used as a placeholder for optional values. These nulls can occur naturally or can be the result of an operation.
Pig Latin – Arithmetic Operators
The following table describes the arithmetic operators of Pig Latin. Suppose a = 10 and b = 20.
| Operator | Description | Example |
|---|---|---|
| + | Addition − Adds values on either side of the operator |
a + b will give 30 |
| − | Subtraction − Subtracts right hand operand from left hand operand |
a − b will give −10 |
| * | Multiplication − Multiplies values on either side of the operator |
a * b will give 200 |
| / | Division − Divides left hand operand by right hand operand |
b / a will give 2 |
| % | Modulus − Divides left hand operand by right hand operand and returns remainder |
b % a will give 0 |
| ? : | Bincond − Evaluates the Boolean operators. It has three operands as shown below. variable x = (expression) ? value1 if true : value2 if false. |
b = (a == 1)? 20: 30; if a=1 the value of b is 20. if a!=1 the value of b is 30. |
CASE WHEN THEN ELSE END |
Case − The case operator is equivalent to nested bincond operator. |
CASE f2 % 2 WHEN 0 THEN 'even' WHEN 1 THEN 'odd' END |
Pig Latin – Comparison Operators
The following table describes the comparison operators of Pig Latin.
| Operator | Description | Example |
|---|---|---|
| == | Equal − Checks if the values of two operands are equal or not; if yes, then the condition becomes true. |
(a = b) is not true |
| != | Not Equal − Checks if the values of two operands are equal or not. If the values are not equal, then condition becomes true. |
(a != b) is true. |
| > | Greater than − Checks if the value of the left operand is greater than the value of the right operand. If yes, then the condition becomes true. |
(a > b) is not true. |
| < | Less than − Checks if the value of the left operand is less than the value of the right operand. If yes, then the condition becomes true. |
(a < b) is true. |
| >= | Greater than or equal to − Checks if the value of the left operand is greater than or equal to the value of the right operand. If yes, then the condition becomes true. |
(a >= b) is not true. |
| <= | Less than or equal to − Checks if the value of the left operand is less than or equal to the value of the right operand. If yes, then the condition becomes true. |
(a <= b) is true. |
| matches | Pattern matching − Checks whether the string in the left-hand side matches with the constant in the right-hand side. |
f1 matches '.*tutorial.*' |
Pig Latin – Type Construction Operators
The following table describes the Type construction operators of Pig Latin.
| Operator | Description | Example |
|---|---|---|
| () | Tuple constructor operator − This operator is used to construct a tuple. |
(Raju, 30) |
| {} | Bag constructor operator − This operator is used to construct a bag. |
{(Raju, 30), (Mohammad, 45)} |
| [] | Map constructor operator − This operator is used to construct a tuple. |
[name#Raja, age#30] |
Pig Latin – Relational Operations
The following table describes the relational operators of Pig Latin.
| Operator | Description |
|---|---|
| Loading and Storing | |
| LOAD | To Load the data from the file system (local/HDFS) into a relation. |
| STORE | To save a relation to the file system (local/HDFS). |
| Filtering | |
| FILTER | To remove unwanted rows from a relation. |
| DISTINCT | To remove duplicate rows from a relation. |
| FOREACH, GENERATE | To generate data transformations based on columns of data. |
| STREAM | To transform a relation using an external program. |
| Grouping and Joining | |
| JOIN | To join two or more relations. |
| COGROUP | To group the data in two or more relations. |
| GROUP | To group the data in a single relation. |
| CROSS | To create the cross product of two or more relations. |
| Sorting | |
| ORDER | To arrange a relation in a sorted order based on one or more fields (ascending or descending). |
| LIMIT | To get a limited number of tuples from a relation. |
| Combining and Splitting | |
| UNION | To combine two or more relations into a single relation. |
| SPLIT | To split a single relation into two or more relations. |
| Diagnostic Operators | |
| DUMP | To print the contents of a relation on the console. |
| DESCRIBE | To describe the schema of a relation. |
| EXPLAIN | To view the logical, physical, or MapReduce execution plans to compute a relation. |
| ILLUSTRATE | To view the step-by-step execution of a series of statements. |
Apache Pig - Reading Data
In general, Apache Pig works on top of Hadoop. It is an analytical tool that analyzes large datasets that exist in the Hadoop File System. To analyze data using Apache Pig, we have to initially load the data into Apache Pig. This chapter explains how to load data to Apache Pig from HDFS.
Preparing HDFS
In MapReduce mode, Pig reads (loads) data from HDFS and stores the results back in HDFS. Therefore, let us start HDFS and create the following sample data in HDFS.
| Student ID | First Name | Last Name | Phone | City |
|---|---|---|---|---|
| 001 | Rajiv | Reddy | 9848022337 | Hyderabad |
| 002 | siddarth | Battacharya | 9848022338 | Kolkata |
| 003 | Rajesh | Khanna | 9848022339 | Delhi |
| 004 | Preethi | Agarwal | 9848022330 | Pune |
| 005 | Trupthi | Mohanthy | 9848022336 | Bhuwaneshwar |
| 006 | Archana | Mishra | 9848022335 | Chennai |
The above dataset contains personal details like id, first name, last name, phone number and city, of six students.
Step 1: Verifying Hadoop
First of all, verify the installation using Hadoop version command, as shown below.
$ hadoop version
If your system contains Hadoop, and if you have set the PATH variable, then you will get the following output −
Hadoop 2.6.0
Subversion https://git-wip-us.apache.org/repos/asf/hadoop.git -r
e3496499ecb8d220fba99dc5ed4c99c8f9e33bb1
Compiled by jenkins on 2014-11-13T21:10Z
Compiled with protoc 2.5.0
From source with checksum 18e43357c8f927c0695f1e9522859d6a
This command was run using /home/Hadoop/hadoop/share/hadoop/common/hadoop
common-2.6.0.jar
Step 2: Starting HDFS
Browse through the sbin directory of Hadoop and start yarn and Hadoop dfs (distributed file system) as shown below.
cd /$Hadoop_Home/sbin/
$ start-dfs.sh
localhost: starting namenode, logging to /home/Hadoop/hadoop/logs/hadoopHadoop-namenode-localhost.localdomain.out
localhost: starting datanode, logging to /home/Hadoop/hadoop/logs/hadoopHadoop-datanode-localhost.localdomain.out
Starting secondary namenodes [0.0.0.0]
starting secondarynamenode, logging to /home/Hadoop/hadoop/logs/hadoop-Hadoopsecondarynamenode-localhost.localdomain.out

$ start-yarn.sh
starting yarn daemons
starting resourcemanager, logging to /home/Hadoop/hadoop/logs/yarn-Hadoopresourcemanager-localhost.localdomain.out
localhost: starting nodemanager, logging to /home/Hadoop/hadoop/logs/yarnHadoop-nodemanager-localhost.localdomain.out
Step 3: Create a Directory in HDFS
In Hadoop DFS, you can create directories using the command mkdir. Create a new directory in HDFS with the name Pig_Data in the required path as shown below.
$cd /$Hadoop_Home/bin/
$ hdfs dfs -mkdir hdfs://localhost:9000/Pig_Data
Step 4: Placing the data in HDFS
The input file of Pig contains each tuple/record in individual lines. And the entities of the record are separated by a delimiter (In our example we used “,”).
In the local file system, create an input file student_data.txt containing data as shown below.
001,Rajiv,Reddy,9848022337,Hyderabad
002,siddarth,Battacharya,9848022338,Kolkata
003,Rajesh,Khanna,9848022339,Delhi
004,Preethi,Agarwal,9848022330,Pune
005,Trupthi,Mohanthy,9848022336,Bhuwaneshwar
006,Archana,Mishra,9848022335,Chennai.
Now, move the file from the local file system to HDFS using put command as shown below. (You can use copyFromLocal command as well.)
$ cd $HADOOP_HOME/bin
$ hdfs dfs -put /home/Hadoop/Pig/Pig_Data/student_data.txt dfs://localhost:9000/pig_data/
Verifying the file
You can use the cat command to verify whether the file has been moved into the HDFS, as shown below.
$ cd $HADOOP_HOME/bin
$ hdfs dfs -cat hdfs://localhost:9000/pig_data/student_data.txt
Output
You can see the content of the file as shown below.
15/10/01 12:16:55 WARN util.NativeCodeLoader: Unable to load native-hadoop
library for your platform... using builtin-java classes where applicable

001,Rajiv,Reddy,9848022337,Hyderabad
002,siddarth,Battacharya,9848022338,Kolkata
003,Rajesh,Khanna,9848022339,Delhi
004,Preethi,Agarwal,9848022330,Pune
005,Trupthi,Mohanthy,9848022336,Bhuwaneshwar
006,Archana,Mishra,9848022335,Chennai
The Load Operator
You can load data into Apache Pig from the file system (HDFS/ Local) using LOAD operator of Pig Latin.
Syntax
The load statement consists of two parts divided by the “=” operator. On the left-hand side, we need to mention the name of the relation where we want to store the data, and on the right-hand side, we have to define how we store the data. Given below is the syntax of the Load operator.
Relation_name = LOAD 'Input file path' USING function as schema;
Where,
relation_name − We have to mention the relation in which we want to store the data.
Input file path − We have to mention the HDFS directory where the file is stored. (In MapReduce mode)
function − We have to choose a function from the set of load functions provided by Apache Pig (BinStorage, JsonLoader, PigStorage, TextLoader).
Schema − We have to define the schema of the data. We can define the required schema as follows −
(column1 : data type, column2 : data type, column3 : data type);
Note − We load the data without specifying the schema. In that case, the columns will be addressed as $01, $02, etc… (check).
Example
As an example, let us load the data in student_data.txt in Pig under the schema named Student using the LOAD command.
Start the Pig Grunt Shell
First of all, open the Linux terminal. Start the Pig Grunt shell in MapReduce mode as shown below.
$ Pig –x mapreduce
It will start the Pig Grunt shell as shown below.
15/10/01 12:33:37 INFO pig.ExecTypeProvider: Trying ExecType : LOCAL
15/10/01 12:33:37 INFO pig.ExecTypeProvider: Trying ExecType : MAPREDUCE
15/10/01 12:33:37 INFO pig.ExecTypeProvider: Picked MAPREDUCE as the ExecType

2015-10-01 12:33:38,080 [main] INFO  org.apache.pig.Main - Apache Pig version 0.15.0 (r1682971) compiled Jun 01 2015, 11:44:35
2015-10-01 12:33:38,080 [main] INFO  org.apache.pig.Main - Logging error messages to: /home/Hadoop/pig_1443683018078.log
2015-10-01 12:33:38,242 [main] INFO  org.apache.pig.impl.util.Utils - Default bootup file /home/Hadoop/.pigbootup not found

2015-10-01 12:33:39,630 [main]
INFO org.apache.pig.backend.hadoop.executionengine.HExecutionEngine - Connecting to hadoop file system at: hdfs://localhost:9000

grunt>
Execute the Load Statement
Now load the data from the file student_data.txt into Pig by executing the following Pig Latin statement in the Grunt shell.
grunt> student = LOAD 'hdfs://localhost:9000/pig_data/student_data.txt'
   USING PigStorage(',')
   as ( id:int, firstname:chararray, lastname:chararray, phone:chararray,
   city:chararray );
Following is the description of the above statement.
| Relation name | We have stored the data in the schema student. | ||||||||||||
| Input file path | We are reading data from the file student_data.txt, which is in the /pig_data/ directory of HDFS. | ||||||||||||
| Storage function | We have used the PigStorage() function. It loads and stores data as structured text files. It takes a delimiter using which each entity of a tuple is separated, as a parameter. By default, it takes ‘\t’ as a parameter. | ||||||||||||
| schema | We have stored the data using the following schema.
|
Note − The load statement will simply load the data into the specified relation in Pig. To verify the execution of the Load statement, you have to use the Diagnostic Operators which are discussed in the next chapters.
Apache Pig - Storing Data
In the previous chapter, we learnt how to load data into Apache Pig. You can store the loaded data in the file system using the store operator. This chapter explains how to store data in Apache Pig using the Store operator.
Syntax
Given below is the syntax of the Store statement.
STORE Relation_name INTO ' required_directory_path ' [USING function];
Example
Assume we have a file student_data.txt in HDFS with the following content.
001,Rajiv,Reddy,9848022337,Hyderabad
002,siddarth,Battacharya,9848022338,Kolkata
003,Rajesh,Khanna,9848022339,Delhi
004,Preethi,Agarwal,9848022330,Pune
005,Trupthi,Mohanthy,9848022336,Bhuwaneshwar
006,Archana,Mishra,9848022335,Chennai.
And we have read it into a relation student using the LOAD operator as shown below.
grunt> student = LOAD 'hdfs://localhost:9000/pig_data/student_data.txt'
   USING PigStorage(',')
   as ( id:int, firstname:chararray, lastname:chararray, phone:chararray,
   city:chararray );
Now, let us store the relation in the HDFS directory “/pig_Output/” as shown below.
grunt> STORE student INTO ' hdfs://localhost:9000/pig_Output/ ' USING PigStorage (',');
Output
After executing the store statement, you will get the following output. A directory is created with the specified name and the data will be stored in it.
2015-10-05 13:05:05,429 [main] INFO  org.apache.pig.backend.hadoop.executionengine.mapReduceLayer.
MapReduceLau ncher - 100% complete
2015-10-05 13:05:05,429 [main] INFO  org.apache.pig.tools.pigstats.mapreduce.SimplePigStats -
Script Statistics:

HadoopVersion    PigVersion    UserId    StartedAt             FinishedAt             Features
2.6.0            0.15.0        Hadoop    2015-10-0 13:03:03    2015-10-05 13:05:05    UNKNOWN
Success!
Job Stats (time in seconds):
JobId          Maps    Reduces    MaxMapTime    MinMapTime    AvgMapTime    MedianMapTime
job_14459_06    1        0           n/a           n/a           n/a           n/a
MaxReduceTime    MinReduceTime    AvgReduceTime    MedianReducetime    Alias    Feature
     0                 0                0                0             student  MAP_ONLY
OutPut folder
hdfs://localhost:9000/pig_Output/

Input(s): Successfully read 0 records from: "hdfs://localhost:9000/pig_data/student_data.txt"
Output(s): Successfully stored 0 records in: "hdfs://localhost:9000/pig_Output"
Counters:
Total records written : 0
Total bytes written : 0
Spillable Memory Manager spill count : 0
Total bags proactively spilled: 0
Total records proactively spilled: 0

Job DAG: job_1443519499159_0006

2015-10-05 13:06:06,192 [main] INFO  org.apache.pig.backend.hadoop.executionengine
.mapReduceLayer.MapReduceLau ncher - Success!
Verification
You can verify the stored data as shown below.
Step 1
First of all, list out the files in the directory named pig_output using the ls command as shown below.
hdfs dfs -ls 'hdfs://localhost:9000/pig_Output/'
Found 2 items
rw-r--r-   1 Hadoop supergroup          0 2015-10-05 13:03 hdfs://localhost:9000/pig_Output/_SUCCESS
rw-r--r-   1 Hadoop supergroup        224 2015-10-05 13:03 hdfs://localhost:9000/pig_Output/part-m-00000
You can observe that two files were created after executing the store statement.
Step 2
Using cat command, list the contents of the file named part-m-00000 as shown below.
$ hdfs dfs -cat 'hdfs://localhost:9000/pig_Output/part-m-00000'
1,Rajiv,Reddy,9848022337,Hyderabad
2,siddarth,Battacharya,9848022338,Kolkata
3,Rajesh,Khanna,9848022339,Delhi
4,Preethi,Agarwal,9848022330,Pune
5,Trupthi,Mohanthy,9848022336,Bhuwaneshwar
6,Archana,Mishra,9848022335,Chennai
Apache Pig - Diagnostic Operators
The load statement will simply load the data into the specified relation in Apache Pig. To verify the execution of the Load statement, you have to use the Diagnostic Operators. Pig Latin provides four different types of diagnostic operators −
- Dump operator
- Describe operator
- Explanation operator
- Illustration operator
In this chapter, we will discuss the Dump operators of Pig Latin.
Dump Operator
The Dump operator is used to run the Pig Latin statements and display the results on the screen. It is generally used for debugging Purpose.
Syntax
Given below is the syntax of the Dump operator.
grunt> Dump Relation_Name
Example
Assume we have a file student_data.txt in HDFS with the following content.
001,Rajiv,Reddy,9848022337,Hyderabad
002,siddarth,Battacharya,9848022338,Kolkata
003,Rajesh,Khanna,9848022339,Delhi
004,Preethi,Agarwal,9848022330,Pune
005,Trupthi,Mohanthy,9848022336,Bhuwaneshwar
006,Archana,Mishra,9848022335,Chennai.
And we have read it into a relation student using the LOAD operator as shown below.
grunt> student = LOAD 'hdfs://localhost:9000/pig_data/student_data.txt'
   USING PigStorage(',')
   as ( id:int, firstname:chararray, lastname:chararray, phone:chararray,
   city:chararray );
Now, let us print the contents of the relation using the Dump operator as shown below.
grunt> Dump student
Once you execute the above Pig Latin statement, it will start a MapReduce job to read data from HDFS. It will produce the following output.
2015-10-01 15:05:27,642 [main]
INFO  org.apache.pig.backend.hadoop.executionengine.mapReduceLayer.MapReduceLauncher -
100% complete
2015-10-01 15:05:27,652 [main]
INFO  org.apache.pig.tools.pigstats.mapreduce.SimplePigStats - Script Statistics:
HadoopVersion  PigVersion  UserId    StartedAt             FinishedAt       Features
2.6.0          0.15.0      Hadoop  2015-10-01 15:03:11  2015-10-01 05:27     UNKNOWN

Success!
Job Stats (time in seconds):

JobId           job_14459_0004
Maps                 1
Reduces              0
MaxMapTime          n/a
MinMapTime          n/a
AvgMapTime          n/a
MedianMapTime       n/a
MaxReduceTime        0
MinReduceTime        0
AvgReduceTime        0
MedianReducetime     0
Alias             student
Feature           MAP_ONLY
Outputs           hdfs://localhost:9000/tmp/temp580182027/tmp757878456,

Input(s): Successfully read 0 records from: "hdfs://localhost:9000/pig_data/
student_data.txt"

Output(s): Successfully stored 0 records in: "hdfs://localhost:9000/tmp/temp580182027/
tmp757878456"

Counters: Total records written : 0 Total bytes written : 0 Spillable Memory Manager
spill count : 0Total bags proactively spilled: 0 Total records proactively spilled: 0

Job DAG: job_1443519499159_0004

2015-10-01 15:06:28,403 [main]
INFO  org.apache.pig.backend.hadoop.executionengine.mapReduceLayer.MapReduceLau ncher - Success!
2015-10-01 15:06:28,441 [main] INFO  org.apache.pig.data.SchemaTupleBackend -
Key [pig.schematuple] was not set... will not generate code.
2015-10-01 15:06:28,485 [main]
INFO  org.apache.hadoop.mapreduce.lib.input.FileInputFormat - Total input paths
to process : 1
2015-10-01 15:06:28,485 [main]
INFO  org.apache.pig.backend.hadoop.executionengine.util.MapRedUtil - Total input paths
to process : 1

(1,Rajiv,Reddy,9848022337,Hyderabad)
(2,siddarth,Battacharya,9848022338,Kolkata)
(3,Rajesh,Khanna,9848022339,Delhi)
(4,Preethi,Agarwal,9848022330,Pune)
(5,Trupthi,Mohanthy,9848022336,Bhuwaneshwar)
(6,Archana,Mishra,9848022335,Chennai)
Apache Pig - Describe Operator
The describe operator is used to view the schema of a relation.
Syntax
The syntax of the describe operator is as follows −
grunt> Describe Relation_name
Example
Assume we have a file student_data.txt in HDFS with the following content.
001,Rajiv,Reddy,9848022337,Hyderabad
002,siddarth,Battacharya,9848022338,Kolkata
003,Rajesh,Khanna,9848022339,Delhi
004,Preethi,Agarwal,9848022330,Pune
005,Trupthi,Mohanthy,9848022336,Bhuwaneshwar
006,Archana,Mishra,9848022335,Chennai.
And we have read it into a relation student using the LOAD operator as shown below.
grunt> student = LOAD 'hdfs://localhost:9000/pig_data/student_data.txt' USING PigStorage(',')
   as ( id:int, firstname:chararray, lastname:chararray, phone:chararray, city:chararray );
Now, let us describe the relation named student and verify the schema as shown below.
grunt> describe student;
Output
Once you execute the above Pig Latin statement, it will produce the following output.
grunt> student: { id: int,firstname: chararray,lastname: chararray,phone: chararray,city: chararray }
Apache Pig - Explain Operator
The explain operator is used to display the logical, physical, and MapReduce execution plans of a relation.
Syntax
Given below is the syntax of the explain operator.
grunt> explain Relation_name;
Example
Assume we have a file student_data.txt in HDFS with the following content.
001,Rajiv,Reddy,9848022337,Hyderabad
002,siddarth,Battacharya,9848022338,Kolkata
003,Rajesh,Khanna,9848022339,Delhi
004,Preethi,Agarwal,9848022330,Pune
005,Trupthi,Mohanthy,9848022336,Bhuwaneshwar
006,Archana,Mishra,9848022335,Chennai.
And we have read it into a relation student using the LOAD operator as shown below.
grunt> student = LOAD 'hdfs://localhost:9000/pig_data/student_data.txt' USING PigStorage(',')
   as ( id:int, firstname:chararray, lastname:chararray, phone:chararray, city:chararray );
Now, let us explain the relation named student using the explain operator as shown below.
grunt> explain student;
Output
It will produce the following output.
$ explain student;

2015-10-05 11:32:43,660 [main]
2015-10-05 11:32:43,660 [main] INFO  org.apache.pig.newplan.logical.optimizer
.LogicalPlanOptimizer -
{RULES_ENABLED=[AddForEach, ColumnMapKeyPrune, ConstantCalculator,
GroupByConstParallelSetter, LimitOptimizer, LoadTypeCastInserter, MergeFilter,
MergeForEach, PartitionFilterOptimizer, PredicatePushdownOptimizer,
PushDownForEachFlatten, PushUpFilter, SplitFilter, StreamTypeCastInserter]}
#-----------------------------------------------
# New Logical Plan:
#-----------------------------------------------
student: (Name: LOStore Schema:
id#31:int,firstname#32:chararray,lastname#33:chararray,phone#34:chararray,city#
35:chararray)
|
|---student: (Name: LOForEach Schema:
id#31:int,firstname#32:chararray,lastname#33:chararray,phone#34:chararray,city#
35:chararray)
    |   |
    |   (Name: LOGenerate[false,false,false,false,false] Schema:
id#31:int,firstname#32:chararray,lastname#33:chararray,phone#34:chararray,city#
35:chararray)ColumnPrune:InputUids=[34, 35, 32, 33,
31]ColumnPrune:OutputUids=[34, 35, 32, 33, 31]
    |   |   |
    |   |   (Name: Cast Type: int Uid: 31)
    |   |   |     |   |   |---id:(Name: Project Type: bytearray Uid: 31 Input: 0 Column: (*))
    |   |   |
    |   |   (Name: Cast Type: chararray Uid: 32)
    |   |   |
    |   |   |---firstname:(Name: Project Type: bytearray Uid: 32 Input: 1
Column: (*))
    |   |   |
    |   |   (Name: Cast Type: chararray Uid: 33)
    |   |   |
    |   |   |---lastname:(Name: Project Type: bytearray Uid: 33 Input: 2
	 Column: (*))
    |   |   |
    |   |   (Name: Cast Type: chararray Uid: 34)
    |   |   |
    |   |   |---phone:(Name: Project Type: bytearray Uid: 34 Input: 3 Column:
(*))
    |   |   |
    |   |   (Name: Cast Type: chararray Uid: 35)
    |   |   |
    |   |   |---city:(Name: Project Type: bytearray Uid: 35 Input: 4 Column:
(*))
    |   |
    |   |---(Name: LOInnerLoad[0] Schema: id#31:bytearray)
    |   |
    |   |---(Name: LOInnerLoad[1] Schema: firstname#32:bytearray)
    |   |
    |   |---(Name: LOInnerLoad[2] Schema: lastname#33:bytearray)
    |   |
    |   |---(Name: LOInnerLoad[3] Schema: phone#34:bytearray)
    |   |
    |   |---(Name: LOInnerLoad[4] Schema: city#35:bytearray)
    |
    |---student: (Name: LOLoad Schema:
id#31:bytearray,firstname#32:bytearray,lastname#33:bytearray,phone#34:bytearray
,city#35:bytearray)RequiredFields:null
#-----------------------------------------------
# Physical Plan: #-----------------------------------------------
student: Store(fakefile:org.apache.pig.builtin.PigStorage) - scope-36
|
|---student: New For Each(false,false,false,false,false)[bag] - scope-35
    |   |
    |   Cast[int] - scope-21
    |   |
    |   |---Project[bytearray][0] - scope-20
    |   |
    |   Cast[chararray] - scope-24
    |   |
    |   |---Project[bytearray][1] - scope-23
    |   |
    |   Cast[chararray] - scope-27
    |   |
    |   |---Project[bytearray][2] - scope-26
    |   |
    |   Cast[chararray] - scope-30
    |   |
    |   |---Project[bytearray][3] - scope-29
    |   |
    |   Cast[chararray] - scope-33
    |   |
    |   |---Project[bytearray][4] - scope-32
    |
    |---student: Load(hdfs://localhost:9000/pig_data/student_data.txt:PigStorage(',')) - scope19
2015-10-05 11:32:43,682 [main]
INFO  org.apache.pig.backend.hadoop.executionengine.mapReduceLayer.MRCompiler -
File concatenation threshold: 100 optimistic? false
2015-10-05 11:32:43,684 [main]
INFO  org.apache.pig.backend.hadoop.executionengine.mapReduceLayer.MultiQueryOp timizer -
MR plan size before optimization: 1 2015-10-05 11:32:43,685 [main]
INFO  org.apache.pig.backend.hadoop.executionengine.mapReduceLayer.
MultiQueryOp timizer - MR plan size after optimization: 1
#--------------------------------------------------
# Map Reduce Plan
#--------------------------------------------------
MapReduce node scope-37
Map Plan
student: Store(fakefile:org.apache.pig.builtin.PigStorage) - scope-36
|
|---student: New For Each(false,false,false,false,false)[bag] - scope-35
    |   |
    |   Cast[int] - scope-21
    |   |
    |   |---Project[bytearray][0] - scope-20
    |   |
    |   Cast[chararray] - scope-24
    |   |
    |   |---Project[bytearray][1] - scope-23
    |   |
    |   Cast[chararray] - scope-27
    |   |
    |   |---Project[bytearray][2] - scope-26
    |   |
    |   Cast[chararray] - scope-30
    |   |
    |   |---Project[bytearray][3] - scope-29
    |   |
    |   Cast[chararray] - scope-33
    |   |
    |   |---Project[bytearray][4] - scope-32
    |
    |---student:
Load(hdfs://localhost:9000/pig_data/student_data.txt:PigStorage(',')) - scope
19-------- Global sort: false
 ----------------
Apache Pig - Illustrate Operator
The illustrate operator gives you the step-by-step execution of a sequence of statements.
Syntax
Given below is the syntax of the illustrate operator.
grunt> illustrate Relation_name;
Example
Assume we have a file student_data.txt in HDFS with the following content.
001,Rajiv,Reddy,9848022337,Hyderabad
002,siddarth,Battacharya,9848022338,Kolkata
003,Rajesh,Khanna,9848022339,Delhi
004,Preethi,Agarwal,9848022330,Pune
005,Trupthi,Mohanthy,9848022336,Bhuwaneshwar
006,Archana,Mishra,9848022335,Chennai.
And we have read it into a relation student using the LOAD operator as shown below.
grunt> student = LOAD 'hdfs://localhost:9000/pig_data/student_data.txt' USING PigStorage(',')
   as ( id:int, firstname:chararray, lastname:chararray, phone:chararray, city:chararray );
Now, let us illustrate the relation named student as shown below.
grunt> illustrate student;
Output
On executing the above statement, you will get the following output.
grunt> illustrate student;

INFO  org.apache.pig.backend.hadoop.executionengine.mapReduceLayer.PigMapOnly$M ap - Aliases
being processed per job phase (AliasName[line,offset]): M: student[1,10] C:  R:
---------------------------------------------------------------------------------------------
|student | id:int | firstname:chararray | lastname:chararray | phone:chararray | city:chararray |
---------------------------------------------------------------------------------------------
|        | 002    | siddarth            | Battacharya        | 9848022338      | Kolkata        |
---------------------------------------------------------------------------------------------
Apache Pig - Group Operator
The GROUP operator is used to group the data in one or more relations. It collects the data having the same key.
Syntax
Given below is the syntax of the group operator.
grunt> Group_data = GROUP Relation_name BY age;
Example
Assume that we have a file named student_details.txt in the HDFS directory /pig_data/ as shown below.
student_details.txt
001,Rajiv,Reddy,21,9848022337,Hyderabad
002,siddarth,Battacharya,22,9848022338,Kolkata
003,Rajesh,Khanna,22,9848022339,Delhi
004,Preethi,Agarwal,21,9848022330,Pune
005,Trupthi,Mohanthy,23,9848022336,Bhuwaneshwar
006,Archana,Mishra,23,9848022335,Chennai
007,Komal,Nayak,24,9848022334,trivendram
008,Bharathi,Nambiayar,24,9848022333,Chennai
And we have loaded this file into Apache Pig with the relation name student_details as shown below.
grunt> student_details = LOAD 'hdfs://localhost:9000/pig_data/student_details.txt' USING PigStorage(',')
   as (id:int, firstname:chararray, lastname:chararray, age:int, phone:chararray, city:chararray);
Now, let us group the records/tuples in the relation by age as shown below.
grunt> group_data = GROUP student_details by age;
Verification
Verify the relation group_data using the DUMP operator as shown below.
grunt> Dump group_data;
Output
Then you will get output displaying the contents of the relation named group_data as shown below. Here you can observe that the resulting schema has two columns −
One is age, by which we have grouped the relation.
The other is a bag, which contains the group of tuples, student records with the respective age.
(21,{(4,Preethi,Agarwal,21,9848022330,Pune),(1,Rajiv,Reddy,21,9848022337,Hydera bad)})
(22,{(3,Rajesh,Khanna,22,9848022339,Delhi),(2,siddarth,Battacharya,22,984802233 8,Kolkata)})
(23,{(6,Archana,Mishra,23,9848022335,Chennai),(5,Trupthi,Mohanthy,23,9848022336 ,Bhuwaneshwar)})
(24,{(8,Bharathi,Nambiayar,24,9848022333,Chennai),(7,Komal,Nayak,24,9848022334, trivendram)})
You can see the schema of the table after grouping the data using the describe command as shown below.
grunt> Describe group_data;

group_data: {group: int,student_details: {(id: int,firstname: chararray,
               lastname: chararray,age: int,phone: chararray,city: chararray)}}
In the same way, you can get the sample illustration of the schema using the illustrate command as shown below.
$ Illustrate group_data;
It will produce the following output −
-------------------------------------------------------------------------------------------------
|group_data|  group:int | student_details:bag{:tuple(id:int,firstname:chararray,lastname:chararray,age:int,phone:chararray,city:chararray)}|
-------------------------------------------------------------------------------------------------
|          |     21     | { 4, Preethi, Agarwal, 21, 9848022330, Pune), (1, Rajiv, Reddy, 21, 9848022337, Hyderabad)}|
|          |     2      | {(2,siddarth,Battacharya,22,9848022338,Kolkata),(003,Rajesh,Khanna,22,9848022339,Delhi)}|
-------------------------------------------------------------------------------------------------
Grouping by Multiple Columns
Let us group the relation by age and city as shown below.
grunt> group_multiple = GROUP student_details by (age, city);
You can verify the content of the relation named group_multiple using the Dump operator as shown below.
grunt> Dump group_multiple;

((21,Pune),{(4,Preethi,Agarwal,21,9848022330,Pune)})
((21,Hyderabad),{(1,Rajiv,Reddy,21,9848022337,Hyderabad)})
((22,Delhi),{(3,Rajesh,Khanna,22,9848022339,Delhi)})
((22,Kolkata),{(2,siddarth,Battacharya,22,9848022338,Kolkata)})
((23,Chennai),{(6,Archana,Mishra,23,9848022335,Chennai)})
((23,Bhuwaneshwar),{(5,Trupthi,Mohanthy,23,9848022336,Bhuwaneshwar)})
((24,Chennai),{(8,Bharathi,Nambiayar,24,9848022333,Chennai)})
(24,trivendram),{(7,Komal,Nayak,24,9848022334,trivendram)})
Group All
You can group a relation by all the columns as shown below.
grunt> group_all = GROUP student_details All;
Now, verify the content of the relation group_all as shown below.
grunt> Dump group_all;

(all,{(8,Bharathi,Nambiayar,24,9848022333,Chennai),(7,Komal,Nayak,24,9848022334 ,trivendram),
(6,Archana,Mishra,23,9848022335,Chennai),(5,Trupthi,Mohanthy,23,9848022336,Bhuw aneshwar),
(4,Preethi,Agarwal,21,9848022330,Pune),(3,Rajesh,Khanna,22,9848022339,Delhi),
(2,siddarth,Battacharya,22,9848022338,Kolkata),(1,Rajiv,Reddy,21,9848022337,Hyd erabad)})
Apache Pig - Cogroup Operator
The COGROUP operator works more or less in the same way as the GROUP operator. The only difference between the two operators is that the group operator is normally used with one relation, while the cogroup operator is used in statements involving two or more relations.
Grouping Two Relations using Cogroup
Assume that we have two files namely student_details.txt and employee_details.txt in the HDFS directory /pig_data/ as shown below.
student_details.txt
001,Rajiv,Reddy,21,9848022337,Hyderabad
002,siddarth,Battacharya,22,9848022338,Kolkata
003,Rajesh,Khanna,22,9848022339,Delhi
004,Preethi,Agarwal,21,9848022330,Pune
005,Trupthi,Mohanthy,23,9848022336,Bhuwaneshwar
006,Archana,Mishra,23,9848022335,Chennai
007,Komal,Nayak,24,9848022334,trivendram
008,Bharathi,Nambiayar,24,9848022333,Chennai
employee_details.txt
001,Robin,22,newyork
002,BOB,23,Kolkata
003,Maya,23,Tokyo
004,Sara,25,London
005,David,23,Bhuwaneshwar
006,Maggy,22,Chennai
And we have loaded these files into Pig with the relation names student_details and employee_details respectively, as shown below.
grunt> student_details = LOAD 'hdfs://localhost:9000/pig_data/student_details.txt' USING PigStorage(',')
   as (id:int, firstname:chararray, lastname:chararray, age:int, phone:chararray, city:chararray);

grunt> employee_details = LOAD 'hdfs://localhost:9000/pig_data/employee_details.txt' USING PigStorage(',')
   as (id:int, name:chararray, age:int, city:chararray);
Now, let us group the records/tuples of the relations student_details and employee_details with the key age, as shown below.
grunt> cogroup_data = COGROUP student_details by age, employee_details by age;
Verification
Verify the relation cogroup_data using the DUMP operator as shown below.
grunt> Dump cogroup_data;
Output
It will produce the following output, displaying the contents of the relation named cogroup_data as shown below.
(21,{(4,Preethi,Agarwal,21,9848022330,Pune), (1,Rajiv,Reddy,21,9848022337,Hyderabad)},
   {    })
(22,{ (3,Rajesh,Khanna,22,9848022339,Delhi), (2,siddarth,Battacharya,22,9848022338,Kolkata) },
   { (6,Maggy,22,Chennai),(1,Robin,22,newyork) })
(23,{(6,Archana,Mishra,23,9848022335,Chennai),(5,Trupthi,Mohanthy,23,9848022336 ,Bhuwaneshwar)},
   {(5,David,23,Bhuwaneshwar),(3,Maya,23,Tokyo),(2,BOB,23,Kolkata)})
(24,{(8,Bharathi,Nambiayar,24,9848022333,Chennai),(7,Komal,Nayak,24,9848022334, trivendram)},
   { })
(25,{   },
   {(4,Sara,25,London)})
The cogroup operator groups the tuples from each relation according to age where each group depicts a particular age value.
For example, if we consider the 1st tuple of the result, it is grouped by age 21. And it contains two bags −
the first bag holds all the tuples from the first relation (student_details in this case) having age 21, and
the second bag contains all the tuples from the second relation (employee_details in this case) having age 21.
In case a relation doesn’t have tuples having the age value 21, it returns an empty bag.
Apache Pig - Join Operator
The JOIN operator is used to combine records from two or more relations. While performing a join operation, we declare one (or a group of) tuple(s) from each relation, as keys. When these keys match, the two particular tuples are matched, else the records are dropped. Joins can be of the following types −
- Self-join
- Inner-join
- Outer-join − left join, right join, and full join
This chapter explains with examples how to use the join operator in Pig Latin. Assume that we have two files namely customers.txt and orders.txt in the /pig_data/ directory of HDFS as shown below.
customers.txt
1,Ramesh,32,Ahmedabad,2000.00
2,Khilan,25,Delhi,1500.00
3,kaushik,23,Kota,2000.00
4,Chaitali,25,Mumbai,6500.00
5,Hardik,27,Bhopal,8500.00
6,Komal,22,MP,4500.00
7,Muffy,24,Indore,10000.00
orders.txt
102,2009-10-08 00:00:00,3,3000
100,2009-10-08 00:00:00,3,1500
101,2009-11-20 00:00:00,2,1560
103,2008-05-20 00:00:00,4,2060
And we have loaded these two files into Pig with the relations customers and orders as shown below.
grunt> customers = LOAD 'hdfs://localhost:9000/pig_data/customers.txt' USING PigStorage(',')
   as (id:int, name:chararray, age:int, address:chararray, salary:int);

grunt> orders = LOAD 'hdfs://localhost:9000/pig_data/orders.txt' USING PigStorage(',')
   as (oid:int, date:chararray, customer_id:int, amount:int);
Let us now perform various Join operations on these two relations.
Self - join
Self-join is used to join a table with itself as if the table were two relations, temporarily renaming at least one relation.
Generally, in Apache Pig, to perform self-join, we will load the same data multiple times, under different aliases (names). Therefore let us load the contents of the file customers.txt as two tables as shown below.
grunt> customers1 = LOAD 'hdfs://localhost:9000/pig_data/customers.txt' USING PigStorage(',')
   as (id:int, name:chararray, age:int, address:chararray, salary:int);

grunt> customers2 = LOAD 'hdfs://localhost:9000/pig_data/customers.txt' USING PigStorage(',')
   as (id:int, name:chararray, age:int, address:chararray, salary:int);
Syntax
Given below is the syntax of performing self-join operation using the JOIN operator.
grunt> Relation3_name = JOIN Relation1_name BY key, Relation2_name BY key ;
Example
Let us perform self-join operation on the relation customers, by joining the two relations customers1 and customers2 as shown below.
grunt> customers3 = JOIN customers1 BY id, customers2 BY id;
Verification
Verify the relation customers3 using the DUMP operator as shown below.
grunt> Dump customers3;
Output
It will produce the following output, displaying the contents of the relation customers.
(1,Ramesh,32,Ahmedabad,2000,1,Ramesh,32,Ahmedabad,2000)
(2,Khilan,25,Delhi,1500,2,Khilan,25,Delhi,1500)
(3,kaushik,23,Kota,2000,3,kaushik,23,Kota,2000)
(4,Chaitali,25,Mumbai,6500,4,Chaitali,25,Mumbai,6500)
(5,Hardik,27,Bhopal,8500,5,Hardik,27,Bhopal,8500)
(6,Komal,22,MP,4500,6,Komal,22,MP,4500)
(7,Muffy,24,Indore,10000,7,Muffy,24,Indore,10000)
Inner Join
Inner Join is used quite frequently; it is also referred to as equijoin. An inner join returns rows when there is a match in both tables.
It creates a new relation by combining column values of two relations (say A and B) based upon the join-predicate. The query compares each row of A with each row of B to find all pairs of rows which satisfy the join-predicate. When the join-predicate is satisfied, the column values for each matched pair of rows of A and B are combined into a result row.
Syntax
Here is the syntax of performing inner join operation using the JOIN operator.
grunt> result = JOIN relation1 BY columnname, relation2 BY columnname;
Example
Let us perform inner join operation on the two relations customers and orders as shown below.
grunt> coustomer_orders = JOIN customers BY id, orders BY customer_id;
Verification
Verify the relation coustomer_orders using the DUMP operator as shown below.
grunt> Dump coustomer_orders;
Output
You will get the following output that will the contents of the relation named coustomer_orders.
(2,Khilan,25,Delhi,1500,101,2009-11-20 00:00:00,2,1560)
(3,kaushik,23,Kota,2000,100,2009-10-08 00:00:00,3,1500)
(3,kaushik,23,Kota,2000,102,2009-10-08 00:00:00,3,3000)
(4,Chaitali,25,Mumbai,6500,103,2008-05-20 00:00:00,4,2060)
Note −
Outer Join: Unlike inner join, outer join returns all the rows from at least one of the relations. An outer join operation is carried out in three ways −
- Left outer join
- Right outer join
- Full outer join
Left Outer Join
The left outer Join operation returns all rows from the left table, even if there are no matches in the right relation.
Syntax
Given below is the syntax of performing left outer join operation using the JOIN operator.
grunt> Relation3_name = JOIN Relation1_name BY id LEFT OUTER, Relation2_name BY customer_id;
Example
Let us perform left outer join operation on the two relations customers and orders as shown below.
grunt> outer_left = JOIN customers BY id LEFT OUTER, orders BY customer_id;
Verification
Verify the relation outer_left using the DUMP operator as shown below.
grunt> Dump outer_left;
Output
It will produce the following output, displaying the contents of the relation outer_left.
(1,Ramesh,32,Ahmedabad,2000,,,,)
(2,Khilan,25,Delhi,1500,101,2009-11-20 00:00:00,2,1560)
(3,kaushik,23,Kota,2000,100,2009-10-08 00:00:00,3,1500)
(3,kaushik,23,Kota,2000,102,2009-10-08 00:00:00,3,3000)
(4,Chaitali,25,Mumbai,6500,103,2008-05-20 00:00:00,4,2060)
(5,Hardik,27,Bhopal,8500,,,,)
(6,Komal,22,MP,4500,,,,)
(7,Muffy,24,Indore,10000,,,,)
Right Outer Join
The right outer join operation returns all rows from the right table, even if there are no matches in the left table.
Syntax
Given below is the syntax of performing right outer join operation using the JOIN operator.
grunt> outer_right = JOIN customers BY id RIGHT, orders BY customer_id;
Example
Let us perform right outer join operation on the two relations customers and orders as shown below.
grunt> outer_right = JOIN customers BY id RIGHT, orders BY customer_id;
Verification
Verify the relation outer_right using the DUMP operator as shown below.
grunt> Dump outer_right
Output
It will produce the following output, displaying the contents of the relation outer_right.
(2,Khilan,25,Delhi,1500,101,2009-11-20 00:00:00,2,1560)
(3,kaushik,23,Kota,2000,100,2009-10-08 00:00:00,3,1500)
(3,kaushik,23,Kota,2000,102,2009-10-08 00:00:00,3,3000)
(4,Chaitali,25,Mumbai,6500,103,2008-05-20 00:00:00,4,2060)
Full Outer Join
The full outer join operation returns rows when there is a match in one of the relations.
Syntax
Given below is the syntax of performing full outer join using the JOIN operator.
grunt> outer_full = JOIN customers BY id FULL OUTER, orders BY customer_id;
Example
Let us perform full outer join operation on the two relations customers and orders as shown below.
grunt> outer_full = JOIN customers BY id FULL OUTER, orders BY customer_id;
Verification
Verify the relation outer_full using the DUMP operator as shown below.
grun> Dump outer_full;
Output
It will produce the following output, displaying the contents of the relation outer_full.
(1,Ramesh,32,Ahmedabad,2000,,,,)
(2,Khilan,25,Delhi,1500,101,2009-11-20 00:00:00,2,1560)
(3,kaushik,23,Kota,2000,100,2009-10-08 00:00:00,3,1500)
(3,kaushik,23,Kota,2000,102,2009-10-08 00:00:00,3,3000)
(4,Chaitali,25,Mumbai,6500,103,2008-05-20 00:00:00,4,2060)
(5,Hardik,27,Bhopal,8500,,,,)
(6,Komal,22,MP,4500,,,,)
(7,Muffy,24,Indore,10000,,,,)
Using Multiple Keys
We can perform JOIN operation using multiple keys.
Syntax
Here is how you can perform a JOIN operation on two tables using multiple keys.
grunt> Relation3_name = JOIN Relation2_name BY (key1, key2), Relation3_name BY (key1, key2);
Assume that we have two files namely employee.txt and employee_contact.txt in the /pig_data/ directory of HDFS as shown below.
employee.txt
001,Rajiv,Reddy,21,programmer,003
002,siddarth,Battacharya,22,programmer,003
003,Rajesh,Khanna,22,programmer,003
004,Preethi,Agarwal,21,programmer,003
005,Trupthi,Mohanthy,23,programmer,003
006,Archana,Mishra,23,programmer,003
007,Komal,Nayak,24,teamlead,002
008,Bharathi,Nambiayar,24,manager,001
employee_contact.txt
001,9848022337,Rajiv@gmail.com,Hyderabad,003
002,9848022338,siddarth@gmail.com,Kolkata,003
003,9848022339,Rajesh@gmail.com,Delhi,003
004,9848022330,Preethi@gmail.com,Pune,003
005,9848022336,Trupthi@gmail.com,Bhuwaneshwar,003
006,9848022335,Archana@gmail.com,Chennai,003
007,9848022334,Komal@gmail.com,trivendram,002
008,9848022333,Bharathi@gmail.com,Chennai,001
And we have loaded these two files into Pig with relations employee and employee_contact as shown below.
grunt> employee = LOAD 'hdfs://localhost:9000/pig_data/employee.txt' USING PigStorage(',')
   as (id:int, firstname:chararray, lastname:chararray, age:int, designation:chararray, jobid:int);

grunt> employee_contact = LOAD 'hdfs://localhost:9000/pig_data/employee_contact.txt' USING PigStorage(',')
   as (id:int, phone:chararray, email:chararray, city:chararray, jobid:int);
Now, let us join the contents of these two relations using the JOIN operator as shown below.
grunt> emp = JOIN employee BY (id,jobid), employee_contact BY (id,jobid);
Verification
Verify the relation emp using the DUMP operator as shown below.
grunt> Dump emp;
Output
It will produce the following output, displaying the contents of the relation named emp as shown below.
(1,Rajiv,Reddy,21,programmer,113,1,9848022337,Rajiv@gmail.com,Hyderabad,113)
(2,siddarth,Battacharya,22,programmer,113,2,9848022338,siddarth@gmail.com,Kolka ta,113)
(3,Rajesh,Khanna,22,programmer,113,3,9848022339,Rajesh@gmail.com,Delhi,113)
(4,Preethi,Agarwal,21,programmer,113,4,9848022330,Preethi@gmail.com,Pune,113)
(5,Trupthi,Mohanthy,23,programmer,113,5,9848022336,Trupthi@gmail.com,Bhuwaneshw ar,113)
(6,Archana,Mishra,23,programmer,113,6,9848022335,Archana@gmail.com,Chennai,113)
(7,Komal,Nayak,24,teamlead,112,7,9848022334,Komal@gmail.com,trivendram,112)
(8,Bharathi,Nambiayar,24,manager,111,8,9848022333,Bharathi@gmail.com,Chennai,111)
Apache Pig - Cross Operator
The CROSS operator computes the cross-product of two or more relations. This chapter explains with example how to use the cross operator in Pig Latin.
Syntax
Given below is the syntax of the CROSS operator.
grunt> Relation3_name = CROSS Relation1_name, Relation2_name;
Example
Assume that we have two files namely customers.txt and orders.txt in the /pig_data/ directory of HDFS as shown below.
customers.txt
1,Ramesh,32,Ahmedabad,2000.00
2,Khilan,25,Delhi,1500.00
3,kaushik,23,Kota,2000.00
4,Chaitali,25,Mumbai,6500.00
5,Hardik,27,Bhopal,8500.00
6,Komal,22,MP,4500.00
7,Muffy,24,Indore,10000.00
orders.txt
102,2009-10-08 00:00:00,3,3000
100,2009-10-08 00:00:00,3,1500
101,2009-11-20 00:00:00,2,1560
103,2008-05-20 00:00:00,4,2060
And we have loaded these two files into Pig with the relations customers and orders as shown below.
grunt> customers = LOAD 'hdfs://localhost:9000/pig_data/customers.txt' USING PigStorage(',')
   as (id:int, name:chararray, age:int, address:chararray, salary:int);

grunt> orders = LOAD 'hdfs://localhost:9000/pig_data/orders.txt' USING PigStorage(',')
   as (oid:int, date:chararray, customer_id:int, amount:int);
Let us now get the cross-product of these two relations using the cross operator on these two relations as shown below.
grunt> cross_data = CROSS customers, orders;
Verification
Verify the relation cross_data using the DUMP operator as shown below.
grunt> Dump cross_data;
Output
It will produce the following output, displaying the contents of the relation cross_data.
(7,Muffy,24,Indore,10000,103,2008-05-20 00:00:00,4,2060)
(7,Muffy,24,Indore,10000,101,2009-11-20 00:00:00,2,1560)
(7,Muffy,24,Indore,10000,100,2009-10-08 00:00:00,3,1500)
(7,Muffy,24,Indore,10000,102,2009-10-08 00:00:00,3,3000)
(6,Komal,22,MP,4500,103,2008-05-20 00:00:00,4,2060)
(6,Komal,22,MP,4500,101,2009-11-20 00:00:00,2,1560)
(6,Komal,22,MP,4500,100,2009-10-08 00:00:00,3,1500)
(6,Komal,22,MP,4500,102,2009-10-08 00:00:00,3,3000)
(5,Hardik,27,Bhopal,8500,103,2008-05-20 00:00:00,4,2060)
(5,Hardik,27,Bhopal,8500,101,2009-11-20 00:00:00,2,1560)
(5,Hardik,27,Bhopal,8500,100,2009-10-08 00:00:00,3,1500)
(5,Hardik,27,Bhopal,8500,102,2009-10-08 00:00:00,3,3000)
(4,Chaitali,25,Mumbai,6500,103,2008-05-20 00:00:00,4,2060)
(4,Chaitali,25,Mumbai,6500,101,2009-20 00:00:00,4,2060)
(2,Khilan,25,Delhi,1500,101,2009-11-20 00:00:00,2,1560)
(2,Khilan,25,Delhi,1500,100,2009-10-08 00:00:00,3,1500)
(2,Khilan,25,Delhi,1500,102,2009-10-08 00:00:00,3,3000)
(1,Ramesh,32,Ahmedabad,2000,103,2008-05-20 00:00:00,4,2060)
(1,Ramesh,32,Ahmedabad,2000,101,2009-11-20 00:00:00,2,1560)
(1,Ramesh,32,Ahmedabad,2000,100,2009-10-08 00:00:00,3,1500)
(1,Ramesh,32,Ahmedabad,2000,102,2009-10-08 00:00:00,3,3000)-11-20 00:00:00,2,1560)
(4,Chaitali,25,Mumbai,6500,100,2009-10-08 00:00:00,3,1500)
(4,Chaitali,25,Mumbai,6500,102,2009-10-08 00:00:00,3,3000)
(3,kaushik,23,Kota,2000,103,2008-05-20 00:00:00,4,2060)
(3,kaushik,23,Kota,2000,101,2009-11-20 00:00:00,2,1560)
(3,kaushik,23,Kota,2000,100,2009-10-08 00:00:00,3,1500)
(3,kaushik,23,Kota,2000,102,2009-10-08 00:00:00,3,3000)
(2,Khilan,25,Delhi,1500,103,2008-05-20 00:00:00,4,2060)
(2,Khilan,25,Delhi,1500,101,2009-11-20 00:00:00,2,1560)
(2,Khilan,25,Delhi,1500,100,2009-10-08 00:00:00,3,1500)
(2,Khilan,25,Delhi,1500,102,2009-10-08 00:00:00,3,3000)
(1,Ramesh,32,Ahmedabad,2000,103,2008-05-20 00:00:00,4,2060)
(1,Ramesh,32,Ahmedabad,2000,101,2009-11-20 00:00:00,2,1560)
(1,Ramesh,32,Ahmedabad,2000,100,2009-10-08 00:00:00,3,1500)
(1,Ramesh,32,Ahmedabad,2000,102,2009-10-08 00:00:00,3,3000)
Apache Pig - Union Operator
The UNION operator of Pig Latin is used to merge the content of two relations. To perform UNION operation on two relations, their columns and domains must be identical.
Syntax
Given below is the syntax of the UNION operator.
grunt> Relation_name3 = UNION Relation_name1, Relation_name2;
Example
Assume that we have two files namely student_data1.txt and student_data2.txt in the /pig_data/ directory of HDFS as shown below.
Student_data1.txt
001,Rajiv,Reddy,9848022337,Hyderabad
002,siddarth,Battacharya,9848022338,Kolkata
003,Rajesh,Khanna,9848022339,Delhi
004,Preethi,Agarwal,9848022330,Pune
005,Trupthi,Mohanthy,9848022336,Bhuwaneshwar
006,Archana,Mishra,9848022335,Chennai.
Student_data2.txt
7,Komal,Nayak,9848022334,trivendram.
8,Bharathi,Nambiayar,9848022333,Chennai.
And we have loaded these two files into Pig with the relations student1 and student2 as shown below.
grunt> student1 = LOAD 'hdfs://localhost:9000/pig_data/student_data1.txt' USING PigStorage(',')
   as (id:int, firstname:chararray, lastname:chararray, phone:chararray, city:chararray);

grunt> student2 = LOAD 'hdfs://localhost:9000/pig_data/student_data2.txt' USING PigStorage(',')
   as (id:int, firstname:chararray, lastname:chararray, phone:chararray, city:chararray);
Let us now merge the contents of these two relations using the UNION operator as shown below.
grunt> student = UNION student1, student2;
Verification
Verify the relation student using the DUMP operator as shown below.
grunt> Dump student;
Output
It will display the following output, displaying the contents of the relation student.
(1,Rajiv,Reddy,9848022337,Hyderabad) (2,siddarth,Battacharya,9848022338,Kolkata)
(3,Rajesh,Khanna,9848022339,Delhi)
(4,Preethi,Agarwal,9848022330,Pune)
(5,Trupthi,Mohanthy,9848022336,Bhuwaneshwar)
(6,Archana,Mishra,9848022335,Chennai)
(7,Komal,Nayak,9848022334,trivendram)
(8,Bharathi,Nambiayar,9848022333,Chennai)
Apache Pig - Split Operator
The SPLIT operator is used to split a relation into two or more relations.
Syntax
Given below is the syntax of the SPLIT operator.
grunt> SPLIT Relation1_name INTO Relation2_name IF (condition1), Relation2_name (condition2),
Example
Assume that we have a file named student_details.txt in the HDFS directory /pig_data/ as shown below.
student_details.txt
001,Rajiv,Reddy,21,9848022337,Hyderabad
002,siddarth,Battacharya,22,9848022338,Kolkata
003,Rajesh,Khanna,22,9848022339,Delhi
004,Preethi,Agarwal,21,9848022330,Pune
005,Trupthi,Mohanthy,23,9848022336,Bhuwaneshwar
006,Archana,Mishra,23,9848022335,Chennai
007,Komal,Nayak,24,9848022334,trivendram
008,Bharathi,Nambiayar,24,9848022333,Chennai
And we have loaded this file into Pig with the relation name student_details as shown below.
student_details = LOAD 'hdfs://localhost:9000/pig_data/student_details.txt' USING PigStorage(',')
   as (id:int, firstname:chararray, lastname:chararray, age:int, phone:chararray, city:chararray);
Let us now split the relation into two, one listing the employees of age less than 23, and the other listing the employees having the age between 22 and 25.
SPLIT student_details into student_details1 if age<23, student_details2 if (22<age and age>25);
Verification
Verify the relations student_details1 and student_details2 using the DUMP operator as shown below.
grunt> Dump student_details1;

grunt> Dump student_details2;
Output
It will produce the following output, displaying the contents of the relations student_details1 and student_details2 respectively.
grunt> Dump student_details1;
(1,Rajiv,Reddy,21,9848022337,Hyderabad)
(2,siddarth,Battacharya,22,9848022338,Kolkata)
(3,Rajesh,Khanna,22,9848022339,Delhi)
(4,Preethi,Agarwal,21,9848022330,Pune)

grunt> Dump student_details2;
(5,Trupthi,Mohanthy,23,9848022336,Bhuwaneshwar)
(6,Archana,Mishra,23,9848022335,Chennai)
(7,Komal,Nayak,24,9848022334,trivendram)
(8,Bharathi,Nambiayar,24,9848022333,Chennai)
Apache Pig - Filter Operator
The FILTER operator is used to select the required tuples from a relation based on a condition.
Syntax
Given below is the syntax of the FILTER operator.
grunt> Relation2_name = FILTER Relation1_name BY (condition);
Example
Assume that we have a file named student_details.txt in the HDFS directory /pig_data/ as shown below.
student_details.txt
001,Rajiv,Reddy,21,9848022337,Hyderabad
002,siddarth,Battacharya,22,9848022338,Kolkata
003,Rajesh,Khanna,22,9848022339,Delhi
004,Preethi,Agarwal,21,9848022330,Pune
005,Trupthi,Mohanthy,23,9848022336,Bhuwaneshwar
006,Archana,Mishra,23,9848022335,Chennai
007,Komal,Nayak,24,9848022334,trivendram
008,Bharathi,Nambiayar,24,9848022333,Chennai
And we have loaded this file into Pig with the relation name student_details as shown below.
grunt> student_details = LOAD 'hdfs://localhost:9000/pig_data/student_details.txt' USING PigStorage(',')
   as (id:int, firstname:chararray, lastname:chararray, age:int, phone:chararray, city:chararray);
Let us now use the Filter operator to get the details of the students who belong to the city Chennai.
filter_data = FILTER student_details BY city == 'Chennai';
Verification
Verify the relation filter_data using the DUMP operator as shown below.
grunt> Dump filter_data;
Output
It will produce the following output, displaying the contents of the relation filter_data as follows.
(6,Archana,Mishra,23,9848022335,Chennai)
(8,Bharathi,Nambiayar,24,9848022333,Chennai)
Apache Pig - Distinct Operator
The DISTINCT operator is used to remove redundant (duplicate) tuples from a relation.
Syntax
Given below is the syntax of the DISTINCT operator.
grunt> Relation_name2 = DISTINCT Relatin_name1;
Example
Assume that we have a file named student_details.txt in the HDFS directory /pig_data/ as shown below.
student_details.txt
001,Rajiv,Reddy,9848022337,Hyderabad
002,siddarth,Battacharya,9848022338,Kolkata
002,siddarth,Battacharya,9848022338,Kolkata
003,Rajesh,Khanna,9848022339,Delhi
003,Rajesh,Khanna,9848022339,Delhi
004,Preethi,Agarwal,9848022330,Pune
005,Trupthi,Mohanthy,9848022336,Bhuwaneshwar
006,Archana,Mishra,9848022335,Chennai
006,Archana,Mishra,9848022335,Chennai
And we have loaded this file into Pig with the relation name student_details as shown below.
grunt> student_details = LOAD 'hdfs://localhost:9000/pig_data/student_details.txt' USING PigStorage(',')
   as (id:int, firstname:chararray, lastname:chararray, phone:chararray, city:chararray);
Let us now remove the redundant (duplicate) tuples from the relation named student_details using the DISTINCT operator, and store it as another relation named distinct_data as shown below.
grunt> distinct_data = DISTINCT student_details;
Verification
Verify the relation distinct_data using the DUMP operator as shown below.
grunt> Dump distinct_data;
Output
It will produce the following output, displaying the contents of the relation distinct_data as follows.
(1,Rajiv,Reddy,9848022337,Hyderabad)
(2,siddarth,Battacharya,9848022338,Kolkata)
(3,Rajesh,Khanna,9848022339,Delhi)
(4,Preethi,Agarwal,9848022330,Pune)
(5,Trupthi,Mohanthy,9848022336,Bhuwaneshwar)
(6,Archana,Mishra,9848022335,Chennai)
Apache Pig - Foreach Operator
The FOREACH operator is used to generate specified data transformations based on the column data.
Syntax
Given below is the syntax of FOREACH operator.
grunt> Relation_name2 = FOREACH Relatin_name1 GENERATE (required data);
Example
Assume that we have a file named student_details.txt in the HDFS directory /pig_data/ as shown below.
student_details.txt
001,Rajiv,Reddy,21,9848022337,Hyderabad
002,siddarth,Battacharya,22,9848022338,Kolkata
003,Rajesh,Khanna,22,9848022339,Delhi
004,Preethi,Agarwal,21,9848022330,Pune
005,Trupthi,Mohanthy,23,9848022336,Bhuwaneshwar
006,Archana,Mishra,23,9848022335,Chennai
007,Komal,Nayak,24,9848022334,trivendram
008,Bharathi,Nambiayar,24,9848022333,Chennai
And we have loaded this file into Pig with the relation name student_details as shown below.
grunt> student_details = LOAD 'hdfs://localhost:9000/pig_data/student_details.txt' USING PigStorage(',')
   as (id:int, firstname:chararray, lastname:chararray,age:int, phone:chararray, city:chararray);
Let us now get the id, age, and city values of each student from the relation student_details and store it into another relation named foreach_data using the foreach operator as shown below.
grunt> foreach_data = FOREACH student_details GENERATE id,age,city;
Verification
Verify the relation foreach_data using the DUMP operator as shown below.
grunt> Dump foreach_data;
Output
It will produce the following output, displaying the contents of the relation foreach_data.
(1,21,Hyderabad)
(2,22,Kolkata)
(3,22,Delhi)
(4,21,Pune)
(5,23,Bhuwaneshwar)
(6,23,Chennai)
(7,24,trivendram)
(8,24,Chennai)
Apache Pig - Order By
The ORDER BY operator is used to display the contents of a relation in a sorted order based on one or more fields.
Syntax
Given below is the syntax of the ORDER BY operator.
grunt> Relation_name2 = ORDER Relatin_name1 BY (ASC|DESC);
Example
Assume that we have a file named student_details.txt in the HDFS directory /pig_data/ as shown below.
student_details.txt
001,Rajiv,Reddy,21,9848022337,Hyderabad
002,siddarth,Battacharya,22,9848022338,Kolkata
003,Rajesh,Khanna,22,9848022339,Delhi
004,Preethi,Agarwal,21,9848022330,Pune
005,Trupthi,Mohanthy,23,9848022336,Bhuwaneshwar
006,Archana,Mishra,23,9848022335,Chennai
007,Komal,Nayak,24,9848022334,trivendram
008,Bharathi,Nambiayar,24,9848022333,Chennai
And we have loaded this file into Pig with the relation name student_details as shown below.
grunt> student_details = LOAD 'hdfs://localhost:9000/pig_data/student_details.txt' USING PigStorage(',')
   as (id:int, firstname:chararray, lastname:chararray,age:int, phone:chararray, city:chararray);
Let us now sort the relation in a descending order based on the age of the student and store it into another relation named order_by_data using the ORDER BY operator as shown below.
grunt> order_by_data = ORDER student_details BY age DESC;
Verification
Verify the relation order_by_data using the DUMP operator as shown below.
grunt> Dump order_by_data;
Output
It will produce the following output, displaying the contents of the relation order_by_data.
(8,Bharathi,Nambiayar,24,9848022333,Chennai)
(7,Komal,Nayak,24,9848022334,trivendram)
(6,Archana,Mishra,23,9848022335,Chennai)
(5,Trupthi,Mohanthy,23,9848022336,Bhuwaneshwar)
(3,Rajesh,Khanna,22,9848022339,Delhi)
(2,siddarth,Battacharya,22,9848022338,Kolkata)
(4,Preethi,Agarwal,21,9848022330,Pune)
(1,Rajiv,Reddy,21,9848022337,Hyderabad)
Apache Pig - Limit Operator
The LIMIT operator is used to get a limited number of tuples from a relation.
Syntax
Given below is the syntax of the LIMIT operator.
grunt> Result = LIMIT Relation_name required number of tuples;
Example
Assume that we have a file named student_details.txt in the HDFS directory /pig_data/ as shown below.
student_details.txt
001,Rajiv,Reddy,21,9848022337,Hyderabad
002,siddarth,Battacharya,22,9848022338,Kolkata
003,Rajesh,Khanna,22,9848022339,Delhi
004,Preethi,Agarwal,21,9848022330,Pune
005,Trupthi,Mohanthy,23,9848022336,Bhuwaneshwar
006,Archana,Mishra,23,9848022335,Chennai
007,Komal,Nayak,24,9848022334,trivendram
008,Bharathi,Nambiayar,24,9848022333,Chennai
And we have loaded this file into Pig with the relation name student_details as shown below.
grunt> student_details = LOAD 'hdfs://localhost:9000/pig_data/student_details.txt' USING PigStorage(',')
   as (id:int, firstname:chararray, lastname:chararray,age:int, phone:chararray, city:chararray);
Now, let’s sort the relation in descending order based on the age of the student and store it into another relation named limit_data using the ORDER BY operator as shown below.
grunt> limit_data = LIMIT student_details 4;
Verification
Verify the relation limit_data using the DUMP operator as shown below.
grunt> Dump limit_data;
Output
It will produce the following output, displaying the contents of the relation limit_data as follows.
(1,Rajiv,Reddy,21,9848022337,Hyderabad)
(2,siddarth,Battacharya,22,9848022338,Kolkata)
(3,Rajesh,Khanna,22,9848022339,Delhi)
(4,Preethi,Agarwal,21,9848022330,Pune)
Apache Pig - Eval Functions
Apache Pig provides various built-in functions namely eval, load, store, math, string, bag and tuple functions.
Eval Functions
Given below is the list of eval functions provided by Apache Pig.
| S.N. | Function & Description |
|---|---|
| 1 | AVG()
To compute the average of the numerical values within a bag. |
| 2 | BagToString()
To concatenate the elements of a bag into a string. While concatenating, we can place a delimiter between these values (optional). |
| 3 | CONCAT()
To concatenate two or more expressions of same type. |
| 4 | COUNT()
To get the number of elements in a bag, while counting the number of tuples in a bag. |
| 5 | COUNT_STAR()
It is similar to the COUNT() function. It is used to get the number of elements in a bag. |
| 6 | DIFF()
To compare two bags (fields) in a tuple. |
| 7 | IsEmpty()
To check if a bag or map is empty. |
| 8 | MAX()
To calculate the highest value for a column (numeric values or chararrays) in a single-column bag. |
| 9 | MIN()
To get the minimum (lowest) value (numeric or chararray) for a certain column in a single-column bag. |
| 10 | PluckTuple()
Using the Pig Latin PluckTuple() function, we can define a string Prefix and filter the columns in a relation that begin with the given prefix. |
| 11 | SIZE()
To compute the number of elements based on any Pig data type. |
| 12 | SUBTRACT()
To subtract two bags. It takes two bags as inputs and returns a bag which contains the tuples of the first bag that are not in the second bag. |
| 13 | SUM()
To get the total of the numeric values of a column in a single-column bag. |
| 14 | TOKENIZE()
To split a string (which contains a group of words) in a single tuple and return a bag which contains the output of the split operation. |
Apache Pig - Load & Store Functions
The Load and Store functions in Apache Pig are used to determine how the data goes ad comes out of Pig. These functions are used with the load and store operators. Given below is the list of load and store functions available in Pig.
| S.N. | Function & Description |
|---|---|
| 1 | PigStorage()
To load and store structured files. |
| 2 | TextLoader()
To load unstructured data into Pig. |
| 3 | BinStorage()
To load and store data into Pig using machine readable format. |
| 4 | Handling Compression
In Pig Latin, we can load and store compressed data. |
Apache Pig - Bag & Tuple Functions
Given below is the list of Bag and Tuple functions.
| S.N. | Function & Description |
|---|---|
| 1 | TOBAG()
To convert two or more expressions into a bag. |
| 2 | TOP()
To get the top N tuples of a relation. |
| 3 | TOTUPLE()
To convert one or more expressions into a tuple. |
| 4 | TOMAP()
To convert the key-value pairs into a Map. |
Apache Pig - String Functions
We have the following String functions in Apache Pig.
| S.N. | Functions & Description |
|---|---|
| 1 | ENDSWITH(string, testAgainst)
To verify whether a given string ends with a particular substring. |
| 2 | STARTSWITH(string, substring)
Accepts two string parameters and verifies whether the first string starts with the second. |
| 3 | SUBSTRING(string, startIndex, stopIndex)
Returns a substring from a given string. |
| 4 | EqualsIgnoreCase(string1, string2)
To compare two stings ignoring the case. |
| 5 | INDEXOF(string, ‘character’, startIndex)
Returns the first occurrence of a character in a string, searching forward from a start index. |
| 6 | LAST_INDEX_OF(expression)
Returns the index of the last occurrence of a character in a string, searching backward from a start index. |
| 7 | LCFIRST(expression)
Converts the first character in a string to lower case. |
| 8 | UCFIRST(expression)
Returns a string with the first character converted to upper case. |
| 9 | UPPER(expression)
UPPER(expression) Returns a string converted to upper case. |
| 10 | LOWER(expression)
Converts all characters in a string to lower case. |
| 11 | REPLACE(string, ‘oldChar’, ‘newChar’);
To replace existing characters in a string with new characters. |
| 12 | STRSPLIT(string, regex, limit)
To split a string around matches of a given regular expression. |
| 13 | STRSPLITTOBAG(string, regex, limit)
Similar to the STRSPLIT() function, it splits the string by given delimiter and returns the result in a bag. |
| 14 | TRIM(expression)
Returns a copy of a string with leading and trailing whitespaces removed. |
| 15 | LTRIM(expression)
Returns a copy of a string with leading whitespaces removed. |
| 16 | RTRIM(expression)
Returns a copy of a string with trailing whitespaces removed. |
Apache Pig - Date-time Functions
Apache Pig provides the following Date and Time functions −
| S.N. | Functions & Description |
|---|---|
| 1 | ToDate(milliseconds)
This function returns a date-time object according to the given parameters. The other alternative for this function are ToDate(iosstring), ToDate(userstring, format), ToDate(userstring, format, timezone) |
| 2 | CurrentTime()
returns the date-time object of the current time. |
| 3 | GetDay(datetime)
Returns the day of a month from the date-time object. |
| 4 | GetHour(datetime)
Returns the hour of a day from the date-time object. |
| 5 | GetMilliSecond(datetime)
Returns the millisecond of a second from the date-time object. |
| 6 | GetMinute(datetime)
Returns the minute of an hour from the date-time object. |
| 7 | GetMonth(datetime)
Returns the month of a year from the date-time object. |
| 8 | GetSecond(datetime)
Returns the second of a minute from the date-time object. |
| 9 | GetWeek(datetime)
Returns the week of a year from the date-time object. |
| 10 | GetWeekYear(datetime)
Returns the week year from the date-time object. |
| 11 | GetYear(datetime)
Returns the year from the date-time object. |
| 12 | AddDuration(datetime, duration)
Returns the result of a date-time object along with the duration object. |
| 13 | SubtractDuration(datetime, duration)
Subtracts the Duration object from the Date-Time object and returns the result. |
| 14 | DaysBetween(datetime1, datetime2)
Returns the number of days between the two date-time objects. |
| 15 | HoursBetween(datetime1, datetime2)
Returns the number of hours between two date-time objects. |
| 16 | MilliSecondsBetween(datetime1, datetime2)
Returns the number of milliseconds between two date-time objects. |
| 17 | MinutesBetween(datetime1, datetime2)
Returns the number of minutes between two date-time objects. |
| 18 | MonthsBetween(datetime1, datetime2)
Returns the number of months between two date-time objects. |
| 19 | SecondsBetween(datetime1, datetime2)
Returns the number of seconds between two date-time objects. |
| 20 | WeeksBetween(datetime1, datetime2)
Returns the number of weeks between two date-time objects. |
| 21 | YearsBetween(datetime1, datetime2)
Returns the number of years between two date-time objects. |
Apache Pig - Math Functions
We have the following Math functions in Apache Pig −
| S.N. | Functions & Description |
|---|---|
| 1 | ABS(expression)
To get the absolute value of an expression. |
| 2 | ACOS(expression)
To get the arc cosine of an expression. |
| 3 | ASIN(expression)
To get the arc sine of an expression. |
| 4 | ATAN(expression)
This function is used to get the arc tangent of an expression. |
| 5 | CBRT(expression)
This function is used to get the cube root of an expression. |
| 6 | CEIL(expression)
This function is used to get the value of an expression rounded up to the nearest integer. |
| 7 | COS(expression)
This function is used to get the trigonometric cosine of an expression. |
| 8 | COSH(expression)
This function is used to get the hyperbolic cosine of an expression. |
| 9 | EXP(expression)
This function is used to get the Euler’s number e raised to the power of x. |
| 10 | FLOOR(expression)
To get the value of an expression rounded down to the nearest integer. |
| 11 | LOG(expression)
To get the natural logarithm (base e) of an expression. |
| 12 | LOG10(expression)
To get the base 10 logarithm of an expression. |
| 13 | RANDOM( )
To get a pseudo random number (type double) greater than or equal to 0.0 and less than 1.0. |
| 14 | ROUND(expression)
To get the value of an expression rounded to an integer (if the result type is float) or rounded to a long (if the result type is double). |
| 15 | SIN(expression)
To get the sine of an expression. |
| 16 | SINH(expression)
To get the hyperbolic sine of an expression. |
| 17 | SQRT(expression)
To get the positive square root of an expression. |
| 18 | TAN(expression)
To get the trigonometric tangent of an angle. |
| 19 | TANH(expression)
To get the hyperbolic tangent of an expression. |
Apache Pig - User Defined Functions
In addition to the built-in functions, Apache Pig provides extensive support for User Defined Functions (UDF’s). Using these UDF’s, we can define our own functions and use them. The UDF support is provided in six programming languages, namely, Java, Jython, Python, JavaScript, Ruby and Groovy.
For writing UDF’s, complete support is provided in Java and limited support is provided in all the remaining languages. Using Java, you can write UDF’s involving all parts of the processing like data load/store, column transformation, and aggregation. Since Apache Pig has been written in Java, the UDF’s written using Java language work efficiently compared to other languages.
In Apache Pig, we also have a Java repository for UDF’s named Piggybank. Using Piggybank, we can access Java UDF’s written by other users, and contribute our own UDF’s.
Types of UDF’s in Java
While writing UDF’s using Java, we can create and use the following three types of functions −
Filter Functions − The filter functions are used as conditions in filter statements. These functions accept a Pig value as input and return a Boolean value.
Eval Functions − The Eval functions are used in FOREACH-GENERATE statements. These functions accept a Pig value as input and return a Pig result.
Algebraic Functions − The Algebraic functions act on inner bags in a FOREACHGENERATE statement. These functions are used to perform full MapReduce operations on an inner bag.
Writing UDF’s using Java
To write a UDF using Java, we have to integrate the jar file Pig-0.15.0.jar. In this section, we discuss how to write a sample UDF using Eclipse. Before proceeding further, make sure you have installed Eclipse and Maven in your system.
Follow the steps given below to write a UDF function −
Open Eclipse and create a new project (say myproject).
Convert the newly created project into a Maven project.
Copy the following content in the pom.xml. This file contains the Maven dependencies for Apache Pig and Hadoop-core jar files.
<project xmlns = "http://maven.apache.org/POM/4.0.0"
   xmlns:xsi = "http://www.w3.org/2001/XMLSchema-instance"
   xsi:schemaLocation = "http://maven.apache.org/POM/4.0.0http://maven.apache .org/xsd/maven-4.0.0.xsd">

   <modelVersion>4.0.0</modelVersion>
   <groupId>Pig_Udf</groupId>
   <artifactId>Pig_Udf</artifactId>
   <version>0.0.1-SNAPSHOT</version>

   <build>
      <sourceDirectory>src</sourceDirectory>
      <plugins>
         <plugin>
            <artifactId>maven-compiler-plugin</artifactId>
            <version>3.3</version>
            <configuration>
               <source>1.7</source>
               <target>1.7</target>
            </configuration>
         </plugin>
      </plugins>
   </build>

   <dependencies>

      <dependency>
         <groupId>org.apache.pig</groupId>
         <artifactId>pig</artifactId>
         <version>0.15.0</version>
      </dependency>

      <dependency>
         <groupId>org.apache.hadoop</groupId>
         <artifactId>hadoop-core</artifactId>
         <version>0.20.2</version>
      </dependency>

   </dependencies>

</project>
Save the file and refresh it. In the Maven Dependencies section, you can find the downloaded jar files.
Create a new class file with name Sample_Eval and copy the following content in it.
import java.io.IOException;
import org.apache.pig.EvalFunc;
import org.apache.pig.data.Tuple;

import java.io.IOException;
import org.apache.pig.EvalFunc;
import org.apache.pig.data.Tuple;

public class Sample_Eval extends EvalFunc<String>{

   public String exec(Tuple input) throws IOException {
      if (input == null || input.size() == 0)
      return null;
      String str = (String)input.get(0);
      return str.toUpperCase();
   }
}
While writing UDF’s, it is mandatory to inherit the EvalFunc class and provide implementation to exec() function. Within this function, the code required for the UDF is written. In the above example, we have return the code to convert the contents of the given column to uppercase.
After compiling the class without errors, right-click on the Sample_Eval.java file. It gives you a menu. Select export as shown in the following screenshot.
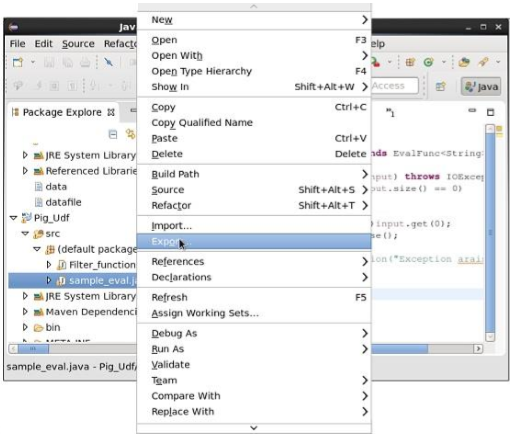
On clicking export, you will get the following window. Click on JAR file.
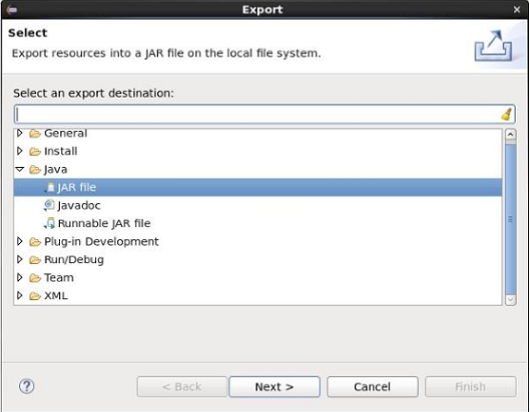
Proceed further by clicking Next> button. You will get another window where you need to enter the path in the local file system, where you need to store the jar file.
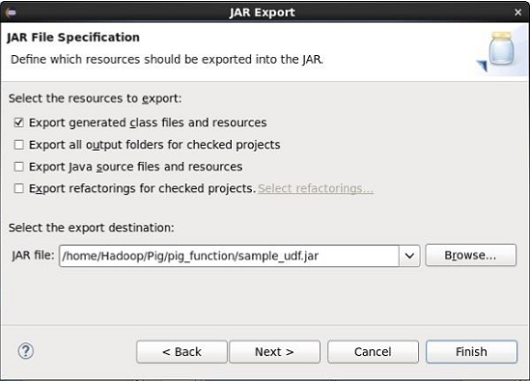
Finally click the Finish button. In the specified folder, a Jar file sample_udf.jar is created. This jar file contains the UDF written in Java.
Using the UDF
After writing the UDF and generating the Jar file, follow the steps given below −
Step 1: Registering the Jar file
After writing UDF (in Java) we have to register the Jar file that contain the UDF using the Register operator. By registering the Jar file, users can intimate the location of the UDF to Apache Pig.
Syntax
Given below is the syntax of the Register operator.
REGISTER path;
Example
As an example let us register the sample_udf.jar created earlier in this chapter.
Start Apache Pig in local mode and register the jar file sample_udf.jar as shown below.
$cd PIG_HOME/bin
$./pig –x local

REGISTER '/$PIG_HOME/sample_udf.jar'
Note − assume the Jar file in the path − /$PIG_HOME/sample_udf.jar
Step 2: Defining Alias
After registering the UDF we can define an alias to it using the Define operator.
Syntax
Given below is the syntax of the Define operator.
DEFINE alias {function | [`command` [input] [output] [ship] [cache] [stderr] ] };
Example
Define the alias for sample_eval as shown below.
DEFINE sample_eval sample_eval();
Step 3: Using the UDF
After defining the alias you can use the UDF same as the built-in functions. Suppose there is a file named emp_data in the HDFS /Pig_Data/ directory with the following content.
001,Robin,22,newyork
002,BOB,23,Kolkata
003,Maya,23,Tokyo
004,Sara,25,London
005,David,23,Bhuwaneshwar
006,Maggy,22,Chennai
007,Robert,22,newyork
008,Syam,23,Kolkata
009,Mary,25,Tokyo
010,Saran,25,London
011,Stacy,25,Bhuwaneshwar
012,Kelly,22,Chennai
And assume we have loaded this file into Pig as shown below.
grunt> emp_data = LOAD 'hdfs://localhost:9000/pig_data/emp1.txt' USING PigStorage(',')
   as (id:int, name:chararray, age:int, city:chararray);
Let us now convert the names of the employees in to upper case using the UDF sample_eval.
grunt> Upper_case = FOREACH emp_data GENERATE sample_eval(name);
Verify the contents of the relation Upper_case as shown below.
grunt> Dump Upper_case;

(ROBIN)
(BOB)
(MAYA)
(SARA)
(DAVID)
(MAGGY)
(ROBERT)
(SYAM)
(MARY)
(SARAN)
(STACY)
(KELLY)
Apache Pig - Running Scripts
Here in this chapter, we will see how how to run Apache Pig scripts in batch mode.
Comments in Pig Script
While writing a script in a file, we can include comments in it as shown below.
Multi-line comments
We will begin the multi-line comments with '/*', end them with '*/'.
/* These are the multi-line comments
  In the pig script */
Single –line comments
We will begin the single-line comments with '--'.
--we can write single line comments like this.
Executing Pig Script in Batch mode
While executing Apache Pig statements in batch mode, follow the steps given below.
Step 1
Write all the required Pig Latin statements in a single file. We can write all the Pig Latin statements and commands in a single file and save it as .pig file.
Step 2
Execute the Apache Pig script. You can execute the Pig script from the shell (Linux) as shown below.
| Local mode | MapReduce mode |
|---|---|
| $ pig -x local Sample_script.pig | $ pig -x mapreduce Sample_script.pig |
You can execute it from the Grunt shell as well using the exec command as shown below.
grunt> exec /sample_script.pig
Executing a Pig Script from HDFS
We can also execute a Pig script that resides in the HDFS. Suppose there is a Pig script with the name Sample_script.pig in the HDFS directory named /pig_data/. We can execute it as shown below.
$ pig -x mapreduce hdfs://localhost:9000/pig_data/Sample_script.pig
Example
Assume we have a file student_details.txt in HDFS with the following content.
student_details.txt
001,Rajiv,Reddy,21,9848022337,Hyderabad
002,siddarth,Battacharya,22,9848022338,Kolkata
003,Rajesh,Khanna,22,9848022339,Delhi
004,Preethi,Agarwal,21,9848022330,Pune
005,Trupthi,Mohanthy,23,9848022336,Bhuwaneshwar
006,Archana,Mishra,23,9848022335,Chennai
007,Komal,Nayak,24,9848022334,trivendram
008,Bharathi,Nambiayar,24,9848022333,Chennai
We also have a sample script with the name sample_script.pig, in the same HDFS directory. This file contains statements performing operations and transformations on the student relation, as shown below.
student = LOAD 'hdfs://localhost:9000/pig_data/student_details.txt' USING PigStorage(',')
   as (id:int, firstname:chararray, lastname:chararray, phone:chararray, city:chararray);

student_order = ORDER student BY age DESC;

student_limit = LIMIT student_order 4;

Dump student_limit;
The first statement of the script will load the data in the file named student_details.txt as a relation named student.
The second statement of the script will arrange the tuples of the relation in descending order, based on age, and store it as student_order.
The third statement of the script will store the first 4 tuples of student_order as student_limit.
Finally the fourth statement will dump the content of the relation student_limit.
Let us now execute the sample_script.pig as shown below.
$./pig -x mapreduce hdfs://localhost:9000/pig_data/sample_script.pig
Apache Pig gets executed and gives you the output with the following content.
(7,Komal,Nayak,24,9848022334,trivendram)
(8,Bharathi,Nambiayar,24,9848022333,Chennai)
(5,Trupthi,Mohanthy,23,9848022336,Bhuwaneshwar)
(6,Archana,Mishra,23,9848022335,Chennai)
2015-10-19 10:31:27,446 [main] INFO  org.apache.pig.Main - Pig script completed in 12
minutes, 32 seconds and 751 milliseconds (752751 ms)