- Apache Bench Tutorial
- Apache Bench - Home
- Apache Bench - Overview
- Apache Bench - Environment Setup
- Testing Our Sample Application
- Testing Multiple URLs Concurrently
- Preparation for Testing Dynamic Pages
- Sequential Test Cases for Dynamic Pages
- Comparison of Outputs
- Apache Bench Useful Resources
- Apache Bench - Quick Guide
- Apache Bench - Useful Resources
- Apache Bench - Discussion
Preparation for Testing Dynamic Pages
In this chapter, we will understand the preparation required for testing dynamic pages. A server-side dynamic web page is a web page the construction of which is controlled by an application server processing server-side scripts. The apache bench can only load test the server-side dynamic web page.
Concurrency Level and the Total Number of Requests
Concurrency level should be lower than the total number of requests.
$ ab -l -r -n 30 -c 80 -k -H "Accept-Encoding: gzip, deflate" http://127.0.0.1:8000/
Output
ab: Cannot use concurrency level greater than total number of requests
Usage: ab [options] [http[s]://]hostname[:port]/path
Use of Flags
In this section, we will describe the use of some important flags with the ab command. We will use the terms, options and flags, interchangeably.
Verbose -v
The verbose option can be used to analyze and debug if there exist multiple number of failed requests. A common indication of failure of the load test is that the test finishes very fast and it gives a good number for request per second value. But it will be a wrong benchmark. To identify the success or failure, you can use the -v 2 option which will dump each response’s body and header to the terminal output. Following command depicts a use case −
$ ab -n 1 -v 2 http://www.generic-example-URL.com/
Output
LOG: header received:
HTTP/1.0 200 OK
…
Content-Length: 2548687
Of course, if you are testing variable responses or returning non-200 HTTP codes in the event of any error, you should simply ignore length checking with the -l option. We will soon see non-200 HTTP when we will launch a web2py application in the subsequent chapters.
Keep-alive -k
When the client sends HTTP request, the connection is made to the server, the server sends the response, and the connection is closed after it has sent the request. This cycle continues with each request. However, with the keep-alive setting (also known as persistent connections), the client maintains an underlying TCP connection open to facilitate multiple requests and response; this eliminates the slow and costly connection initialization time that would otherwise be present.
Variable document length -l
If the web page is of variable length, then you should make use of the option -l. Apache Bench does not report errors if the length of the responses is not constant. This can be useful for dynamic pages.
Use of option -r
How to force ab not to exit on receiving errors? You should use the option -r. Without this option, your test may break as soon as any request hits the socket error. However, with this option, errors will be reported in the failed errors heading, but the test will continue till the end.
Use of option -H
This option is used to add arbitrary header line. The argument is typically in the form of a valid header line, containing a colon-separated field-value pair (i.e., “Accept-Encoding: zip/zop;8bit”).
Use of option -C
In the following section, we will learn in detail how to use the above options in combination with the option to use the cookie value, i.e., the -C option. The -C option is typically in the form of a name = value pair. This field can be repeated.
Using Session Cookie with Apache Bench
To understand how to use the cookie with Apache Bench, we need a web page that tries to set a cookie. A very good example is the web2py application which is a python web framework.
Installing web2py
We are going to quickly install another python app web2py. You can read more on how to use it on Web2py Framework Overview.
Python is generally installed by default on the Ubuntu and Debian server. Therefore, one requirement is already met to run web2py successfully.
However, we need to install the unzip package to extract the source files of web2py from the zip file which we will be downloading −
$ sudo apt-get update
$ sudo apt-get install unzip
Let us get the web2py framework from the project’s website. We will download this to our home folder −
$cd ~
$ wget http://www.web2py.com/examples/static/web2py_src.zip
Now, we can unzip the file we just downloaded and move inside −
$ unzip web2py_src.zip
$ cd web2py
To run the web2py, you do not need to install it. Once you are inside the web2py directory, you can run it by typing the following command −
$python web2py.py
If everything is successful, you will see the following output where you will be asked to choose a password for the administrative UI −
web2py Web Framework
Created by Massimo Di Pierro, Copyright 2007-2017
Version 2.14.6-stable+timestamp.2016.05.10.00.21.47
Database drivers available: sqlite3, imaplib, pymysql, pg8000
WARNING:web2py:GUI not available because Tk library is not installed
choose a password:

please visit:
        http://127.0.0.1:8000/
use "kill -SIGTERM 23904" to shutdown the web2py server
However, you need to be aware of the fact that the launched web interface is accessible on the local machine only.
From the output, you can understand that to stop the web server, you will have to type “CTRL-C” in the instant terminal. On the other hand, to stop the web2py server on the other terminal related to the same VPS, you can insert the command kill -SIGTERM <PID>, where <PID> is the process ID for the web2py server, which in this case is 23904.
Session Cookie from web2py
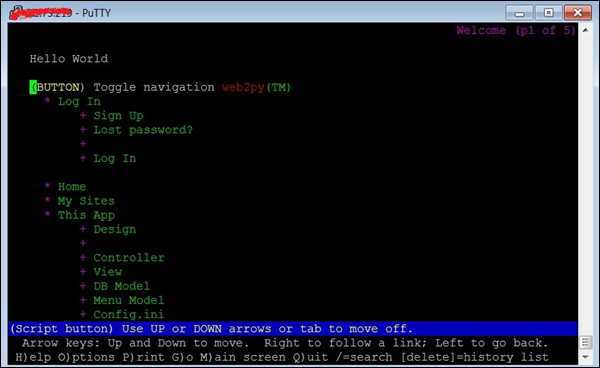
If a page is only accessible by a logged in user, not directly accessible from the login page, in that case you can use the -C flag. This flag defines a cookie for the ab command. But you have to get the value of the session identifier cookie from a valid session. How to get that? Various online tutorials will guide you towards Chrome (or Mozilla) browser developer tools. But in our test case, as the application is available only on the command line, we will use the lynx browser to obtain the value.
Let us get the cookie value of a session first. Open another terminal and type the following command −
$ lynx http://127.0.0.1:8000/
In response to the above command, lynx will ask your permission to accept the cookie from the web2py server as shown in the image below.

Note down the cookie value before typing y to accept the cookie. Now the terminal will look similar to the following image – website on the terminal!
Having obtained the cookie value, we will now run the ab test. For that, we will have to open the third terminal (see the image below) −
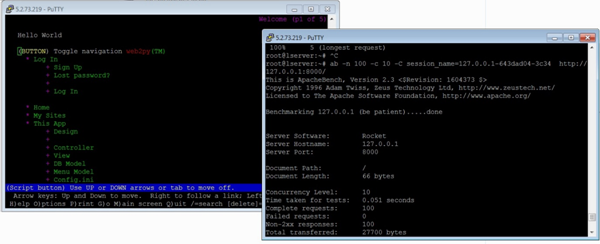
Now, let us use the -C flag in the third terminal −
$ ab -n 100 -c 10 -C session_name = 127.0.0.1-643dad04-3c34 http://127.0.0.1:8000/
Output
This is ApacheBench, Version 2.3 <$Revision: 1604373 $>
Copyright 1996 Adam Twiss, Zeus Technology Ltd, http://www.zeustech.net/
Licensed to The Apache Software Foundation, http://www.apache.org/

Benchmarking 127.0.0.1 (be patient).....done


Server Software:        Rocket
Server Hostname:        127.0.0.1
Server Port:            8000

Document Path:          /
Document Length:        66 bytes

Concurrency Level:      10
Time taken for tests:   0.051 seconds
Complete requests:      100
Failed requests:        0
Non-2xx responses:      100
Total transferred:      27700 bytes
HTML transferred:       6600 bytes
Requests per second:    1968.12 [#/sec] (mean)
Time per request:       5.081 [ms] (mean)
Time per request:       0.508 [ms] (mean, across all concurrent requests)
Transfer rate:          532.39 [Kbytes/sec] received

Connection Times (ms)
              min  mean[+/-sd] median   max
Connect:        1    2   0.9      2       4
Processing:     0    3   0.9      3       5
Waiting:        0    2   1.1      2       4
Total:          4    5   0.7      5       7

Percentage of the requests served within a certain time (ms)
  50%      5
  66%      5
  75%      5
  80%      6
  90%      6
  95%      6
  98%      7
  99%      7
 100%      7 (longest request)
From the output above, we note several points. First, web2py uses Rocket web server. We also note that we are getting ‘Non-2xx responses’ in addition to previously discussed headings in the output. In general, Http protocol responds to a request using a response code, and anything within the 200s range means ‘okay’, and the rest corresponds to some problem. For example, 400s are resource related errors such as 404 File Not Found. 500s correspond to server errors. In our instant case, there is no error anywhere except when we are using the -C option. It can be suppressed using the -l option as already described.
Checking Admin Page
In this section, we will understand how to check the admin page. For the purpose of comparison, let us test another URL of the web2py application −
$ ab -n 100 -c 10 session_name = 127.0.0.1-643dad04-3c34 http://127.0.0.1:8000/admin
Output
This is ApacheBench, Version 2.3 <$Revision: 1604373 $>
Copyright 1996 Adam Twiss, Zeus Technology Ltd, http://www.zeustech.net/
Licensed to The Apache Software Foundation, http://www.apache.org/

Benchmarking 127.0.0.1 (be patient).....done


Server Software:        Rocket
Server Hostname:        127.0.0.1
Server Port:            8000

Document Path:          /admin
Document Length:        8840 bytes

Concurrency Level:      10
Time taken for tests:   2.077 seconds
Complete requests:      100
Failed requests:        0
Total transferred:      926700 bytes
HTML transferred:       884000 bytes
Requests per second:    48.14 [#/sec] (mean)
Time per request:       207.749 [ms] (mean)
Time per request:       20.775 [ms] (mean, across all concurrent requests)
Transfer rate:          435.61 [Kbytes/sec] received

Connection Times (ms)
          min  mean[+/-sd] median   max
Connect:        0    1   3.2      0      12
Processing:    62  204  52.2    199     400
Waiting:       61  203  52.0    199     400
Total:         62  205  54.3    199     411

Percentage of the requests served within a certain time (ms)
  50%    199
  66%    211
  75%    220
  80%    226
  90%    264
  95%    349
  98%    381
  99%    411
 100%    411 (longest request)
You should in particular note the respective statistics in section “Connection Times” and “Percentage of the requests served …” of http://127.0.0.1:8000/ and http://127.0.0.1:8000/admin. There is a huge difference.
Using Timelimit Option
Generally, Timelimit option is a tricky one. Let us understand this from the manual of ab, which is quite explanatory −
-t timelimit
Maximum number of seconds to spend for benchmarking. This implies a -n 50000 internally.
Use this to benchmark the server within a fixed total amount of time.
Per default there is no timelimit.
Let us run a test with this option. We will note our observations after the going through the output −
$ ab -n 100 -c 10 -t 60 http://127.0.0.1:8000/
Output
This is ApacheBench, Version 2.3 <$Revision: 1604373 $>
Copyright 1996 Adam Twiss, Zeus Technology Ltd, http://www.zeustech.net/
Licensed to The Apache Software Foundation, http://www.apache.org/

Benchmarking 127.0.0.1 (be patient)
Completed 5000 requests
Completed 10000 requests
Completed 15000 requests
Completed 20000 requests
Completed 25000 requests
Completed 30000 requests
Completed 35000 requests
Completed 40000 requests
Completed 45000 requests
Completed 50000 requests
Finished 50000 requests


Server Software:        Rocket
Server Hostname:        127.0.0.1
Server Port:            8000

Document Path:          /
Document Length:        66 bytes

Concurrency Level:      10
Time taken for tests:   22.547 seconds
Complete requests:      50000
Failed requests:        0
Non-2xx responses:      50000
Total transferred:      13850000 bytes
HTML transferred:       3300000 bytes
Requests per second:    2217.61 [#/sec] (mean)
Time per request:       4.509 [ms] (mean)
Time per request:       0.451 [ms] (mean, across all concurrent requests)
Transfer rate:          599.88 [Kbytes/sec] received

Connection Times (ms)
              min  mean[+/-sd] median   max
Connect:        0    2   0.8      2       8
Processing:     0    2   3.2      2     218
Waiting:        0    2   3.2      2     218
Total:          2    4   3.1      4     220

Percentage of the requests served within a certain time (ms)
  50%      4
  66%      4
  75%      4
  80%      5
  90%      5
  95%      5
  98%      7
  99%      8
 100%    220 (longest request)
Notice that the output shows this option overrides the number of requests specified by the -n option and continues upto the 50K requests. However, as the requests were handled very fast, ab has terminated as soon as 50k mark was achieved – within 22 seconds (see heading Time taken for tests) in the instant case.
You can test the same command replacing http://127.0.0.1:8000/ with http://127.0.0.1:8000/admin (assuming it is our web2py application) or a third party website like https://www.apache.org/, notice the difference in statistics.
Checklist Before Performing the Load Test
There are a few checks which will help you successfully run the test, and measure the performance accurately. Consider the following conditions before performing the load test −
Ensure that no extra python module is loaded.
To avoid TCP/IP Port Exhaustion, you should typically wait 2-3 minutes before you move to another ab test.
Ensure that the number of concurrent connections are lower than Apache Worker Threads.
You should reboot the server before performing another test, if Apache or python crashes.