
- Android Basics
- Android - Home
- Android - Overview
- Android - Environment Setup
- Android - Architecture
- Android - Application Components
- Android - Hello World Example
- Android - Resources
- Android - Activities
- Android - Services
- Android - Broadcast Receivers
- Android - Content Providers
- Android - Fragments
- Android - Intents/Filters
- Android - User Interface
- Android - UI Layouts
- Android - UI Controls
- Android - Event Handling
- Android - Styles and Themes
- Android - Custom Components
- Android Advanced Concepts
- Android - Drag and Drop
- Android - Notifications
- Location Based Services
- Android - Sending Email
- Android - Sending SMS
- Android - Phone Calls
- Publishing Android Application
- Android Useful Examples
- Android - Alert Dialoges
- Android - Animations
- Android - Audio Capture
- Android - AudioManager
- Android - Auto Complete
- Android - Best Practices
- Android - Bluetooth
- Android - Camera
- Android - Clipboard
- Android - Custom Fonts
- Android - Data Backup
- Android - Developer Tools
- Android - Emulator
- Android - Facebook Integration
- Android - Gestures
- Android - Google Maps
- Android - Image Effects
- Android - ImageSwitcher
- Android - Internal Storage
- Android - JetPlayer
- Android - JSON Parser
- Android - Linkedin Integration
- Android - Loading Spinner
- Android - Localization
- Android - Login Screen
- Android - MediaPlayer
- Android - Multitouch
- Android - Navigation
- Android - Network Connection
- Android - NFC Guide
- Android - PHP/MySQL
- Android - Progress Circle
- Android - ProgressBar
- Android - Push Notification
- Android - RenderScript
- Android - RSS Reader
- Android - Screen Cast
- Android - SDK Manager
- Android - Sensors
- Android - Session Management
- Android - Shared Preferences
- Android - SIP Protocol
- Android - Spelling Checker
- Android - SQLite Database
- Android - Support Library
- Android - Testing
- Android - Text to Speech
- Android - TextureView
- Android - Twitter Integration
- Android - UI Design
- Android - UI Patterns
- Android - UI Testing
- Android - WebView Layout
- Android - Wi-Fi
- Android - Widgets
- Android - XML Parsers
- Android Useful Resources
- Android - Questions and Answers
- Android - Useful Resources
- Android - Discussion
Android - RadioGroup Control
A RadioGroup class is used for set of radio buttons.
If we check one radio button that belongs to a radio group, it automatically unchecks any previously checked radio button within the same group.
RadioGroup Attributes
Following are the important attributes related to RadioGroup control. You can check Android official documentation for complete list of attributes and related methods which you can use to change these attributes are run time.
| Attribute | Description |
|---|---|
| android:checkedButton | This is the id of child radio button that should be checked by default within this radio group. |
Inherited from android.view.View Class −
| Sr.No. | Attribute & Description |
|---|---|
| 1 | android:background This is a drawable to use as the background. |
| 2 |
android:contentDescription This defines text that briefly describes content of the view. |
| 3 |
android:id This supplies an identifier name for this view |
| 4 |
android:onClick This is the name of the method in this View's context to invoke when the view is clicked. |
| 5 |
android:visibility This controls the initial visibility of the view. |
Example
This example will take you through simple steps to show how to create your own Android application using Linear Layout and RadioGroup.
| Step | Description |
|---|---|
| 1 | You will use Android studio IDE to create an Android application and name it as My Application under a package com.example.saira_000.myapplication; as explained in the Hello World Example chapter. |
| 2 | Modify src/MainActivity.java file to add a click event. |
| 2 | Modify the default content of res/layout/activity_main.xml file to include Android UI control. |
| 3 | No need to change default constants at res/values/strings.xml, android studio takes care of default constants. |
| 4 | Run the application to launch Android emulator and verify the result of the changes done in the application. |
Following is the content of the modified main activity file src/MainActivity.java. This file can include each of the fundamental lifecycle methods.
In the below example abc indicates the image of tutorialspoint
package com.example.saira_000.myapplication;

import android.app.Activity;
import android.support.v7.app.ActionBarActivity;
import android.os.Bundle;
import android.view.Menu;
import android.view.MenuItem;
import android.view.View;
import android.widget.Button;
import android.widget.RadioButton;
import android.widget.RadioGroup;
import android.widget.Toast;

public class MainActivity extends Activity {
   private RadioGroup radioSexGroup;
   private RadioButton radioSexButton;
   private Button btnDisplay;

   @Override
   protected void onCreate(Bundle savedInstanceState) {
      super.onCreate(savedInstanceState);
      setContentView(R.layout.activity_main);
      radioSexGroup=(RadioGroup)findViewById(R.id.radioGroup);

      btnDisplay=(Button)findViewById(R.id.button);

      btnDisplay.setOnClickListener(new View.OnClickListener() {
         @Override
         public void onClick(View v) {
            int selectedId=radioSexGroup.getCheckedRadioButtonId();
            radioSexButton=(RadioButton)findViewById(selectedId);
            Toast.makeText(MainActivity.this,radioSexButton.getText(),Toast.LENGTH_SHORT).show();
         }
      });
   }
}
Following will be the content of res/layout/activity_main.xml file −
<?xml version="1.0" encoding="utf-8"?>
<RelativeLayout xmlns:android="http://schemas.android.com/apk/res/android"
   xmlns:tools="http://schemas.android.com/tools"
   android:layout_width="match_parent"
   android:layout_height="match_parent"
   android:paddingLeft="@dimen/activity_horizontal_margin"
   android:paddingRight="@dimen/activity_horizontal_margin"
   android:paddingTop="@dimen/activity_vertical_margin"
   android:paddingBottom="@dimen/activity_vertical_margin"
   tools:context=".MainActivity">

   <TextView
      android:layout_width="wrap_content"
      android:layout_height="wrap_content"
      android:text="Radio button"
      android:id="@+id/textView"
      android:layout_alignParentTop="true"
      android:layout_centerHorizontal="true"
      android:textSize="35dp" />

   <TextView
      android:layout_width="wrap_content"
      android:layout_height="wrap_content"
      android:text="Tutorialspoint"
      android:id="@+id/textView2"
      android:layout_below="@+id/textView"
      android:layout_alignRight="@+id/textView"
      android:layout_alignEnd="@+id/textView"
      android:textSize="35dp"
      android:textColor="@android:color/holo_green_dark" />

   <ImageView
      android:layout_width="wrap_content"
      android:layout_height="wrap_content"
      android:id="@+id/imageView"
      android:src="@drawable/abc"
      android:layout_below="@+id/textView2"
      android:layout_alignLeft="@+id/textView"
      android:layout_alignStart="@+id/textView"
      android:layout_alignRight="@+id/textView"
      android:layout_alignEnd="@+id/textView" />

   <RadioGroup
      android:layout_width="fill_parent"
      android:layout_height="90dp"
      android:layout_below="@+id/imageView"
      android:layout_marginTop="58dp"
      android:weightSum="1"
      android:id="@+id/radioGroup"
      android:layout_alignLeft="@+id/textView2"
      android:layout_alignStart="@+id/textView2"
      android:layout_alignRight="@+id/textView3"
      android:layout_alignEnd="@+id/textView3">

      <RadioButton
         android:layout_width="wrap_content"
         android:layout_height="55dp"
         android:text="Male"
         android:id="@+id/radioButton"
         android:layout_gravity="center_horizontal"
         android:checked="false"
         android:textSize="25dp" />

      <RadioButton
         android:layout_width="wrap_content"
         android:layout_height="wrap_content"
         android:text="Female"
         android:id="@+id/radioButton2"
         android:layout_gravity="center_horizontal"
         android:checked="false"
         android:textSize="25dp"
         android:layout_weight="0.13" />
   </RadioGroup>

   <TextView
      android:layout_width="wrap_content"
      android:layout_height="wrap_content"
      android:text="    Are you?"
      android:id="@+id/textView3"
      android:textSize="35dp"
      android:layout_below="@+id/imageView"
      android:layout_alignRight="@+id/textView2"
      android:layout_alignEnd="@+id/textView2"
      android:layout_alignLeft="@+id/imageView"
      android:layout_alignStart="@+id/imageView" />

   <Button
      android:layout_width="wrap_content"
      android:layout_height="wrap_content"
      android:text="New Button"
      android:id="@+id/button"
      android:layout_gravity="center_horizontal"
      android:layout_below="@+id/radioGroup"
      android:layout_centerHorizontal="true" />

</RelativeLayout>
Following will be the content of res/values/strings.xml to define these new constants −
<?xml version="1.0" encoding="utf-8"?>
<resources>
   <string name="app_name">My Applicaiton</string>
   <string name="example_radiogroup">Example showing RadioGroup</string>
</resources>
Following is the default content of AndroidManifest.xml −
<?xml version="1.0" encoding="utf-8"?>
<manifest xmlns:android="http://schemas.android.com/apk/res/android"
   package="com.example.saira_000.myapplication" >

   <application
      android:allowBackup="true"
      android:icon="@drawable/ic_launcher"
      android:label="@string/app_name"
      android:theme="@style/AppTheme" >

      <activity
         android:name="com.example.My Application.MainActivity"
         android:label="@string/app_name" >

         <intent-filter>
            <action android:name="android.intent.action.MAIN" />
            <category android:name="android.intent.category.LAUNCHER" />
         </intent-filter>

      </activity>

   </application>
</manifest>
Let's try to run your My Application application. I assume you had created your AVD while doing environment setup. To run the app from Android studio, open one of your project's activity files and click Run  icon from the toolbar. Android studio installs the app on your AVD and starts it and if everything is fine with your setup and application, it will display following Emulator window −
The following screen will appear, here we have a RadioGroup.
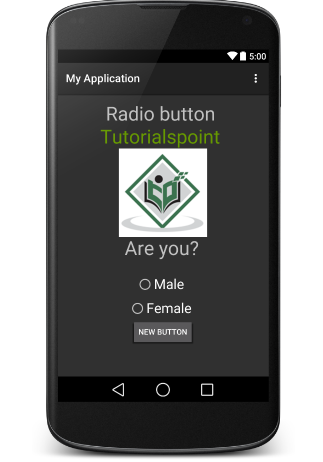
Need to select male or female radio button then click on new button. if you do above steps without fail, you would get a toast message after clicked by new button
Exercise
I will recommend to try above example with different attributes of RadioButton in Layout XML file as well at programming time to have different look and feel of the RadioButton. Try to make it editable, change to font color, font family, width, textSize etc and see the result. You can also try above example with multiple RadioButton controls in one activity.