
- Android Basics
- Android - Home
- Android - Overview
- Android - Environment Setup
- Android - Architecture
- Android - Application Components
- Android - Hello World Example
- Android - Resources
- Android - Activities
- Android - Services
- Android - Broadcast Receivers
- Android - Content Providers
- Android - Fragments
- Android - Intents/Filters
- Android - User Interface
- Android - UI Layouts
- Android - UI Controls
- Android - Event Handling
- Android - Styles and Themes
- Android - Custom Components
- Android Advanced Concepts
- Android - Drag and Drop
- Android - Notifications
- Location Based Services
- Android - Sending Email
- Android - Sending SMS
- Android - Phone Calls
- Publishing Android Application
- Android Useful Examples
- Android - Alert Dialoges
- Android - Animations
- Android - Audio Capture
- Android - AudioManager
- Android - Auto Complete
- Android - Best Practices
- Android - Bluetooth
- Android - Camera
- Android - Clipboard
- Android - Custom Fonts
- Android - Data Backup
- Android - Developer Tools
- Android - Emulator
- Android - Facebook Integration
- Android - Gestures
- Android - Google Maps
- Android - Image Effects
- Android - ImageSwitcher
- Android - Internal Storage
- Android - JetPlayer
- Android - JSON Parser
- Android - Linkedin Integration
- Android - Loading Spinner
- Android - Localization
- Android - Login Screen
- Android - MediaPlayer
- Android - Multitouch
- Android - Navigation
- Android - Network Connection
- Android - NFC Guide
- Android - PHP/MySQL
- Android - Progress Circle
- Android - ProgressBar
- Android - Push Notification
- Android - RenderScript
- Android - RSS Reader
- Android - Screen Cast
- Android - SDK Manager
- Android - Sensors
- Android - Session Management
- Android - Shared Preferences
- Android - SIP Protocol
- Android - Spelling Checker
- Android - SQLite Database
- Android - Support Library
- Android - Testing
- Android - Text to Speech
- Android - TextureView
- Android - Twitter Integration
- Android - UI Design
- Android - UI Patterns
- Android - UI Testing
- Android - WebView Layout
- Android - Wi-Fi
- Android - Widgets
- Android - XML Parsers
- Android Useful Resources
- Android - Questions and Answers
- Android - Useful Resources
- Android - Discussion
Android List View
Android ListView is a view which groups several items and display them in vertical scrollable list. The list items are automatically inserted to the list using an Adapter that pulls content from a source such as an array or database.
List View
An adapter actually bridges between UI components and the data source that fill data into UI Component. Adapter holds the data and send the data to adapter view, the view can takes the data from adapter view and shows the data on different views like as spinner, list view, grid view etc.
The ListView and GridView are subclasses of AdapterView and they can be populated by binding them to an Adapter, which retrieves data from an external source and creates a View that represents each data entry.
Android provides several subclasses of Adapter that are useful for retrieving different kinds of data and building views for an AdapterView ( i.e. ListView or GridView). The common adapters are ArrayAdapter,Base Adapter, CursorAdapter, SimpleCursorAdapter,SpinnerAdapter and WrapperListAdapter. We will see separate examples for both the adapters.
ListView Attributes
Following are the important attributes specific to GridView −
| Sr.No | Attribute & Description |
|---|---|
| 1 | android:id This is the ID which uniquely identifies the layout. |
| 2 | android:divider This is drawable or color to draw between list items. |
| 3 | android:dividerHeight This specifies height of the divider. This could be in px, dp, sp, in, or mm. |
| 4 | android:entries Specifies the reference to an array resource that will populate the ListView. |
| 5 | android:footerDividersEnabled When set to false, the ListView will not draw the divider before each footer view. The default value is true. |
| 6 | android:headerDividersEnabled When set to false, the ListView will not draw the divider after each header view. The default value is true. |
ArrayAdapter
You can use this adapter when your data source is an array. By default, ArrayAdapter creates a view for each array item by calling toString() on each item and placing the contents in a TextView. Consider you have an array of strings you want to display in a ListView, initialize a new ArrayAdapter using a constructor to specify the layout for each string and the string array −
ArrayAdapter adapter = new ArrayAdapter<String>(this,R.layout.ListView,StringArray);
Here are arguments for this constructor −
First argument this is the application context. Most of the case, keep it this.
Second argument will be layout defined in XML file and having TextView for each string in the array.
Final argument is an array of strings which will be populated in the text view.
Once you have array adapter created, then simply call setAdapter() on your ListView object as follows −
ListView listView = (ListView) findViewById(R.id.listview);
listView.setAdapter(adapter);
You will define your list view under res/layout directory in an XML file. For our example we are going to using activity_main.xml file.
Example
Following is the example which will take you through simple steps to show how to create your own Android application using ListView. Follow the following steps to modify the Android application we created in Hello World Example chapter −
| Step | Description |
|---|---|
| 1 | You will use Android Studio IDE to create an Android application and name it as ListDisplay under a package com.example.ListDisplay as explained in the Hello World Example chapter. |
| 2 | Modify the default content of res/layout/activity_main.xml file to include ListView content with the self explanatory attributes. |
| 3 | No need to change string.xml, Android studio takes care of default string constants. |
| 4 | Create a Text View file res/layout/activity_listview.xml. This file will have setting to display all the list items. So you can customize its fonts, padding, color etc. using this file. |
| 6 | Run the application to launch Android emulator and verify the result of the changes done in the application. |
Following is the content of the modified main activity file src/com.example.ListDisplay/ListDisplay.java. This file can include each of the fundamental life cycle methods.
package com.example.ListDisplay;

import android.os.Bundle;
import android.app.Activity;
import android.view.Menu;
import android.widget.ArrayAdapter;
import android.widget.ListView;

public class ListDisplay extends Activity {
   // Array of strings...
   String[] mobileArray = {"Android","IPhone","WindowsMobile","Blackberry",
      "WebOS","Ubuntu","Windows7","Max OS X"};

   @Override
   protected void onCreate(Bundle savedInstanceState) {
      super.onCreate(savedInstanceState);
      setContentView(R.layout.activity_main);

      ArrayAdapter adapter = new ArrayAdapter<String>(this,
         R.layout.activity_listview, mobileArray);

      ListView listView = (ListView) findViewById(R.id.mobile_list);
      listView.setAdapter(adapter);
   }
}
Following will be the content of res/layout/activity_main.xml file −
<LinearLayout xmlns:android="http://schemas.android.com/apk/res/android"
   xmlns:tools="http://schemas.android.com/tools"
   android:layout_width="match_parent"
   android:layout_height="match_parent"
   android:orientation="vertical"
   tools:context=".ListActivity" >

   <ListView
      android:id="@+id/mobile_list"
      android:layout_width="match_parent"
      android:layout_height="wrap_content" >
   </ListView>

</LinearLayout>
Following will be the content of res/values/strings.xml to define two new constants −
<?xml version="1.0" encoding="utf-8"?>
<resources>
   <string name="app_name">ListDisplay</string>
   <string name="action_settings">Settings</string>
</resources>
Following will be the content of res/layout/activity_listview.xml file −
<?xml version="1.0" encoding="utf-8"?>
<!--  Single List Item Design -->

<TextView xmlns:android="http://schemas.android.com/apk/res/android"
   android:id="@+id/label"
   android:layout_width="fill_parent"
   android:layout_height="fill_parent"
   android:padding="10dip"
   android:textSize="16dip"
   android:textStyle="bold" >
</TextView>
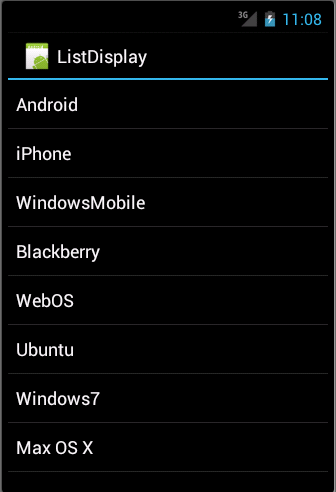
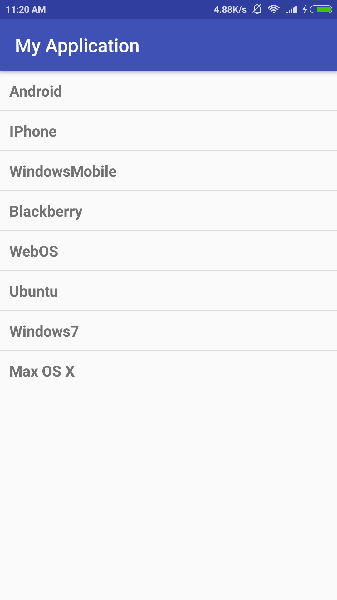
Let's try to run our modified Hello World! application we just modified. I assume you had created your AVD while doing environment set-up. To run the app from Android studio, open one of your project's activity files and click Run  icon from the tool bar. Android studio installs the app on your AVD and starts it and if everything is fine with your set-up and application, it will display following Emulator window −
SimpleCursorAdapter
You can use this adapter when your data source is a database Cursor. When using SimpleCursorAdapter, you must specify a layout to use for each row in the Cursor and which columns in the Cursor should be inserted into which views of the layout.
For example, if you want to create a list of people's names and phone numbers, you can perform a query that returns a Cursor containing a row for each person and columns for the names and numbers. You then create a string array specifying which columns from the Cursor you want in the layout for each result and an integer array specifying the corresponding views that each column should be placed −
String[] fromColumns = {ContactsContract.Data.DISPLAY_NAME,
   ContactsContract.CommonDataKinds.Phone.NUMBER};
int[] toViews = {R.id.display_name, R.id.phone_number};
When you instantiate the SimpleCursorAdapter, pass the layout to use for each result, the Cursor containing the results, and these two arrays −
SimpleCursorAdapter adapter = new SimpleCursorAdapter(this,
   R.layout.person_name_and_number, cursor, fromColumns, toViews, 0);

ListView listView = getListView();
listView.setAdapter(adapter);
The SimpleCursorAdapter then creates a view for each row in the Cursor using the provided layout by inserting each from Columns item into the corresponding toViews view.