- Amazon Web Services Tutorial
- AWS - Home
- Amazon Web Services Basics
- AWS - Cloud Computing
- AWS - Basic Architecture
- AWS - Management Console
- AWS - Console Mobile App
- AWS - Account
- Amazon Computer Services
- AWS - Elastic Compute Cloud
- AWS - Auto Scaling
- AWS - WorkSpaces
- AWS - Lambda
- Amazon Network Services
- AWS - Virtual Private Cloud
- AWS - Route 53
- AWS - Direct Connect
- Amazon Storage Services
- AWS - Amazon S3
- AWS - Elastic Block Store
- AWS - Storage Gateway
- AWS - CloudFront
- Amazon Database Services
- AWS - Relational Database Service
- AWS - DynamoDB
- AWS - Redshift
- Amazon Analytics Services
- AWS - Amazon Kinesis
- AWS - Elastic MapReduce
- AWS - Data Pipeline
- AWS - Machine Learning
- Amazon Application Services
- AWS - Simple WorkFlow Service
- AWS - WorkMail
- Amazon Web Services Resources
- AWS - Quick Guide
- AWS - Useful Resources
- AWS - Discussion
Amazon Web Services - Account
How to Use AWS Account?
Following are the steps to access AWS services −
- Create an AWS account.
- Sign-up for AWS services.
- Create your password and access your account credentials.
- Activate your services in credits section.
Create an AWS Account
Amazon provides a fully functional free account for one year for users to use and learn the different components of AWS. You get access to AWS services like EC2, S3, DynamoDB, etc. for free. However, there are certain limitations based on the resources consumed.
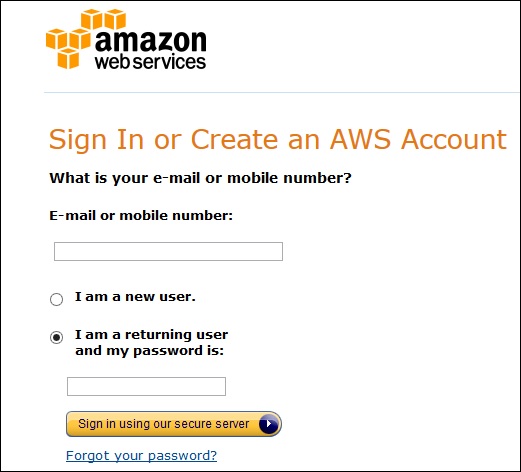
Step 1 − To create an AWS account, open this link https://aws.amazon.com and sign-up for new account and enter the required details.
If we already have an account, then we can sign-in using the existing AWS password.
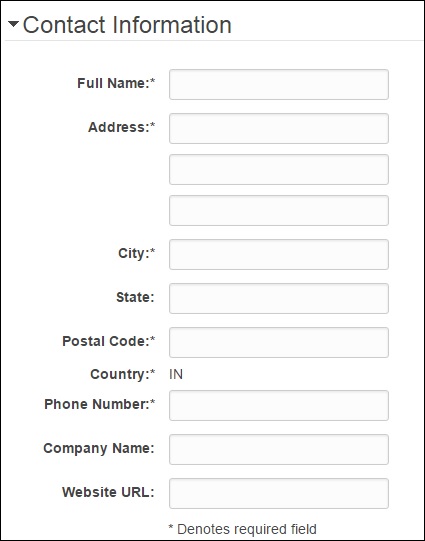
Step 2 − After providing an email-address, complete this form. Amazon uses this information for billing, invoicing and identifying the account. After creating the account, sign-up for the services needed.
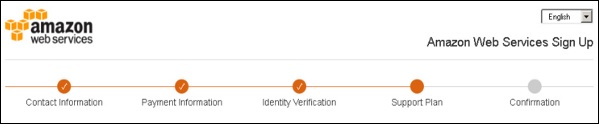
Step 3 − To sign-up for the services, enter the payment information. Amazon executes a minimal amount transaction against the card on the file to check that it is valid. This charge varies with the region.
Step 4 − Next, is the identity verification. Amazon does a call back to verify the provided contact number.
Step 5 − Choose a support plan. Subscribe to one of the plans like Basic, Developer, Business, or Enterprise. The basic plan costs nothing and has limited resources, which is good to get familiar with AWS.
Step 6 − The final step is confirmation. Click the link to login again and it redirects to AWS management console.
Now the account is created and can be used to avail AWS services.
AWS Account Identifiers
AWS assigns two unique IDs to each AWS account.
- An AWS account ID
- A conical user ID
AWS Account ID
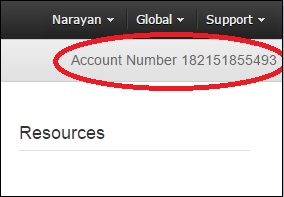
It is a 12-digit number like 123456789000 and is used to construct Amazon Resource Names (ARN). This ID helps to distinguish our resources from resources in other AWS accounts.
To know the AWS account number, click Support on the upper right side of the navigation bar in AWS management console as shown in the following screenshot.
Conical String User ID
It is a long string of alphanumeric characters like 1234abcdef1234. This ID is used in Amazon S3 bucket policy for cross-account access, i.e. to access resources in another AWS account.
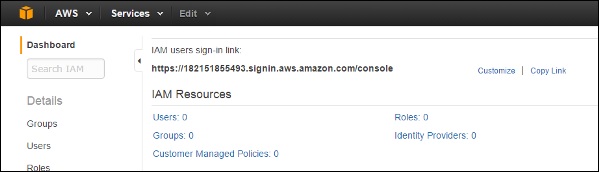
Account Alias
Account alias is the URL for your sign-in page and contains the account ID by default. We can customize this URL with the company name and even overwrite the previous one.
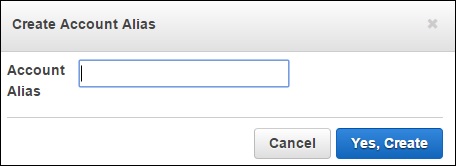
How to Create/Delete Your Own AWS Account Alias?
Step 1 − Sign in to the AWS management console and open the IAM console using the following link https://console.aws.amazon.com/iam/
Step 2 − Select the customize link and create an alias of choice.
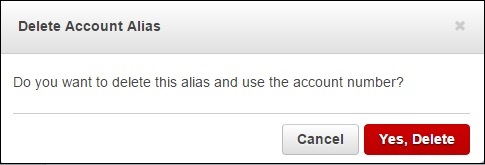
Step 3 − To delete the alias, click the customize link, then click the Yes, Delete button. This deletes the alias and it reverts to the Account ID.
Multi Factor Authentication
Multi Factor Authentication (MFA) provides additional security by authenticating the users to enter a unique authentication code from an approved authentication device or SMS text message when they access AWS websites or services. If the MFA code is correct, then only the user can access AWS services or else not.
Requirements
To use MFA services, the user has to assign a device (hardware or virtual) to IAM user or AWS root account. Each MFA device assigned to the user must be unique, i.e. the user cannot enter a code from another user's device to authenticate.
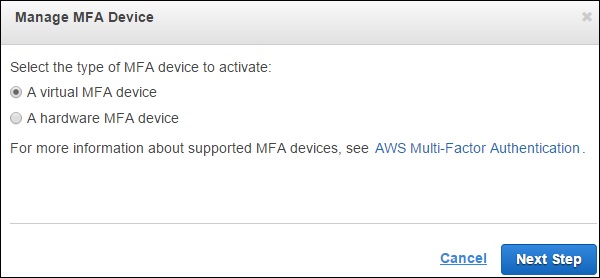
How to Enable MFA Device?
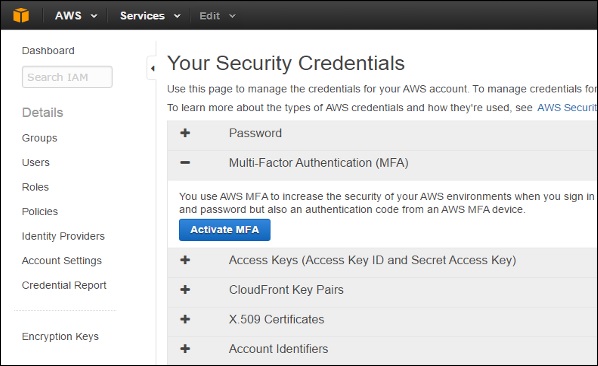
Step 1 − Open the following link, https:// console.aws.amazon.com/iam/
Step 2 − On the web page, choose users from the navigation pane on the right side to view the list of user name.
Step 3 − Scroll down to security credentials and choose MFA. Click activate MFA.
Step 4 − Follow the instructions and the MFA device will get activated with the account.
There are 3 ways to enable a MFA device −
SMS MFA Device
In this method, MFA requires us to configure the IAM user with the phone number of the user's SMS-compatible mobile device. When the user signs in, AWS sends a six-digit code by SMS text message to the user's mobile device. The user is required to enter the same code on a second web page during sign-in to authenticate the right user. This SMS-based MFA cannot be used with AWS root account.
Hardware MFA Device
In this method, MFA requires us to assign an MFA device (hardware) to the IAM user or the AWS root account. The device generates a six-digit numeric code based upon a time synchronized one-time password algorithm. The user has to enter the same code from the device on a second web page during sign-in to authenticate the right user.
Virtual MFA Device
In this method, MFA requires us to assign an MFA device (virtual) to the IAM user or the AWS root account. A virtual device is a software application (mobile app) running on a mobile device that emulates a physical device. The device generates a six-digit numeric code based upon a time-synchronized one-time password algorithm. The user has to enter the same code from the device on a second web page during sign-in to authenticate the right user.
AWS Identity & Access Management (IAM)
IAM is a user entity which we create in AWS to represent a person that uses it with limited access to resources. Hence, we do not have to use the root account in our day-to-day activities as the root account has unrestricted access to our AWS resources.
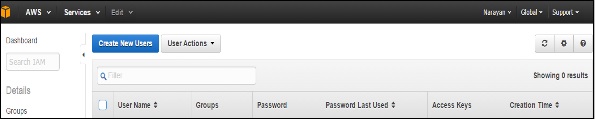
How to Create Users in IAM?
Step 1 − Open the link https://console.aws.amazon.com/iam/ to sign-in to AWS Management console.
Step 2 − Select the Users option on the left navigation pane to open the list of all users.
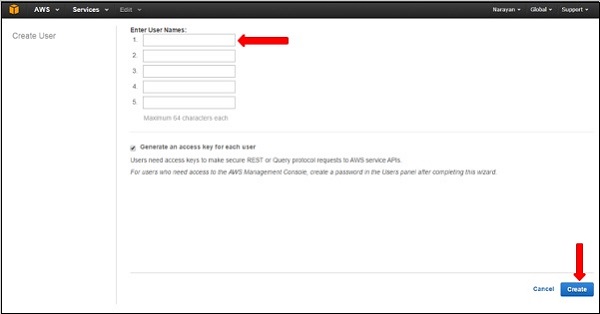
Step 3 − We can also create New Users using the Create New Users option, a new window will open. Enter the user-name which we want to create. Select the create option and a new user will be created.
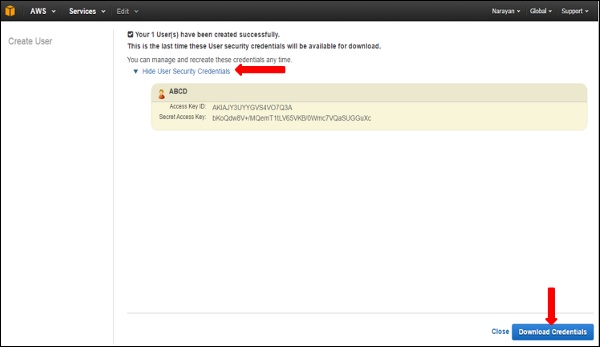
Step 4 − We can also see Access Key IDs and secret keys by selecting Show Users Security Credentials link. We can also save these details on the computer using the Download Credentials option.
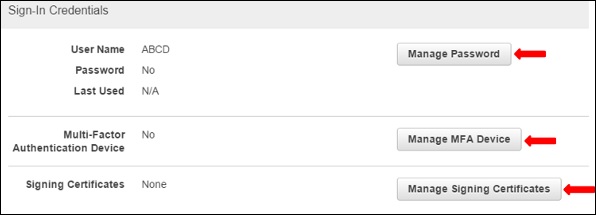
Step 5 − We can manage the user’s own security credentials like creating password, managing MFA devices, managing security certificates, creating/deleting access keys, adding user to groups, etc.
There are many more features that are optional and are available on the web page.