- Advanced Excel Tutorial
- Advanced Excel - Home
- Excel New Features
- Excel - Chart Recommendations
- Advanced Excel - Format Charts
- Advanced Excel - Chart Design
- Advanced Excel - Richer Data Labels
- Advanced Excel - Leader Lines
- Advanced Excel - New Functions
- Fundamental Data Analysis
- Excel - Instant Data Analysis
- Excel - Sorting Data by Color
- Advanced Excel - Slicers
- Advanced Excel - Flash Fill
- Powerful Data Analysis
- Excel - PivotTable Recommendations
- Powerful Data Analysis – 1
- Advanced Excel - Data Model
- Advanced Excel - Power Pivot
- Excel - External Data Connection
- Advanced Excel - Pivot Table Tools
- Powerful Data Analysis – 2
- Advanced Excel - Power View
- Advanced Excel - Visualizations
- Advanced Excel - Pie Charts
- Advanced Excel - Additional Features
- Advanced Excel - Power View Services
- Advanced Excel - Format Reports
- Advanced Excel - Handling Integers
- Other Features
- Advanced Excel - Templates
- Advanced Excel - Inquire
- Advanced Excel - Workbook Analysis
- Advanced Excel - Manage Passwords
- Advanced Excel - File Formats
- Excel - Discontinued Features
- Advanced Excel Useful Resources
- Advanced Excel - Quick Guide
- Advanced Excel - Useful Resources
- Advanced Excel - Discussion
Advanced Excel - Power View
Power View is a feature of Microsoft Excel 2013 that enables interactive data exploration, visualization, and presentation encouraging intuitive ad-hoc reporting.
Create a Power View Sheet
Make sure Power View add-in is enabled in Excel 2013.
Step 1 − Click on the File menu and then Click on Options.
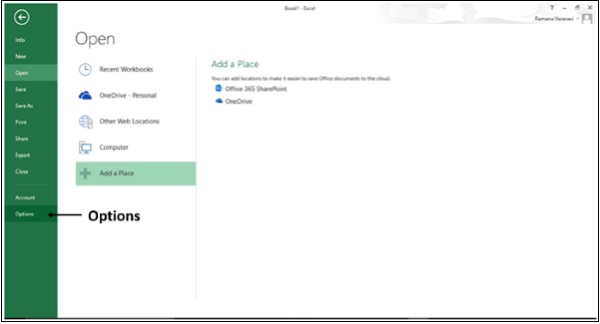
The Excel Options window appears.
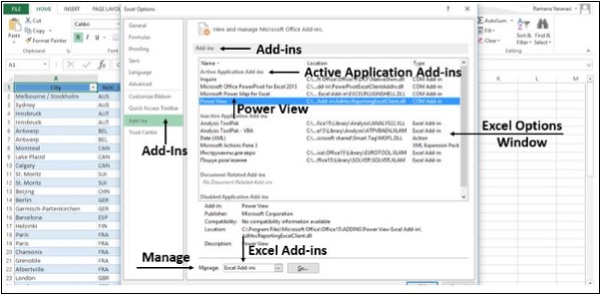
Step 2 − Click on Add-Ins.
Step 3 − In the Manage box, click the drop-down arrow and select Excel Add-ins.
Step 4 − All the available Add-ins will be displayed. If Power View Add-in is enabled, it appears in Active Application Add-ins.
If it does not appear, follow these steps −
Step 1 − In the Excel Options Window, Click on Add-Ins.
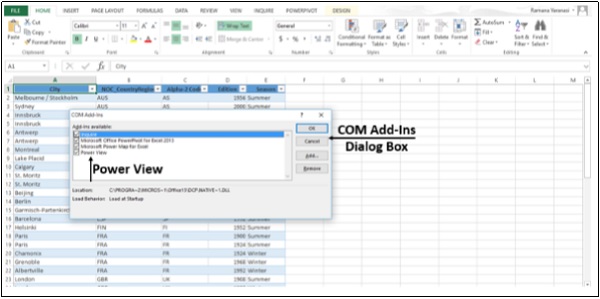
Step 2 − In the Manage box, click the drop-down arrow and select COM Add-ins
Step 3 − Click on the Go button. A COM Add-Ins Dialog Box appears.
Step 4 − Check the Power View Check Box.
Step 5 − Click OK.
Now, you are ready to create the Power View sheet.
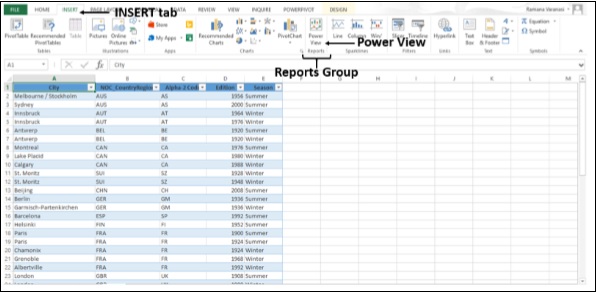
Step 1 − Click on the Data Table.
Step 2 − Click on Insert tab.
Step 3 − Click on Power View in Reports Group.
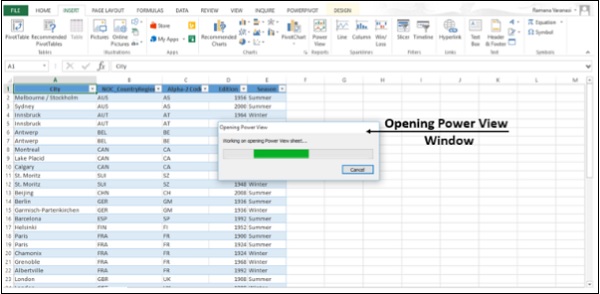
An Opening Power View window opens, showing the progress of Working on opening Power View sheet.
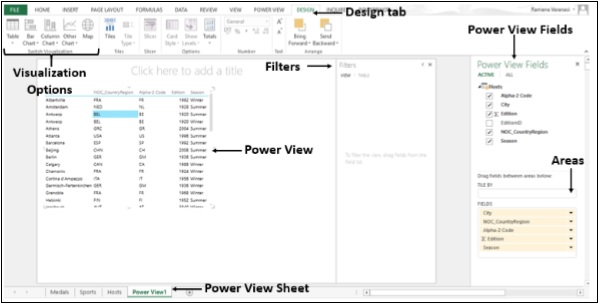
The Power View sheet is created for you and added to your Workbook with the Power View. On the Right-side of the Power View, you find the Power View Fields. Under the Power View Fields you will find Areas.
In the Ribbon, if you click on Design tab, you will find various Visualization options.